
Appearance: How to: Retrofit True HID projectors in your cobalt

Thread Starter
Senior Member
Joined: 06-28-05
Posts: 4,194
Likes: 0
From: Wilmington, DE
And now for the longfully awaited how-to... The Cobalt HID Retrofit!
Note that while the projectors you will be retrofitting are DOT approved, the assembly and customiztion of these headlights are not. Just like any other modification, these are for "off-road" use only. CobaltSS.net and I will not be held accountable if you electrocute yourself or fail your state motor vehicle inspection.
Keep in mind that this is only a guide as each person's retrofit will be different and unique to their own style and customization
So you have come to the realization that those "Plug and Play" HID Kits and "Halo Projectors aren't for you. This is good. Welcome to the world of pure, unaltered, evenly distributed, non-glareing, High Intensity Discharge Light.
Parts Needed:
1.Cobalt Headlights
2.2 Left Hand Drive (U.S. Spec) D2S Single-Xenon or Bi-Xenon (High/low) Projectors.
3.2 4100k-4300k D2S Xenon Bulbs
4.2 D2S Ballasts
5.1 30A Bosch Type Automotive 12V Relay
6.2 15A Inline fuses
7.1 25A Inline fuse
8.45ft 18 gauge red wire
9.45ft 18 gauge black wire
10.Solder
11.Heat shrink
12.Lots of wire loom
13.9007 bulb
14.10ft 26 gauge red wire
15.10ft 26 gauge black wire
I wouldn't attempt this unless you have access to a dremel or other rotary tool.
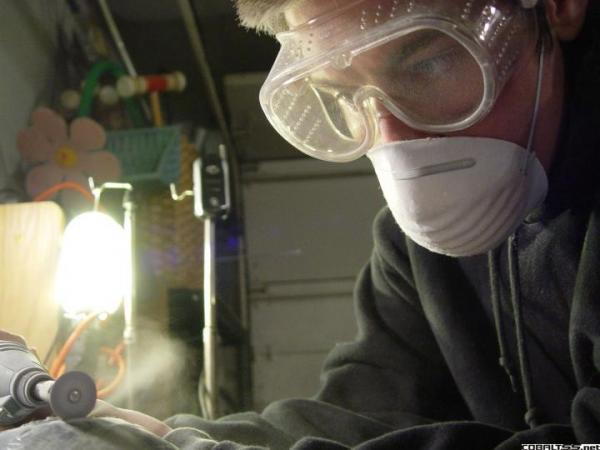
Wear protective gear and work in a well ventelated area. The dust from cutting your headlights could severely injure your lungs
1.To start off, you will need a set of Cobalt Headlamps. You can find these on eBay, your local junkyard, or the classified section on this site.

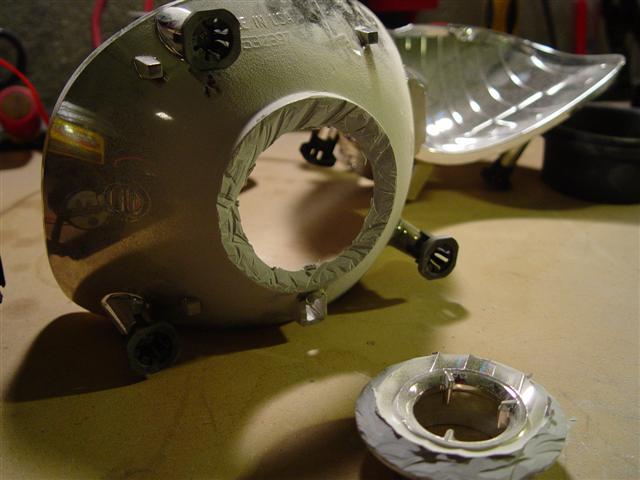
You will need to remove all of the bulbs and the wiring harness from the headlight. Remove the rubber shroud that surrounds the bulb holder. After you have done this, you will need to get the headlamp apart. Some people use an oven but I prefer to use a hairdryer or a heat gun. With your hairdryer or heat gun on high, heat a 6 inch section where the plastic clear lens meets the grey frame of the light. Heat until the seal between is soft. Use a flat head screw driver and start digging and prying the area apart. There are clips at the top and bottom of the light which can be pryed apart after heated. (BE CAREFUL! (use the hairdryer in addtion to the prying to help.) After you have a 6 inch section of the light apart, stick a pen or some other strong object inbetween to keep it apart. Keep working around the light and repeat the previous until the light comes apart.
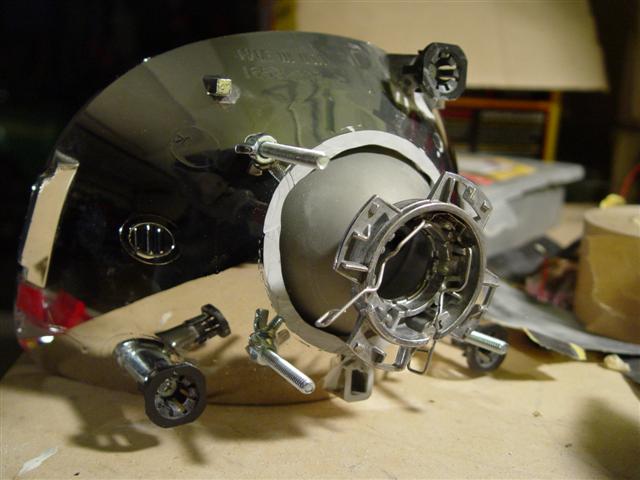
Now the reflective shroud is attachted to the grey frame. Unscrew all of the Hex screws on the back of the light. This should leave you with the reflector attached to the frame. This is where it gets tricky. You must remove this reflector without damaging it. It was very difficult for me to remove this without breaking it. I used my hairdryer and heated up the black plastic clips that hold the reflector to the metal knobs attached to the frame. Then I pryed each clip off by hand. Please be very careful doing this. If for some reason you do damage the reflector by breaking off the peg that is attached to the black clip, you can use superglue to reattach.
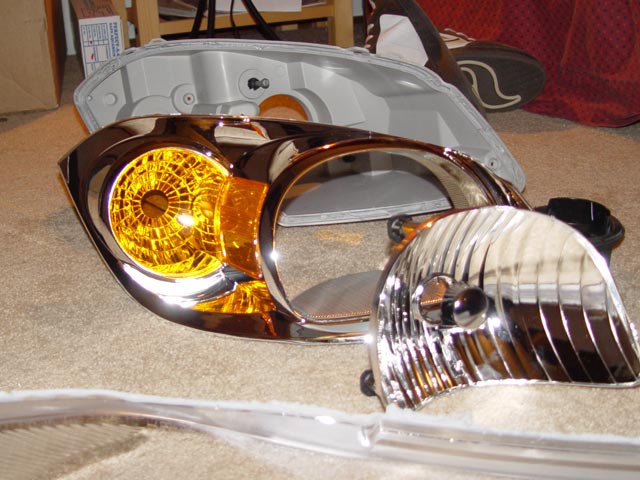
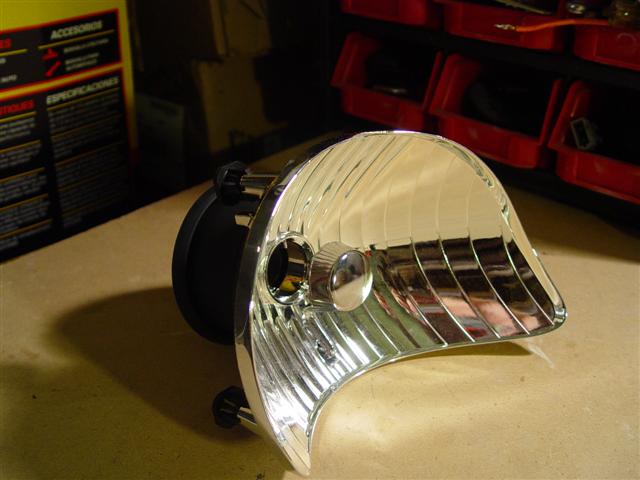
Now you have your reflector isolated.
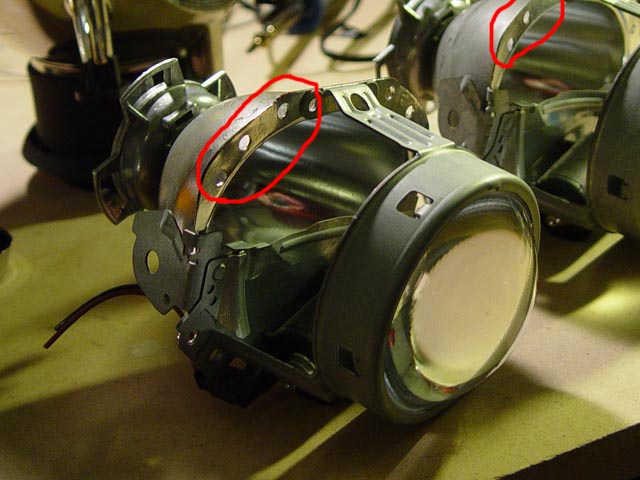
Now you will need OEM HID projectors. These typically take a bulb size D2S. There are HID projectors all over ebay which is where I suggest you look. Linkage. Also, if you are lucky, you can find HID projectors in junkyards on the higher priced luxury cars. I used the Hella E55 Bi-xenon projectors for my project. (Nissan Maxima, Audi A6, BMW 7 Series, Mercedes CLK550)
Bi-xenon projectors will normally have a solenoid attached to the projector that will allow the cutoff shield to move up and down producing a highbeam light.
Depending on what projector you are using, you must cut around where the bulb is inserted in the Cobalt reflector to allow the back of the projector to pass through.
You must cut from the center of the cobalt bulb holder because this will allow the back of the projector to pass through the stock hole in the frame of the headlight.
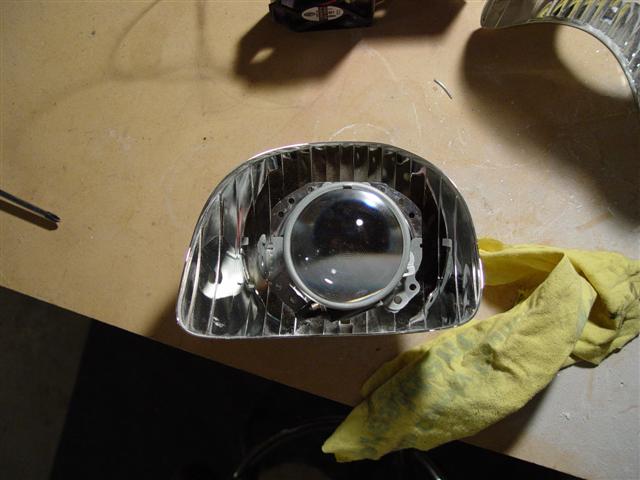
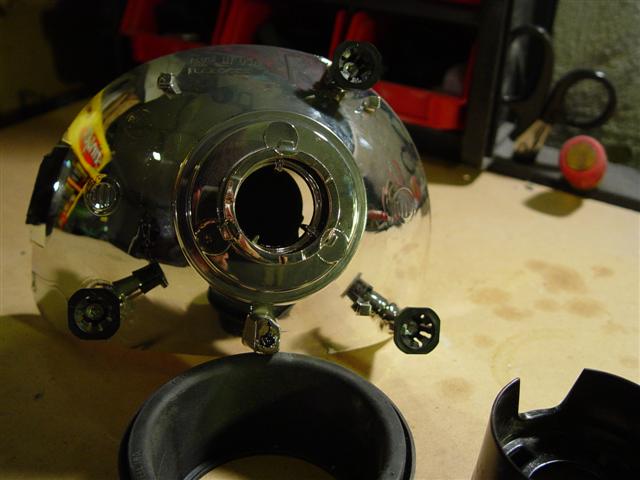
Most projectors have screw holes around the middle of the projector.
You will need to get the according bolt to fit through these holes. Getting the projector to sit in the reflector properly is another tricky part.
If you can see the cutoff shield between the projector lens and projector reflector bowl, make sure it is on the bottom. (Nobody wants an upside projector!) You are going to have to drill holes in the back of the reflector to match up to the screw holes on your projector. For my retrofit, I used small springs and wingnuts to allow me to adjust the angle of the projector.
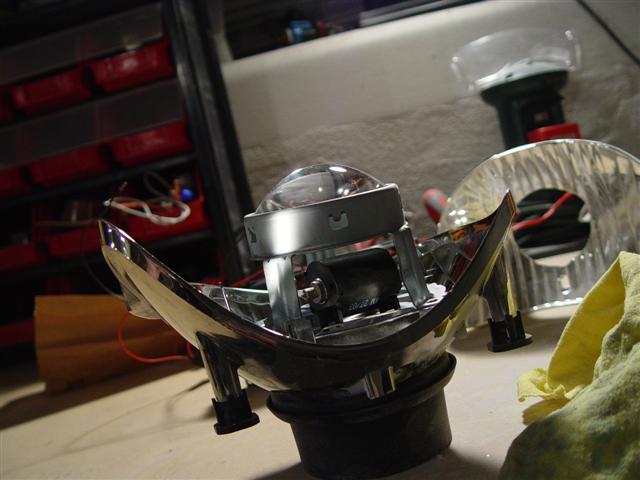
(keep in mind that since you are installing the projector to the stock reflector, you will have some adjustability after install.) Get the projector as straight as you can in the cobalt reflector. Now attach the cobalt reflector with projector installed back onto the headlight frame.

Aiming:
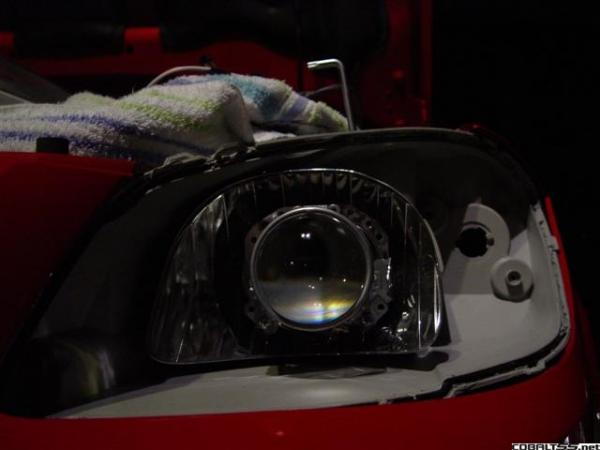
This aiming section will primarily focus on getting the light horizontal and centered. Install the D2S bulb into the projector. Make sure you secure the bulb with the bulb holder! Now hook up a ballast to the light and install the headlight frame back onto the car.

Make sure you screw it on your car like you will when you drive your car so after you seal the lights, it will be the same. Now turn your lights on. about 15 feet away from a light colored wall: Adjust your projector using the bolts you installed to get the cutoff beam level/horizontal.

Try to get both the driver and passenger side lights to be at the same horizontal angle.
Note that while the projectors you will be retrofitting are DOT approved, the assembly and customiztion of these headlights are not. Just like any other modification, these are for "off-road" use only. CobaltSS.net and I will not be held accountable if you electrocute yourself or fail your state motor vehicle inspection.
Keep in mind that this is only a guide as each person's retrofit will be different and unique to their own style and customization
So you have come to the realization that those "Plug and Play" HID Kits and "Halo Projectors aren't for you. This is good. Welcome to the world of pure, unaltered, evenly distributed, non-glareing, High Intensity Discharge Light.
Parts Needed:
1.Cobalt Headlights
2.2 Left Hand Drive (U.S. Spec) D2S Single-Xenon or Bi-Xenon (High/low) Projectors.
3.2 4100k-4300k D2S Xenon Bulbs
4.2 D2S Ballasts
5.1 30A Bosch Type Automotive 12V Relay
6.2 15A Inline fuses
7.1 25A Inline fuse
8.45ft 18 gauge red wire
9.45ft 18 gauge black wire
10.Solder
11.Heat shrink
12.Lots of wire loom
13.9007 bulb
14.10ft 26 gauge red wire
15.10ft 26 gauge black wire
I wouldn't attempt this unless you have access to a dremel or other rotary tool.
Wear protective gear and work in a well ventelated area. The dust from cutting your headlights could severely injure your lungs
1.To start off, you will need a set of Cobalt Headlamps. You can find these on eBay, your local junkyard, or the classified section on this site.
You will need to remove all of the bulbs and the wiring harness from the headlight. Remove the rubber shroud that surrounds the bulb holder. After you have done this, you will need to get the headlamp apart. Some people use an oven but I prefer to use a hairdryer or a heat gun. With your hairdryer or heat gun on high, heat a 6 inch section where the plastic clear lens meets the grey frame of the light. Heat until the seal between is soft. Use a flat head screw driver and start digging and prying the area apart. There are clips at the top and bottom of the light which can be pryed apart after heated. (BE CAREFUL! (use the hairdryer in addtion to the prying to help.) After you have a 6 inch section of the light apart, stick a pen or some other strong object inbetween to keep it apart. Keep working around the light and repeat the previous until the light comes apart.
Now the reflective shroud is attachted to the grey frame. Unscrew all of the Hex screws on the back of the light. This should leave you with the reflector attached to the frame. This is where it gets tricky. You must remove this reflector without damaging it. It was very difficult for me to remove this without breaking it. I used my hairdryer and heated up the black plastic clips that hold the reflector to the metal knobs attached to the frame. Then I pryed each clip off by hand. Please be very careful doing this. If for some reason you do damage the reflector by breaking off the peg that is attached to the black clip, you can use superglue to reattach.
Now you have your reflector isolated.
Now you will need OEM HID projectors. These typically take a bulb size D2S. There are HID projectors all over ebay which is where I suggest you look. Linkage. Also, if you are lucky, you can find HID projectors in junkyards on the higher priced luxury cars. I used the Hella E55 Bi-xenon projectors for my project. (Nissan Maxima, Audi A6, BMW 7 Series, Mercedes CLK550)
Bi-xenon projectors will normally have a solenoid attached to the projector that will allow the cutoff shield to move up and down producing a highbeam light.
Depending on what projector you are using, you must cut around where the bulb is inserted in the Cobalt reflector to allow the back of the projector to pass through.
You must cut from the center of the cobalt bulb holder because this will allow the back of the projector to pass through the stock hole in the frame of the headlight.
Most projectors have screw holes around the middle of the projector.
You will need to get the according bolt to fit through these holes. Getting the projector to sit in the reflector properly is another tricky part.
If you can see the cutoff shield between the projector lens and projector reflector bowl, make sure it is on the bottom. (Nobody wants an upside projector!) You are going to have to drill holes in the back of the reflector to match up to the screw holes on your projector. For my retrofit, I used small springs and wingnuts to allow me to adjust the angle of the projector.
(keep in mind that since you are installing the projector to the stock reflector, you will have some adjustability after install.) Get the projector as straight as you can in the cobalt reflector. Now attach the cobalt reflector with projector installed back onto the headlight frame.
Aiming:
This aiming section will primarily focus on getting the light horizontal and centered. Install the D2S bulb into the projector. Make sure you secure the bulb with the bulb holder! Now hook up a ballast to the light and install the headlight frame back onto the car.
Make sure you screw it on your car like you will when you drive your car so after you seal the lights, it will be the same. Now turn your lights on. about 15 feet away from a light colored wall: Adjust your projector using the bolts you installed to get the cutoff beam level/horizontal.
Try to get both the driver and passenger side lights to be at the same horizontal angle.
Last edited by TommyP; May 17, 2012 at 08:48 PM.


Thread Starter
Senior Member
Joined: 06-28-05
Posts: 4,194
Likes: 0
From: Wilmington, DE
Now to get each projector centered. What I mean by centered is to get the elevation in the cutoff line directly centered infront of each light. It doesn't need to be exactally centered, but as close as possible.
This whole first aiming process will take a long time unless you are already close or satisfied with your results. After you have gotten each light horizontal and centered, now you can use your stock aimer to raise or lower each light. You are going to want your cutoff line to look like this:
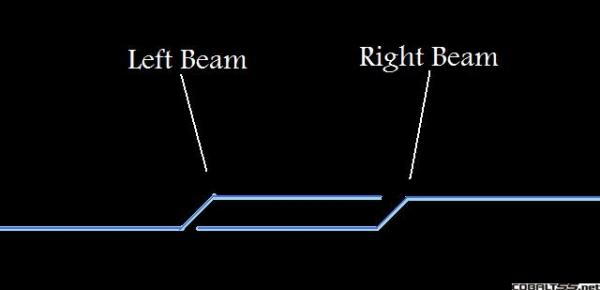
Now your lights are aimed... Took long enough right!?!
If you used bi-xenon projectors, run the wires from the bi-xenon solenoid through the back of the headlight frame. Now depending on your projector, some have an exposed projector reflector bowl and some don't. For those with sealed projectors, don't worry too much about this part.
Light is now escaping out of the sides of the projector reflector bowl.

You can create a cover to go over the exposed areas or mask off the entire opening like I did. I used cardboard to create a template. I traced around the opening around the stock cobalt chrome shroud.
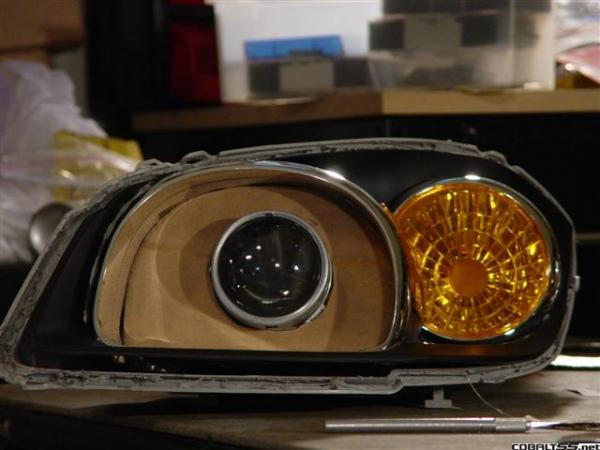
I cut out the area where the projector sticks out. After I got it perfect, I used thin sheet metal and cut out the final product. I then installed this new cover on the stock shroud using an epoxy.

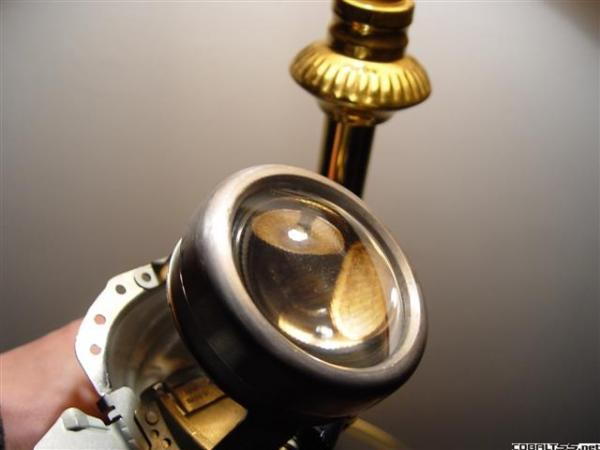
The projector lens in the projectors I used were 3 inches. I went around to different stores to find a thingamabobber to act as a bezel to go over the tip of my projector.

I ended up using covers for flood lights I found at Lowes. Use your imagination for a bezel for the projector. You don't really need one but it sure does make it look better!
Make sure you screw the stock cobalt chrome shroud to the frame.
After you are finished with all the adjustments, aiming, and final touches... you are ready to reseal your lights. You will be reheating the the sealant you pryed apart in the begining. Heat it all up and press each part together with all your might. spring clamps help lots too. make sure the whole light assembly is completely back together before it cools.

These are the D2S style ballasts I am using along with the D2S HID bulbs:

Here is a wiring diagram for your wiring harness. You will need to crush a 9007 bulb and use the metal spokes coming from above. If you don't feel safe using a crushed 9007, you can just directly wire your stock harness in where the diagram shows the 9007 connector. If you are only using a single xenon projector, ignore the red and black wires going to the projectors themselves.
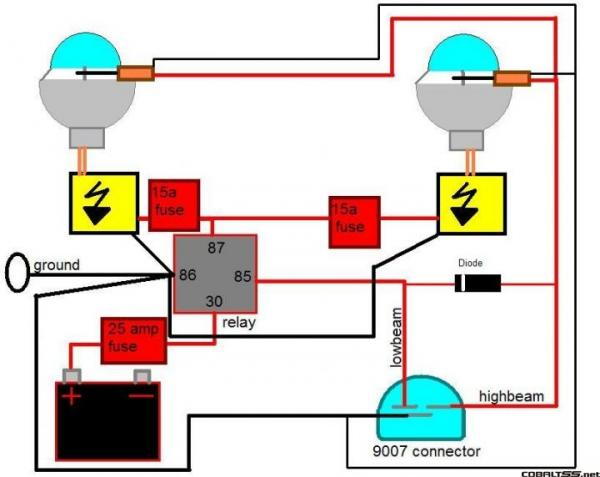
Use the 18 Gauge wire for the power/ground to the ballasts and battery. The 26 gauge wire is only for the bi-xenon solenoid wiring.
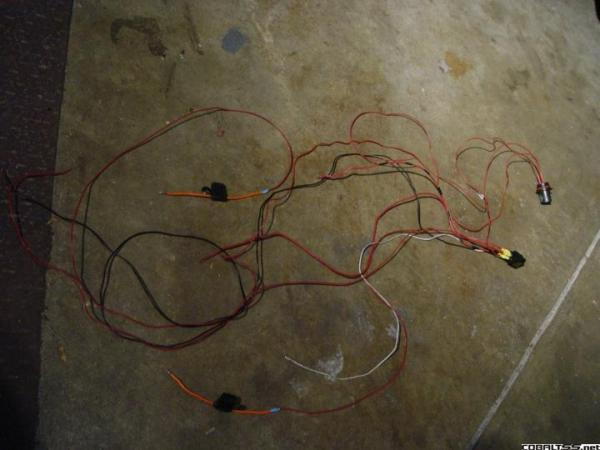
After every wire is soldered and heat shrinked, cover the harness in wireloom.

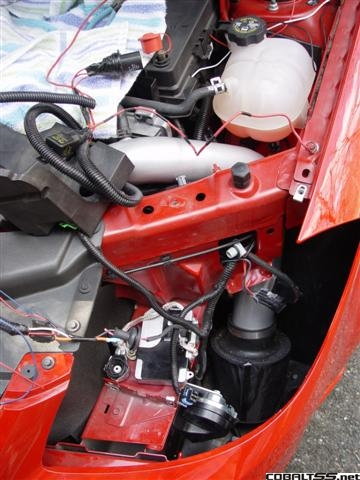
As for mounting the ballasts, the best location is below the black headlight mounting area. I unscrewed it and mounted the ballast right below. Depending on your ballast, make sure the D2S connector will reach to the back of your projector before you mount it.
Remember to make your lights unique!
This whole first aiming process will take a long time unless you are already close or satisfied with your results. After you have gotten each light horizontal and centered, now you can use your stock aimer to raise or lower each light. You are going to want your cutoff line to look like this:
Now your lights are aimed... Took long enough right!?!
If you used bi-xenon projectors, run the wires from the bi-xenon solenoid through the back of the headlight frame. Now depending on your projector, some have an exposed projector reflector bowl and some don't. For those with sealed projectors, don't worry too much about this part.
Light is now escaping out of the sides of the projector reflector bowl.
You can create a cover to go over the exposed areas or mask off the entire opening like I did. I used cardboard to create a template. I traced around the opening around the stock cobalt chrome shroud.
I cut out the area where the projector sticks out. After I got it perfect, I used thin sheet metal and cut out the final product. I then installed this new cover on the stock shroud using an epoxy.
The projector lens in the projectors I used were 3 inches. I went around to different stores to find a thingamabobber to act as a bezel to go over the tip of my projector.
I ended up using covers for flood lights I found at Lowes. Use your imagination for a bezel for the projector. You don't really need one but it sure does make it look better!
Make sure you screw the stock cobalt chrome shroud to the frame.
After you are finished with all the adjustments, aiming, and final touches... you are ready to reseal your lights. You will be reheating the the sealant you pryed apart in the begining. Heat it all up and press each part together with all your might. spring clamps help lots too. make sure the whole light assembly is completely back together before it cools.
These are the D2S style ballasts I am using along with the D2S HID bulbs:
Here is a wiring diagram for your wiring harness. You will need to crush a 9007 bulb and use the metal spokes coming from above. If you don't feel safe using a crushed 9007, you can just directly wire your stock harness in where the diagram shows the 9007 connector. If you are only using a single xenon projector, ignore the red and black wires going to the projectors themselves.
Use the 18 Gauge wire for the power/ground to the ballasts and battery. The 26 gauge wire is only for the bi-xenon solenoid wiring.
After every wire is soldered and heat shrinked, cover the harness in wireloom.
As for mounting the ballasts, the best location is below the black headlight mounting area. I unscrewed it and mounted the ballast right below. Depending on your ballast, make sure the D2S connector will reach to the back of your projector before you mount it.
Remember to make your lights unique!
Last edited by Mercury; Feb 20, 2007 at 11:37 PM.

Senior Member
Joined: 09-02-06
Posts: 614
Likes: 0
From: Amherst, NY
nice write up merc. what ever happend to those vette headlights??
the big problem is getting the driver side headlight level. the passenger one was no problem. I jacked it up the first time because i tried to do it by eyeing it. I actually took one of those spinning laser levels and mounted my extra headlight with the reflector in place. I leveled everything out and adjusted the level to the proper height. I had the laser so it wasn't spinning and moved it to where i thought i was going to place the projector and marked it off. I measured the distance from the bottom holes to the top holes and adjusted the level and then marked it again. It came out alot better. I also mounted my ballasts right to the black headlight guide. I made some brackets to hold the ballasts in place and bolted it all up. i guess i could contribute my pictures to this thread also.
click the picture to go to my album

o and you don't need a dremel for this lol....just a hacksaw and a file. ok so i agree, a dremel probably makes it alot easier.
the big problem is getting the driver side headlight level. the passenger one was no problem. I jacked it up the first time because i tried to do it by eyeing it. I actually took one of those spinning laser levels and mounted my extra headlight with the reflector in place. I leveled everything out and adjusted the level to the proper height. I had the laser so it wasn't spinning and moved it to where i thought i was going to place the projector and marked it off. I measured the distance from the bottom holes to the top holes and adjusted the level and then marked it again. It came out alot better. I also mounted my ballasts right to the black headlight guide. I made some brackets to hold the ballasts in place and bolted it all up. i guess i could contribute my pictures to this thread also.
click the picture to go to my album
o and you don't need a dremel for this lol....just a hacksaw and a file. ok so i agree, a dremel probably makes it alot easier.


New Member
Joined: 02-20-07
Posts: 78
Likes: 0
From: Yonkers NY
help
i just recieved my phillips d2s bulbs and i cant figure out if i need anything else. do i need bulb holders/retainers or do you just use the clips on back of the projector? any pictures of a direct backshot of the headlights with bulb in place

Banned
Joined: 04-27-06
Posts: 380
Likes: 0
From: The real OC biatch...
where did you guys get the projectors from? n/m : http://search.ebay.com/ws/search/Sal...&fcl=3&frpp=50
Thread Starter
Senior Member
Joined: 06-28-05
Posts: 4,194
Likes: 0
From: Wilmington, DE
You only have D2S bulbs? What projectors and what ballasts do you have?

Senior Member
Joined: 07-03-05
Posts: 4,272
Likes: 0
From: South Bend , Indiana
Awesome stuff Merc . I will fiiiiinally be doing mine this spring using Acura bi-Xenons and couple other cool things . Thanks for the info on wiring ...your creation kills the anything that can purchased . Thats only one headlamp , but still 
Senior Member
Joined: 09-02-06
Posts: 614
Likes: 0
From: Amherst, NY
where did you guys get the projectors from? n/m : http://search.ebay.com/ws/search/Sal...&fcl=3&frpp=50
Senior Member
Joined: 05-17-06
Posts: 7,283
Likes: 0
From: Ft. Eustis, VA
Awesome write-up!
How much was the cost, etc.? I'm in the middle of painting my headlights, and before I break the lights apart I would like to do this. However, I do not feel like removing it twice or having my lights off for a extended amount of time if you know what I mean.
Exactly! However, these matters are unique to only the Cobalt world.
How much was the cost, etc.? I'm in the middle of painting my headlights, and before I break the lights apart I would like to do this. However, I do not feel like removing it twice or having my lights off for a extended amount of time if you know what I mean.
Last edited by Blackout06LS; Feb 28, 2007 at 08:04 AM. Reason: Automerged Doublepost
Senior Member
Joined: 09-02-06
Posts: 614
Likes: 0
From: Amherst, NY
i did the mounting and what not first then figured out how i wanted to enclose the back. its going to depend on how your projectors get mounted
Senior Member
Joined: 08-28-05
Posts: 4,368
Likes: 0
From: Socal
in the wiring diagram it says i need a diode in between the high and low beams... i was just wondering where to pick one of these up... im almost done, i cant wait to see the final product...thanks
Thread Starter
Senior Member
Joined: 06-28-05
Posts: 4,194
Likes: 0
From: Wilmington, DE
You can pick one up at radioshack or at any hobby electronics store
Last edited by Mercury; Mar 7, 2007 at 09:09 PM. Reason: Automerged Doublepost