
4x4 Rock Buggy TC 2.4 Build

 Moderator
i would agree, that looks a little low. ideally you want it above the oil level in the pan so the oil coming from the turbo has no restriction. and the perfect oil drain hose would be as close to vertical as possible, i dont think going around the block to the old oil filter location would be a good idea.

this is the pan zzp sells, can use that as a reference.
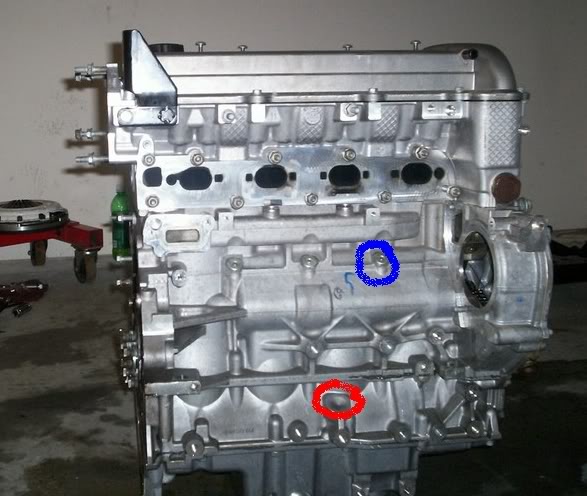
there is a location in the block you can drill for the oil return. if you find a pic of an lnf you will see it. the hole has to be drilled down at an angle, and you may need to drill the passage horizontally, tap and plug the hole. kinda hard to explain. i have done it in a 2.2l many years ago, however with my current build i put a fitting in the oil pan.

this is the pan zzp sells, can use that as a reference.
there is a location in the block you can drill for the oil return. if you find a pic of an lnf you will see it. the hole has to be drilled down at an angle, and you may need to drill the passage horizontally, tap and plug the hole. kinda hard to explain. i have done it in a 2.2l many years ago, however with my current build i put a fitting in the oil pan.

Thread Starter
Junior Member
Joined: 03-03-14
Posts: 415
Likes: 0
From: Florida
i would agree, that looks a little low. ideally you want it above the oil level in the pan so the oil coming from the turbo has no restriction. and the perfect oil drain hose would be as close to vertical as possible, i dont think going around the block to the old oil filter location would be a good idea.
this is the pan zzp sells, can use that as a reference.
there is a location in the block you can drill for the oil return. if you find a pic of an lnf you will see it. the hole has to be drilled down at an angle, and you may need to drill the passage horizontally, tap and plug the hole. kinda hard to explain. i have done it in a 2.2l many years ago, however with my current build i put a fitting in the oil pan.
Joined: 05-15-11
Posts: 27,333
Likes: 584
From: Livonia, MI
Yep, thats it. Saab lsj blocks and lnfs are threaded there from the factory. Hey man, think of it this way, youre learning now, and youll be able to turbo anything once youre done. 
thats it. when i built my 2.2l waaay back i ended up having to drill the bolt hole boss below it straight through, then drill and tap it for a pipe plug. i had to do that to connect the actual drain hole to the pan. i may not have had enough angle on the drain hole when i drilled it as i havent heard of others having to do that, although most put the drain in the pan. i do like this drain location though, its nice and high above the oil level, even when shut off. only reason i didnt use it now is my engine mount covers it up.

Thread Starter
Junior Member
Joined: 03-03-14
Posts: 415
Likes: 0
From: Florida
Sigh ... thanks ya'll. If I have to drill straight into that bolt hole I'm screwed because the transmission has to come back off to do that. If I can judt drill down at an angle straight into that boss I'll still have to remove the pan again but at least the trans can stay on for that.
Thread Starter
Junior Member
Joined: 03-03-14
Posts: 415
Likes: 0
From: Florida
I did not have a good day today. I drilled that drain boss on the block, didn't have to go in from the side so that was nice. But I buggered up the tap job and destroyed the bore for tapping. So then I tried to weld a fitting on it instead but with the contour of the block right there and the trans in the way I wasn't able to get a good weld. In the process of trying to weld I managed to melt a couple threads on the fitting that I was welding so now that needed to come off. Only way to access it to cut it off was to remove the trans, which I did. After doing so and being able to get a good close look at the bore I discovered that somewhere during this entire process a small crack in the lower block formed where I had tried to tap it. So now I have to repair that before I can go any further.
1 step forward, 2 steps back.
I did manage to weld the oil port fittings on the other side of the black though.
1 step forward, 2 steps back.
I did manage to weld the oil port fittings on the other side of the black though.
Thread Starter
Junior Member
Joined: 03-03-14
Posts: 415
Likes: 0
From: Florida
Yes and no. The area I was having trouble welding wasn't very accessible with or without the trans on. After I took the trans off and cut the damaged fitting off I grinded the top surface of the boss down a good bit to get it away from the lip of the lower block, which was my main obstacle. I think that has given me enough space to weld where I couldn't before, so once I repair the crack I should be able to weld another fitting on. But I couldn't have grinded that area with the trans there. I wouldn't have known to grind it even with the trans off though so I would likely be in the same spot right now either way. :-\

Thread Starter
Junior Member
Joined: 03-03-14
Posts: 415
Likes: 0
From: Florida
I wish the oil drain hole looked as good. 
I'll drill the end of the crack tomorrow, grind a groove down the length of it, weld it all up, and then weld the fitting on over it.
I ordered the wrong hose ends on accident so it will be another week now before I can get all this engine plumbing wrapped up. I've spent way too much time with the engine on a pallet. need to get started on the chassis.
Thread Starter
Junior Member
Joined: 03-03-14
Posts: 415
Likes: 0
From: Florida
No, not yet. I'm needing to get this engine / trans all finalized before I can get dimensions for the chassis. After I finish the plumbing I need to mount a hydraulic pump on the front of the engine (for steering) and then figure out how I'm going to mate a truck-style driveshaft to where the CV shafts once were. I have a plan in place for that, fairly straight forward. But something people have dealt with when using transaxles in the past is the retaining clips on the shafts that keep the them from sliding out of the trans not being strong enough once there is another driveshaft attached to them with a slip yoke on it. The slip yoke has friction as it expands and contracts and eventually pulls the shaft out of the trans. I have a few plans on how I can more positively retain the shafts but I have to just mock some stuff up before I can finalize anything and before I do that I need to finish the project I'm on.


Thread Starter
Junior Member
Joined: 03-03-14
Posts: 415
Likes: 0
From: Florida
The pump that fits those OEM brackets is very small and low pressure for filling the big hydraulic cylinders that we use to turn the big tires easily. Something like this is what we generally use to push those big tires around when they are good and bound up in the rocks:
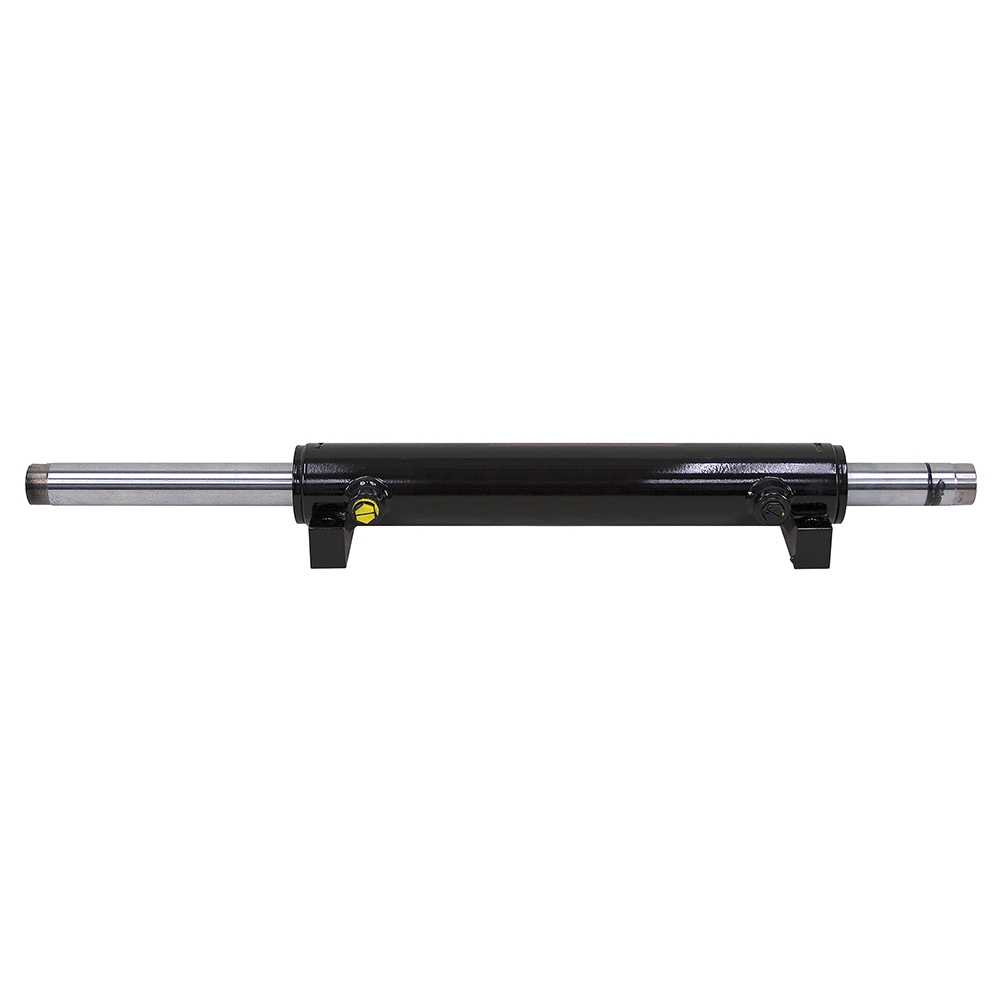
It's not like rack and pinion steering or anything OEM for that matter. It's more like what you would find on a tractor or a Lull.
For a frame of reference, the stock Solstice pump maxes out probably around about 2.5 gpm and 1400 psi. My system will max out around 10 gpm and 2500 psi.
It's not like rack and pinion steering or anything OEM for that matter. It's more like what you would find on a tractor or a Lull.
For a frame of reference, the stock Solstice pump maxes out probably around about 2.5 gpm and 1400 psi. My system will max out around 10 gpm and 2500 psi.
Last edited by patooyee; Jan 7, 2016 at 05:27 PM.
Thread Starter
Junior Member
Joined: 03-03-14
Posts: 415
Likes: 0
From: Florida
OK, the LNF drain hole isn't happening. I just can't get int there underneath the lip of the lower block to weld. I'm welding that hole closed now. All this bullshit for ******* nothing.
Anyone got any other suggestions?
Anyone got any other suggestions?

Thread Starter
Junior Member
Joined: 03-03-14
Posts: 415
Likes: 0
From: Florida
I'm pissed off about the drain line so I'm taking a step back from it. Drilled my oil feed "fitting" to 1/16 (.0625). Spec is .060 but 1/16 is the closest drill size to that. This hole seems tiny. Does that seem right?

Thread Starter
Junior Member
Joined: 03-03-14
Posts: 415
Likes: 0
From: Florida
I'm having a hard time finding somewhere to put an oil return fitting in the oil pan. I put that trans back on because there's no way to tell where it will fit otherwise. The spot I had it to begin with is literally the one and only spot on that side of the pan where there is space to put a fitting that doesn't hit the side of the transmission. There's plenty of spots to come up from under the pan and go into the bottom on the back, high side of the pan. But that means the oil has to fight gravity for a short distance before it enters the pan. I guess that would be an issue?
Only other option is to somehow go all the way around the block. Even doing that the line would have to run uphill either to get over the bell housing or under and back up the oil pan.
There is nowhere in the side of the lower block except the LNF bore that I've screwed up beyond use.
Only other option is to somehow go all the way around the block. Even doing that the line would have to run uphill either to get over the bell housing or under and back up the oil pan.
There is nowhere in the side of the lower block except the LNF bore that I've screwed up beyond use.