
Intake valve cleaning


Thread Starter
Junior Member
Joined: 07-01-12
Posts: 480
Likes: 9
From: NC
Intake valve cleaning
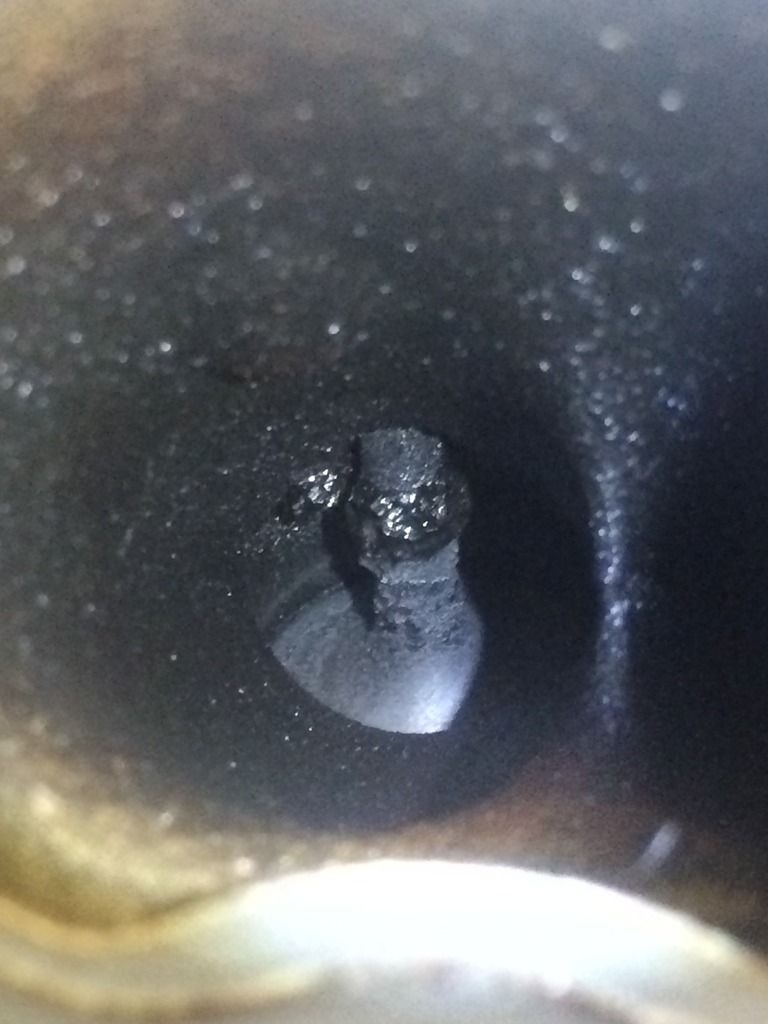
I finally cleaned the intake valves today. 72,818 miles, Powell air/oil separator at 52,428. I just used metal picks, Sea Foam, and a gun barrel brush to clean them. Not as thorough like a media blaster would get it, but I got a lot of carbon out. Longer picks would have made it easier. If I have to do this again, I'll get a media blaster. I'd want it cleaner than this. Put a new PCV valve in while at it. Throttle seems a little more responsive, but that could be a placebo effect. I'll see it in my fuel mileage this week. I've been averaging mid 22 mpg each tank lately.


I finally cleaned the intake valves today. 72,818 miles, Powell air/oil separator at 52,428. I just used metal picks, Sea Foam, and a gun barrel brush to clean them. Not as thorough like a media blaster would get it, but I got a lot of carbon out. Longer picks would have made it easier. If I have to do this again, I'll get a media blaster. I'd want it cleaner than this. Put a new PCV valve in while at it. Throttle seems a little more responsive, but that could be a placebo effect. I'll see it in my fuel mileage this week. I've been averaging mid 22 mpg each tank lately.


Thread Starter
Junior Member
Joined: 07-01-12
Posts: 480
Likes: 9
From: NC
I agree it's not complete. I don't think pulling the manifold was really that much work, so going back in isn't that difficult. I'll be prepared when I inspect them again in a year or so.
ya but ur wasting 20 bucks for a gasket every time. so if ur gonna go in and do it, why not just do it right once and not worry about it again
Thread Starter
Junior Member
Joined: 07-01-12
Posts: 480
Likes: 9
From: NC
I'll go hop in my time machine and stop myself from wasting a trivial amount of money. If I knew it was going to be so much work for a not-so-great yield, I wouldn't have bothered with this method. I don't mind learning some things the hard way.
Last edited by Solaris99; Sep 25, 2016 at 01:43 PM.

I manually cleaned mine on the now deceased car and mine were just as good as a walnut blast. The whole point is to fill the intake ports to drown all the valves and let them soak for as long as possible. Then, you go to town.
This isn't meant to be demeaning towards you either. I just don't want someone searching about how to go about it and then coming to the same conclusion as you.
Half assed work = half assed results

Senior Member
Joined: 06-10-12
Posts: 2,880
Likes: 63
From: Manitoba, Canada
It works great. You just did a half assed job.
I manually cleaned mine on the now deceased car and mine were just as good as a walnut blast. The whole point is to fill the intake ports to drown all the valves and let them soak for as long as possible. Then, you go to town.
This isn't meant to be demeaning towards you either. I just don't want someone searching about how to go about it and then coming to the same conclusion as you.
Half assed work = half assed results
Here's a link for people that are searching in the future. https://www.cobaltss.net/forums/how-...emoval-304188/
Thread Starter
Junior Member
Joined: 07-01-12
Posts: 480
Likes: 9
From: NC
I was unwilling to go nuts with solvent, as I've read concerns about it leaking into the cylinders. Maybe that's an irrational fear as long as the valves are closed completely.
Last edited by Solaris99; Sep 25, 2016 at 05:00 PM.
Thread Starter
Junior Member
Joined: 07-01-12
Posts: 480
Likes: 9
From: NC
I was erring well on the side of caution with this. It wasn't so much a concern for hydrolock (just pull the spark plugs) as I had read it would be bad to wash the oil out of the ring lands. Again, I don't mind doing it twice as long as I don't screw the engine up.


Guess I had better luck doing mine
I spent a few hours doing them
I used a long flathead to get through the big stuff to start, then I used a rounded pick to get everything out. I soaked my valves in Mazda zoom engine cleaner, then I went at them with a pic, then I sprayed carb cleaner in them, then I blasted the carb cleaner out with an air nozzle. Got great results
Went from this:
To this:
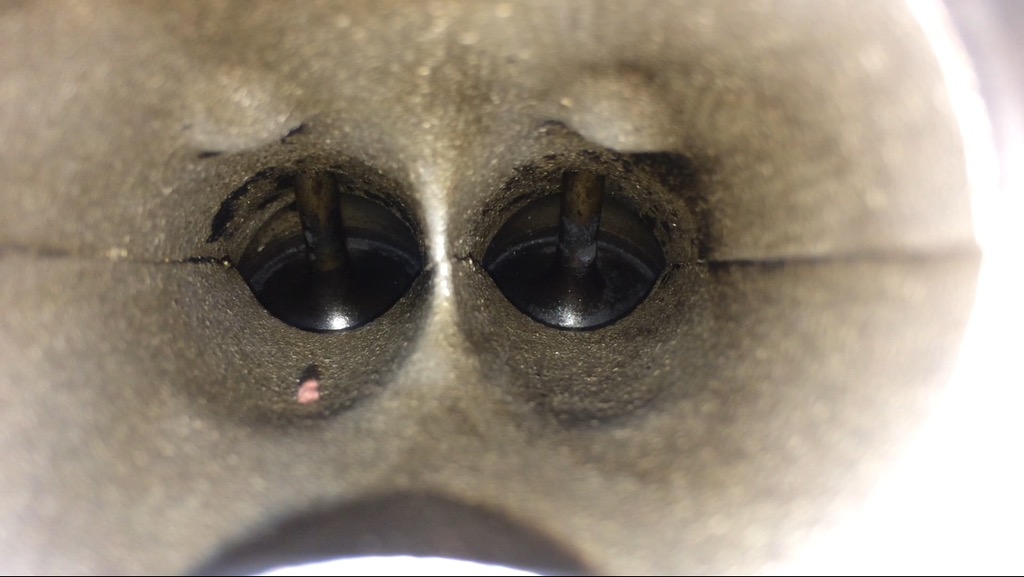
I spent a few hours doing them
I used a long flathead to get through the big stuff to start, then I used a rounded pick to get everything out. I soaked my valves in Mazda zoom engine cleaner, then I went at them with a pic, then I sprayed carb cleaner in them, then I blasted the carb cleaner out with an air nozzle. Got great results
Went from this:

To this:


To be exact on what I used, I used CRC carb cleaner, Mazda zoom engine cleaner. I blasted them a few times with that and let them soak in the Mazda zoom engine cleaner then also with carb cleaner as I cleaned the other valves. The carbon was coming out easy.
Senior Member
Joined: 09-18-15
Posts: 747
Likes: 96
From: Battle Creek, MI
CRC makes a GDI valve cleaner that I used when I did mine. Had intention of using the shops media blaster but of course it had to **** out halfway through the first cylinder. Ended up swapping back and forth between the CRC stuff and carb cleaner with picks and some flexible plastic brushes. Ended up with some damn clean valves for doing everything by hand.
Edit: I let the valves soak in the GDI cleaner for a bit before going to town with it and carb clean. It's interesting to watch the white foam it makes turn black and liquify the carbon to the point a rag can remove all but the most baked on gunk.
Edit: I let the valves soak in the GDI cleaner for a bit before going to town with it and carb clean. It's interesting to watch the white foam it makes turn black and liquify the carbon to the point a rag can remove all but the most baked on gunk.

The GDI stuff from CRC is pretty strong cleaner, I've used it on my gdi audi but I can't get a borescope to see before after differences. It would be a good cleaner to use.
Senior Member
Joined: 04-19-09
Posts: 4,427
Likes: 361
From: Jackson, TN
I used gm top engine cleaner on my ls and it worked great, I really need to do my ss soon. 42k and im sure the previous owner never did it. the stuff from gm works great if let to soak for the appropriate time. Used brake cleaner after a good soak and the carbon disappears. We use it on the 3.6di all the time.

