
Dual Pass Opt B with Cobra Heat Exchanger Help

Member
Joined: 07-10-06
Posts: 336
Likes: 1
From: Charlotte, NC
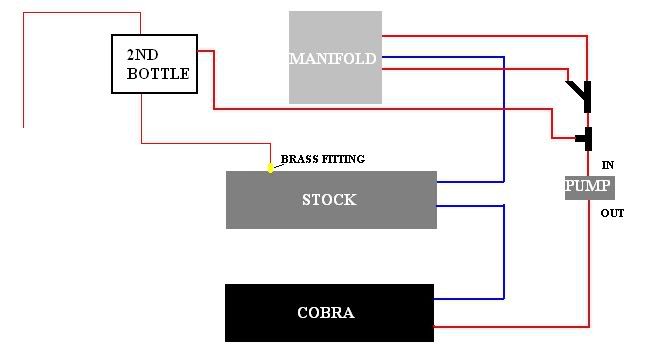
The Feed Lines to the H/E need to be swapped in this Pic, You want to run into the Stock H/E then to the Cobra H/E Then back out to the Center Port of the Endplate! The Pump is inline before the H/E, Then when coming out of the Last H/E it goes directly into the center Port!
Another words out of the endplate into the Pump>>> Then out of the Pump to the stock H/E>>> Then out of the Stock H/E into the Cobra H/E>>> Then out of the Cobra H/E into the Center Port of the Enplate! Other than That the Diagram is Pretty close!
Another words out of the endplate into the Pump>>> Then out of the Pump to the stock H/E>>> Then out of the Stock H/E into the Cobra H/E>>> Then out of the Cobra H/E into the Center Port of the Enplate! Other than That the Diagram is Pretty close!
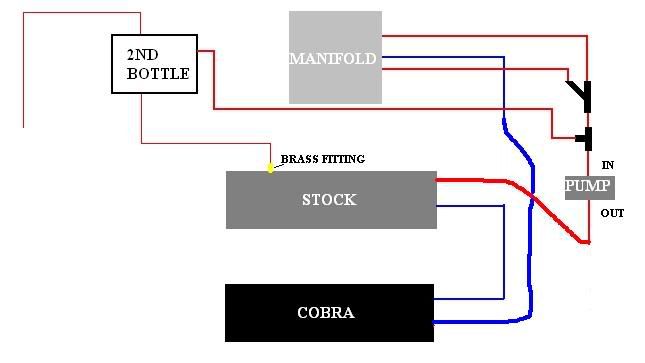
CAN SOMEONE PLEASE CORRECT THIS DIAGRAM THE WAY BILL SAYS TO....
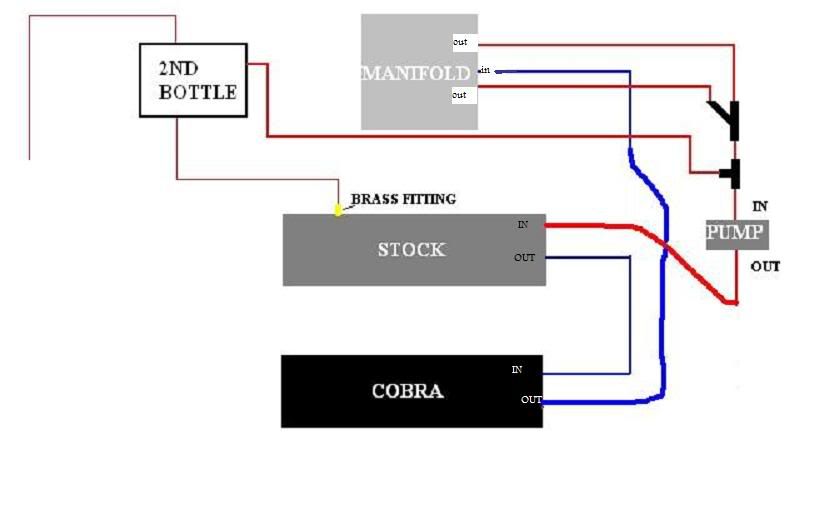
I think this is right according to what Bill is describing above
Last edited by kanabrewski; Nov 14, 2007 at 11:51 PM.
Senior Member
Joined: 01-05-06
Posts: 2,509
Likes: 1
From: Ft Lauderdale

Senior Member
Joined: 03-01-06
Posts: 6,088
Likes: 1
From: Westchester, New York
im thinking about doing mine soon, since i have everything, and i dont even drive the car anymore, but maybe tomorrow ill finish up making the brackets for the H/E and mount the H/E on and see what it looks like
Senior Member
Joined: 03-30-06
Posts: 3,014
Likes: 0
From: Exit 29, NY
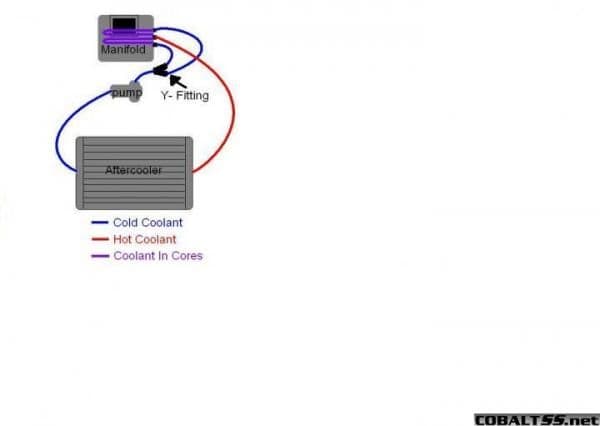
I got a question, how come in this thread https://www.cobaltss.net/forums/advanced-performance-modifications-130/dual-pass-intercooler-38126/ they have a diagram and they have 2 cold lines going in and only 1 hot with the dual pass plate? Maybe im missing something.

later
later
Senior Member
Joined: 03-30-06
Posts: 3,014
Likes: 0
From: Exit 29, NY
later
Like in his case he is adding more cold fluid quicker having the cores swapped but the normal way ur taking the hot fluid away quicker.. hmmm...
Last edited by RollOver360; Dec 24, 2007 at 10:27 PM. Reason: Automerged Doublepost

Senior Member
Joined: 03-13-06
Posts: 1,004
Likes: 0
From: Michigan
well, the system is closed, so it would flow the same rate in and out either way. The only question is whether you want the top and bottom cores to get the hottest fluid first or the middle two cores

 [/IMG]

Senior Member
Joined: 09-15-06
Posts: 589
Likes: 1
From: Slippery Rock, PA
I have been putting off installing my cobra HE for a while. I finally got the brackets from bwoody put on the thing today and decided to actually put it on. It is such a pain. I had to widen the holes on the brackets because they did not line up. I finally got them on then I put on L connectors and wanted to see how it would mount.
First thing I notice is there is no way it is clearing the radiator with the elbows on it. It will sqeeze in there, but it really doesn't have enough room. I figured maybe I could weld custom curves, but too much effort for the thing. Then, I look at the brackets. They basically line up with my molding. If I line them up with the actual metal there is barely even room for the in and out of just the HE to clear. These brackets were a waste of money it seems like. I think I might give up on the thing. If anyone has installed it with the bwoody brackets and cares to help me understand better please PM me. I don't think I'm missing anything though.
First thing I notice is there is no way it is clearing the radiator with the elbows on it. It will sqeeze in there, but it really doesn't have enough room. I figured maybe I could weld custom curves, but too much effort for the thing. Then, I look at the brackets. They basically line up with my molding. If I line them up with the actual metal there is barely even room for the in and out of just the HE to clear. These brackets were a waste of money it seems like. I think I might give up on the thing. If anyone has installed it with the bwoody brackets and cares to help me understand better please PM me. I don't think I'm missing anything though.
Senior Member
Joined: 01-05-06
Posts: 2,509
Likes: 1
From: Ft Lauderdale
I have been putting off installing my cobra HE for a while. I finally got the brackets from bwoody put on the thing today and decided to actually put it on. It is such a pain. I had to widen the holes on the brackets because they did not line up. I finally got them on then I put on L connectors and wanted to see how it would mount.
First thing I notice is there is no way it is clearing the radiator with the elbows on it. It will sqeeze in there, but it really doesn't have enough room. I figured maybe I could weld custom curves, but too much effort for the thing. Then, I look at the brackets. They basically line up with my molding. If I line them up with the actual metal there is barely even room for the in and out of just the HE to clear. These brackets were a waste of money it seems like. I think I might give up on the thing. If anyone has installed it with the bwoody brackets and cares to help me understand better please PM me. I don't think I'm missing anything though.
First thing I notice is there is no way it is clearing the radiator with the elbows on it. It will sqeeze in there, but it really doesn't have enough room. I figured maybe I could weld custom curves, but too much effort for the thing. Then, I look at the brackets. They basically line up with my molding. If I line them up with the actual metal there is barely even room for the in and out of just the HE to clear. These brackets were a waste of money it seems like. I think I might give up on the thing. If anyone has installed it with the bwoody brackets and cares to help me understand better please PM me. I don't think I'm missing anything though.
Man thats alot of effort! Just go to Home depot & Buy a piece of stock Aluminum 1 1/4 wide X 1/8 to 3/16" thick x 4 foot long. Then simply cut a piece 12 inches long & Bend it at around 5 inch mark <<<<< Measure your cleareance 1st! You now have a L Bracket Make your own Holes were you want them & Every thing lines up great! Cost is about 10 dollars & you can even Polish them like I did!

I didn't install a cobra but you can bend it any where you want & you will have 4 ft of Aluminum to Play with!
Senior Member
Joined: 09-15-06
Posts: 589
Likes: 1
From: Slippery Rock, PA
Man thats alot of effort! Just go to Home depot & Buy a piece of stock Aluminum 1 1/4 wide X 1/8 to 3/16" thick x 4 foot long. Then simply cut a piece 12 inches long & Bend it at around 5 inch mark <<<<< Measure your cleareance 1st! You now have a L Bracket Make your own Holes were you want them & Every thing lines up great! Cost is about 10 dollars & you can even Polish them like I did!
I didn't install a cobra but you can bend it any where you want & you will have 4 ft of Aluminum to Play with!
I didn't install a cobra but you can bend it any where you want & you will have 4 ft of Aluminum to Play with!
Senior Member
Joined: 01-05-06
Posts: 2,509
Likes: 1
From: Ft Lauderdale
It isn't really that. I have the brackets on. I just can't figure out where they are supposed to mount. Still, even if I put the HE at the farthest out it can go. It just doesn't want to fit hose wise. It isn't really the brackets that are killing me. I just couldn't find any way that the hoses fit in a way I thought wouldn't potentially hurt the condensor behind if I hit a big bump etc.

Senior Member
Joined: 09-15-06
Posts: 589
Likes: 1
From: Slippery Rock, PA
Yeah, that is what I meant with L connector. They end up being too big. At least the plastic ones. If I could find a copper one it might be smaller, but no local stores had them. I had to order the L from CED. With it on it practically pushes into the condenser.
Senior Member
Joined: 01-05-06
Posts: 2,509
Likes: 1
From: Ft Lauderdale
Senior Member
Joined: 09-15-06
Posts: 589
Likes: 1
From: Slippery Rock, PA
Thanks for the advice. My issue right now and for the last few months... My AIT2 temps are not staying where they should be unless I fill the option B surge tank past the bleeder line. So, if I fill it half full (the cold fill line) the temps go way up. Fluid also seems to only flow through the bleed line after I turn off the car. Is it possible I put the orafice in backward? Would this cause that result? I don't think anyone else has to fill thiers up that high do they? It is odd that is seem to work when it is overfilled though.
Senior Member
Joined: 01-05-06
Posts: 2,509
Likes: 1
From: Ft Lauderdale
Thanks for the advice. My issue right now and for the last few months... My AIT2 temps are not staying where they should be unless I fill the option B surge tank past the bleeder line. So, if I fill it half full (the cold fill line) the temps go way up. Fluid also seems to only flow through the bleed line after I turn off the car. Is it possible I put the orafice in backward? Would this cause that result? I don't think anyone else has to fill thiers up that high do they? It is odd that is seem to work when it is overfilled though.
Senior Member
Joined: 09-15-06
Posts: 589
Likes: 1
From: Slippery Rock, PA
All my plumbing should be fine. I can't remember what way I put in the orifice. I only got to thinking that since it doesn't flow right. It doesn't make much sense how it is working now. I'll go out and see if I can get it loose and check it. I'm hoping it is as simple as that, but wierd how it would yeild that result.
I believe my little end was facing away from it. That was fun. I had to take a knife and cut off the end of the hose. Cut into the hose and extract the thing, then the hose barely fit back. Lucky I left a little slack when I put it on. I hope that helps some. I'll have to monitor it a while and see what happens.
What would having that facing the wrong way do? What issues was I likely having?
Last edited by liolixli; Jan 8, 2008 at 05:40 PM. Reason: Automerged Doublepost
Senior Member
Joined: 01-05-06
Posts: 2,509
Likes: 1
From: Ft Lauderdale
All my plumbing should be fine. I can't remember what way I put in the orifice. I only got to thinking that since it doesn't flow right. It doesn't make much sense how it is working now. I'll go out and see if I can get it loose and check it. I'm hoping it is as simple as that, but wierd how it would yeild that result.
I believe my little end was facing away from it. That was fun. I had to take a knife and cut off the end of the hose. Cut into the hose and extract the thing, then the hose barely fit back. Lucky I left a little slack when I put it on. I hope that helps some. I'll have to monitor it a while and see what happens.
What would having that facing the wrong way do? What issues was I likely having?
I believe my little end was facing away from it. That was fun. I had to take a knife and cut off the end of the hose. Cut into the hose and extract the thing, then the hose barely fit back. Lucky I left a little slack when I put it on. I hope that helps some. I'll have to monitor it a while and see what happens.
What would having that facing the wrong way do? What issues was I likely having?

Senior Member
Joined: 07-21-07
Posts: 3,608
Likes: 0
From: Florida
wow this is way too ******* confusing, its like reading chinese to me lol. maybe because im running on a few hours of sleep and have been working since 8am. if you want to do my car bill i'll pay you lol