
so i bought a porsche.......


Thread Starter
Senior Member
iTrader: (1)
Joined: 10-27-07
Posts: 5,681
Likes: 266
From: Abbotsford BC
finally some progress. ive finally got a clutch for the beast. the end result is i used the stage 3+ spec pressure plate i already had, got a spec 3+ disc for a 944 n/a, and with a few mods it all works together along with a fidenza flywheel. i also managed to work out the slave cylinder/release bearing. i used a slave cylinder from a 2005-2012 mustang, ive used them before in custom applications, they work very well because they have a lot of possible travel (actual travel is determined by the master cylinder) making them forgiving to set up. ive got the pedestal for it machined and bolted to the adapter plate.


ive also got the oil pan powder coated, so its ready to go on. all i need to do is make the steel line from the slave to outside the bellhousing and ill be ready to bolt it all together and cram the motor in for the final time.
ive also got the oil pan powder coated, so its ready to go on. all i need to do is make the steel line from the slave to outside the bellhousing and ill be ready to bolt it all together and cram the motor in for the final time.

no i meant a sunbird
it started life as a 90 sunbird turbo convertable, it got an 87 z24 cavalier front end and 92 cavalier tail lights. the main reason we built it was because everyone said its impossible to put an ecotec in a 1st or 2nd gen j-body. it was actually quite simple, however nobody has been able to replicate it.
it started life as a 90 sunbird turbo convertable, it got an 87 z24 cavalier front end and 92 cavalier tail lights. the main reason we built it was because everyone said its impossible to put an ecotec in a 1st or 2nd gen j-body. it was actually quite simple, however nobody has been able to replicate it.

Thread Starter
Senior Member
iTrader: (1)
Joined: 10-27-07
Posts: 5,681
Likes: 266
From: Abbotsford BC
thanks. that was almost 9 years ago. knowing what i do now i would have done some things a bit differently. it would have actually worked out better for packaging if we supercharged it, there was very little room in the back for the turbo. it kept melting steering rack boots and actually bubbled the paint on the hood.

Thread Starter
Senior Member
iTrader: (1)
Joined: 10-27-07
Posts: 5,681
Likes: 266
From: Abbotsford BC
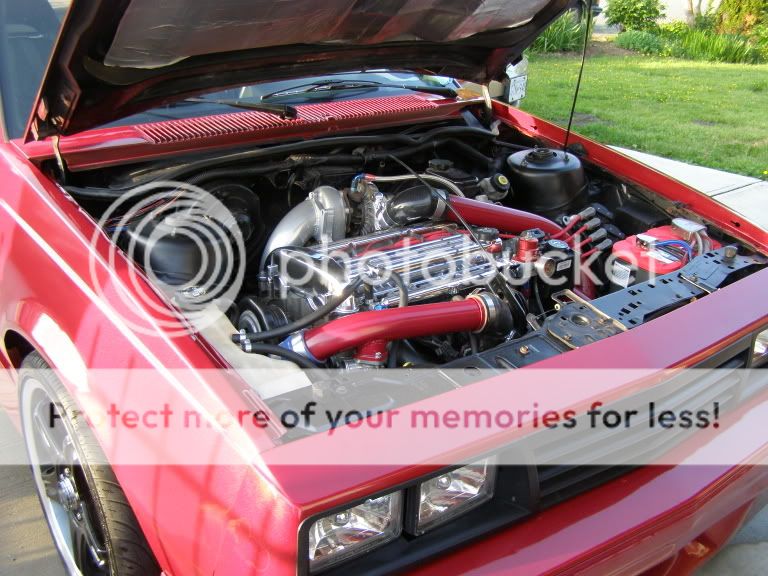
that was fresh from the polishing shop. its still on the motor, however its needing a re polish. i may just powdercoat it though, im not much of a polished fan myself, too much upkeep.
Thread Starter
Senior Member
iTrader: (1)
Joined: 10-27-07
Posts: 5,681
Likes: 266
From: Abbotsford BC
its back in, and this time to stay


had to do some more machining on my slave cylinder mount. when i measured everything when it was in pieces and calculated the installed height i somehow made a .200" error and i couldnt get the adapter onto the bellhousing. woops. of well, at least it was .200" i had to remove and not add. so its in the car to stay now. hopefully with get the majority of my parts powdercoated tomorrow and can start bolting some stuff on.
had to do some more machining on my slave cylinder mount. when i measured everything when it was in pieces and calculated the installed height i somehow made a .200" error and i couldnt get the adapter onto the bellhousing. woops. of well, at least it was .200" i had to remove and not add. so its in the car to stay now. hopefully with get the majority of my parts powdercoated tomorrow and can start bolting some stuff on.

 Moderator
Thread Starter
Senior Member
iTrader: (1)
Joined: 10-27-07
Posts: 5,681
Likes: 266
From: Abbotsford BC


Thread Starter
Senior Member
iTrader: (1)
Joined: 10-27-07
Posts: 5,681
Likes: 266
From: Abbotsford BC
thanks
got my lower rad "hose" built tonight. managed to get it sealed with no pinholes on the first shot.

also started the downpipe tonight. it looks like there is a lot of room for it, but its real tight once you start snaking 3" tubing through there.

got my lower rad "hose" built tonight. managed to get it sealed with no pinholes on the first shot.
also started the downpipe tonight. it looks like there is a lot of room for it, but its real tight once you start snaking 3" tubing through there.
Thread Starter
Senior Member
iTrader: (1)
Joined: 10-27-07
Posts: 5,681
Likes: 266
From: Abbotsford BC
thanks. i love working with stainless. the stuff im using is all food grade stuff. its pricey, but ill never have to replace it.
got the downpipe tacked up the last couple evenings. thought this was going to be easy, turns out it was more complicated than the charge pipes.


gonna be a bit till i can get the rest done. on the way home after snapping those pics the cobalt decided the clutch master cylinder should no longer be attached to the firewall. gotta try and track down a new firewall plate. worst time it could possible for it to happen.
got the downpipe tacked up the last couple evenings. thought this was going to be easy, turns out it was more complicated than the charge pipes.
gonna be a bit till i can get the rest done. on the way home after snapping those pics the cobalt decided the clutch master cylinder should no longer be attached to the firewall. gotta try and track down a new firewall plate. worst time it could possible for it to happen.
Thread Starter
Senior Member
iTrader: (1)
Joined: 10-27-07
Posts: 5,681
Likes: 266
From: Abbotsford BC
im back at it this week. my boss decided we should take the week off, so im spending the whole time working on the car.
as of now, the exhaust is complete. the turbo manifold, turbo, downpipe, exhaust and water pump cover/thermostat housing are all in for the final time. got an air intake built, all the turbo plumbing is done.


im hoping to button up most of the mechanical stuff tomorrow. ive gotta build fuel lines, mount the fan, install the rad hose, bleed the brakes and clutch, and a couple other loose ends. hoping to start wiring it by thursday.
as of now, the exhaust is complete. the turbo manifold, turbo, downpipe, exhaust and water pump cover/thermostat housing are all in for the final time. got an air intake built, all the turbo plumbing is done.
im hoping to button up most of the mechanical stuff tomorrow. ive gotta build fuel lines, mount the fan, install the rad hose, bleed the brakes and clutch, and a couple other loose ends. hoping to start wiring it by thursday.

Thread Starter
Senior Member
iTrader: (1)
Joined: 10-27-07
Posts: 5,681
Likes: 266
From: Abbotsford BC
starting to get down to the last things. the car is now 95% wired, just need to terminate the oil pressure sensor wiring and make a battery cable to the starter. had the car powered up for the first time, ecu, dash logger, and all the gauges worked right off the bat, not a single issue. that was one good thing about waiting for parts for so long, it gave me time to really plan out the wiring harness. as it is, only 2 wires from everything i added are spliced into the factory wiring, and thats switched power and an illumination wire for the boost gauge.
tomorrow ill be finishing the wiring, making fuel lines, and hopefully bleeding brakes and the clutch. if everything goes the way im hoping, itll run before next weekend.
tomorrow ill be finishing the wiring, making fuel lines, and hopefully bleeding brakes and the clutch. if everything goes the way im hoping, itll run before next weekend.