
a couple of easy tucks for the lsj


a couple of easy tucks for the lsj
there doesn't seem to be much around here on wire tucking for Cobalts, so I thought I'd share a couple of simple ones that I have done in the last couple weeks
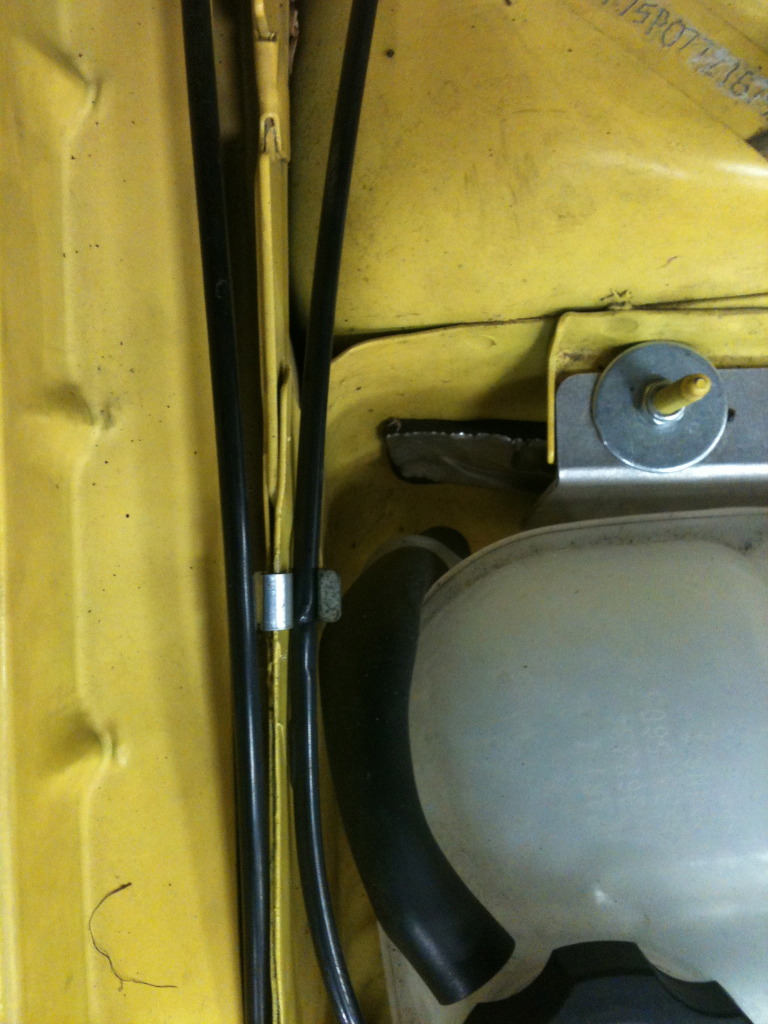
First is the core support. The harness runs across the core support from driver side to passenger side, feeds the headlights, front signals, outside temp sensor, and the washer pump. It's not bad in the center, but at both ends the harness is on top of the spotweld flange and is visible.
A lot of guys pull the clips off the studs and hang the harness on the back of the core support, I went a step further.
I pulled the passenger light, disconnected everything, pulled the clips, and pulled the whole harness to the driver side.
there are two big holes in the underside of the core support to run the harness through, so I ran a coat hanger through, taped the harness to it, and started to pull through.
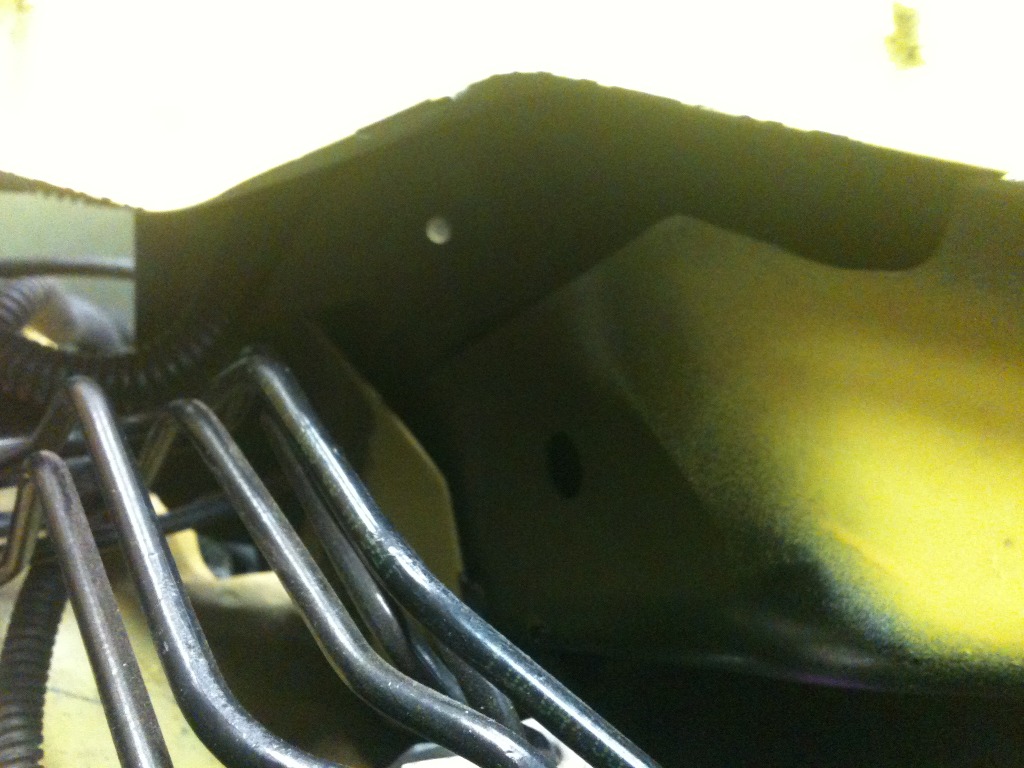
there's also a hole in the core support right at the temp sender, problem is, the wire connector won't fit through the hole. I tried to get the pins out of the plug but I couldn't, so I ended up cutting the wires. I had to solder on a few inches extra wire to get the wires to pull through with the coathanger. Soldered the clipped plug back on, stuffed the extra length back in the core support.
I used the factory split loom, but I might go back and change it later.
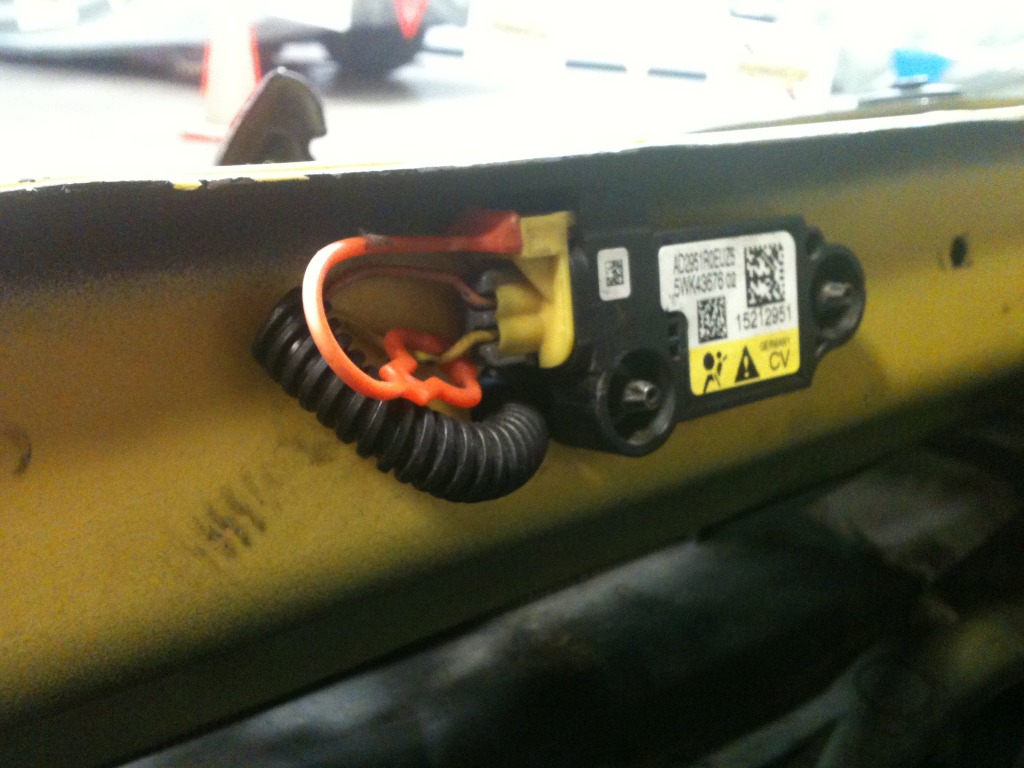
pull the rest ouf the harness out the passenger side, route it back the way it was down where you can't really see it anyway, plug everything back in, put headlight back.
the whole harness isn't completely hidden from view like a "real" tuck, but it sure is much cleaner. If you're really enterprising, cut the studs off, grind, fill, repaint. I might do that later
you can also move the ground for that harness off the far left stud on the core support and ground it at the stud under the washer bottle. I haven't done that yet.
First is the core support. The harness runs across the core support from driver side to passenger side, feeds the headlights, front signals, outside temp sensor, and the washer pump. It's not bad in the center, but at both ends the harness is on top of the spotweld flange and is visible.
A lot of guys pull the clips off the studs and hang the harness on the back of the core support, I went a step further.
I pulled the passenger light, disconnected everything, pulled the clips, and pulled the whole harness to the driver side.
there are two big holes in the underside of the core support to run the harness through, so I ran a coat hanger through, taped the harness to it, and started to pull through.
there's also a hole in the core support right at the temp sender, problem is, the wire connector won't fit through the hole. I tried to get the pins out of the plug but I couldn't, so I ended up cutting the wires. I had to solder on a few inches extra wire to get the wires to pull through with the coathanger. Soldered the clipped plug back on, stuffed the extra length back in the core support.
I used the factory split loom, but I might go back and change it later.
pull the rest ouf the harness out the passenger side, route it back the way it was down where you can't really see it anyway, plug everything back in, put headlight back.
the whole harness isn't completely hidden from view like a "real" tuck, but it sure is much cleaner. If you're really enterprising, cut the studs off, grind, fill, repaint. I might do that later
you can also move the ground for that harness off the far left stud on the core support and ground it at the stud under the washer bottle. I haven't done that yet.
Last edited by wayfarer; Nov 19, 2012 at 10:11 PM.


there doesn't seem to be much around here on wire tucking for cobalts, so i thought i'd share a couple of simple ones that i have done in the last couple weeks
first is the core support. The harness runs across the core support from driver side to passenger side, feeds the headlights, front signals, outside temp sensor, and the washer pump. It's not bad in the center, but at both ends the harness is on top of the spotweld flange and is visible.
A lot of guys pull the clips off the studs and hang the harness on the back of the core support, i went a step further.
I pulled the passenger light, disconnected everything, pulled the clips, and pulled the whole harness to the driver side.
There are two big holes in the underside of the core support to run the harness through, so i ran a coat hanger through, taped the harness to it, and started to pull through.

there's also a hole in the core support right at the temp sender, problem is, the wire connector won't fit through the hole. I tried to get the pins out of the plug but i couldn't, so i ended up cutting the wires. I had to solder on a few inches extra wire to get the wires to pull through with the coathanger. Soldered the clipped plug back on, stuffed the extra length back in the core support.
I used the factory split loom, but i might go back and change it later.

pull the rest ouf the harness out the passenger side, route it back the way it was down where you can't really see it anyway, plug everything back in, put headlight back.
The whole harness isn't completely hidden from view like a "real" tuck, but it sure is much cleaner. If you're really enterprising, cut the studs off, grind, fill, repaint. I might do that later

you can also move the ground for that harness off the far left stud on the core support and ground it at the stud under the washer bottle. I haven't done that yet.
first is the core support. The harness runs across the core support from driver side to passenger side, feeds the headlights, front signals, outside temp sensor, and the washer pump. It's not bad in the center, but at both ends the harness is on top of the spotweld flange and is visible.
A lot of guys pull the clips off the studs and hang the harness on the back of the core support, i went a step further.
I pulled the passenger light, disconnected everything, pulled the clips, and pulled the whole harness to the driver side.
There are two big holes in the underside of the core support to run the harness through, so i ran a coat hanger through, taped the harness to it, and started to pull through.
there's also a hole in the core support right at the temp sender, problem is, the wire connector won't fit through the hole. I tried to get the pins out of the plug but i couldn't, so i ended up cutting the wires. I had to solder on a few inches extra wire to get the wires to pull through with the coathanger. Soldered the clipped plug back on, stuffed the extra length back in the core support.
I used the factory split loom, but i might go back and change it later.
pull the rest ouf the harness out the passenger side, route it back the way it was down where you can't really see it anyway, plug everything back in, put headlight back.
The whole harness isn't completely hidden from view like a "real" tuck, but it sure is much cleaner. If you're really enterprising, cut the studs off, grind, fill, repaint. I might do that later
you can also move the ground for that harness off the far left stud on the core support and ground it at the stud under the washer bottle. I haven't done that yet.
picture fail!!!!!!!!!!!!!!!!!!!!!!!!!!!!!!!
there doesn't seem to be much around here on wire tucking for Cobalts, so I thought I'd share a couple of simple ones that I have done in the last couple weeks
First is the core support. The harness runs across the core support from driver side to passenger side, feeds the headlights, front signals, outside temp sensor, and the washer pump. It's not bad in the center, but at both ends the harness is on top of the spotweld flange and is visible.
A lot of guys pull the clips off the studs and hang the harness on the back of the core support, I went a step further.
I pulled the passenger light, disconnected everything, pulled the clips, and pulled the whole harness to the driver side.
there are two big holes in the underside of the core support to run the harness through, so I ran a coat hanger through, taped the harness to it, and started to pull through.

there's also a hole in the core support right at the temp sender, problem is, the wire connector won't fit through the hole. I tried to get the pins out of the plug but I couldn't, so I ended up cutting the wires. I had to solder on a few inches extra wire to get the wires to pull through with the coathanger. Soldered the clipped plug back on, stuffed the extra length back in the core support.
I used the factory split loom, but I might go back and change it later.

pull the rest ouf the harness out the passenger side, route it back the way it was down where you can't really see it anyway, plug everything back in, put headlight back.
the whole harness isn't completely hidden from view like a "real" tuck, but it sure is much cleaner. If you're really enterprising, cut the studs off, grind, fill, repaint. I might do that later

you can also move the ground for that harness off the far left stud on the core support and ground it at the stud under the washer bottle. I haven't done that yet.
First is the core support. The harness runs across the core support from driver side to passenger side, feeds the headlights, front signals, outside temp sensor, and the washer pump. It's not bad in the center, but at both ends the harness is on top of the spotweld flange and is visible.
A lot of guys pull the clips off the studs and hang the harness on the back of the core support, I went a step further.
I pulled the passenger light, disconnected everything, pulled the clips, and pulled the whole harness to the driver side.
there are two big holes in the underside of the core support to run the harness through, so I ran a coat hanger through, taped the harness to it, and started to pull through.
there's also a hole in the core support right at the temp sender, problem is, the wire connector won't fit through the hole. I tried to get the pins out of the plug but I couldn't, so I ended up cutting the wires. I had to solder on a few inches extra wire to get the wires to pull through with the coathanger. Soldered the clipped plug back on, stuffed the extra length back in the core support.
I used the factory split loom, but I might go back and change it later.
pull the rest ouf the harness out the passenger side, route it back the way it was down where you can't really see it anyway, plug everything back in, put headlight back.
the whole harness isn't completely hidden from view like a "real" tuck, but it sure is much cleaner. If you're really enterprising, cut the studs off, grind, fill, repaint. I might do that later
you can also move the ground for that harness off the far left stud on the core support and ground it at the stud under the washer bottle. I haven't done that yet.
Last edited by blu3_v1p3r; Nov 19, 2012 at 10:09 PM.

Senior Member
Joined: 08-30-08
Posts: 3,628
Likes: 0
From: Central Florida
there doesn't seem to be much around here on wire tucking for Cobalts, so I thought I'd share a couple of simple ones that I have done in the last couple weeks
First is the core support. The harness runs across the core support from driver side to passenger side, feeds the headlights, front signals, outside temp sensor, and the washer pump. It's not bad in the center, but at both ends the harness is on top of the spotweld flange and is visible.
A lot of guys pull the clips off the studs and hang the harness on the back of the core support, I went a step further.
I pulled the passenger light, disconnected everything, pulled the clips, and pulled the whole harness to the driver side.
there are two big holes in the underside of the core support to run the harness through, so I ran a coat hanger through, taped the harness to it, and started to pull through.

there's also a hole in the core support right at the temp sender, problem is, the wire connector won't fit through the hole. I tried to get the pins out of the plug but I couldn't, so I ended up cutting the wires. I had to solder on a few inches extra wire to get the wires to pull through with the coathanger. Soldered the clipped plug back on, stuffed the extra length back in the core support.
I used the factory split loom, but I might go back and change it later.

pull the rest ouf the harness out the passenger side, route it back the way it was down where you can't really see it anyway, plug everything back in, put headlight back.
the whole harness isn't completely hidden from view like a "real" tuck, but it sure is much cleaner. If you're really enterprising, cut the studs off, grind, fill, repaint. I might do that later
you can also move the ground for that harness off the far left stud on the core support and ground it at the stud under the washer bottle. I haven't done that yet.
First is the core support. The harness runs across the core support from driver side to passenger side, feeds the headlights, front signals, outside temp sensor, and the washer pump. It's not bad in the center, but at both ends the harness is on top of the spotweld flange and is visible.
A lot of guys pull the clips off the studs and hang the harness on the back of the core support, I went a step further.
I pulled the passenger light, disconnected everything, pulled the clips, and pulled the whole harness to the driver side.
there are two big holes in the underside of the core support to run the harness through, so I ran a coat hanger through, taped the harness to it, and started to pull through.
there's also a hole in the core support right at the temp sender, problem is, the wire connector won't fit through the hole. I tried to get the pins out of the plug but I couldn't, so I ended up cutting the wires. I had to solder on a few inches extra wire to get the wires to pull through with the coathanger. Soldered the clipped plug back on, stuffed the extra length back in the core support.
I used the factory split loom, but I might go back and change it later.
pull the rest ouf the harness out the passenger side, route it back the way it was down where you can't really see it anyway, plug everything back in, put headlight back.
the whole harness isn't completely hidden from view like a "real" tuck, but it sure is much cleaner. If you're really enterprising, cut the studs off, grind, fill, repaint. I might do that later
you can also move the ground for that harness off the far left stud on the core support and ground it at the stud under the washer bottle. I haven't done that yet.
Joined: 12-23-09
Posts: 12,643
Likes: 7
From: Mt. Pleasant S.C.
This is wrong
[IMG]<a href="http://s1147.photobucket.com/albums/o552/kcwoerth/?action=view&current=IMG_0622.jpg" target="_blank"><img src="http://i1147.photobucket.com/albums/o552/kcwoerth/IMG_0622.jpg" border="0" alt="Photobucket"></a>[/IMG]
this is right
[ IMG]http://i1147.photobucket.com/albums/o552/kcwoerth/IMG_0622.jpg[/IMG]
strip off the bullshit and leave just the URL to the image itself. the forums will do all the rest. I also put in an extra space in [ img so that it wouldn't render and so that you can see the code. remove the space.
[IMG]<a href="http://s1147.photobucket.com/albums/o552/kcwoerth/?action=view&current=IMG_0622.jpg" target="_blank"><img src="http://i1147.photobucket.com/albums/o552/kcwoerth/IMG_0622.jpg" border="0" alt="Photobucket"></a>[/IMG]
[ IMG]http://i1147.photobucket.com/albums/o552/kcwoerth/IMG_0622.jpg[/IMG]
i tried a BUNCH of different ways, but what ended up working, was that I was not deleting the "http" out of the insert img code box. once I copied the image code, deleted the "http" from the box and then pasted, it worked.
ok, part 2 coming shortly
ok, part 2 coming shortly
ok, part 2, after the picture SNAFU.
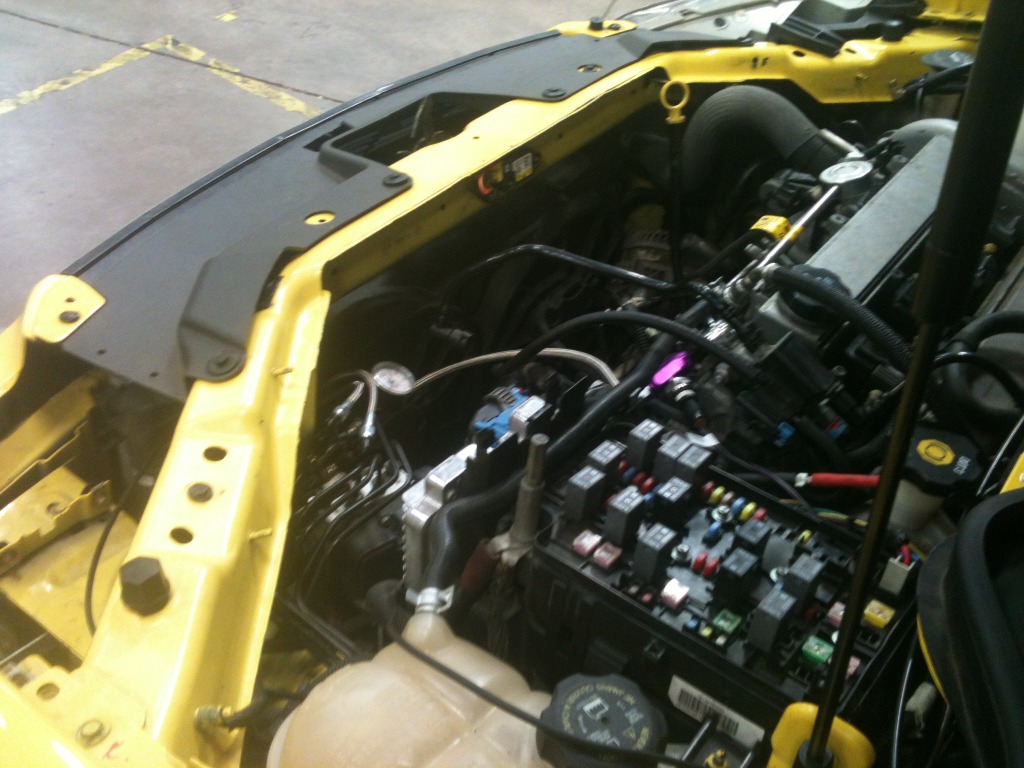
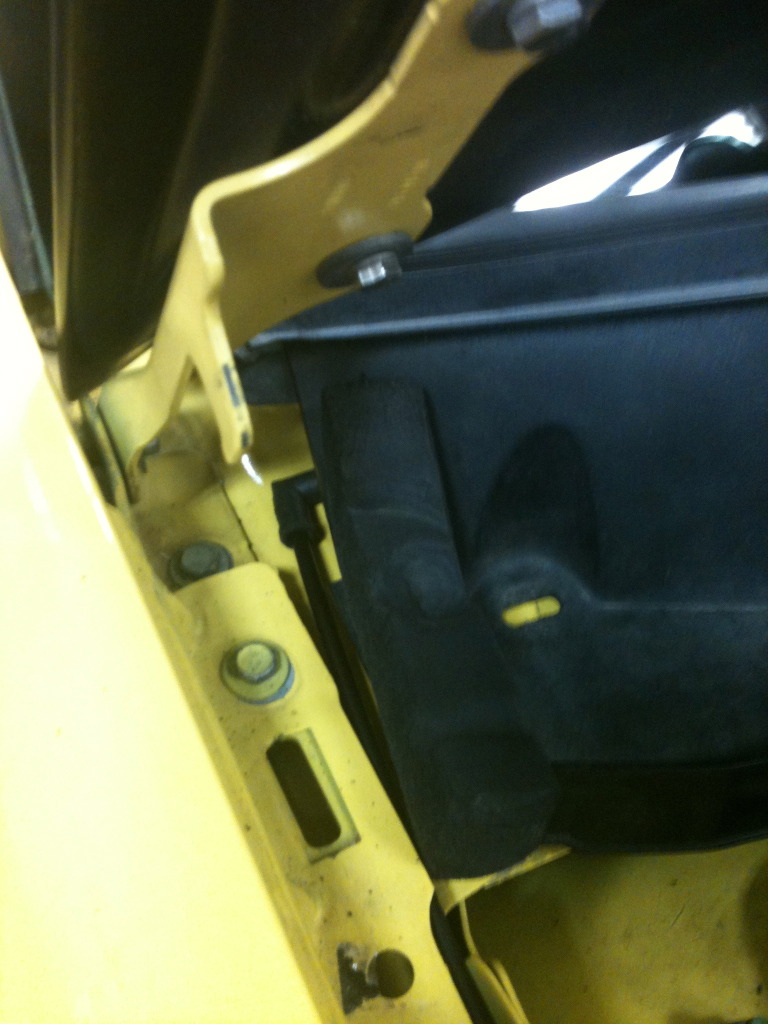
the wires running across the firewall, the tabs on the wiper tray, the clips, and the windshield washer hose running across bug the crap out of me, so, I started by pulling all the clips loose and hanging the washer tube and wires. Pulled the wiper arms off and removed the tray completely.
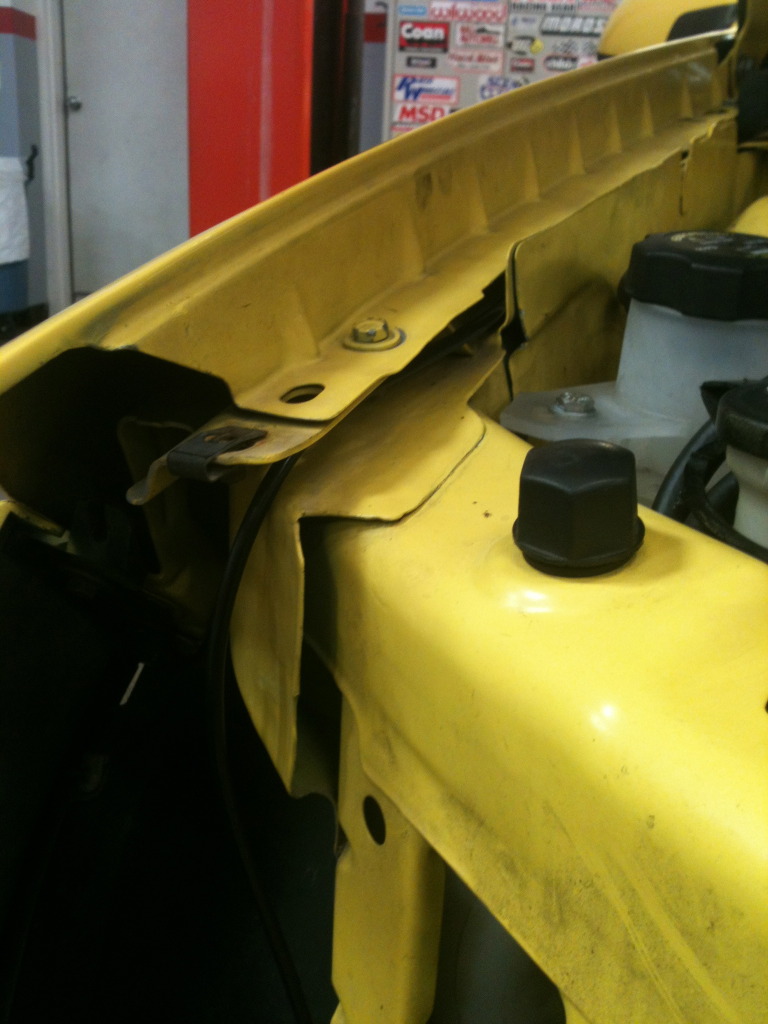
first I took the elbow off where the hose turns the corner from the fender to the firewall, and the long straight piece of tube that crosses the firewall. I pulled the washer hose connectors off the spray nozzles and flipped them, so the tee is on the passenger nozzle and the end is on the driver side.

heated up the curl in the hose with a heat gun to straighten inout, cut off about an inch and a half, and glued the 90 degree to the end, so it lined up with the groove where the fender meets the inner fender.
took the hose off at the washer bottle, put the rubber end at the bottle on one end of the long straight, and popped it back where the old one was.
ran it up in front of the core support, and then up the groove mentioned earlier.
hooked the other end to the 90 at the firewall.
took the heat gun and heated the line up where it turns and goes up the fender.
cut the tabs off the wiper tray.
last thing, took off the plastic "nuts" holding the insulation to the firewall, stuffed the wheel speed sensor wiring that ran across the firewall down low behind the insulation and reinstalled the "nuts"
the wires running across the firewall, the tabs on the wiper tray, the clips, and the windshield washer hose running across bug the crap out of me, so, I started by pulling all the clips loose and hanging the washer tube and wires. Pulled the wiper arms off and removed the tray completely.
first I took the elbow off where the hose turns the corner from the fender to the firewall, and the long straight piece of tube that crosses the firewall. I pulled the washer hose connectors off the spray nozzles and flipped them, so the tee is on the passenger nozzle and the end is on the driver side.
heated up the curl in the hose with a heat gun to straighten inout, cut off about an inch and a half, and glued the 90 degree to the end, so it lined up with the groove where the fender meets the inner fender.
took the hose off at the washer bottle, put the rubber end at the bottle on one end of the long straight, and popped it back where the old one was.
ran it up in front of the core support, and then up the groove mentioned earlier.
hooked the other end to the 90 at the firewall.
took the heat gun and heated the line up where it turns and goes up the fender.
cut the tabs off the wiper tray.
last thing, took off the plastic "nuts" holding the insulation to the firewall, stuffed the wheel speed sensor wiring that ran across the firewall down low behind the insulation and reinstalled the "nuts"
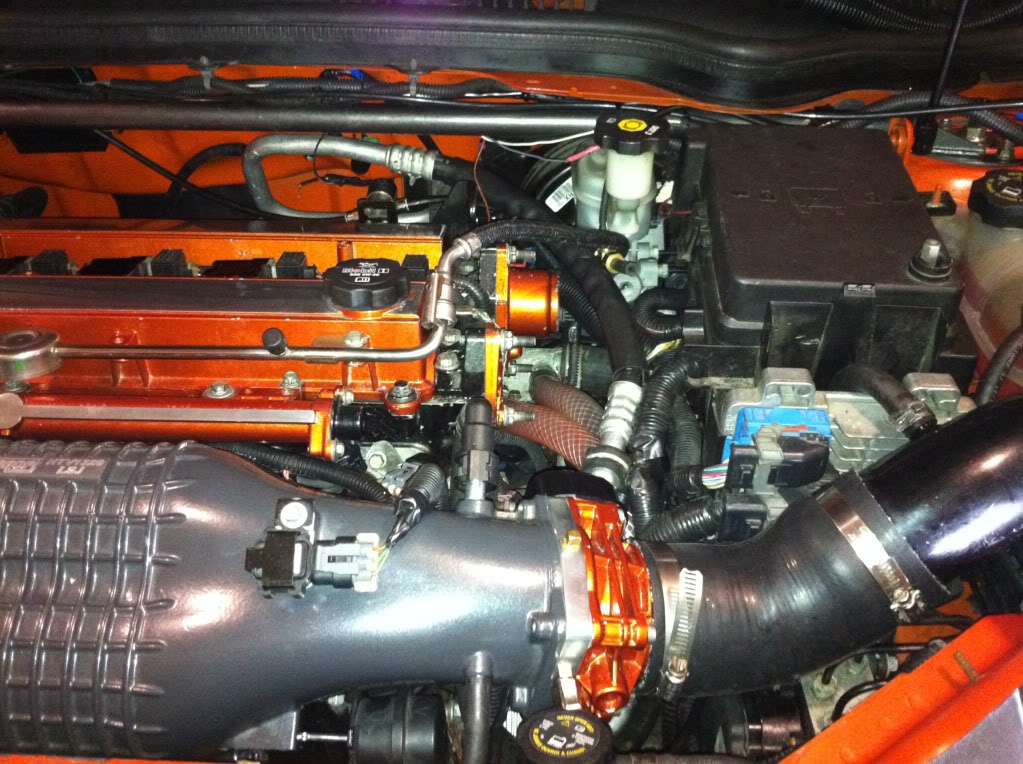
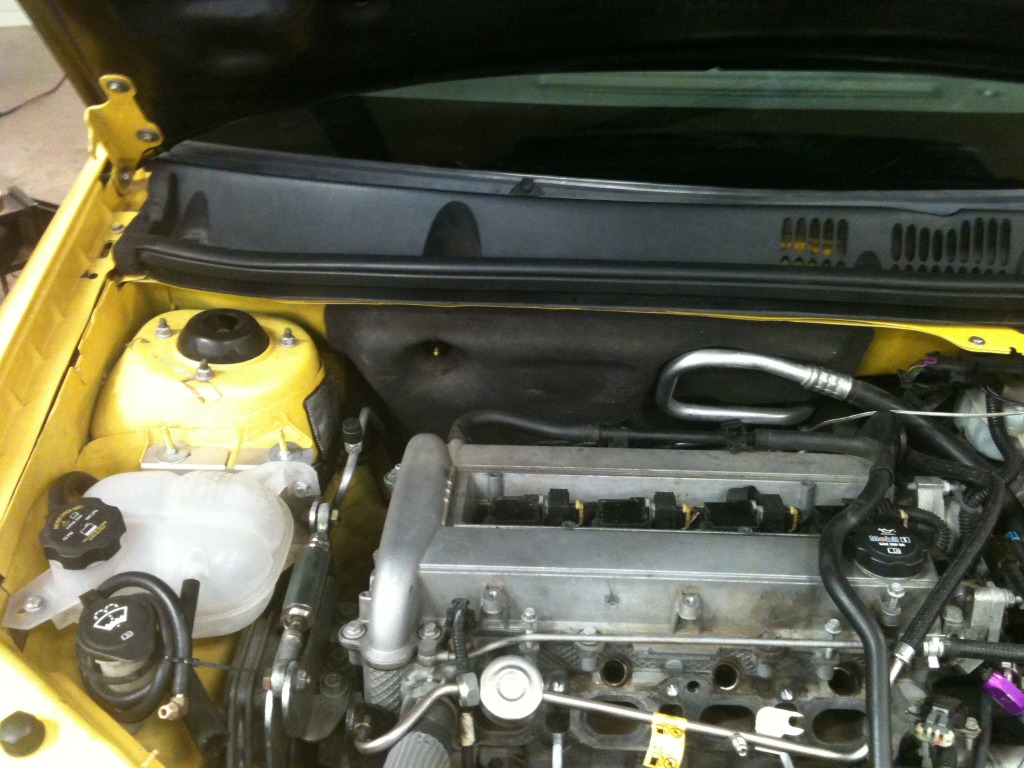
^^^^^missing alot on the back of the engine. Looks good.
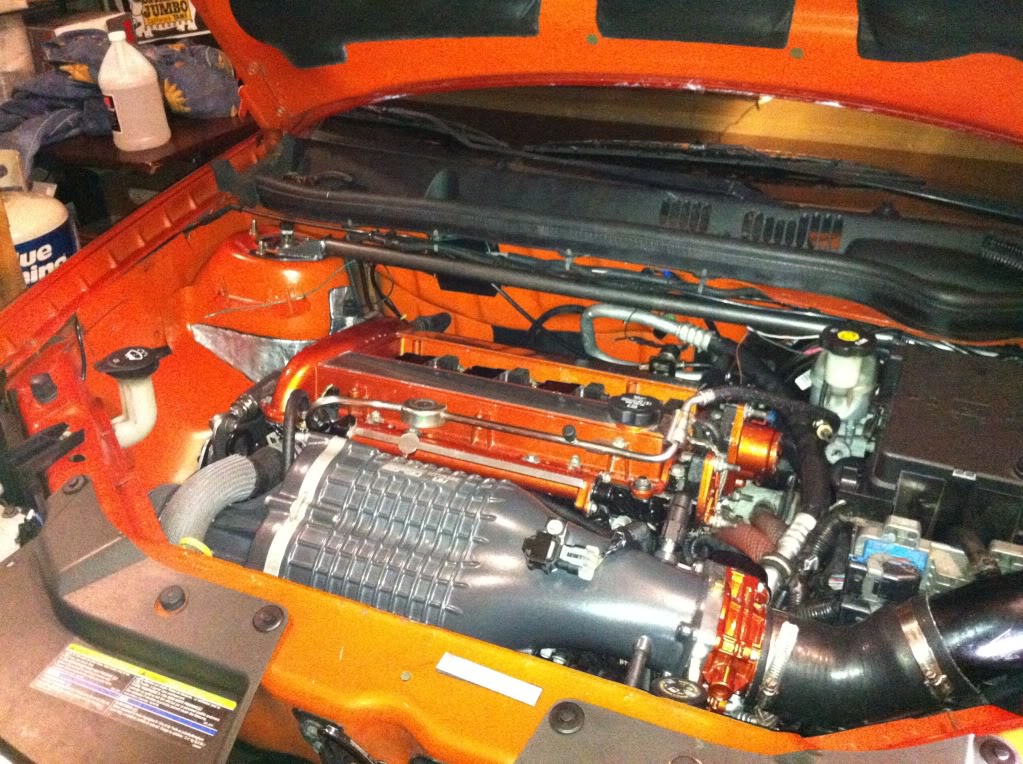
That's the next step of this part of the project. revise vaccuum lines, fuel line, and pcv hose.
Started evap delete, everything's gone under the hood, evap can's gone under the car, but I haven't had a chance to finish the tank and the filler neck yet. maybe this weekend.
That's the next step of this part of the project. revise vaccuum lines, fuel line, and pcv hose.
Started evap delete, everything's gone under the hood, evap can's gone under the car, but I haven't had a chance to finish the tank and the filler neck yet. maybe this weekend.

Junior Member
Joined: 12-13-11
Posts: 420
Likes: 0
From: Wisconsin
^^^^^missing alot on the back of the engine. Looks good.
That's the next step of this part of the project. revise vaccuum lines, fuel line, and pcv hose.
Started evap delete, everything's gone under the hood, evap can's gone under the car, but I haven't had a chance to finish the tank and the filler neck yet. maybe this weekend.
That's the next step of this part of the project. revise vaccuum lines, fuel line, and pcv hose.
Started evap delete, everything's gone under the hood, evap can's gone under the car, but I haven't had a chance to finish the tank and the filler neck yet. maybe this weekend.
I like hidden stuff, but in that valley between the back of the engine and the fuse box, I'll settle for visible but "sanitary". Right now it just looks like 42 different GM engineers puked their guts into that spot. There's no rhyme or reason, just random looking ****.
I think it's absolutely retarded the way the fuel line cuts the corner of the valve cover stock, and I hate the angle up at the end of the rail feed and the 45 on the end of the factory soft line, so I'm moving the pcv, and revising the fuel delivery to run in the groove where the pcv used to go. I'm pretty sure at this point that means cutting the hard line where it runs up the firewall, putting an AN end on it, then a new AN flex hose up to the rail feed.
what I want to do with the vacuum line is pull the nipple out of the manifold, drill, tap, replace with an AN adapter, and run a hard line around the backside of the engine. Trying to decide between a vaccuum block or just adding nipples to the main line. I'm worried about the adapter fitting clearning the blower, or if I move it, interfering with the fuel rail. I don't have enough pieces to put together to check clearance right now
Junior Member
Joined: 12-13-11
Posts: 420
Likes: 0
From: Wisconsin
I like hidden stuff, but in that valley between the back of the engine and the fuse box, I'll settle for visible but "sanitary". Right now it just looks like 42 different GM engineers puked their guts into that spot. There's no rhyme or reason, just random looking ****.
I think it's absolutely retarded the way the fuel line cuts the corner of the valve cover stock, and I hate the angle up at the end of the rail feed and the 45 on the end of the factory soft line, so I'm moving the pcv, and revising the fuel delivery to run in the groove where the pcv used to go. I'm pretty sure at this point that means cutting the hard line where it runs up the firewall, putting an AN end on it, then a new AN flex hose up to the rail feed.
what I want to do with the vacuum line is pull the nipple out of the manifold, drill, tap, replace with an AN adapter, and run a hard line around the backside of the engine. Trying to decide between a vaccuum block or just adding nipples to the main line. I'm worried about the adapter fitting clearning the blower, or if I move it, interfering with the fuel rail. I don't have enough pieces to put together to check clearance right now
I think it's absolutely retarded the way the fuel line cuts the corner of the valve cover stock, and I hate the angle up at the end of the rail feed and the 45 on the end of the factory soft line, so I'm moving the pcv, and revising the fuel delivery to run in the groove where the pcv used to go. I'm pretty sure at this point that means cutting the hard line where it runs up the firewall, putting an AN end on it, then a new AN flex hose up to the rail feed.
what I want to do with the vacuum line is pull the nipple out of the manifold, drill, tap, replace with an AN adapter, and run a hard line around the backside of the engine. Trying to decide between a vaccuum block or just adding nipples to the main line. I'm worried about the adapter fitting clearning the blower, or if I move it, interfering with the fuel rail. I don't have enough pieces to put together to check clearance right now
Your idea would work on drilling and taping, I'd just run a little angle up to gain a little clearence from the supercharger, its pretty close with a TVs, m62 does have a lot more room.and wouldnt need an angle