
Official Dejon Piping Install Thread!!!


Official Dejon Piping Install Thread!!!
Okay Guys here's the how to install guide you've been waiting for...
Tools you will need:
1) Two flat head screwdrivers
2) Ratchet set (small)
3) Scissors or razor cutter
4) Snap ring pliers ( Go to Sears and get heavy duty ones)
5) Zip ties
6) Pliers
7) Hex or star shaped socket
8) Portable Light source.
9) A couple feet of 7/32" Vacuum hose. Maybe 5 feet to be safe.
(Caution I would strongly recommend disconnecting you battery before installation)
Step #1
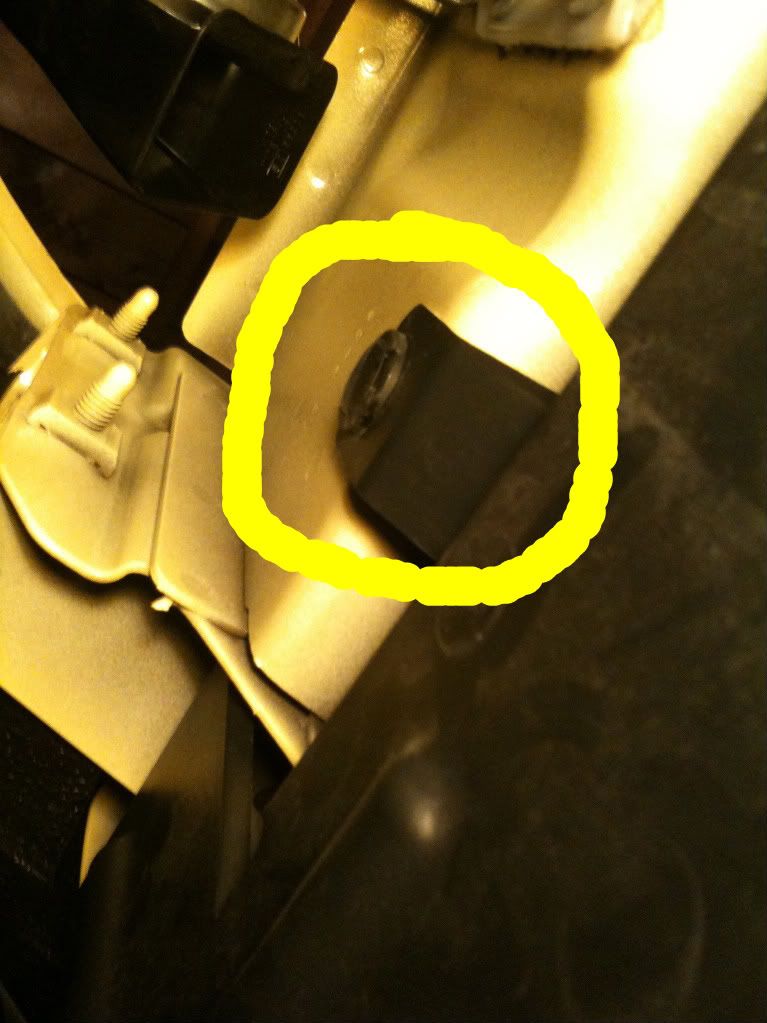
Remove the torx screw, hex screw, or star shaped screw. It looks like a star it will be located under the stock charge piping. It may take a while depending on the tool you will be using, but just be patient. If you don't care about keeping the stock piping to put back on in the future, then the simple way would be to cut it off.
Step # 2
Once you have gotten that screw out, the next step will be to loosen the clamp holding the charge piping to the turbo. Not sure what the size it is but i'm sure you'll figure it out .
(Note your clamp will look slightly different because this is already the clamp from dejon)
Step # 3
Once you have the top clamp loose of the charge piping, you will need to jack the front end of your car up. I highly recommend using jack stands for this.
Step # 4
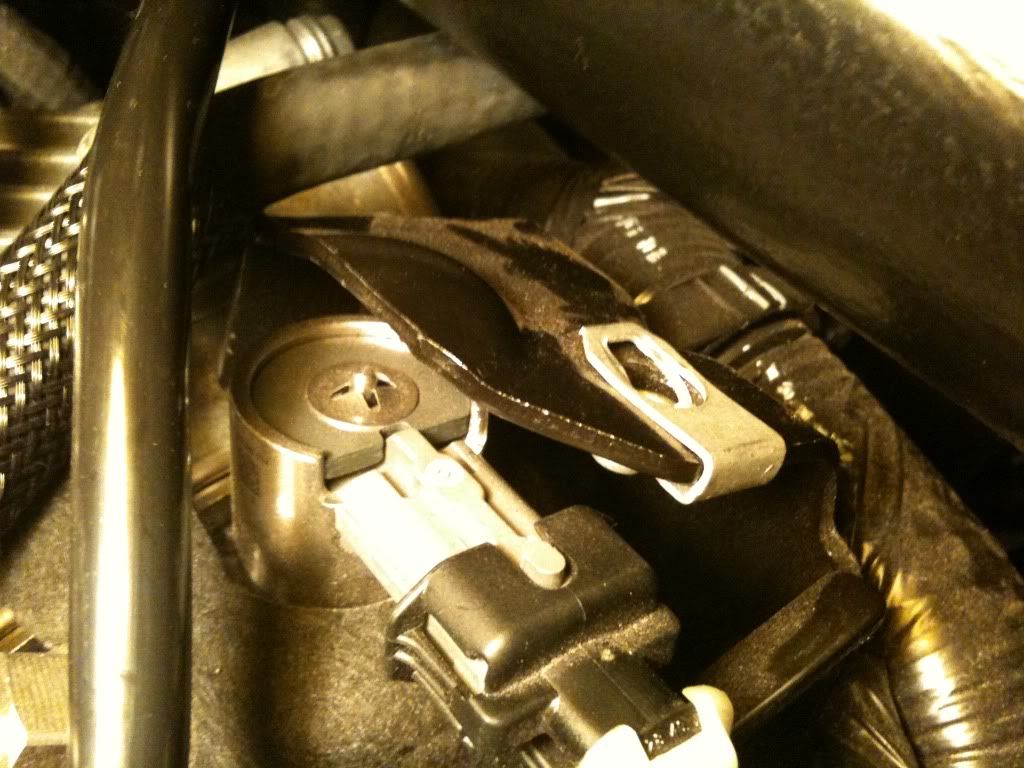
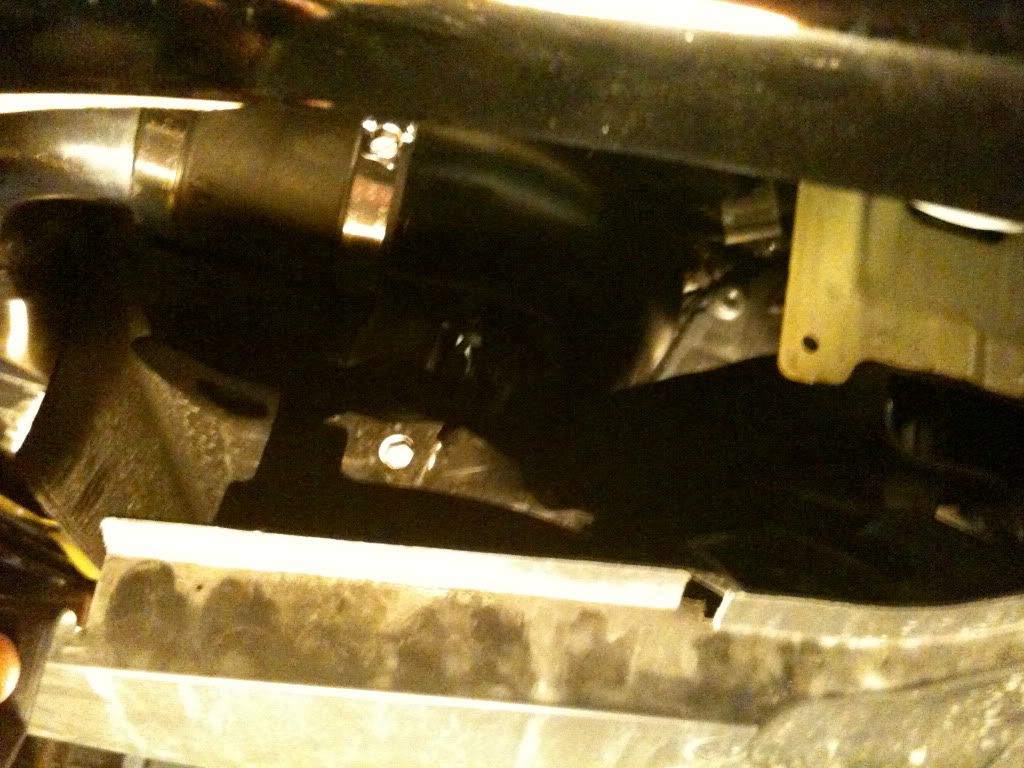
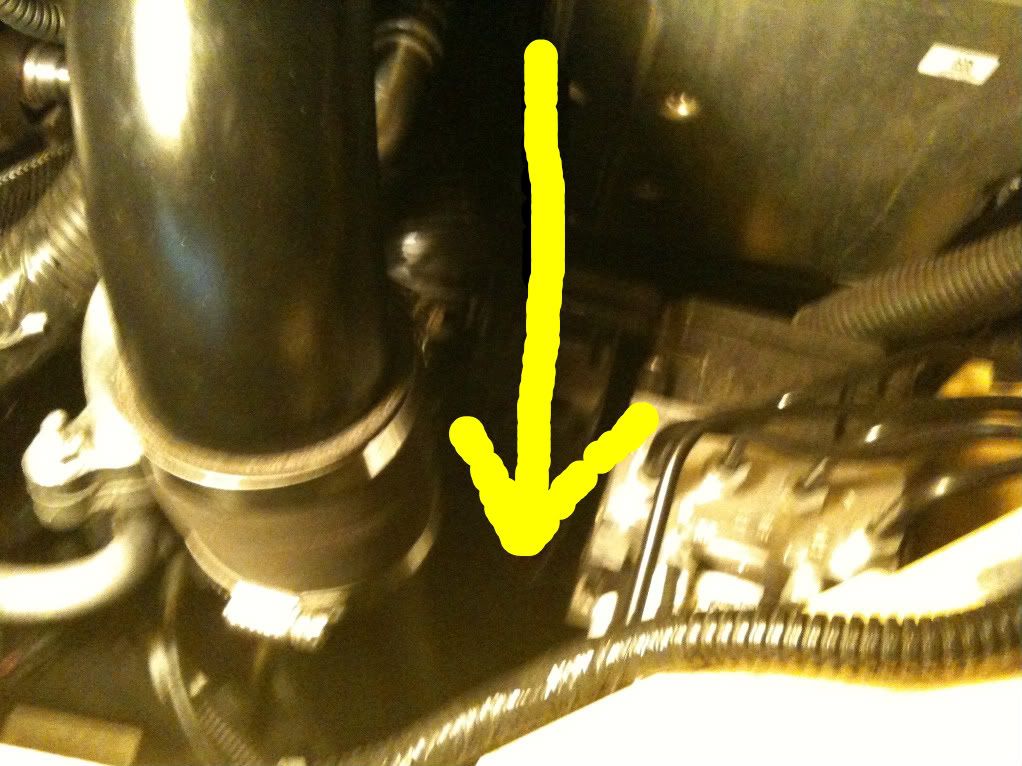
After your car has been jacked up, you will need to lay down underneath the car and you should have a light source handy. Once under the car it should look like this.
Step # 5
Now you will need your two flathead screwdrivers for this. There will be two little slots on the plastic clip, which I have pictured below. Insert one of the flatheads into one side and the other flathead into the other. One on the top, one on the bottom of the plastic clip. Using equal pressure, carefully pull outwards until center pin comes out. Then using your fingers or screwdriver pull out larger plastic clip.
Step # 6
Once you pull that plastic piece out, you might need to also remove the small screw holding the plastic fender well in. This would be located on the right side of the shield.
Step # 7
After that is removed if needed, you will then need to pull the plastic shield out from the front of the bumper. It may take some twisting and turning. After you get the front fin like shaped piece pulled out, the rest of the shield will come down pretty easy by grabbing in and gently pulling it down.
Step # 8
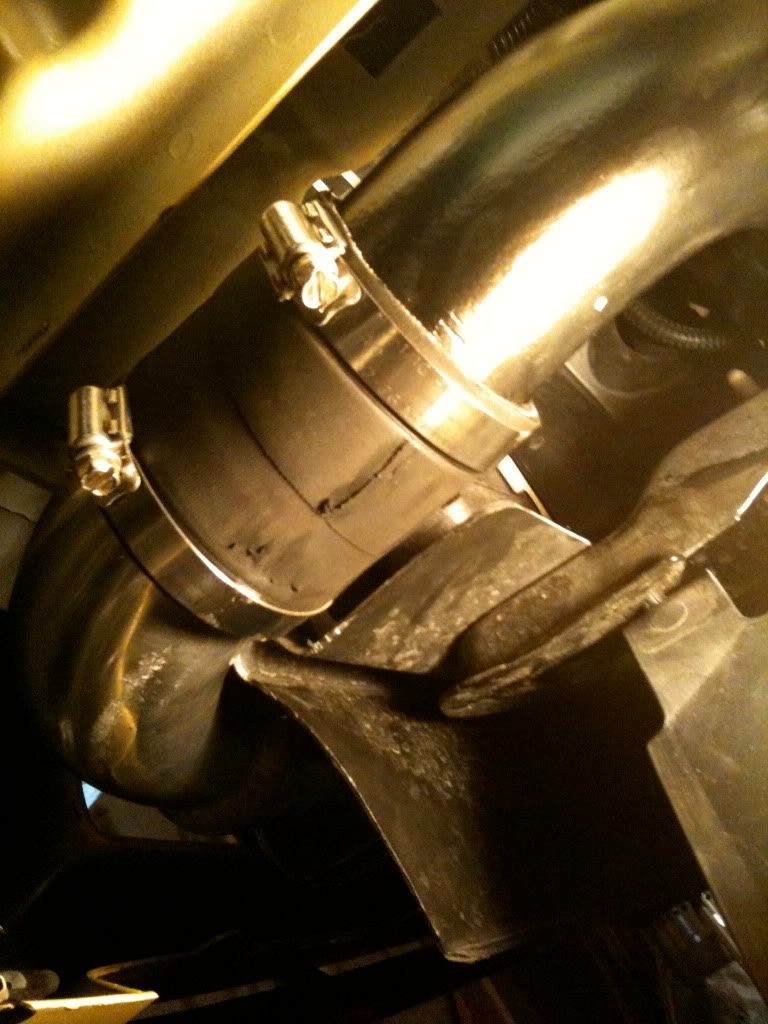
Once the plastic shield has been pulled down you will see the clamp where the lower charge piping and the intercooler meet. You will need to loosen that clamp using one of your sockets. After loosening it, grab the intercooler pipe and the charge pipe and begin to wiggle and pull them apart from each other.
(Again your clamp and intercooler pipe may look different because i have a different set up)
Step # 9
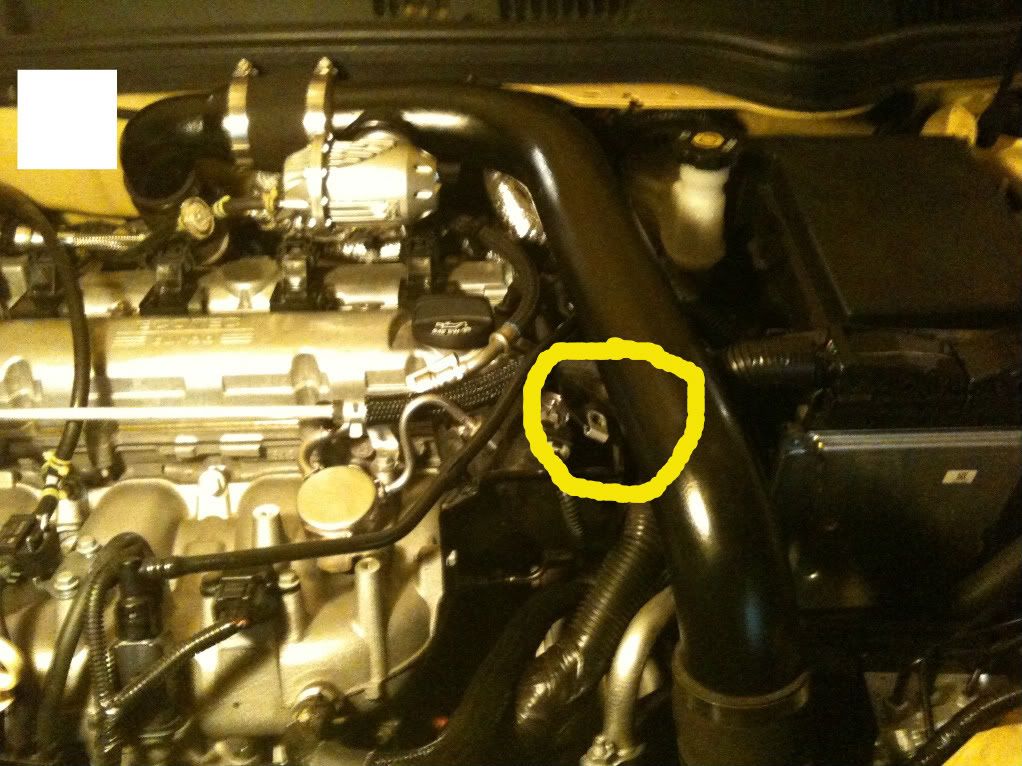
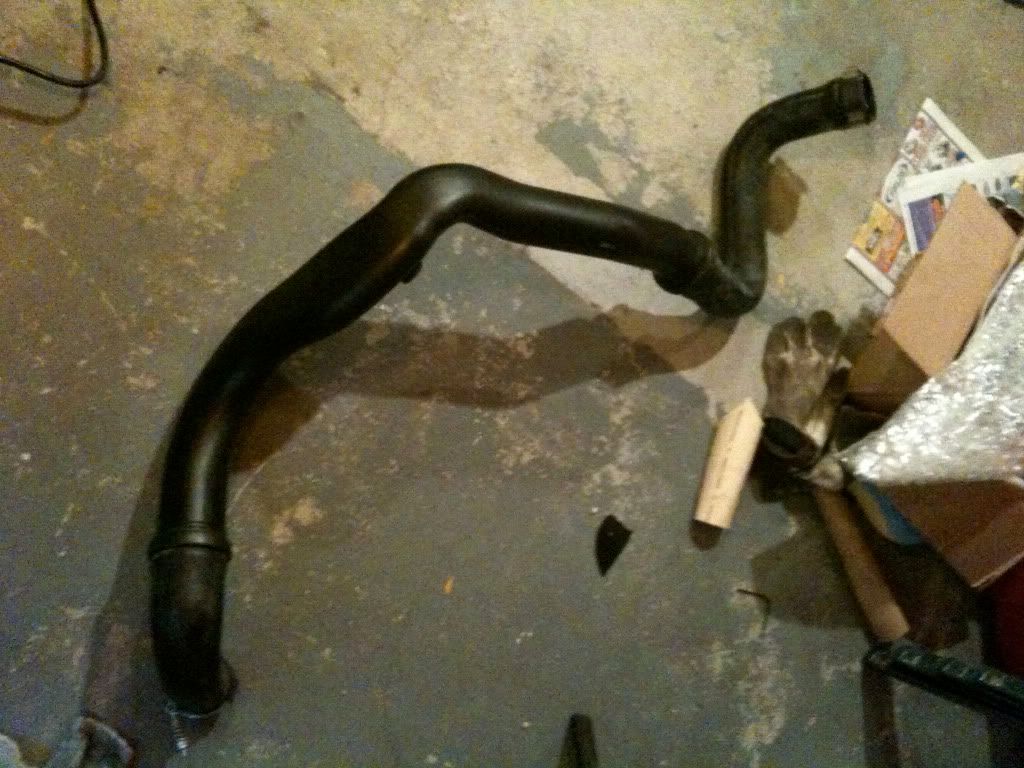
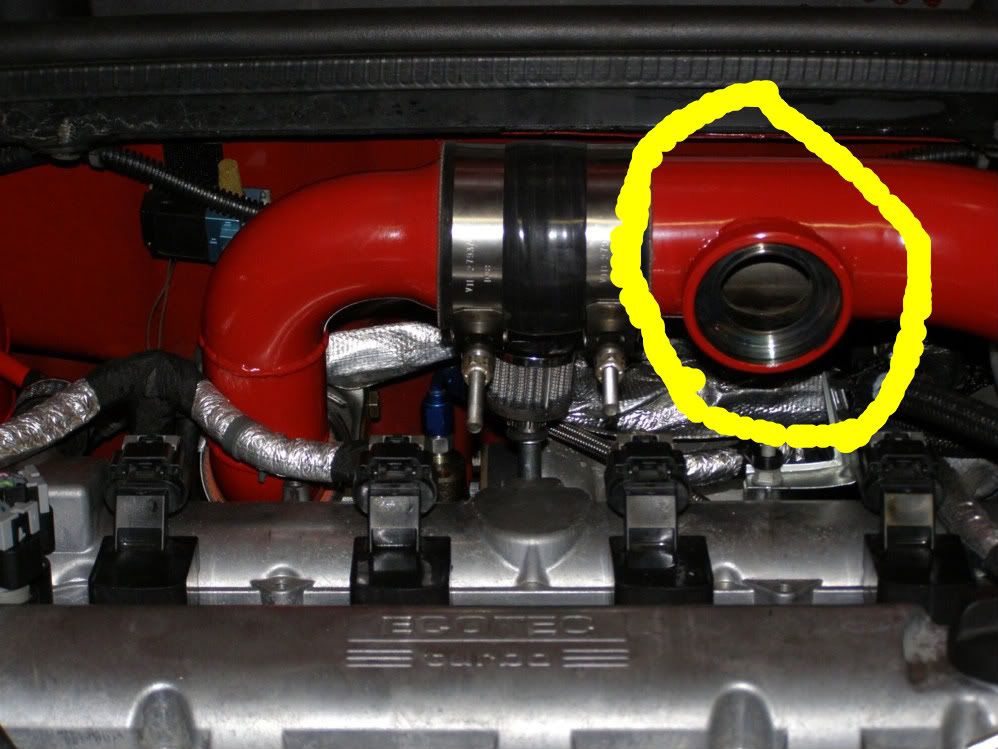
Once you have the intercooler tube and the charge pipe disconnected from each other, you can crawl out from underneath and proceed to the engine bay. Once you get back up there finish taking off the charge piping connected to the turbo by wiggling and pulling the upper charge piping. After you get that taken off, after some twisting and turning you should be able to pull the charge piping out of the engine bay by pulling it upwards. It should look like this after taken off.
Step # 10
Good job, now you got the old ugly charge piping out and now it's time to put in the new charge piping you bought. Now some charge piping depending on where you bought it from, will have less tubing or more. I believe the Injen is one or two pieces. And Dejon, Hahn, and synapse are four. Correct me if i'm wrong. Not sure about CIA or Genuinesaab, and any others i'm forgetting lol. So for now i will be referring to the Dejon, because the people who bought that product have asked me to do this for them. No offense to any other vendors.
Step # 11
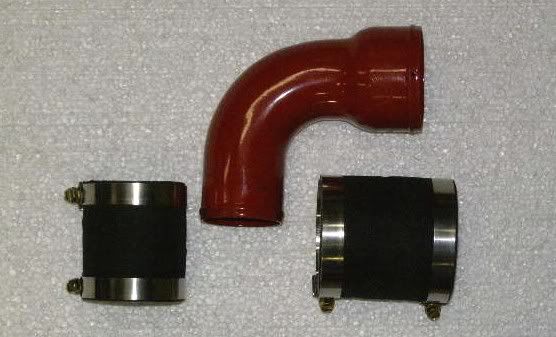
Getting back, lets start putting the new charge piping on now. The kit should have come with three pipes and four clamps. ( These pictures were taken from the dejon website, http://cobalt.dejonpowerhouse.com)


Now if you have bought a blow off valve, now would be the time to install it into the flange in the piping. ( Picture was taken from dejon website, http://cobalt.dejonpowerhouse.com)
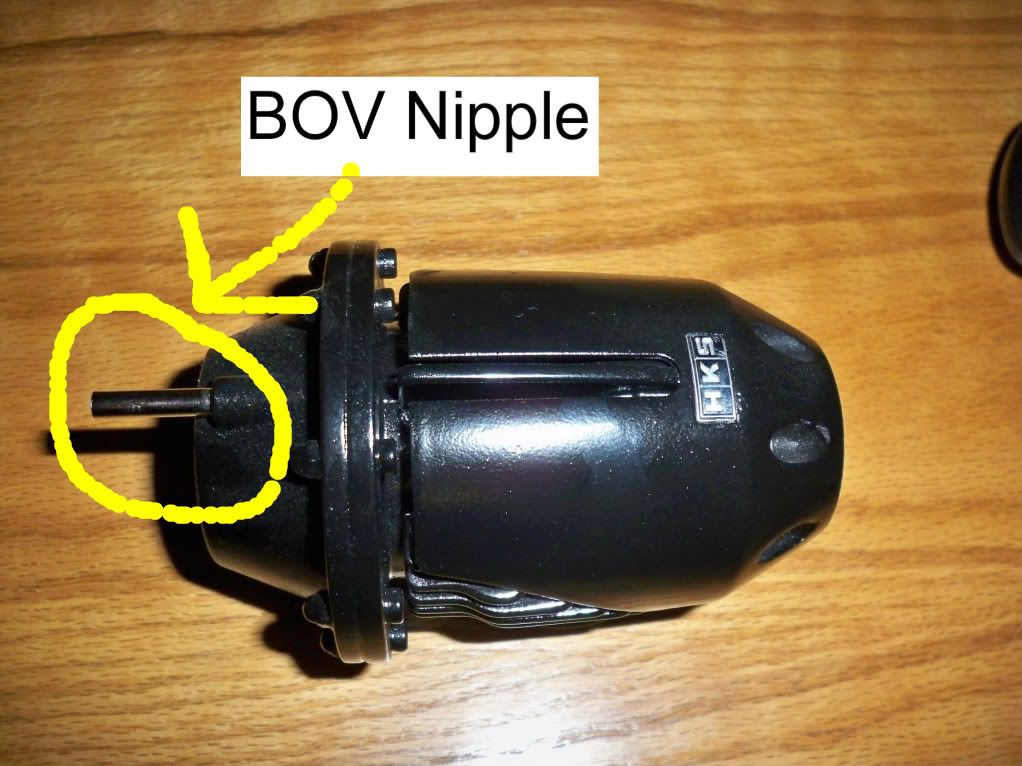
First you will want to put that rubber seal into the grove in the flange. Next you will want to slide that metal ring around the base of the HKS BOV, and make sure the side which has groves extending outwards faces down to ensure proper seal. That information should have came in a handout with your purchase of the HKS. Refer to that if confusion.
After you have the metal ring around the bov, you will need to grab your snap ring pliers. Again i highly recommend getting the ones i bought from Sears because the are very strong. Set the pliers using the little knob, so that they are completely open so that when you squeeze them, the two tips move closer together. Place the bov into the flange on top of the rubber seal. Insert the two tips into the small holes in the metal ring. Start to compress the rings until the tips of the rings touch or get really close. Then push the front of the metal ring into the flange, and while one hand holds the pliers together use the other hand to push the back of the metal ring into the flange and then release the pressure from the pliers. This may take some time, and once you think you may have it try to twist the bov in place. It should be tight and move little if at all.
Step # 12
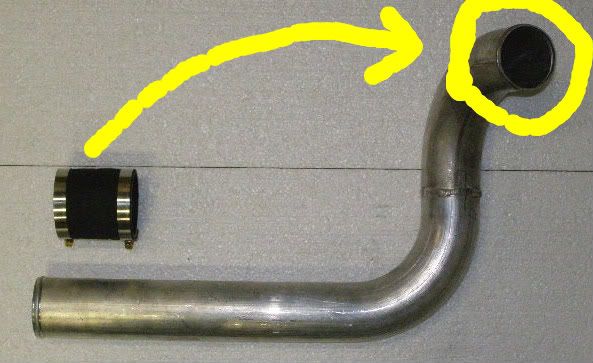
Now that you have the bov in the flange you can begin to assemble the new piping. First I would recommend installing the piping from bottom to top. You can do it however you choose. So starting from the bottom, grab a coupler (The rubber section) and two clamps (Metal rings which have a screw attached). Your piping color will vary depending on which color you ordered.
Next I would put the coupler on the charge pipe first, adjust the clamp to a good location, close to the edge of the coupler, and tighten it. Do not over tighten.
After the coupler is secure I would feed the pipe downward through the top of the engine bay into the hole where your old piping used to be. You will need to turn the pipe and angle it in various ways to make it to the bottom.
Once you get the pipe down through the bottom, crawl back under the car. If you have another person helping you I would advise them to hold the top of the pipe for you. Slide the coupler from the charge pipe onto the intercooler pipe. But make sure that you have the second clamp, and put it on the left side of the coupler, on the intercooler pipe. Once you get the coupler slid over enough onto the intercooler pipe, tighten the clamp but don't overdue it.
Step # 13
Now that you have the bottom of the new charge pipe connected to the intercooler pipe, crawl back out and go to the engine bay. Don't put back together the shield underneath yet, because you might have to go back underneath for adjustments. Now you will need your upper pipe that may or may not have a flange for the bov.
Now that you have these, install the coupler with one of the clamps onto that lower piping piece you just installed.
Now that you have the coupler on with the clamp, tighten the clamp make sure its low enough on the coupler. After that is tightened, insert the pipe that may or may not have a flange, which is the pipe pictured above. Stick the lower pipe into the coupler and make sure you have the clamp on before you put the pipe into the coupler.

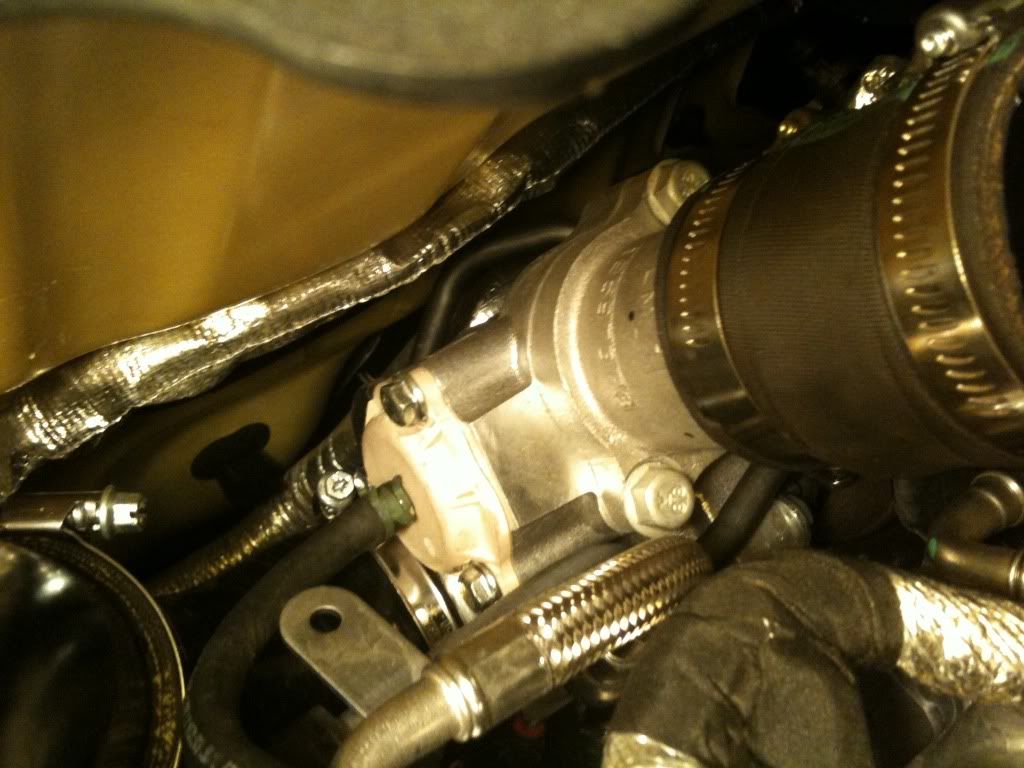
After you have that pipe into the coupler, just tighten the clamp a little because you may need room to wiggle the pipe later. But make sure later on you to remember tighten it! Next put the coupler and clamp on the other end of the pipe. Tighten the clamp. Next you will want to install the U bend pipe. I would recommend putting the clamp on the bottom of it and the secure that onto the top of the turbo and then tighten it.

Step # 14
After you have secured the small U shaped pipe onto the turbo, slide the end of that pipe into the coupler connected to the pipe that already may have a flange on it, or also called the upper piping piece. Make sure that you have the clamp on it before you connect them.
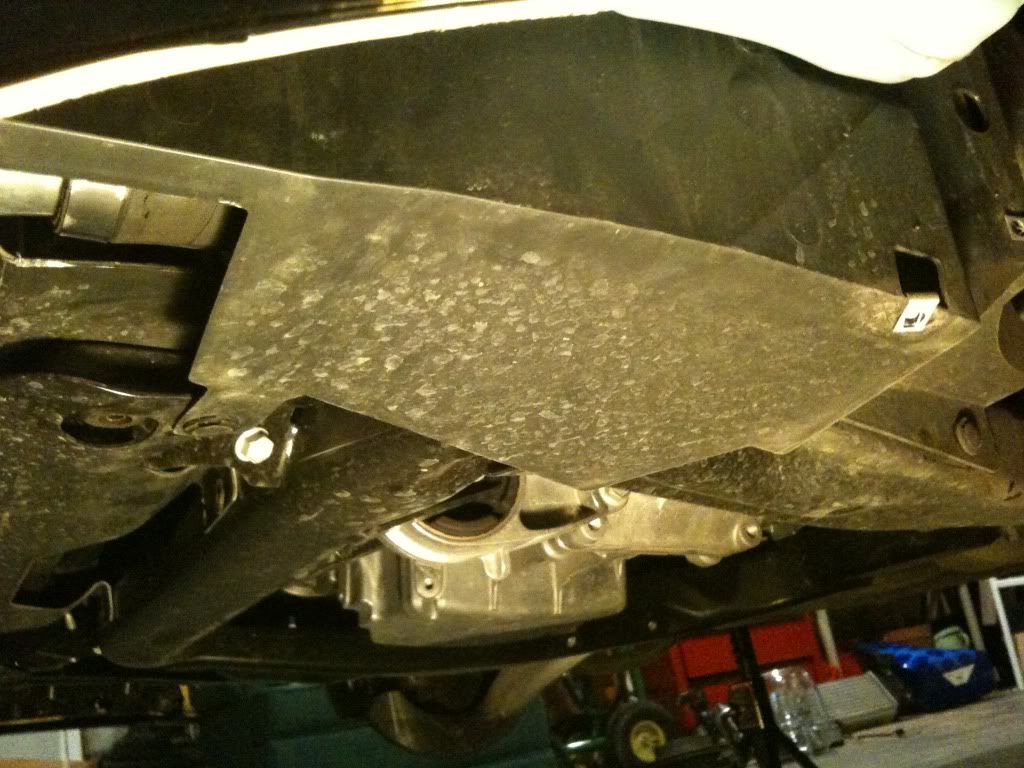
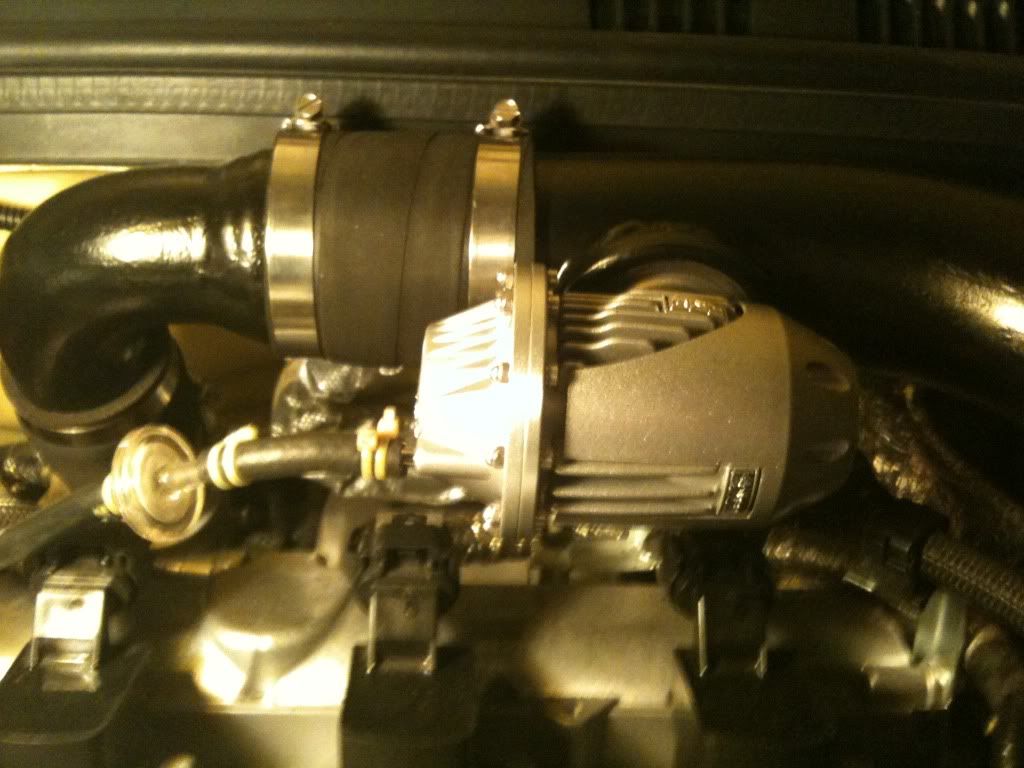
Tighten the clamp, and now all of your piping should be connected. You may have to loosen some of the clamps and push the piping together more to get the piping to be flat so that it doesn't rub on your hood. Now it should look like this minus the tubing for the bov, which I will get to next. Now if all the piping is secure and looks good, make sure to go over and tighten all the clamps. And don't forget to re-install the shield underneath the car.
Step # 15
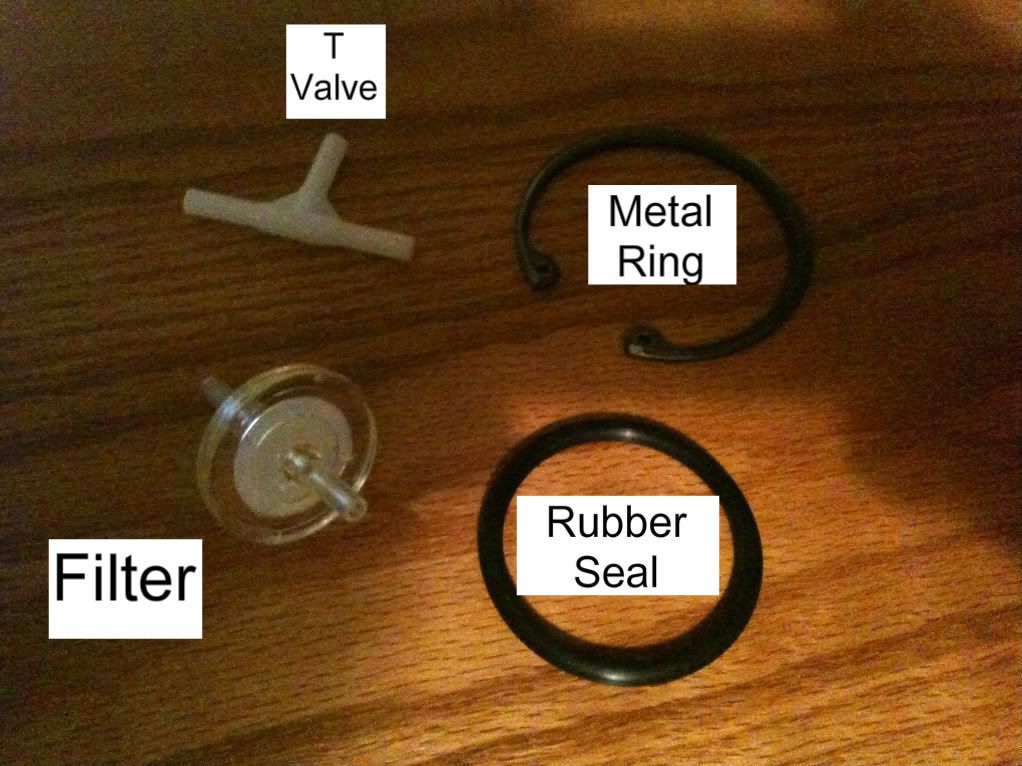
OK congrats! Now you have the piping put on. But if you bought a blow off valve it's not over yet. Your bov should already be tight in place in the piping. Now you will need your scissors, zip ties, pliers, and a couple feet of vacuum hose. Also you will need the T valve and the filter which are pictured above with the rubber seal and the metal ring.
Step # 16
So the first step will be to disconnect your vacuum hose from the stock bypass valve nipple.
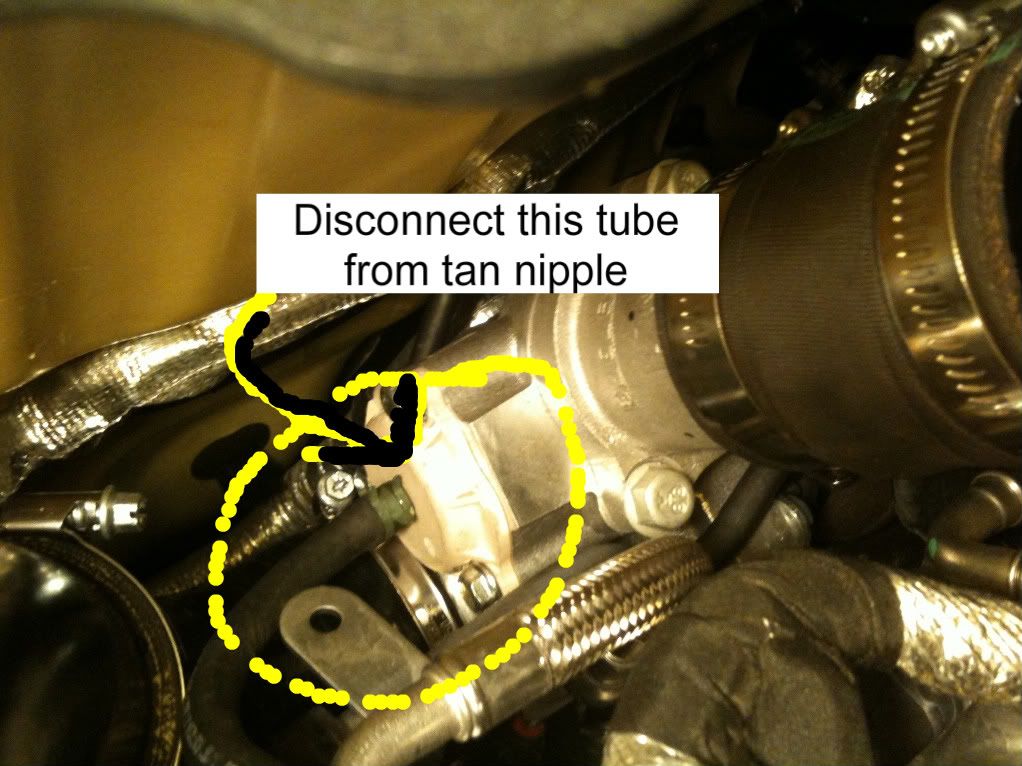
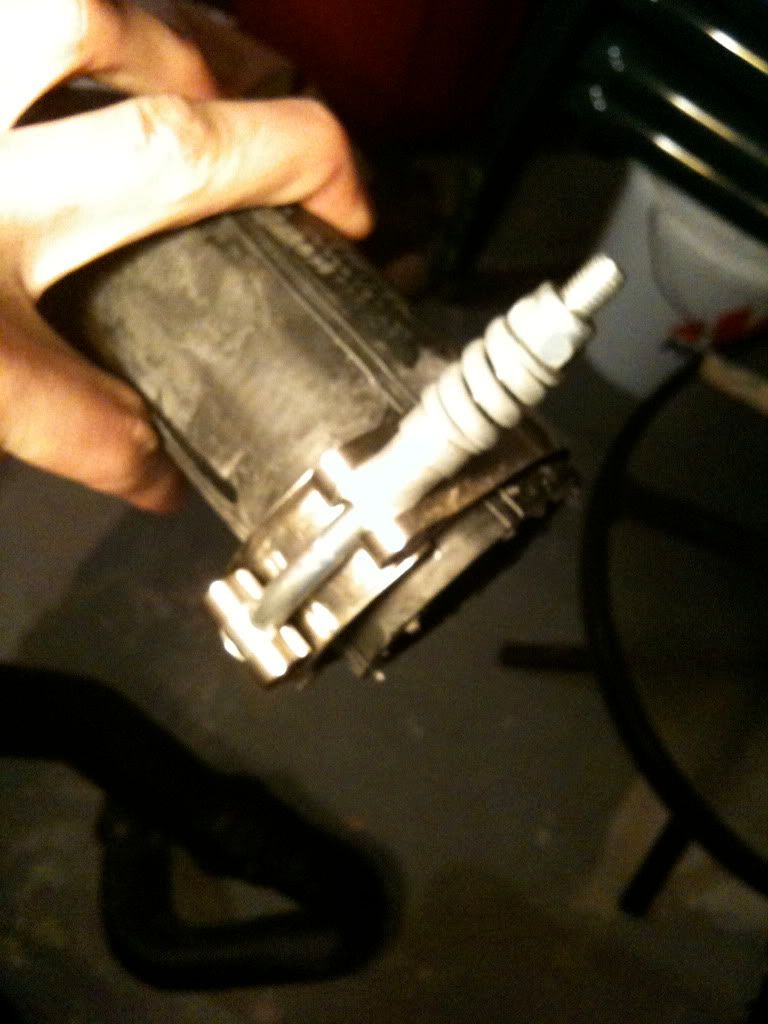
This tube you will then use to connect to your bov. But before you connect that, you will need to cut a small section of vacuum hose about 2" or so, from the two or three feet extra you bought. Slide the filter into the end of the hose you just dis-connected from the bypass valve nipple, and use a zip tie and pliers to secure the filter inside that vacuum hose. Then on the other side of the filter install the small piece of tube you cut about 2", again use your zip tie to secure. Next connect the other side of that small vacuum hose to the nipple of your bov, and use a zip tie to secure it. When your done it should look like this.
Step # 17
Now that you have the tubing for you bov connected, you will need to grab your T valve and scissors. In the picture below you can see where I cut the vacuum hose and insert the T Valve. Use zip ties to connect all the tubing. The diagram shows you which hose leads where.
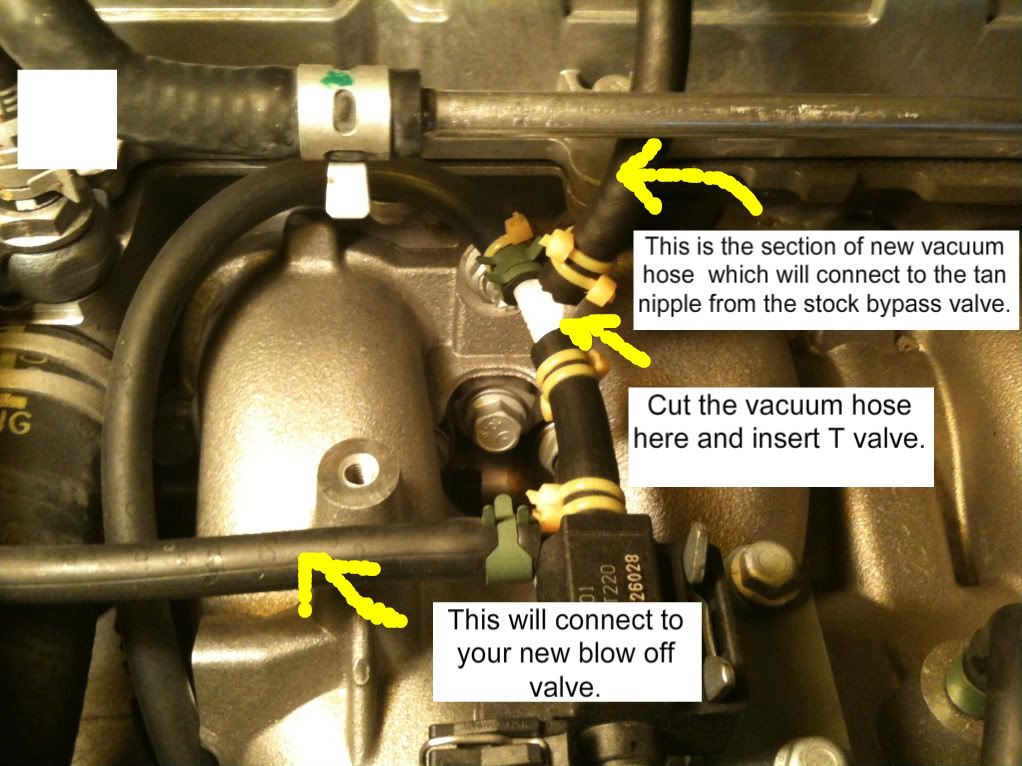
So after you have secured all the hoses to the T valve and connected the vacuum hose to the stock tan bypass valve nipple, your all done connecting the hoses!!! You can adjust the hoses as needed. I ran my bov hose along the side of the valve cover and ran the hose from the stock bypass valve nipple to the T valve across the valve cover.
After installation, remove jack stands with caution and refer to the manufactures manual on how to do so. You may throw a code after installation from connecting the bov. This happened to me and I believe is normal in the fact that when you install the bov that happens. But by getting a tune, you will delete this code. After car is safely on the ground. Reconnect the battery, if you had disconnected it. Start your car and let it idle. Rev your engine and check for any leaks. Now you should have the sweetness of HKS if all was done properly. If anyone is confused feel free to pm me. Or if you have any other questions, even if you think they sound stupid. Also I was limited to only 25 photos. Thanks Guys and i hope this will help!
Sean.
Tools you will need:
1) Two flat head screwdrivers
2) Ratchet set (small)
3) Scissors or razor cutter
4) Snap ring pliers ( Go to Sears and get heavy duty ones)
5) Zip ties
6) Pliers
7) Hex or star shaped socket
8) Portable Light source.
9) A couple feet of 7/32" Vacuum hose. Maybe 5 feet to be safe.
(Caution I would strongly recommend disconnecting you battery before installation)
Step #1
Remove the torx screw, hex screw, or star shaped screw. It looks like a star it will be located under the stock charge piping. It may take a while depending on the tool you will be using, but just be patient. If you don't care about keeping the stock piping to put back on in the future, then the simple way would be to cut it off.
Step # 2
Once you have gotten that screw out, the next step will be to loosen the clamp holding the charge piping to the turbo. Not sure what the size it is but i'm sure you'll figure it out .
(Note your clamp will look slightly different because this is already the clamp from dejon)
Step # 3
Once you have the top clamp loose of the charge piping, you will need to jack the front end of your car up. I highly recommend using jack stands for this.
Step # 4
After your car has been jacked up, you will need to lay down underneath the car and you should have a light source handy. Once under the car it should look like this.
Step # 5
Now you will need your two flathead screwdrivers for this. There will be two little slots on the plastic clip, which I have pictured below. Insert one of the flatheads into one side and the other flathead into the other. One on the top, one on the bottom of the plastic clip. Using equal pressure, carefully pull outwards until center pin comes out. Then using your fingers or screwdriver pull out larger plastic clip.
Step # 6
Once you pull that plastic piece out, you might need to also remove the small screw holding the plastic fender well in. This would be located on the right side of the shield.
Step # 7
After that is removed if needed, you will then need to pull the plastic shield out from the front of the bumper. It may take some twisting and turning. After you get the front fin like shaped piece pulled out, the rest of the shield will come down pretty easy by grabbing in and gently pulling it down.
Step # 8
Once the plastic shield has been pulled down you will see the clamp where the lower charge piping and the intercooler meet. You will need to loosen that clamp using one of your sockets. After loosening it, grab the intercooler pipe and the charge pipe and begin to wiggle and pull them apart from each other.
(Again your clamp and intercooler pipe may look different because i have a different set up)
Step # 9
Once you have the intercooler tube and the charge pipe disconnected from each other, you can crawl out from underneath and proceed to the engine bay. Once you get back up there finish taking off the charge piping connected to the turbo by wiggling and pulling the upper charge piping. After you get that taken off, after some twisting and turning you should be able to pull the charge piping out of the engine bay by pulling it upwards. It should look like this after taken off.
Step # 10
Good job, now you got the old ugly charge piping out and now it's time to put in the new charge piping you bought. Now some charge piping depending on where you bought it from, will have less tubing or more. I believe the Injen is one or two pieces. And Dejon, Hahn, and synapse are four. Correct me if i'm wrong. Not sure about CIA or Genuinesaab, and any others i'm forgetting lol. So for now i will be referring to the Dejon, because the people who bought that product have asked me to do this for them. No offense to any other vendors.
Step # 11
Getting back, lets start putting the new charge piping on now. The kit should have come with three pipes and four clamps. ( These pictures were taken from the dejon website, http://cobalt.dejonpowerhouse.com)
Now if you have bought a blow off valve, now would be the time to install it into the flange in the piping. ( Picture was taken from dejon website, http://cobalt.dejonpowerhouse.com)
First you will want to put that rubber seal into the grove in the flange. Next you will want to slide that metal ring around the base of the HKS BOV, and make sure the side which has groves extending outwards faces down to ensure proper seal. That information should have came in a handout with your purchase of the HKS. Refer to that if confusion.
After you have the metal ring around the bov, you will need to grab your snap ring pliers. Again i highly recommend getting the ones i bought from Sears because the are very strong. Set the pliers using the little knob, so that they are completely open so that when you squeeze them, the two tips move closer together. Place the bov into the flange on top of the rubber seal. Insert the two tips into the small holes in the metal ring. Start to compress the rings until the tips of the rings touch or get really close. Then push the front of the metal ring into the flange, and while one hand holds the pliers together use the other hand to push the back of the metal ring into the flange and then release the pressure from the pliers. This may take some time, and once you think you may have it try to twist the bov in place. It should be tight and move little if at all.
Step # 12
Now that you have the bov in the flange you can begin to assemble the new piping. First I would recommend installing the piping from bottom to top. You can do it however you choose. So starting from the bottom, grab a coupler (The rubber section) and two clamps (Metal rings which have a screw attached). Your piping color will vary depending on which color you ordered.
Next I would put the coupler on the charge pipe first, adjust the clamp to a good location, close to the edge of the coupler, and tighten it. Do not over tighten.
After the coupler is secure I would feed the pipe downward through the top of the engine bay into the hole where your old piping used to be. You will need to turn the pipe and angle it in various ways to make it to the bottom.
Once you get the pipe down through the bottom, crawl back under the car. If you have another person helping you I would advise them to hold the top of the pipe for you. Slide the coupler from the charge pipe onto the intercooler pipe. But make sure that you have the second clamp, and put it on the left side of the coupler, on the intercooler pipe. Once you get the coupler slid over enough onto the intercooler pipe, tighten the clamp but don't overdue it.
Step # 13
Now that you have the bottom of the new charge pipe connected to the intercooler pipe, crawl back out and go to the engine bay. Don't put back together the shield underneath yet, because you might have to go back underneath for adjustments. Now you will need your upper pipe that may or may not have a flange for the bov.
Now that you have these, install the coupler with one of the clamps onto that lower piping piece you just installed.
Now that you have the coupler on with the clamp, tighten the clamp make sure its low enough on the coupler. After that is tightened, insert the pipe that may or may not have a flange, which is the pipe pictured above. Stick the lower pipe into the coupler and make sure you have the clamp on before you put the pipe into the coupler.
After you have that pipe into the coupler, just tighten the clamp a little because you may need room to wiggle the pipe later. But make sure later on you to remember tighten it! Next put the coupler and clamp on the other end of the pipe. Tighten the clamp. Next you will want to install the U bend pipe. I would recommend putting the clamp on the bottom of it and the secure that onto the top of the turbo and then tighten it.
Step # 14
After you have secured the small U shaped pipe onto the turbo, slide the end of that pipe into the coupler connected to the pipe that already may have a flange on it, or also called the upper piping piece. Make sure that you have the clamp on it before you connect them.
Tighten the clamp, and now all of your piping should be connected. You may have to loosen some of the clamps and push the piping together more to get the piping to be flat so that it doesn't rub on your hood. Now it should look like this minus the tubing for the bov, which I will get to next. Now if all the piping is secure and looks good, make sure to go over and tighten all the clamps. And don't forget to re-install the shield underneath the car.
Step # 15
OK congrats! Now you have the piping put on. But if you bought a blow off valve it's not over yet. Your bov should already be tight in place in the piping. Now you will need your scissors, zip ties, pliers, and a couple feet of vacuum hose. Also you will need the T valve and the filter which are pictured above with the rubber seal and the metal ring.
Step # 16
So the first step will be to disconnect your vacuum hose from the stock bypass valve nipple.
This tube you will then use to connect to your bov. But before you connect that, you will need to cut a small section of vacuum hose about 2" or so, from the two or three feet extra you bought. Slide the filter into the end of the hose you just dis-connected from the bypass valve nipple, and use a zip tie and pliers to secure the filter inside that vacuum hose. Then on the other side of the filter install the small piece of tube you cut about 2", again use your zip tie to secure. Next connect the other side of that small vacuum hose to the nipple of your bov, and use a zip tie to secure it. When your done it should look like this.
Step # 17
Now that you have the tubing for you bov connected, you will need to grab your T valve and scissors. In the picture below you can see where I cut the vacuum hose and insert the T Valve. Use zip ties to connect all the tubing. The diagram shows you which hose leads where.
So after you have secured all the hoses to the T valve and connected the vacuum hose to the stock tan bypass valve nipple, your all done connecting the hoses!!! You can adjust the hoses as needed. I ran my bov hose along the side of the valve cover and ran the hose from the stock bypass valve nipple to the T valve across the valve cover.
After installation, remove jack stands with caution and refer to the manufactures manual on how to do so. You may throw a code after installation from connecting the bov. This happened to me and I believe is normal in the fact that when you install the bov that happens. But by getting a tune, you will delete this code. After car is safely on the ground. Reconnect the battery, if you had disconnected it. Start your car and let it idle. Rev your engine and check for any leaks. Now you should have the sweetness of HKS if all was done properly. If anyone is confused feel free to pm me. Or if you have any other questions, even if you think they sound stupid. Also I was limited to only 25 photos. Thanks Guys and i hope this will help!
Sean.
Last edited by skuruc; Feb 10, 2010 at 10:12 AM.

Just a side note, if you don't mind getting dirty jacking the car is not needed.
I installed a full dejon pipe set and dejon intake by myself in less than 45 minutes without ever jacking the car, and I'm a 265lb fatbody....
Oh, and also, in before the move!
I installed a full dejon pipe set and dejon intake by myself in less than 45 minutes without ever jacking the car, and I'm a 265lb fatbody....
Oh, and also, in before the move!


For the block off plate, all you do is take off the three bolts holding the tan bypass valve coer inplace. And replace it with the block off plate. You will need to take out your intake to make it easier but you dont have to. And so you just didnt disconnect the hose from the nipple? How does it sound?

Senior Member
Joined: 08-02-07
Posts: 841
Likes: 1
From: VA
okay... so i feel like 1/4 inch hose is too large... it doesnt fit on the t-valve tightly? it fits on the filter but not the t valve tight
nor on the nipple of the bov its not tight on there...
nor on the nipple of the bov its not tight on there...
Last edited by SC cobaltss15; Feb 9, 2010 at 10:32 PM. Reason: Automerged Doublepost
7/32" hose fits te vacuum lines good, but on my hks bov its a little big. It works though. Also, with mine I threw a code. I didn't get a number from autozone, but something about the bpv. I know it doesn't help much. Anyone else get this? Car runs great though. I love it.
Senior Member
Joined: 08-02-07
Posts: 841
Likes: 1
From: VA
i wanna say my car runs well..like power and everything is still awesome! but like my blow off valve flutters badly...and like if i get on it, my friends that follow me say black smoke comes out and it smells like gas..

Senior Member
Joined: 09-25-09
Posts: 2,753
Likes: 0
From: Memphis, TN
So I installed mine just right with no rub. Then I took my car in for some work where they removed it and reinstalled it and now a spot of powdercoating about half the size of a dime is gone. So basically GM fucked up my ****.