
Electrical: 12 volt power tap and grounding for accessories


Thread Starter
New Member
Joined: 06-06-05
Posts: 114
Likes: 0
From: asdf
12 volt power tap and grounding for accessories
Heres my how-to for obtaining a 12v switched or continuous source and a place for ground.
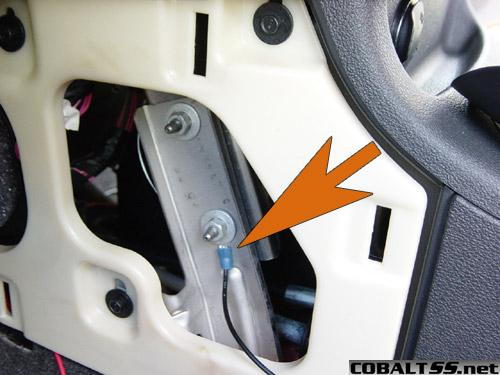
First pull off both side panels on the upper console area as shown in my Dashboard Disassembly how-to.
The driver side will give you access to a good grounding stud and a source for 12v continuous power. To access the 12v continuous power, reach up and behind the 12v accessory plug. You will feel a small two wire harness coming from it. The harness has two wires, one black (ground) and one red (power).

From here you can cut and splice in your wiring to power your accessories. Your power tap will remain hidden behind the console panel and if you choose to you can still retain the use of your 12v accessory plug.
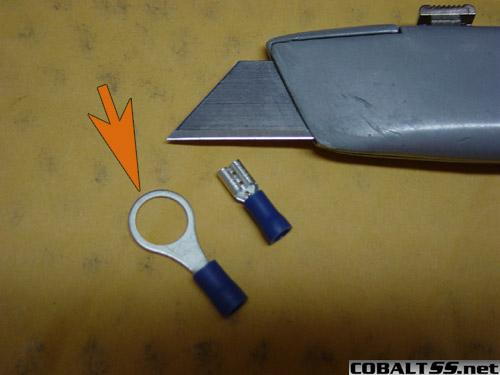
On this same side we will connect our black ground wire. You will see a metal frame member plainly visible with two studs and two nuts. Both of these provide a good grounding location. A 10mm metric socket is needed to remove the nut. And a 14-16 gauge clamp on ring will work well here.
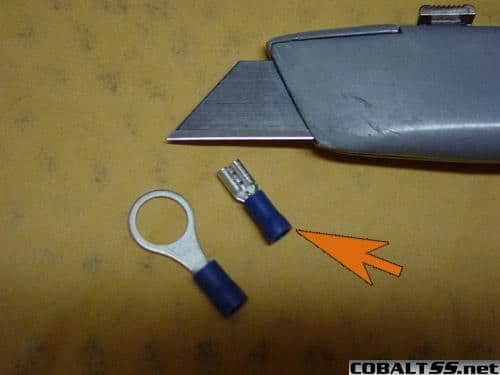
If you need a 12v switched source (only on when key is in the accessory or run position) go over to the passenger console side panel. Behind this panel is one of the fuse panels on the car. On the panel itself is a diagram of which fuse controls what and its rating. I chose to use the sun roof fuse. To get power out of the fuse while the fuse is inserted we will need a power tap. Simply slide it over one and up of the blades on the fuse, then insert back into the fuse panel. Now we have a easy connection point for a 14-16 gauge quick connector.

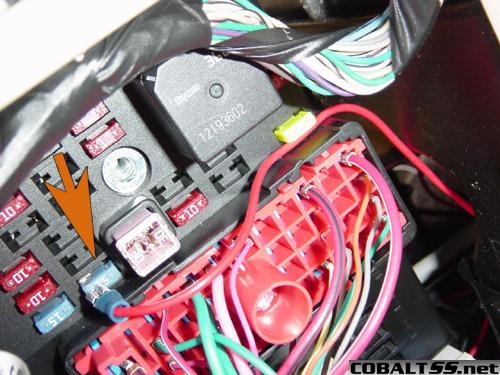
Tip: On the fuse block itself is a long white tool for removing fuses. Its below the red portion with all the wires and is also noted on the fuse panel diagram.
First pull off both side panels on the upper console area as shown in my Dashboard Disassembly how-to.
The driver side will give you access to a good grounding stud and a source for 12v continuous power. To access the 12v continuous power, reach up and behind the 12v accessory plug. You will feel a small two wire harness coming from it. The harness has two wires, one black (ground) and one red (power).
From here you can cut and splice in your wiring to power your accessories. Your power tap will remain hidden behind the console panel and if you choose to you can still retain the use of your 12v accessory plug.
On this same side we will connect our black ground wire. You will see a metal frame member plainly visible with two studs and two nuts. Both of these provide a good grounding location. A 10mm metric socket is needed to remove the nut. And a 14-16 gauge clamp on ring will work well here.
If you need a 12v switched source (only on when key is in the accessory or run position) go over to the passenger console side panel. Behind this panel is one of the fuse panels on the car. On the panel itself is a diagram of which fuse controls what and its rating. I chose to use the sun roof fuse. To get power out of the fuse while the fuse is inserted we will need a power tap. Simply slide it over one and up of the blades on the fuse, then insert back into the fuse panel. Now we have a easy connection point for a 14-16 gauge quick connector.
Tip: On the fuse block itself is a long white tool for removing fuses. Its below the red portion with all the wires and is also noted on the fuse panel diagram.


New Member
Joined: 08-16-06
Posts: 127
Likes: 0
From: MI
Originally Posted by Xavipheus
Isnt that tap on the wrong side? I thought it goes on the right side?

Member
Joined: 01-28-06
Posts: 376
Likes: 0
From: Des Moines, Iowa
Originally Posted by udmsvt
i was wondering the same thing. i just read a dif thread on here about tapping the "right" (being front) blade of the fuse. can anyone clarify?
Well I just installed my Radar detector & used this how to for wiring & the front side of the fuse is always hot so to keep your circut fused you want to put the spade just where it is in the pic

one side note the two spots above the sun roof are spares & work great to add things same as you did on the sunroof just pop a fuse in one of the spares & wala as thats what I did
Great write up Thanks !!!!!1
Last edited by SS Gordon; Oct 3, 2006 at 05:54 AM.
Member
Joined: 03-06-07
Posts: 219
Likes: 0
From: chicago, il
What is the power wire currently used for. in case of mistakes, what will go bad? and can some one clarify if the lights will go out when the car is off. and would go on only if the headlight switch is on and/or ignition is on or run?


Senior Member
Joined: 09-15-06
Posts: 689
Likes: 0
From: Dirty Jerz
ok if you use the Fuse tap method,you would use the this as your postive red wire as far negative aka ground i would need to use the bolt on the other side correct?
Im looking to power in the car neons, as far as a switch i would put that switch on the Red wire correct, not on the ground?
so the two ports above the sunroof fuse are spares and givbe 12v and can be used by just sticking a fuse in and use the above method?
Im looking to power in the car neons, as far as a switch i would put that switch on the Red wire correct, not on the ground?
so the two ports above the sunroof fuse are spares and givbe 12v and can be used by just sticking a fuse in and use the above method?

Senior Member
Joined: 01-23-08
Posts: 2,920
Likes: 0
From: Cape Coral, FL
so to wire my interior leds, i would tap into a fuse that has power while the car is on, then run that to a switch then the switch to my led tubes...... and then just run the ground from my led tubes to some bare metal?


