Interior: 3 Gauge A Pillar Install w/ Dual Interceptors


3 Gauge A Pillar Install w/ Dual Interceptors
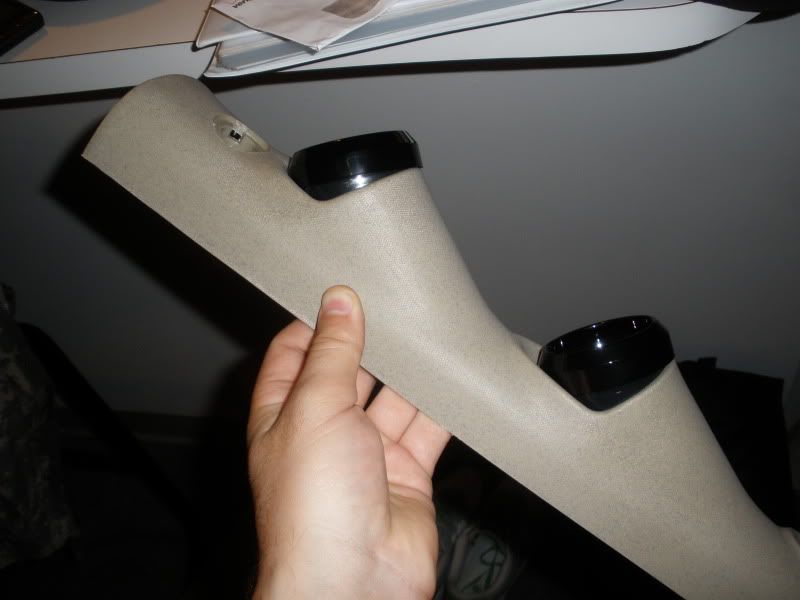
I decided to make a little how-to for installing the triple gauge A pillar with stock boost gauge and dual aeroforce interceptor gauges. Difficulty would be about a 2 on a scale of 1-10 with 10 being the hardest.
Here is a before picture.

First you need to pry out the little plastic clip that says air bag on it. Don’t worry it isn’t your air bag and taking it out won’t deploy anything.

Now take out the screw securing the pillar to the car with a small star bit wrench. I am not completely sure of the size but it is pretty small.

Next I got my fingers behind the plastic pillar and pulled starting from the top towards the center of the car. I had to use a little bit of force to get the metal clips to pop free. Working my way down to the middle and the bottom I was able to free all three clips attaching it to the metal beam.

Before you can completely remove the pillar you need to disconnect the boost gauge wires. Just use your fingernail or a small flat head to get under the clip and pry it out.


Then I removed the metal clip attached to the plastic hold and removed the two nuts from the bolt posts. I used 11/32” socket to loosen the nuts but they weren’t very tight, you could get by with using your fingers to loosen it. Then simply pull the boost gauge out the front of the pillar.

Now you can take the metal clips off the stock pillar and put them on your new pillar. This was the hardest part I encountered during the install. The clips have 4 feet or teeth that dig itself into the plastic as you pull up on them. So I used 2 flat heads to get behind the teeth and was able to pull it off fairly easily after that.

Now it is time to install the gauges into the pillar. I put the stock boost back in the same position, as that is the only hole it would fit into. Simply align the bolts into the plastic guides and tighten the nuts to secure it in place. Next position the interceptors at the angle you would like and tighten the metal clasp so that they do not fall forward or twist in place.


Next I had to run the wires for the new gauges to be hooked up to the OBD2 port just under the compartment under the left side of the dash. I found it difficult to push the wires up so I fed some fishing line down from the opening in the top and wrapped it around the wires so that I could just pull them up.


Then I just clipped in the connectors to the bottom port on the gauges and tucked the excess wire into the dash.

Now it is time to install the new pillar with gauges into position. I started from the bottom working my way up. Positioning the bigger bottom piece in place was a bit tricky but once it was behind the dash it was simple. Then make sure the wires are tucked out of the way and will not be pinched or squashed by the clips. I positioned the pillar so that the metal clips aligned to the holes in the frame and pressed firmly to lock it into place. Then pushed the top clip in. Now all you have to do is screw in the bolt and put the plastic cover back on.


Now turn your car on and program the gauges to display what parameters you want to be displayed.
Here is a before picture.
First you need to pry out the little plastic clip that says air bag on it. Don’t worry it isn’t your air bag and taking it out won’t deploy anything.
Now take out the screw securing the pillar to the car with a small star bit wrench. I am not completely sure of the size but it is pretty small.
Next I got my fingers behind the plastic pillar and pulled starting from the top towards the center of the car. I had to use a little bit of force to get the metal clips to pop free. Working my way down to the middle and the bottom I was able to free all three clips attaching it to the metal beam.
Before you can completely remove the pillar you need to disconnect the boost gauge wires. Just use your fingernail or a small flat head to get under the clip and pry it out.
Then I removed the metal clip attached to the plastic hold and removed the two nuts from the bolt posts. I used 11/32” socket to loosen the nuts but they weren’t very tight, you could get by with using your fingers to loosen it. Then simply pull the boost gauge out the front of the pillar.
Now you can take the metal clips off the stock pillar and put them on your new pillar. This was the hardest part I encountered during the install. The clips have 4 feet or teeth that dig itself into the plastic as you pull up on them. So I used 2 flat heads to get behind the teeth and was able to pull it off fairly easily after that.
Now it is time to install the gauges into the pillar. I put the stock boost back in the same position, as that is the only hole it would fit into. Simply align the bolts into the plastic guides and tighten the nuts to secure it in place. Next position the interceptors at the angle you would like and tighten the metal clasp so that they do not fall forward or twist in place.
Next I had to run the wires for the new gauges to be hooked up to the OBD2 port just under the compartment under the left side of the dash. I found it difficult to push the wires up so I fed some fishing line down from the opening in the top and wrapped it around the wires so that I could just pull them up.
Then I just clipped in the connectors to the bottom port on the gauges and tucked the excess wire into the dash.
Now it is time to install the new pillar with gauges into position. I started from the bottom working my way up. Positioning the bigger bottom piece in place was a bit tricky but once it was behind the dash it was simple. Then make sure the wires are tucked out of the way and will not be pinched or squashed by the clips. I positioned the pillar so that the metal clips aligned to the holes in the frame and pressed firmly to lock it into place. Then pushed the top clip in. Now all you have to do is screw in the bolt and put the plastic cover back on.
Now turn your car on and program the gauges to display what parameters you want to be displayed.
Last edited by orbalt08; Aug 30, 2009 at 10:04 AM. Reason: Moved picture files




Member
Joined: 09-19-08
Posts: 211
Likes: 0
From: Yates/Carlton - Lyndonville
No, not the gauge itself. I was referring to the gauge pod, my bad. I'm hoping I'm not going to have a fitting issue with the AEM wideband gauge that I'm getting. It looks like if I really wanted to, I could VERY carefully take a dremel to the portion of the gauge pod that needs to be trimmed for clearance. As it is right now, with the Interceptor kind of shoved in the pod I can't even get the bracket on the back of the gauge.

No, not the gauge itself. I was referring to the gauge pod, my bad. I'm hoping I'm not going to have a fitting issue with the AEM wideband gauge that I'm getting. It looks like if I really wanted to, I could VERY carefully take a dremel to the portion of the gauge pod that needs to be trimmed for clearance. As it is right now, with the Interceptor kind of shoved in the pod I can't even get the bracket on the back of the gauge.

another questions...does anyone know if it is possible to wire a different gauge (AEM Digital Boost Gauge) using the stock boost gauge wires? Just curious.