
2.0 LNF Engine: Boost leak test a stock SS LNF.


Thread Starter
Senior Member
Joined: 06-22-09
Posts: 5,989
Likes: 7
From: Kathmandu
Boost leak test a stock SS LNF.
I have a lot of guys PM'ing me about boost leak testing. It's easy, so here's how to do it........
Things you're gonna need:
1) Home Depot 1-1/4 PVC elbow - $1.87 (Make sure one end has outer diameter of about 1-1/2" and the other has an outer diameter of about 2".)
2) Home Depot 1-1/4 S PVC Cap - $0.72
3) 7/16" drill bit - $5.77
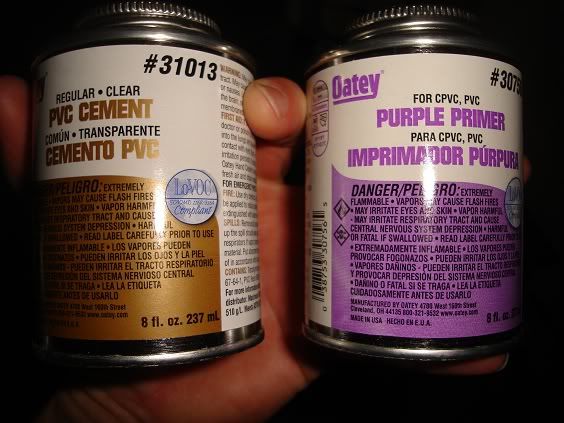
4) PVC pipe primer and glue - $6.77
5) 1/4" NPT X 1/4" air quick disconnect - $1.98
6) 6-pack of Bud Light - $5.65
Total: $22.76
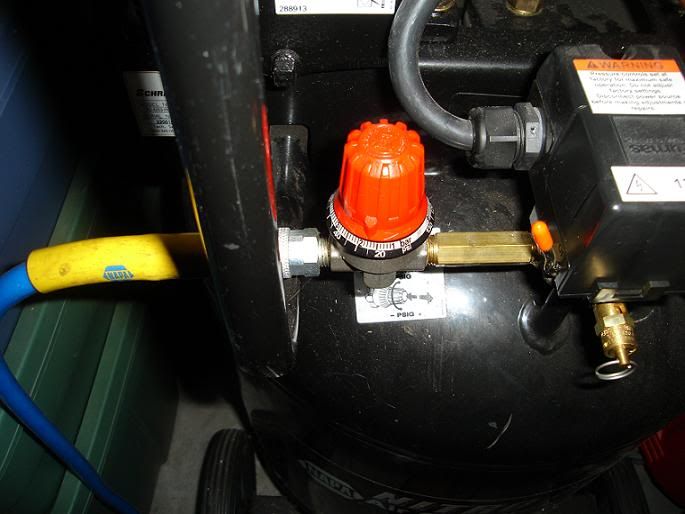
You will also need a source of compressed air and a regulator to regulate the amount of pressure you will be supplying to your precious LNF charge piping system. I didn't include the price of this stuff because it's too expensive to go and buy to just do a simple boost leak test in this manner. Instead of installing the air fitting I listed above, you can actually install a valve stem and use a compressed air tank or bike pump to supply the air pressure. That procedure is not covered here. This procedure is for real men that have tools.
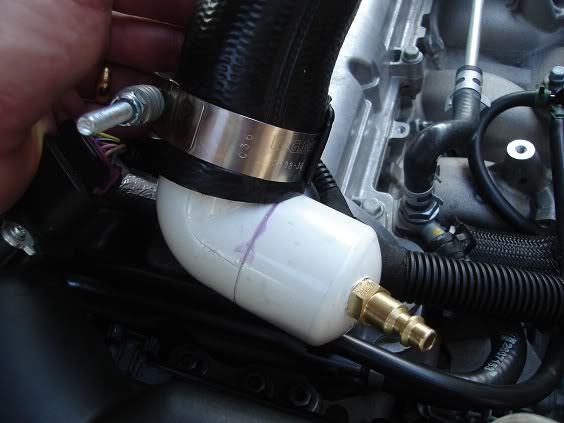
After you drink a beer, you need to first build the boost leak testing jig:
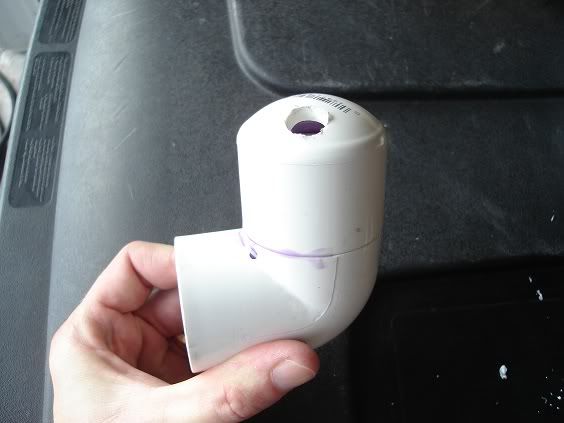
1) Drill a 7/16" hole in your PVC cap.
2) Using your PVC primer, prime both the parts of the PVC elbow and cap.
3) Using your PVC cement, glue together the cap and elbow. If you aren't familiar with PVC primer/cement and how to use them, I'm taking your man-card away. They look like this:
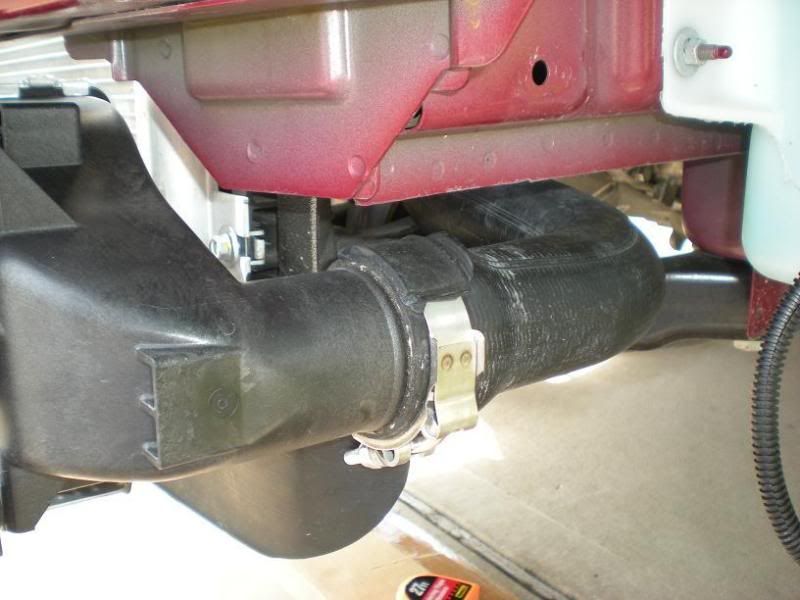
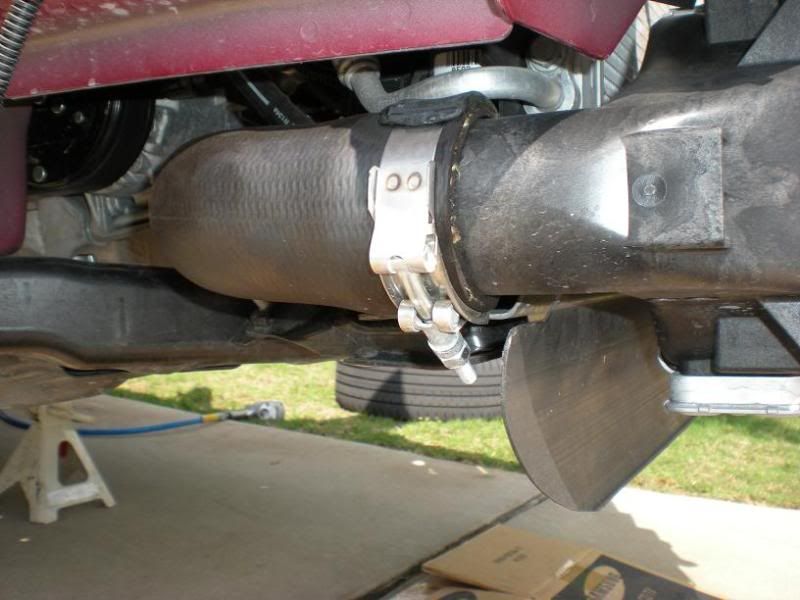
The stuff chemically bonds the PVC pieces together, so you're ready to use the jig immediately. It looks like this:
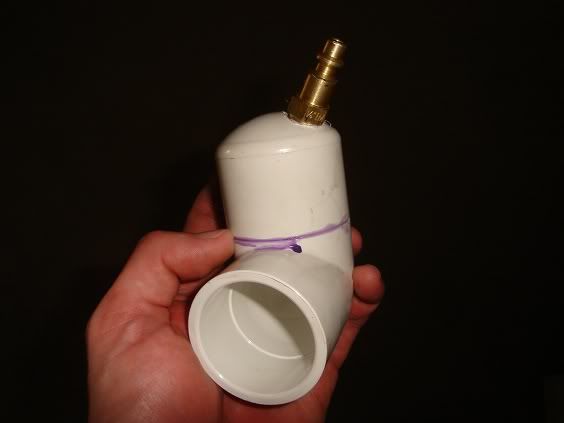
4) Screw the 1/4" air fitting into the 7/16" hole that you drilled. This is probably the hardest part of the whole procedure, unless you want to splurge for a tap. Just muscle it in there with a 9/16" shallow socket and 1/2" ratchet. You now have a boost leak jig for a stock LNF.
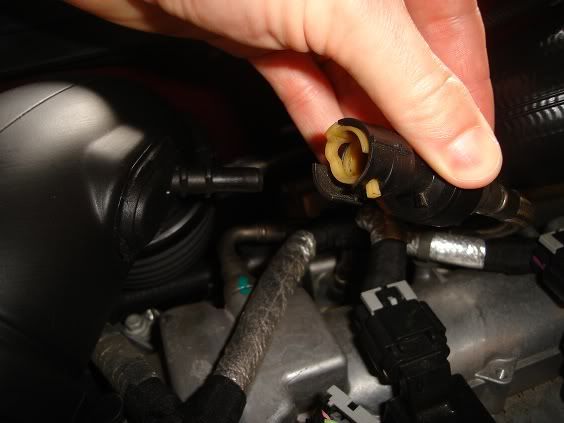
5) Now get under the hood and unhook the PCV tube. You're gonna be working around it and it's as fragile as a wine glass, so unhook it to be safe.
6) Unscrew the oil filler cap on the valve cover. Don't ask me why, it's just leftover stuff from my old DSM days. Just do it.

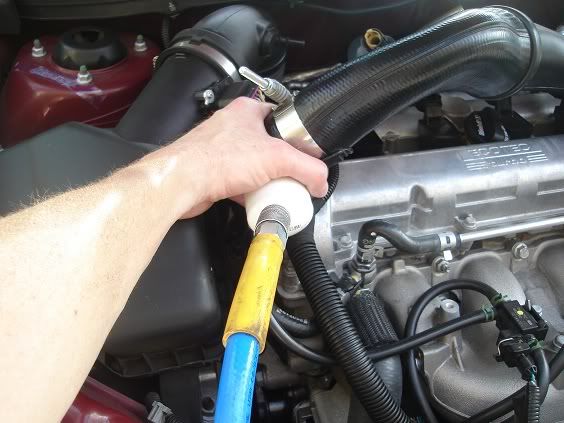
7) Unsrew the hotside clamp at the turbo outlet and pull the hotside boost tubing away from the turbo. You can maneuver it out of the way without unbolting from that impossible-to-get-to mounting bolt on the driver's side of the block.
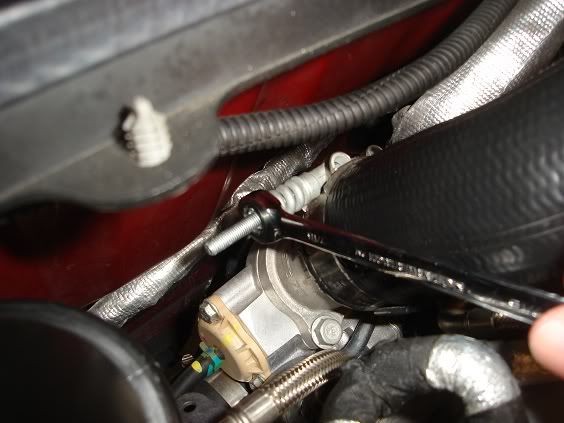
8) Cover turbo outlet with some kind of cap or shove a CLEAN rag in it. We don't want you dropping anything in your K04, now do we?
9) Drink a beer and fire up the air compressor. You don't need a lot of tank pressure.
10) Insert the boost leak test jig into the hotside piping and tighten the clamp. Have a buddy hold the tubing in place for you so you don't touch the MAF wiring. You don't want MAF issues.
10) *****VERY IMPORTANT******Set your air pressure regulator to 20 to 26 PSI. The higher the pressure, the louder the hissing noise when you find a leak, but don't go over 26 PSI. Compressed air is very dangerous, so don't hurt yourself or your 'Balt.
11) With your regulator set, you're ready to hook up the air pressure to the jig. Have a buddy hold it for you when it's hooked up. Your buddy doesn't have to be white, like the pasty arm you see here.
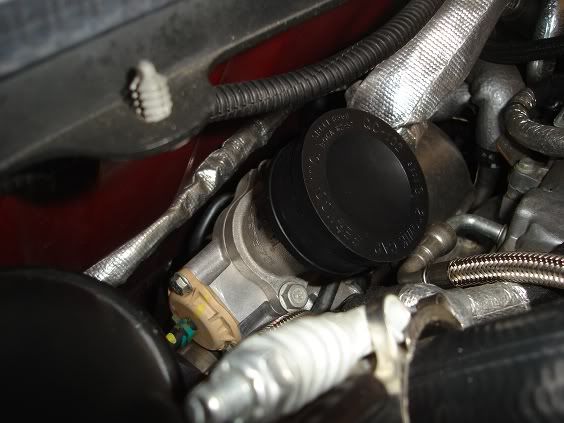
12) Listen for air hissing noises. If you hear any, the real work begins.
13) Drink the rest of your beer.
Usually, leaks are around the IC clamps, so you end up having to take off your bumper parts and sometimes the whole bumper cover. To properly test for even the smallest leaks, take the bumper cover off, fill a squirt bottle with soap and water (don't shake it...DUH!) and squirt all over the IC, the piping, and all connections. If you have a leak, it will foam up.
Now you can stop PM'ing me.

Things you're gonna need:
1) Home Depot 1-1/4 PVC elbow - $1.87 (Make sure one end has outer diameter of about 1-1/2" and the other has an outer diameter of about 2".)
2) Home Depot 1-1/4 S PVC Cap - $0.72
3) 7/16" drill bit - $5.77
4) PVC pipe primer and glue - $6.77
5) 1/4" NPT X 1/4" air quick disconnect - $1.98
6) 6-pack of Bud Light - $5.65
Total: $22.76
You will also need a source of compressed air and a regulator to regulate the amount of pressure you will be supplying to your precious LNF charge piping system. I didn't include the price of this stuff because it's too expensive to go and buy to just do a simple boost leak test in this manner. Instead of installing the air fitting I listed above, you can actually install a valve stem and use a compressed air tank or bike pump to supply the air pressure. That procedure is not covered here. This procedure is for real men that have tools.
After you drink a beer, you need to first build the boost leak testing jig:
1) Drill a 7/16" hole in your PVC cap.
2) Using your PVC primer, prime both the parts of the PVC elbow and cap.
3) Using your PVC cement, glue together the cap and elbow. If you aren't familiar with PVC primer/cement and how to use them, I'm taking your man-card away. They look like this:
The stuff chemically bonds the PVC pieces together, so you're ready to use the jig immediately. It looks like this:
4) Screw the 1/4" air fitting into the 7/16" hole that you drilled. This is probably the hardest part of the whole procedure, unless you want to splurge for a tap. Just muscle it in there with a 9/16" shallow socket and 1/2" ratchet. You now have a boost leak jig for a stock LNF.
5) Now get under the hood and unhook the PCV tube. You're gonna be working around it and it's as fragile as a wine glass, so unhook it to be safe.
6) Unscrew the oil filler cap on the valve cover. Don't ask me why, it's just leftover stuff from my old DSM days. Just do it.
7) Unsrew the hotside clamp at the turbo outlet and pull the hotside boost tubing away from the turbo. You can maneuver it out of the way without unbolting from that impossible-to-get-to mounting bolt on the driver's side of the block.
8) Cover turbo outlet with some kind of cap or shove a CLEAN rag in it. We don't want you dropping anything in your K04, now do we?
9) Drink a beer and fire up the air compressor. You don't need a lot of tank pressure.
10) Insert the boost leak test jig into the hotside piping and tighten the clamp. Have a buddy hold the tubing in place for you so you don't touch the MAF wiring. You don't want MAF issues.
10) *****VERY IMPORTANT******Set your air pressure regulator to 20 to 26 PSI. The higher the pressure, the louder the hissing noise when you find a leak, but don't go over 26 PSI. Compressed air is very dangerous, so don't hurt yourself or your 'Balt.
11) With your regulator set, you're ready to hook up the air pressure to the jig. Have a buddy hold it for you when it's hooked up. Your buddy doesn't have to be white, like the pasty arm you see here.
12) Listen for air hissing noises. If you hear any, the real work begins.
13) Drink the rest of your beer.
Usually, leaks are around the IC clamps, so you end up having to take off your bumper parts and sometimes the whole bumper cover. To properly test for even the smallest leaks, take the bumper cover off, fill a squirt bottle with soap and water (don't shake it...DUH!) and squirt all over the IC, the piping, and all connections. If you have a leak, it will foam up.
Now you can stop PM'ing me.
Last edited by TommyP; Apr 26, 2012 at 07:02 PM.
thanks for the howto.
you already showed me how in person, so just wanted to say thanks again!
i see you made a new boost checker.
thanks for the original one as well
+1 rep for sure.
also you should put this in your sig.
cause you know people will still ask you how to do it.
lmao.
you already showed me how in person, so just wanted to say thanks again!
i see you made a new boost checker.
thanks for the original one as well
+1 rep for sure.
also you should put this in your sig.
cause you know people will still ask you how to do it.
lmao.
Thread Starter
Senior Member
Joined: 06-22-09
Posts: 5,989
Likes: 7
From: Kathmandu

Last edited by SSlobalt; Jul 29, 2010 at 01:15 PM. Reason: Automerged Doublepost


New Member
Joined: 04-06-11
Posts: 99
Likes: 0
Very helpful post! I got to say, it took me about 4 hours to make the piece (apparently home depot and lowes were out of everything), and my drill did not have enough room to use a 7/16 bit so I had to do it with my hands lol. However, once it was made it took me less than an hour to test it and fix the leak. Much appreciated!
Thread Starter
Senior Member
Joined: 06-22-09
Posts: 5,989
Likes: 7
From: Kathmandu
Very helpful post! I got to say, it took me about 4 hours to make the piece (apparently home depot and lowes were out of everything), and my drill did not have enough room to use a 7/16 bit so I had to do it with my hands lol. However, once it was made it took me less than an hour to test it and fix the leak. Much appreciated!


Thread Starter
Senior Member
Joined: 06-22-09
Posts: 5,989
Likes: 7
From: Kathmandu
damnit. I can't edit it anymore. I need to change that last part where you have the buddy hold it. I guess I didn't tighten the clamp enough, or my jig got more slippery, but I did a check last week and my pipe popped off at 24 psi. It didn't do much but make noise, but I'd like to take that last part out about having someone hold it. Now, I'm just going to throw a towel over it so it doesn't send anything shooting around.
Good luck, Aaron. Don't let this post worry you. It really isn't a fireworks show if it pops off, or anything.
Good luck, Aaron. Don't let this post worry you. It really isn't a fireworks show if it pops off, or anything.


Thread Starter
Senior Member
Joined: 06-22-09
Posts: 5,989
Likes: 7
From: Kathmandu
You can, but it spins the turbo with no oil in it and air goes from the turbo into the valve cover through that impossible-to-remove braided line, so you hear that "leaking" sound, even though it's not really a leak. I built a jig to go on in the turbo inlet as well, to test the BPV for leaks, but I don't like to use it unless I have to.


