
General Suspension: Front Brake Job

Thread Starter
I'm old school
Joined: 02-16-05
Posts: 6,905
Likes: 3
From: Nashville
Front Brake Job
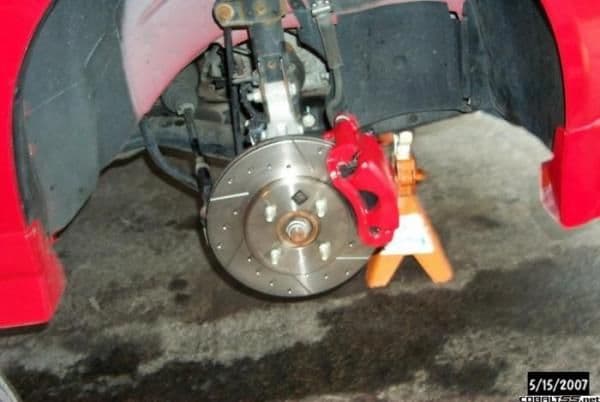
Here's the typical front brake job on a Cobalt. Some notes before we begin. First, I coincidently repainted my calipers during this job, hence the old bits of red. Second, I am replacing my rotors. If you plan to resurface, you need to have a means to do that. Brake work is messy. You might want to wear some latex gloves and a N95 mask.
I am using the brand spankin' new drilled and slotted performance AC Delco Durastop 4*100 rotors for this installation that I just picked up today from Tom at Crate Engine Depot. It's nice living close to there. Here are the part numbers if you can read them.

If not, the rotors are "1#19158823" which is probably the GM number, or "1#18A1784", which is probably the Delco number. The pads are "17D956CH" or GM# 19157359.
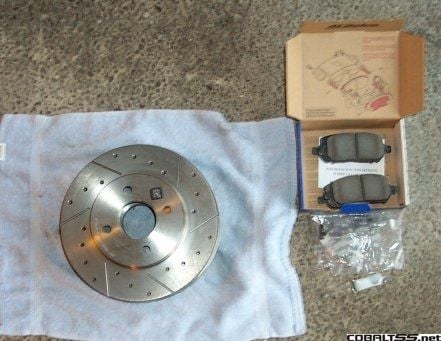
The rotors are just that. The Pads come with a small amount of lube for the install, replacement mounting clips and some simple instructions printed on the inside of the packaging.
First, and obviously, jack the front of the car and remove the front wheels.
Here's a tip; turn the steering wheel toward the side you are working on. It makes getting at the bolts a lot easier.
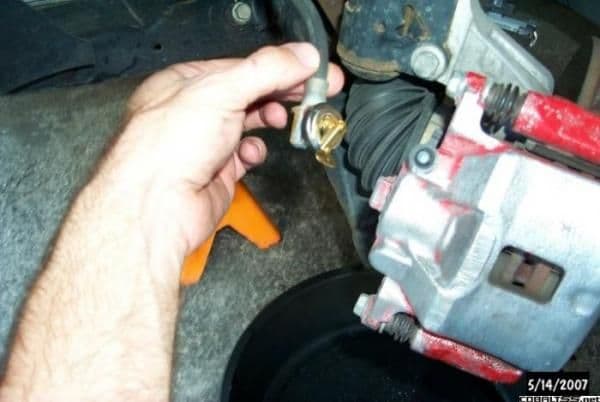
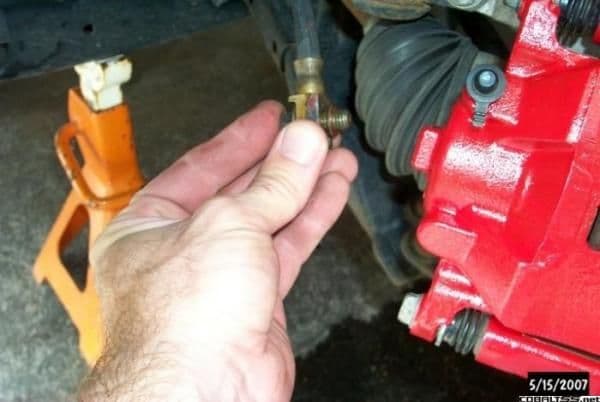
For my job today, I am completely removing the calipers from the car. You don't have to do that for a typical brake job, and if you're not, skip this part. If you do, remember you will have to bleed your system. If you are removing the calipers, place a catch pan under the hub and remove the banjo bolt from the caliper.

Fluid will leak out of the caliper, but not much. Almost nothing will leak out of your brake line. Here's another tip; If you plan to leave the brake line unattached for a little while, plug it. I used a simple expaning rubber plug.
If you are not removing the brake line, you still have to take the caliper off the knuckle. Take off the caliper mounting bolts.
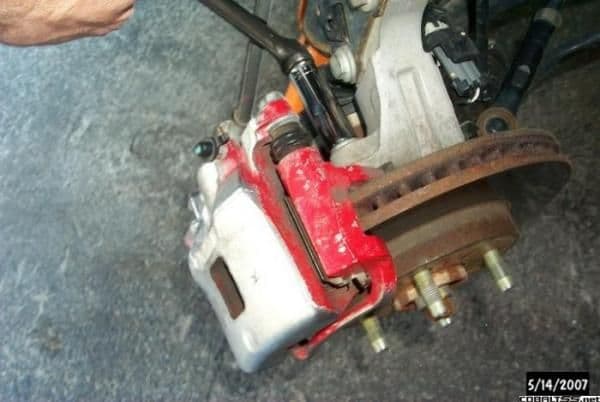
This is the top bolt. The bottom bolt is right next to a hub bolt of the same size. Make sure you take off the right one! Once you do this, the caliper will fall off, so hold on to it. If you still have the brake line attached, don't let the caliper hang from it. Hang the caliper from some wire wrapped around your suspension spring or whatever else you've got. If you disconnected the caliper, let it drain.
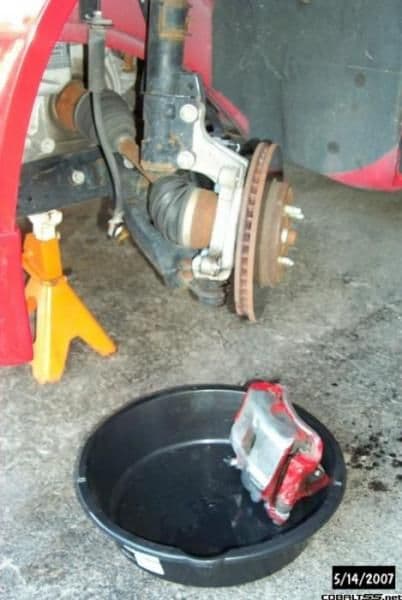
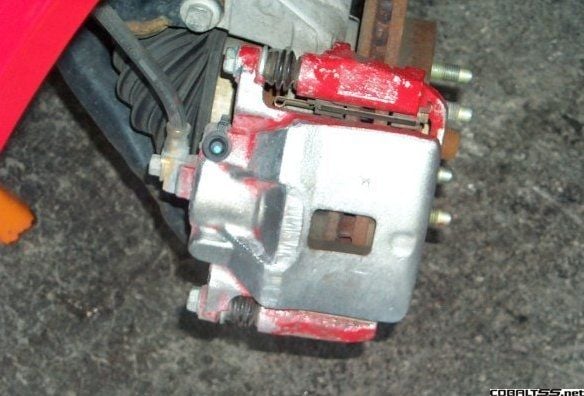
When you remove your old brake pads, there is a small clip on one of them like this:

That does come with the new pads, so you can toss it. I don't know what it is honestly.
If you want to paint your calipers, now is a good time. CLICK HERE for the how-to on that.
With your hardware all cleaned up, you can start installation. This in not as simple as the reverse of disassembly. If you didn't remove your calipers, you will need to compress your caliper pistons. There are special tools for this, but a simple C-clamp like this works great:
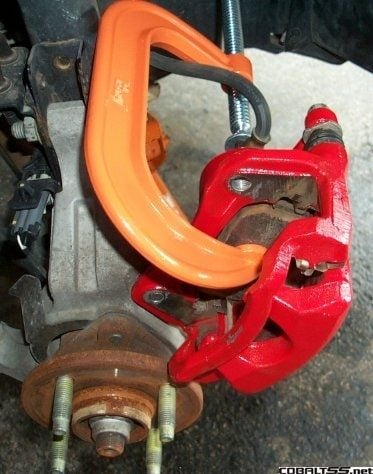
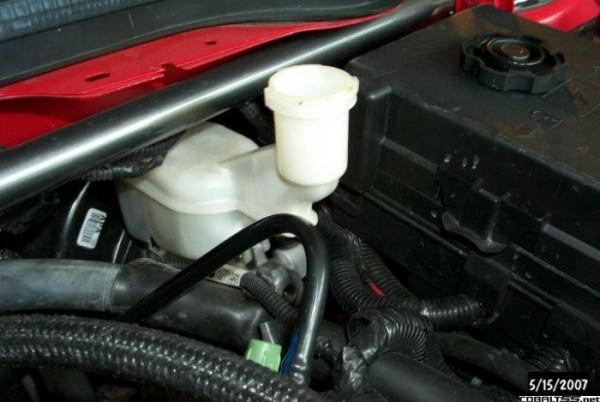
To get this to work, leave one of the old brake pads still in the caliper to give the clamp something to push against. Also, remove the cap from your brake resevoir. Otherwise it may pop off all by itself and break some plastic.
If you did remove your calipers, you can just squeeze the piston in by hand. Additionally, you can do all of the pad assembly on the bench first before reinstalling on the car. When installing the pads, lubricate the back plate and the slide tabs. There is a diagram of the locations included with the package. This picture is blurry because the camera was too close, but you get the idea. I just smeared a glob around evenly with my finger.

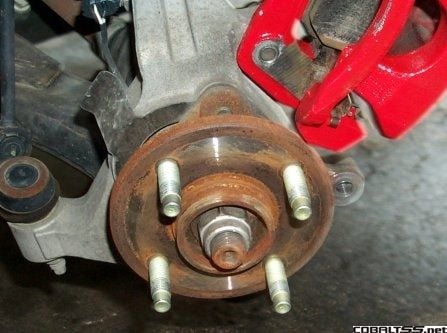
Next, clean the hub. Brake rotors warp because they can't dissipate heat evenly. If the hub has a bunch of corrosion or other crap on it, the rotor won't sit straight, your alignment will get all screwed up, and the rotor will most certainly warp.
Now install you rotor (easy enough) and the caliper.
If you removed the brake line, reinstall it now. Be sure to put the washer on the banjo bolt.
Okay, most important part coming up. TORQUE ALL HARDWARE PROPERLY!

If you don't have a torque wrench, don't do the job! Seriously.
Bleeder valve 11NM - 97 in/lbs
Caliper guide pin bolt 34NM - 25 ft/lbs
Caliper mounting bolt 115NM - 85 ft/lbs
Hose to caliper (banjo) bolt 48NM - 35 ft/lbs
If you removed the brake line, bleed the brakes now. Click here for that How-To. Otherwise, you're done! Put your wheels back on and go road test it! Oh, and don't forget, lug nut torque is 100 ft/lbs. And that one is MOST important.
I am using the brand spankin' new drilled and slotted performance AC Delco Durastop 4*100 rotors for this installation that I just picked up today from Tom at Crate Engine Depot. It's nice living close to there.
If not, the rotors are "1#19158823" which is probably the GM number, or "1#18A1784", which is probably the Delco number. The pads are "17D956CH" or GM# 19157359.
The rotors are just that. The Pads come with a small amount of lube for the install, replacement mounting clips and some simple instructions printed on the inside of the packaging.
First, and obviously, jack the front of the car and remove the front wheels.
Here's a tip; turn the steering wheel toward the side you are working on. It makes getting at the bolts a lot easier.
For my job today, I am completely removing the calipers from the car. You don't have to do that for a typical brake job, and if you're not, skip this part. If you do, remember you will have to bleed your system. If you are removing the calipers, place a catch pan under the hub and remove the banjo bolt from the caliper.
Fluid will leak out of the caliper, but not much. Almost nothing will leak out of your brake line. Here's another tip; If you plan to leave the brake line unattached for a little while, plug it. I used a simple expaning rubber plug.
If you are not removing the brake line, you still have to take the caliper off the knuckle. Take off the caliper mounting bolts.
This is the top bolt. The bottom bolt is right next to a hub bolt of the same size. Make sure you take off the right one! Once you do this, the caliper will fall off, so hold on to it. If you still have the brake line attached, don't let the caliper hang from it. Hang the caliper from some wire wrapped around your suspension spring or whatever else you've got. If you disconnected the caliper, let it drain.
When you remove your old brake pads, there is a small clip on one of them like this:
That does come with the new pads, so you can toss it. I don't know what it is honestly.
If you want to paint your calipers, now is a good time. CLICK HERE for the how-to on that.
With your hardware all cleaned up, you can start installation. This in not as simple as the reverse of disassembly. If you didn't remove your calipers, you will need to compress your caliper pistons. There are special tools for this, but a simple C-clamp like this works great:
To get this to work, leave one of the old brake pads still in the caliper to give the clamp something to push against. Also, remove the cap from your brake resevoir. Otherwise it may pop off all by itself and break some plastic.
If you did remove your calipers, you can just squeeze the piston in by hand. Additionally, you can do all of the pad assembly on the bench first before reinstalling on the car. When installing the pads, lubricate the back plate and the slide tabs. There is a diagram of the locations included with the package. This picture is blurry because the camera was too close, but you get the idea. I just smeared a glob around evenly with my finger.
Next, clean the hub. Brake rotors warp because they can't dissipate heat evenly. If the hub has a bunch of corrosion or other crap on it, the rotor won't sit straight, your alignment will get all screwed up, and the rotor will most certainly warp.
Now install you rotor (easy enough) and the caliper.
If you removed the brake line, reinstall it now. Be sure to put the washer on the banjo bolt.
Okay, most important part coming up. TORQUE ALL HARDWARE PROPERLY!
If you don't have a torque wrench, don't do the job! Seriously.
Bleeder valve 11NM - 97 in/lbs
Caliper guide pin bolt 34NM - 25 ft/lbs
Caliper mounting bolt 115NM - 85 ft/lbs
Hose to caliper (banjo) bolt 48NM - 35 ft/lbs
If you removed the brake line, bleed the brakes now. Click here for that How-To. Otherwise, you're done! Put your wheels back on and go road test it! Oh, and don't forget, lug nut torque is 100 ft/lbs. And that one is MOST important.
Last edited by REIGN SS; Aug 23, 2010 at 11:01 AM.


Member
Joined: 11-10-05
Posts: 381
Likes: 0
From: Northern Illinois
Those are not GM Performance rotors correct ? They are the Delco replacements ? I have been trying to find out about those, but my parts guy hasn't seen them yet. Are those ceramic pads ? I have used Delco ceramics before. I think you will be happy with them, long wear and almost no brake dust. I will be switching to them soon. I take it you found your vibration to be brake related ?
Dennis
Dennis
Senior Member
Joined: 05-29-06
Posts: 1,519
Likes: 1
From: Glen Ellyn, Illinois
Originally Posted by denniss
....almost no brake dust
Thread Starter
I'm old school
Joined: 02-16-05
Posts: 6,905
Likes: 3
From: Nashville
These are Delco, not GMPP.
I still don't actually know what the vibration problem is. This is part of my troubleshooting, however I don't think it's going to make a difference. With this, I have done a 4 wheel road force balance and rotation and a front brake replacement, so when I take it in under warranty, they won't bother trying those things again.
I still don't actually know what the vibration problem is. This is part of my troubleshooting, however I don't think it's going to make a difference. With this, I have done a 4 wheel road force balance and rotation and a front brake replacement, so when I take it in under warranty, they won't bother trying those things again.

Senior Member
Joined: 03-02-06
Posts: 620
Likes: 0
From: Fleetwood, PA
Nice write-up One question though since I've never done any brake work: If you do not remove the brake line you said to use the c-clamp to compress the piston so does that mean you still have to unbolt the caliper or is there a way to do this with it still bolded in?
One question though since I've never done any brake work: If you do not remove the brake line you said to use the c-clamp to compress the piston so does that mean you still have to unbolt the caliper or is there a way to do this with it still bolded in?
Thread Starter
I'm old school
Joined: 02-16-05
Posts: 6,905
Likes: 3
From: Nashville
Two questions there. First one about taking the rotor off. Do you still have the two factory assembly line speed nuts on the lugs holding the rotors in place? If so, they are garbage, your can take them off and throw them out. Go ahead and destroy them if you have to. The rotors are not pressed on to the hubs. They just fit on the wheel lugs loosely.
Second question about compressing the piston. You still have to remove the caliper from the knuckle in order to get the rotor off. You just don't have to remove the brake line.
Second question about compressing the piston. You still have to remove the caliper from the knuckle in order to get the rotor off. You just don't have to remove the brake line.

the brake will only need to be bled if the brake line is removed and air is in the system
start furthest away from master RR,LR,RF,LF in that order when bleeding brakes
also if you are using the c clamp or channel lock pliers to push the piston back in, open the bleeder screw cuz pushing the heated fluid from the bottom of the calipers back into the ABS module and lines causes snot to form in the lines and also can blow out a modules pressure seals
removing the master cyl cap also will ensure this doesnt happen at the top of the brake system
also if say a lot of air is in the system, open the bleeders and let it gravity bleed ensuring the fluid level never goes dry in master...this will get enough air out before manual brake bleeding(RR,LR,RF,LF) method of pumping it up and holding the pedal down while someone opens the bleederto let air and fluid out
close valve before releasing the foot pedal pressure and repeat
halfcent hit it on the head when he said TORQUE TO SPECS

Senior Member
Joined: 05-04-07
Posts: 1,845
Likes: 0
From: somewhere
Question. I want to paint my calipers when they are off my car. If I remove the pads to give everything a thourough cleaning can I reuse them? Sorry never been in this situation before. Or can I just wash them with the pads on? They do get wet when they sit in the rain afterall.
Thread Starter
I'm old school
Joined: 02-16-05
Posts: 6,905
Likes: 3
From: Nashville
You most certainly can remove and reuse your current brake pads. Here is the rule with regard to that. You can't change anything. You must use the same pads, in the same location you removed them from, on the same rotor. Brake pads and rotors "mate" to each other after they are used a bit. If you switch something, you will cause premature wear and other problems. So perhaps label the pads with their positions for reassembly. Also, you will still want to apply a fresh layer of grease for the reinstallation.
Senior Member
Joined: 05-04-07
Posts: 1,845
Likes: 0
From: somewhere
You most certainly can remove and reuse your current brake pads. Here is the rule with regard to that. You can't change anything. You must use the same pads, in the same location you removed them from, on the same rotor. Brake pads and rotors "mate" to each other after they are used a bit. If you switch something, you will cause premature wear and other problems. So perhaps label the pads with their positions for reassembly. Also, you will still want to apply a fresh layer of grease for the reinstallation.
edit: I hope its the right kind. Its called Brake and Caliper Grease for use on: shimmed disc brake pads, rotor hats, caliper slides bolts and pins, all metal to metal contact points. Right kind?
Last edited by CJ BadBlackSS; May 23, 2007 at 09:49 PM.


New Member
Joined: 01-12-06
Posts: 130
Likes: 0
From: Canada
Yeah CJ thats the right stuff. You need a cyl glide or some other type of slider grease for the sliders before you put them back in the Stands. I suggest you use some anti-seize on the hardware and anti-squeel spray on the back of the pads. Grease works, but its not exactly the right stuff for the job. Thumbs up for Halfcent though, really thorough.
Member
Joined: 11-10-05
Posts: 381
Likes: 0
From: Northern Illinois
Nice how to, but I would like to add that the banjo washers should always be replace if the brake lines are removed. They are made of soft material (copper or aluminum depending on what the calipers are made from) that crushes to form a seal. once crushed they loose much of their ability to crush more to form a seal again. If they don't leak without over torquing you will be lucky. Washers are cheap and avalible at parts stores or dealer.
Dennis
Dennis
