
Appearance: Front Facia removal and replacement

Thread Starter
I'm old school
Joined: 02-16-05
Posts: 6,905
Likes: 3
From: Nashville
Front Facia removal and replacement
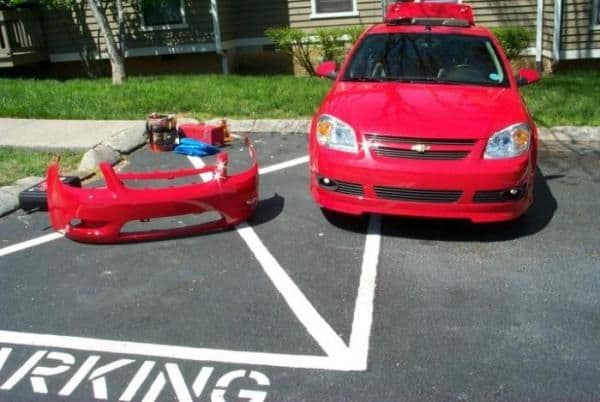
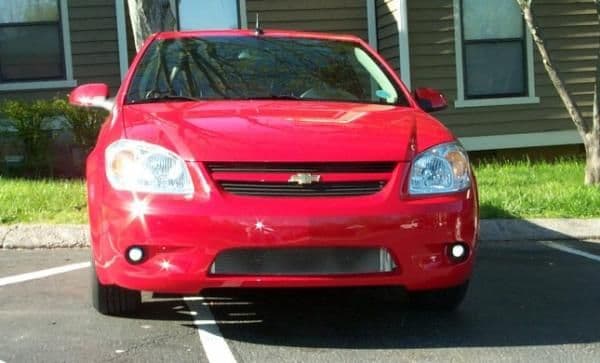
Hello all. It's been a long time since I've done a good how-to. But this is a good one. At least I hope you'll think so. For some time I've wanted to swap on the SS facia to my LS. Well about 7 months ago I got wacked by a guy that backed into me. Then I moved to Tennessee where there is no front license plate, so I have the drilled holes. So it was time to finally do it. Can't see it too well, but here it is:

mkulrey13 did one a little while ago too if you want to take a look.
In case you have ever wondered if swapping different kinds of facias onto different cars works, it does. There are a couple of issues which I'll show you here. Also, my car has the RK Sport lip on it. You'll see that in the pictures as we go, but don't worry. It doesn't effect anything.
So the first step to any project like this is WASH YOUR ****!

Seriously people. I can't tell you how much it pains me to see people working on their nasty ass, filthy cars. A clean car is a happy car, and it's easier to work on.
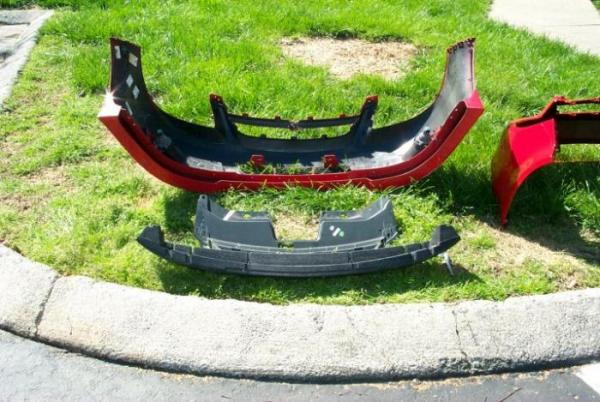
So here's our project:
Take that thinggy on the left and swap it with the one on the right. Here's what you need:
Jack and Stands
19mm Socket (wheel lugs) and Driver handles
7 and 10 mm nut drivers or sockets
Assorted screw drivers
Torq's bit drivers (for the fog lights)
Start by getting the car jacked up and take off the front wheels.

Now we just start taking off fasteners. Start with the wheel well. Theses are 7mm.
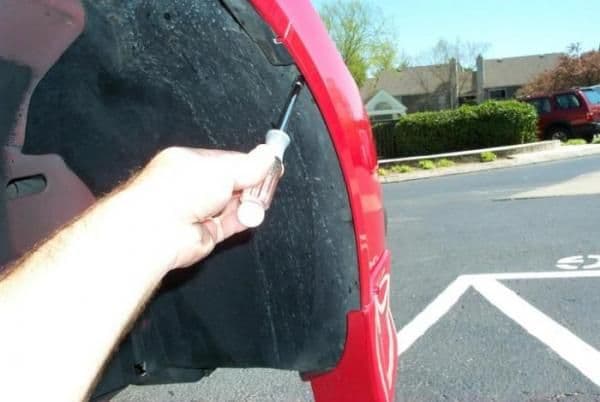
You don't have to completely remove it. After you get it loose from the front, just fold it back for the time being.
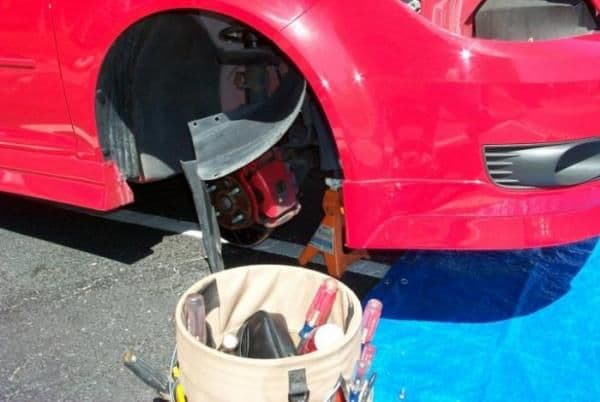
Work your way across underneath, removing all of the fasteners for the lower air dam. There is one push-on fastener at each corner.
At this point, the air dam will be removed. This bring us to issue #1.
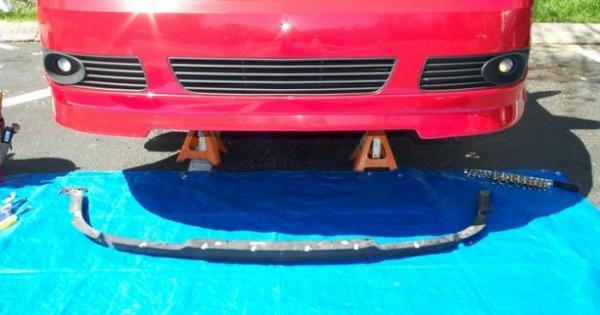
The air dam will not work on the different facia. It's a different shape. If you are simply replacing your facia directly, no problem. Otherwise, you won't be able to use this part again. So set it and it's fasteners aside.
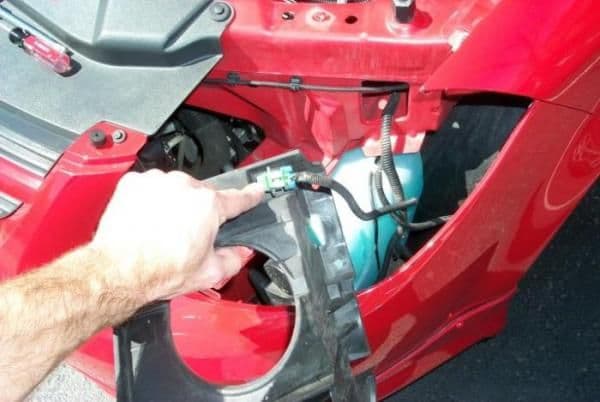
Now unplug the fog light harnesses
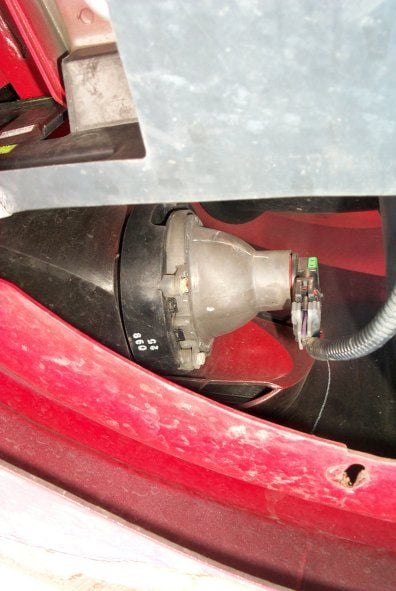
Okay, before leaving the bottom end, don't forget the two big plastic pins under the lower grill.

Now you're done underneath. Move up to the headlights. Remove them completely. Start with the bolts that attach the light to the frame:

You can tilt the headlight out right now, or continue and take off the frame bolts too.
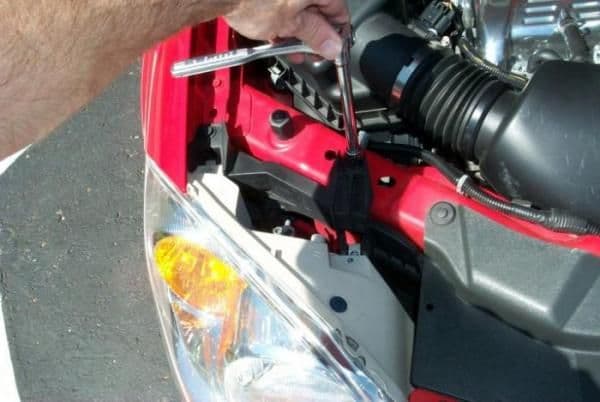
Now you have to tilt the light out. It's a little tricky, you have push the inside of the light in and twist the fixture out. The key is, don't force anything. It will come out smoothly, you just have to wiggle it a little. Here's a different How-To with some good pictures of the angle you need. Unplug the harness and set them aside, and then take off the lower frame bolts.
Okay, on the left headlight (driver side), the OAT (outside air temp) sensor is attached to it. Just unplug the harness and leave it in the frame.
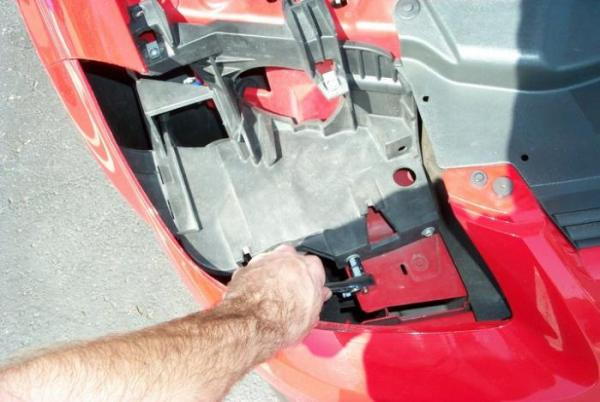
Now take off the grill fasteners up top. You're going to remove the grill along with the facia. It's easier that way.

Last spot are the large bolts that attach the facia to the fender. This is why you took the headlight frame off.
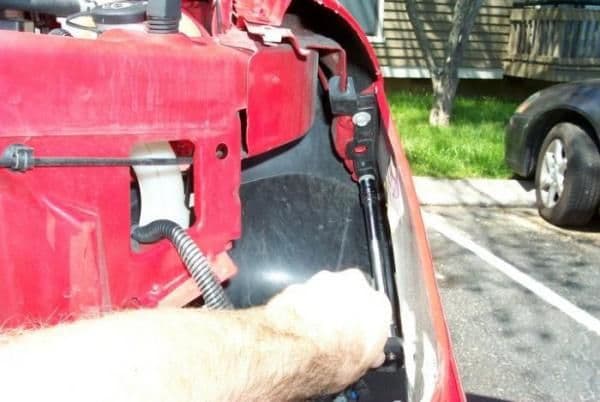
There is a bracket that goes along with those bolts. Keep them together. Don't worry if they get mixed up, they only go on one way.
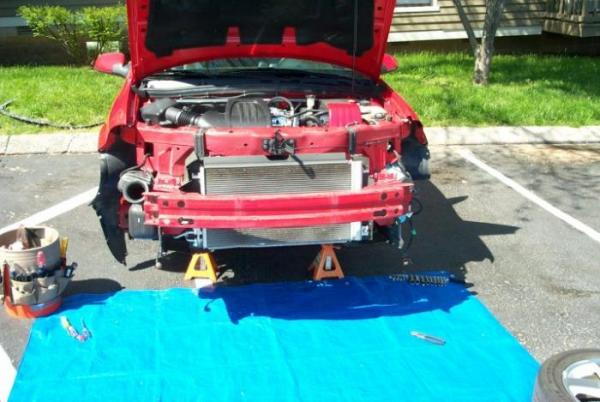
Okay, that's it. Pull the facia off the car.
mkulrey13 did one a little while ago too if you want to take a look.
In case you have ever wondered if swapping different kinds of facias onto different cars works, it does. There are a couple of issues which I'll show you here. Also, my car has the RK Sport lip on it. You'll see that in the pictures as we go, but don't worry. It doesn't effect anything.
So the first step to any project like this is WASH YOUR ****!
Seriously people. I can't tell you how much it pains me to see people working on their nasty ass, filthy cars. A clean car is a happy car, and it's easier to work on.
So here's our project:
Take that thinggy on the left and swap it with the one on the right. Here's what you need:
Jack and Stands
19mm Socket (wheel lugs) and Driver handles
7 and 10 mm nut drivers or sockets
Assorted screw drivers
Torq's bit drivers (for the fog lights)
Start by getting the car jacked up and take off the front wheels.
Now we just start taking off fasteners. Start with the wheel well. Theses are 7mm.
You don't have to completely remove it. After you get it loose from the front, just fold it back for the time being.
Work your way across underneath, removing all of the fasteners for the lower air dam. There is one push-on fastener at each corner.
At this point, the air dam will be removed. This bring us to issue #1.
The air dam will not work on the different facia. It's a different shape. If you are simply replacing your facia directly, no problem. Otherwise, you won't be able to use this part again. So set it and it's fasteners aside.
Now unplug the fog light harnesses
Okay, before leaving the bottom end, don't forget the two big plastic pins under the lower grill.
Now you're done underneath. Move up to the headlights. Remove them completely. Start with the bolts that attach the light to the frame:
You can tilt the headlight out right now, or continue and take off the frame bolts too.
Now you have to tilt the light out. It's a little tricky, you have push the inside of the light in and twist the fixture out. The key is, don't force anything. It will come out smoothly, you just have to wiggle it a little. Here's a different How-To with some good pictures of the angle you need. Unplug the harness and set them aside, and then take off the lower frame bolts.
Okay, on the left headlight (driver side), the OAT (outside air temp) sensor is attached to it. Just unplug the harness and leave it in the frame.
Now take off the grill fasteners up top. You're going to remove the grill along with the facia. It's easier that way.
Last spot are the large bolts that attach the facia to the fender. This is why you took the headlight frame off.
There is a bracket that goes along with those bolts. Keep them together. Don't worry if they get mixed up, they only go on one way.
Okay, that's it. Pull the facia off the car.
Last edited by Halfcent; Apr 16, 2008 at 11:01 PM.
Thread Starter
I'm old school
Joined: 02-16-05
Posts: 6,905
Likes: 3
From: Nashville
Part 2
Okay, with the two facias next to each other, start swapping parts from one over the other. The grill and styrofoam insert can swap as a unit:
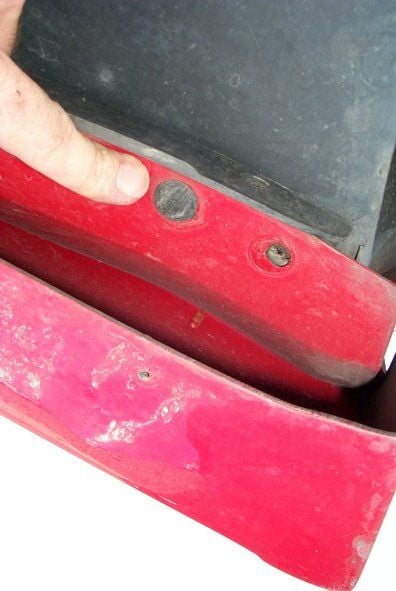
You don't really need to much guidance here. It's very obvious once you get it in front of you. The fog lights however are a bit more tricky. I tried to find an easier way to do this for you guys. But there just isn't. So here's what you do. First remove the two mounting screws at the bottom.
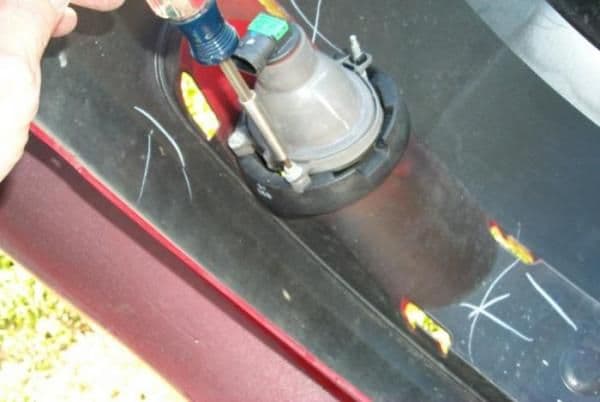
Then screw out the adjusting screw from the front to completely remove the light from the mount.
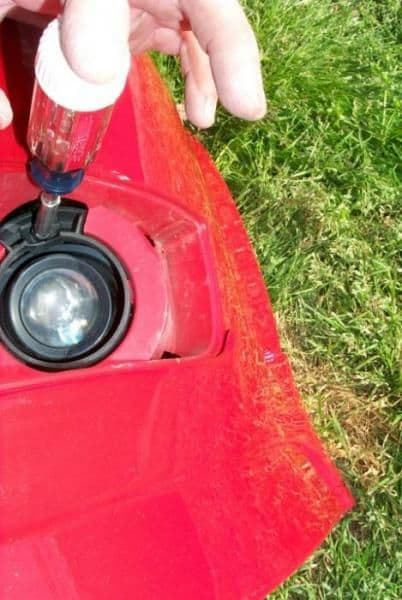
Having an LS, I had to remove the grill inserts to get at that adjuster. Here's a picture of that:

Now pop the frame off. You have to remove the light first to do this, there is no other way.
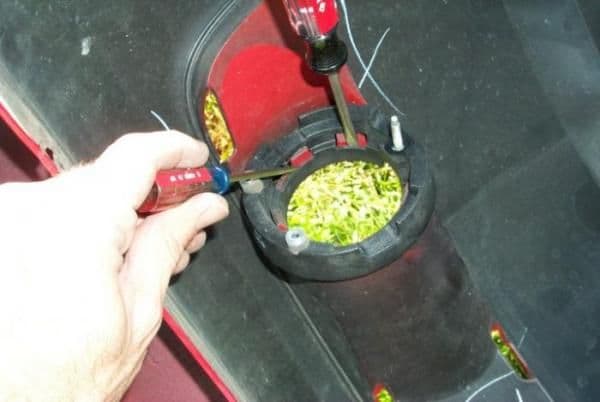
Now, look above again at those two tiny little rubber grommets over the screw holes for the mounting screws. They fall off and get lost really easy. Don't lose them. I lost one and I'm pissed.
Okay, clean up the lights and swap them over onto the new facia. Installation of the facia back on the car is pretty much the reverse of removal, so I don't have a lot of pictures of that except for these couple.
Here is issue #2:
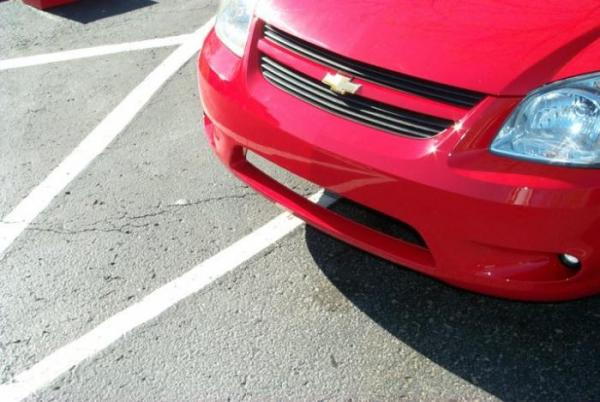
The new facia is lower then the original, and the last screw on the wheel well wont match up with the new, lower facia. It's not a big problem actually. I will probably get SS wheel wells at some point just to complete the installation. But for now, it really doesn't create a problem.
Here's the finished product:
Now once you put your headlights back on, your probably going to think to yourself "Damn, those fit horribly! What the hell did I do wrong?" Trust me, you did nothing wrong. All Cobalt headlights fit like ****. Seriously. Yours probably fit like **** before you took them off and you just didn't notice. It's pretty normal actually.
I have ordered the SS/TC grill set from Crate Engine Depot (Tom is the man). That will fill in the hole. It would have been nice to have had it during this job since it would have been super simple to install it with the facia off the car, but it's really not that much harder with it still on.
I'm going to look into getting the SS air damn as well. I'm thinking it will help with a little support around that bottom edge. I'm guessing it's pretty cheap. Then I'll put my RK Sport lip back on to finish it up. I bought a brand new one and got it painted at the same time as the facia. Click here to see how to do that job. It's actually easier to install that lip with the facia on the car. So that's next.
You don't really need to much guidance here. It's very obvious once you get it in front of you. The fog lights however are a bit more tricky. I tried to find an easier way to do this for you guys. But there just isn't. So here's what you do. First remove the two mounting screws at the bottom.
Then screw out the adjusting screw from the front to completely remove the light from the mount.
Having an LS, I had to remove the grill inserts to get at that adjuster. Here's a picture of that:
Now pop the frame off. You have to remove the light first to do this, there is no other way.
Now, look above again at those two tiny little rubber grommets over the screw holes for the mounting screws. They fall off and get lost really easy. Don't lose them. I lost one and I'm pissed.
Okay, clean up the lights and swap them over onto the new facia. Installation of the facia back on the car is pretty much the reverse of removal, so I don't have a lot of pictures of that except for these couple.
Here is issue #2:
The new facia is lower then the original, and the last screw on the wheel well wont match up with the new, lower facia. It's not a big problem actually. I will probably get SS wheel wells at some point just to complete the installation. But for now, it really doesn't create a problem.
Here's the finished product:
Now once you put your headlights back on, your probably going to think to yourself "Damn, those fit horribly! What the hell did I do wrong?" Trust me, you did nothing wrong. All Cobalt headlights fit like ****. Seriously. Yours probably fit like **** before you took them off and you just didn't notice. It's pretty normal actually.
I have ordered the SS/TC grill set from Crate Engine Depot (Tom is the man). That will fill in the hole. It would have been nice to have had it during this job since it would have been super simple to install it with the facia off the car, but it's really not that much harder with it still on.
I'm going to look into getting the SS air damn as well. I'm thinking it will help with a little support around that bottom edge. I'm guessing it's pretty cheap. Then I'll put my RK Sport lip back on to finish it up. I bought a brand new one and got it painted at the same time as the facia. Click here to see how to do that job. It's actually easier to install that lip with the facia on the car. So that's next.


 Very nice.
Thread Starter
I'm old school
Joined: 02-16-05
Posts: 6,905
Likes: 3
From: Nashville

Thread Starter
I'm old school
Joined: 02-16-05
Posts: 6,905
Likes: 3
From: Nashville
Senior Member
Joined: 09-08-06
Posts: 3,511
Likes: 2
From: *
"The new facia is lower then the original, and the last screw on the wheel well wont match up with the new, lower facia. It's not a big problem actually. I will probably get SS wheel wells at some point just to complete the installation. But for now, it really doesn't create a problem."
Halfcent, you need to get the 2 brackets that fill in the left and right lower side. It is not a separate wheel well -- they are the same on all models -- it is filled in with plastic brackets. I'll find the part numbers and get a pic of them.
https://www.cobaltss.net/gallery/fil...racket_002.jpg

https://www.cobaltss.net/gallery/fil...racket_001.jpg

Halfcent, you need to get the 2 brackets that fill in the left and right lower side. It is not a separate wheel well -- they are the same on all models -- it is filled in with plastic brackets. I'll find the part numbers and get a pic of them.
https://www.cobaltss.net/gallery/fil...racket_002.jpg
https://www.cobaltss.net/gallery/fil...racket_001.jpg

Thread Starter
I'm old school
Joined: 02-16-05
Posts: 6,905
Likes: 3
From: Nashville
Okay, interesting. I'm actually headed to the dealer this morning to look at the air dam, so I'll look for that too. Thanks for the note.
----------------------------------------------------
And, I'm back. Okay, they didn't have the air dams in stock, won't get it until next week. But here's the part diagram:
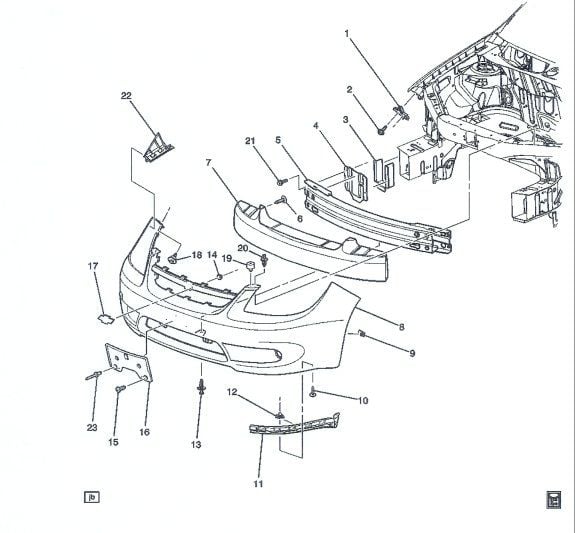
There actually isn't an air damn for this facia according to the diagram, just those corner brackets. And according to UPS, I'll get my grills tomorrow.
----------------------------------------------------
And, I'm back. Okay, they didn't have the air dams in stock, won't get it until next week. But here's the part diagram:
There actually isn't an air damn for this facia according to the diagram, just those corner brackets. And according to UPS, I'll get my grills tomorrow.
Last edited by Halfcent; Apr 17, 2008 at 04:36 PM.
Senior Member
Joined: 09-08-06
Posts: 3,511
Likes: 2
From: *
There is an air dam -- it is not in the picture above -- it is attached to the lower radiator. You'll find it in the radiator section.
Air Dam (air deflector) PN 22699897
Retainer for air dam PN 11518017 (2 ea)
You have to either lift the radiator or unbolt the 2 lower radiator brackets to position the air dam -- it is held on by the radiator, then the 2 retainers hold the air dam to the radiator cross member.
SS fascia Brackets:
Right: PN 15248110
Left: PN 15248111 (#11 in picture above)
Last edited by Red07SSNA; Apr 17, 2008 at 07:06 PM.

Senior Member
Joined: 08-07-07
Posts: 627
Likes: 0
From: Michigan
Halfcent, you blow my mind. I could listen to you talk about Ecotec's and cobalts all day...
By the way what is the msrp of that fascia? Cuz im pretty sure I was looking for a rear bumper and front fascia for my car from an SS and it was like more money than the most expensive widebody kit....thats just becuase the dealer near my house is TERRIBLE about ripping you off...
There is one cool guy that works there i was getting quotes on gmpp stuff once to compare to what CED charged and he kept saying things like, well it says 240, bull ill give it to you for 160...like 40% ish off! I wish I could remember who he was so I can find him next time i go there.
Senior Member
Joined: 08-07-07
Posts: 627
Likes: 0
From: Michigan
Half cent, are you planning on going F/I eventually? I get the feeling you are once (if) we get full tuning support.
Im still debating it, but then again my car might be at the point where I just buy a turbo balt once I decide to do it...im already at 50k miles... I actually had over 4000$ saved up in cash for a mod fund and then i took it and bought my girlfriend and engagement ring and I took her on a cruise for spring break so right now all my mods are cheap paint this and DIY visual mods lol
Im still debating it, but then again my car might be at the point where I just buy a turbo balt once I decide to do it...im already at 50k miles... I actually had over 4000$ saved up in cash for a mod fund and then i took it and bought my girlfriend and engagement ring and I took her on a cruise for spring break so right now all my mods are cheap paint this and DIY visual mods lol

Thread Starter
I'm old school
Joined: 02-16-05
Posts: 6,905
Likes: 3
From: Nashville
The fog light inserts (mounts I think you mean?) are reused on the new facia. There weren't any left over parts there.
The SS/SC lip is held to the facia with a bunch of friction clips. If you get underneath your car and just look at it, you will see them. Just remove the clips and the lip comes off. However you will now have a bunch of holes in your facia.
Last edited by Halfcent; Apr 18, 2008 at 10:52 AM. Reason: Automerged Doublepost

Member
Joined: 10-03-06
Posts: 384
Likes: 0
From: Crystal Lake, IL
ok maybe im retarded but on the LS or BASE models there is that option to have fog lights or not and you have to get those pieces which i dont have for the lower bumper which you have cause i can see them in your how to pics but i dont see you using the pieces on the ss bumper because it doesn't require them do you still have those pieces there should be 2 one left and one right they are for fog lights
Last edited by Guardian314; Apr 18, 2008 at 11:04 AM. Reason: no quote