Appearance: How To : Chevy Skyline Tail Lights


 03-25-2010, 03:08 AM
#152
Senior Member
Thread Starter
iTrader: (1)
Join Date: 04-10-07
Location: winnipeg
Posts: 3,705
Likes: 0
Received 0 Likes
on
0 Posts
the way i have them set up there they stay on all the time while the car si on,they are set up as running lights and do not get brighter when braking...just running lights so at night you have 4 running lights lights on across the back and the regular brkae lights only light brighter when braking.

 04-29-2010, 04:53 PM
#156
New Member

Join Date: 09-28-05
Location: NY, US, 10543
Posts: 8
Likes: 0
Received 0 Likes
on
0 Posts


Heres mine. Took me about 2 hrs, removing the sealant was the worst, until i started using a hairdryer and it was smooth sailing.
btw I just seal it back up with clear gutter sealant for outdoor waterproof use.
Last edited by Image020; 05-02-2010 at 09:46 PM. Reason: Reuploaded pix
04-30-2010, 01:39 AM
#157
Senior Member


 05-19-2010, 11:42 PM
#162
Senior Member
iTrader: (2)
Join Date: 05-10-08
Location: Kure Beach, NC
Posts: 11,788
Likes: 0
Received 0 Likes
on
0 Posts
some1 send me a set of those gay aftermarket LED taillights and a set of stock tail lights and ill try to make some real nice OEM looking LED tails by combining the two
 05-20-2010, 12:16 AM
#164
Senior Member
iTrader: (1)
Join Date: 09-08-08
Location: NE Ohio
Posts: 804
Likes: 0
Received 0 Likes
on
0 Posts
sub'd been thinking aboiut doing this when i can, just been trying to find a LED that i like and maybe cut to the length i want. good job, other than i dont like the reverse ones, i want mine to wrap all the way around
05-20-2010, 12:21 AM
#165
Senior Member
iTrader: (2)
Join Date: 05-10-08
Location: Kure Beach, NC
Posts: 11,788
Likes: 0
Received 0 Likes
on
0 Posts
^absolutely. i did this mod awhile ago and cut the wires since. I bought ones that were too short so i extended it by soldering in another couple LED's. Connection went bad over time and they started flickering. Plus got tired of the LED rings on the reverse and solid bulb on the tails, just not OEM looking the way they light up and the finished look. Wish they made a nice OEM looking set of tails that had LED rings
05-20-2010, 12:26 AM
#166
Senior Member
iTrader: (1)
Join Date: 09-08-08
Location: NE Ohio
Posts: 804
Likes: 0
Received 0 Likes
on
0 Posts
^^ hear ya, last thing i want to do is have to go back in there for something, it'll be a while if i do them. there is a set that they sell but last i looked it was like $350 for all 4, a little out of my range for tail lights, a lot more stuff i want i could get with that kind of $$.
12-05-2010, 09:34 PM
#170
Senior Member
iTrader: (5)

Join Date: 08-24-10
Location: Norf Cakalacky
Posts: 9,675
Likes: 0
Received 0 Likes
on
0 Posts
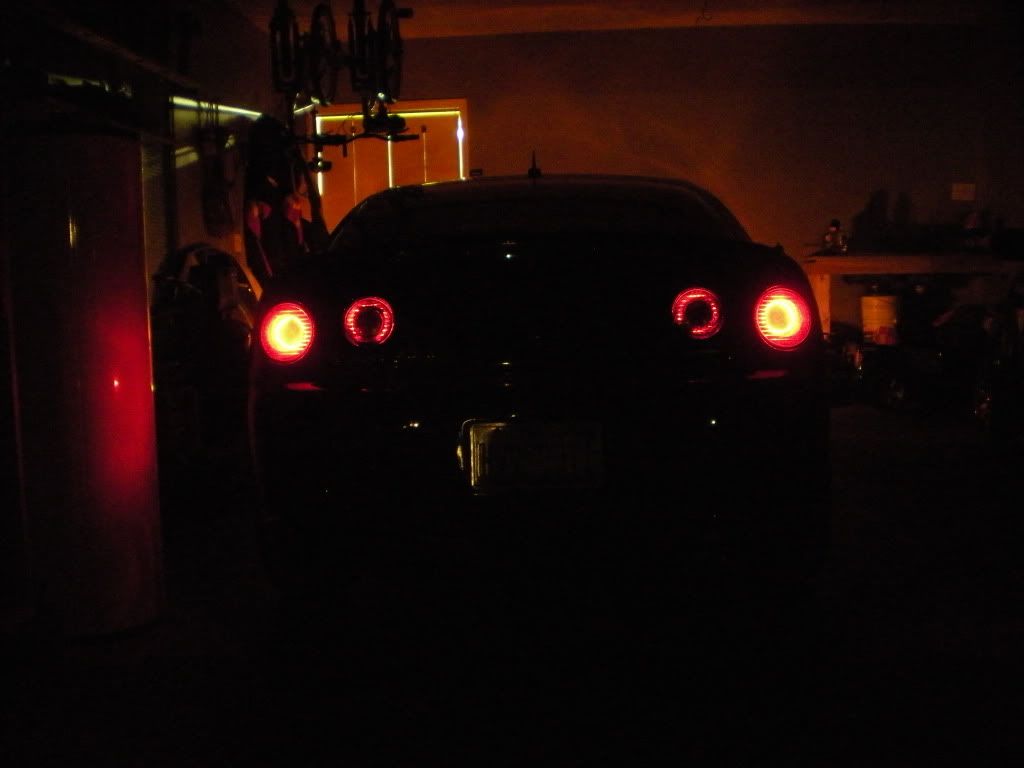
I did mine a lil different... after i finished, I realized that the white part on the inner ones got a liiiil 2 much light, it might not look horrible here... but i really didn't like it. All 4 were so that both on the right would blink when i turn right an bla bla bla...
only pic I got the night I was fully finished...
Bad angle but I like em better than the icpw ones.. they're gonna look effin sexy when I tint em

So when I took out the middle ones to redo em, I heated up the my middle left one for 2 long an the plastic deformed so I couldn't put my reverse lense back in there so now only one light comes up when I reverse an only the outside ones are wired in(the LEDs broke onthe supaheated shell )
)
CCFL's might actually look pretty nice
only pic I got the night I was fully finished...
Bad angle but I like em better than the icpw ones.. they're gonna look effin sexy when I tint em
So when I took out the middle ones to redo em, I heated up the my middle left one for 2 long an the plastic deformed so I couldn't put my reverse lense back in there so now only one light comes up when I reverse an only the outside ones are wired in(the LEDs broke onthe supaheated shell
)CCFL's might actually look pretty nice
12-05-2010, 10:02 PM
#172
Senior Member
iTrader: (5)
Join Date: 08-24-10
Location: Norf Cakalacky
Posts: 9,675
Likes: 0
Received 0 Likes
on
0 Posts
yea they're bad as shiiiiiiiiiiiiiiiiiit so now I'm mad as that they dont work AND I'm out of a reverse light and the 4 reverse bulbs I went thru lol It makes sense to stop after the first... two but I just wanted to be done an actually had it till my ex came out an scared the **** outta me 
that they dont work AND I'm out of a reverse light and the 4 reverse bulbs I went thru lol It makes sense to stop after the first... two but I just wanted to be done an actually had it till my ex came out an scared the **** outta me
01-08-2011, 01:16 PM
#174
Senior Member
iTrader: (2)

Join Date: 05-31-08
Location: Ohio
Posts: 614
Likes: 0
Received 0 Likes
on
0 Posts
this can actually be done with two l.e.d lights (per lens), a clear rod for windows blinds of all things (per lens), and a resistor(per lens). you can also wire these up so the reverse lights work with the brake lights, becoming brighter, blinking correctly, and 100% correctly.
Using my above mentioned method, you wont get bleed through on any lights, even if you go above that little lip, as the lights runs around the circle that you made rather than poting all over the place.
I would also recommend clear rtv sealant, Seals perfectly and works for the headlights too, another easy way to disassemble those lights is use the oven, the same method used for removing the headlight lenses. This is actually the next "mod" for my balt. You can also paint a circle around the inside of the lens (black) to ensure there is only a ring of light rather than a ring that lights up the whole lens. depending on how you want your lights to look.
ccfl halo's would also work. Or if you look into it enough there is a circular L.E.D made for xbox modifications to light up the emblem on the top of an old school xbox. those would be perfect as they're prefabbed, perfectly round, and cheap to replace if you ever break one.
Last edited by 07Maliboo; 01-08-2011 at 01:35 PM.

