
Appearance: How To: Custom Tint Your Tail Lights w/ Design(so their not illegal - at least in AB)


Thread Starter
Senior Member
Joined: 05-24-07
Posts: 703
Likes: 0
From: Calgary, Alberta, Canada
DISCLAIMER: Neither I nor Cobalt SS are held liable if you:
a) F*k up your lights trying this � remember that doing this kind of mod can and probably will void your lease or at least your dealership will charge you to replace the lights � after all the next person who buys your car may be a Granny and not a big fan of Skulls ^_^
b) Choose an image that doesn�t allow enough light to pass through and as a result you get pulled over or rear ended.
c) Tint the reverse so much that you cant see your neighbor behind you and wind up backing over his foot and him suing your ass ^_^ (just kidding but you get the point)
----- ----- ----- ----- ----- ----- ----- ----- ----- ----- ----- ----- ----- -----
Ok so I was very inspired after seeing this thread on tinting my tail lights:
Appearance HOW TO: TINT YOUR LIGHTS in 10 steps - Cobalt SS Network
However I know in my Province of Alberta it�s illegal to have them fully smoked out � (Or at least you run the risk of being regularly pulled over by the cops)�
Now in Calgary here every 2nd or 3rd vehicle is a Truck and I see them with the �Dodge� emblems / tail light guards over their lights so I figured well if they can do that to theirs why can�t I get away with something similar.
----- ----- ----- ----- ----- ----- ----- ----- ----- ----- ----- ----- ----- -----
That being said here is my 1st How To:
Dificulty - Pretty minimal since I'm new to doing mods and I was able to pull this off with some work and attention to detail.
Total Time: It took about 6 hours from the application to the final product - this was also cause I did it over the course of 2 evenings...
What you�ll need:
1) Patience & a steady hand (most important)
2) Vinyl from your local home hardware / Rona / Revy ($10)
3) Exacto-Blade or Razor blade ($5)
4) Stencil / Template (Free � Gotta Love the Internet)
5) VHT Night Shade spray tint ($9.50)
6) Clear Coat Spray ($8 � $10)
7) 1000 + grade sand paper (OPTIONAL - helps w/ VHT adherance)
Step 1) Find an image that you like � Remember to keep it simple � I looked around at a ton of Tribal tattoos and straight black art work � Keep in mind the finer the detail the harder it will be to cut around it and making detatched pieces makes it even harder to line up on both lights.
Step 2) Print off the image and use it as a stencil to cut around on the Vinyl � I personally found cutting on the back of the vinyl to be easier as it didn�t tend to lift or stick as much to the blade.
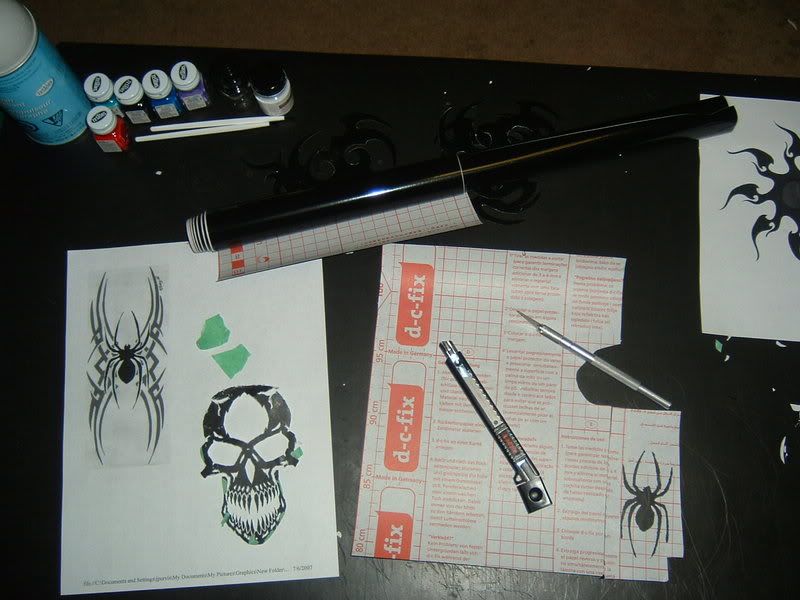
Step 3) With your cut out patterns � to get a sense of the final product take some time and tape em on a cardboard surface and spray them with the VHT � This will give you a good sense of how the final product will look as you will have to remember the final image will be in red (or white) and the rest in black.

Step 4) Placement - Once you�ve settled on a image that will allow enough light through to avoid getting you pulled over by the Cops � (hence why I went with the Skulls rather than the Spider web design I thought of originally).
Carefully remove the vinyl backing and apply the decal � remember your doing this to both sides so if you as **** as I am try measuring so you have it in almost the same spot on both unless your going for a curved image where it may look cool to have them like �(� one side and �)� on the other.
Step5) After having the vinyl laid down begin painting carefully � for this process I followed the steps here: Appearance HOW TO: TINT YOUR LIGHTS in 10 steps - Cobalt SS Network
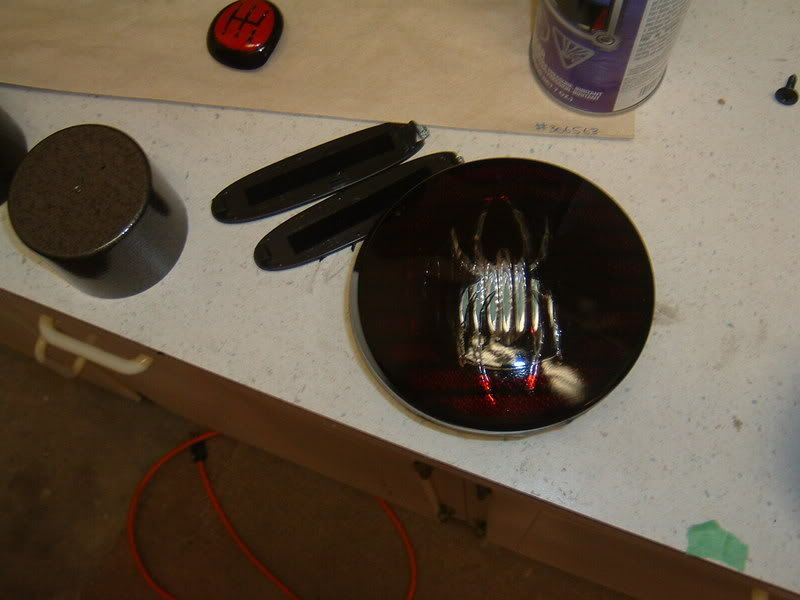
Step 6) Once finished tinting and prior to the Clear Coat application � carefully with the razor blade and with light pressure (so you don�t scratch the hell out of the lights) Carefully cut around the vinyl to avoid pulling the tint off with the decal. I found for the skull it was easiest if I sectioned it so I didn�t have to worry about trying to get the whole thing off in one shot � meaning I cut down to the bottom of the eyes and pealed the top off then carried on to the mouth and then to the teeth.

Step 7) After finishing taking the decal off stand back look again and compare, if satisfied apply your clear coat layers � I found for me as you can kind of see in the pics 2 coats of clear coat isn�t enough to keep give the really nice gloss finish so you apply 2 � 3 light coats and 1 heavy coat (which I�ll be doing this weekend to make em shinier.
Step 8) Let dry, re install and try them out �
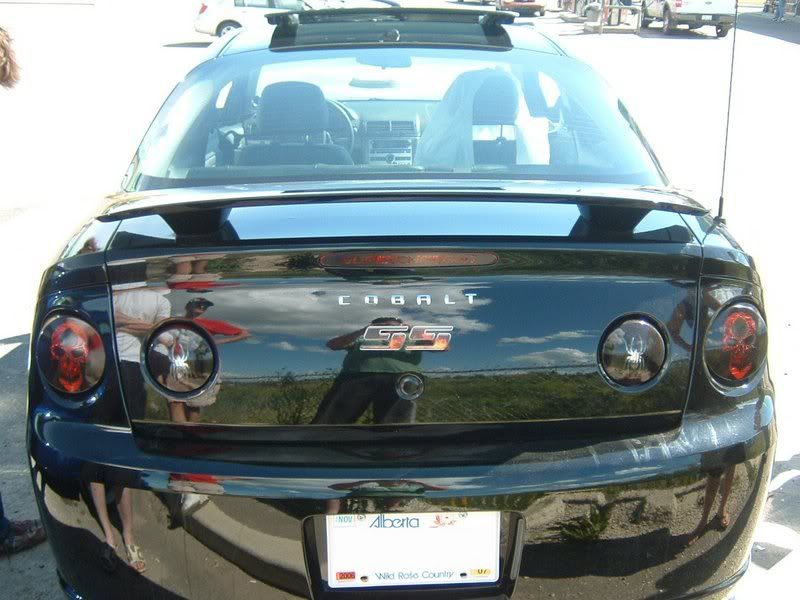
Day Shots:
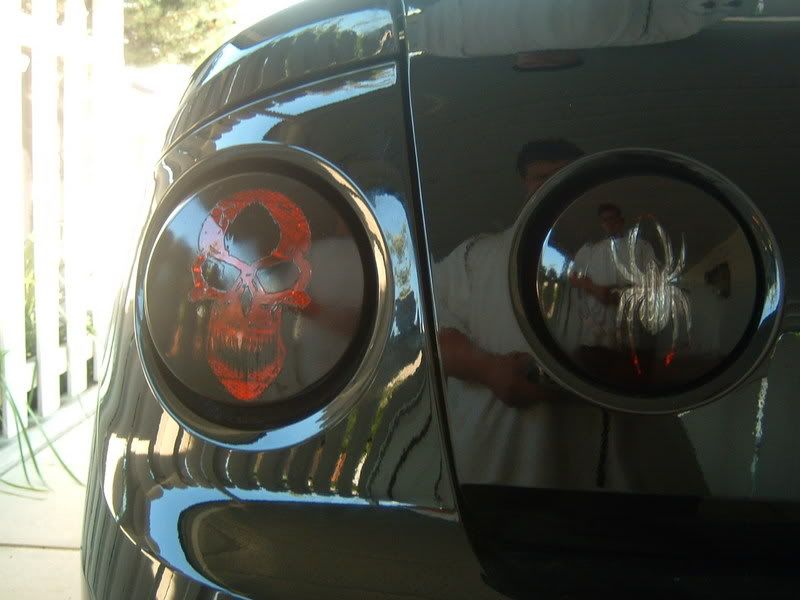
From the AB Cobalt Meet in Sylvan � July 21, 2007:
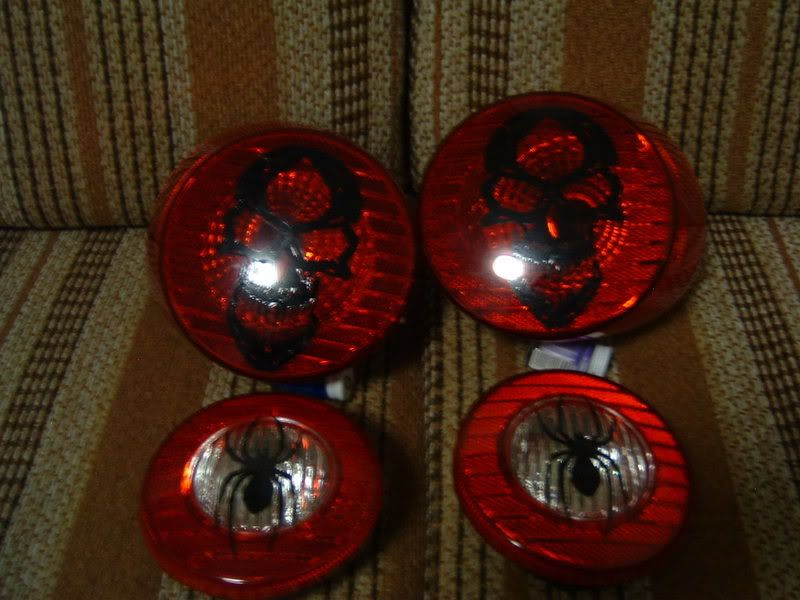
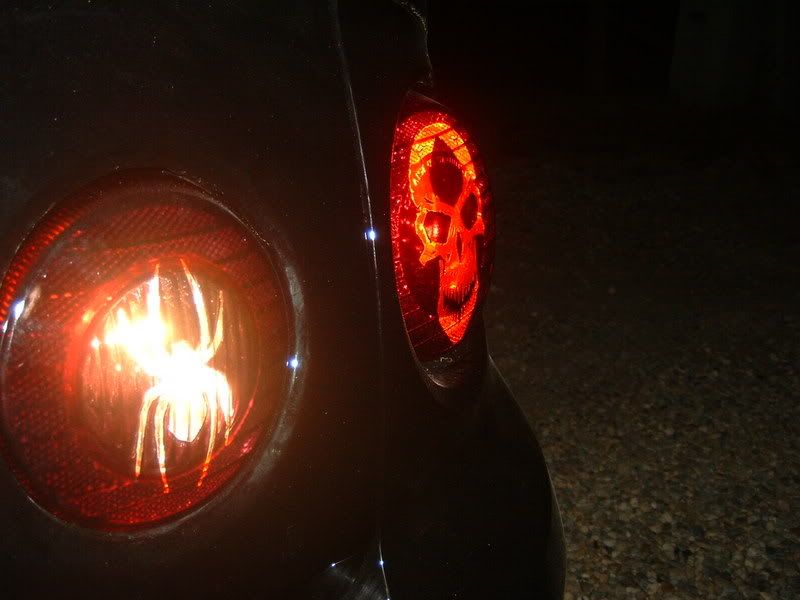
Night Time Shots:

----- ----- ----- ----- ----- ----- ----- ----- ----- ----- ----- ----- ----- -----
That�s it that�s all I hope this has been pretty straight forward and you like mine and have fun playing around with your own. I know for me the longest part of the process was picking / finding an image I�d like to have on the car for the rest of the time I own it and that would fit with my intended theme of a Black Widow (skulls = death, spiders = black widow).
Feel free to ask questions and I�ll do my best to answer them.
a) F*k up your lights trying this � remember that doing this kind of mod can and probably will void your lease or at least your dealership will charge you to replace the lights � after all the next person who buys your car may be a Granny and not a big fan of Skulls ^_^
b) Choose an image that doesn�t allow enough light to pass through and as a result you get pulled over or rear ended.
c) Tint the reverse so much that you cant see your neighbor behind you and wind up backing over his foot and him suing your ass ^_^ (just kidding but you get the point)
----- ----- ----- ----- ----- ----- ----- ----- ----- ----- ----- ----- ----- -----
Ok so I was very inspired after seeing this thread on tinting my tail lights:
Appearance HOW TO: TINT YOUR LIGHTS in 10 steps - Cobalt SS Network
However I know in my Province of Alberta it�s illegal to have them fully smoked out � (Or at least you run the risk of being regularly pulled over by the cops)�
Now in Calgary here every 2nd or 3rd vehicle is a Truck and I see them with the �Dodge� emblems / tail light guards over their lights so I figured well if they can do that to theirs why can�t I get away with something similar.
----- ----- ----- ----- ----- ----- ----- ----- ----- ----- ----- ----- ----- -----
That being said here is my 1st How To:
Dificulty - Pretty minimal since I'm new to doing mods and I was able to pull this off with some work and attention to detail.
Total Time: It took about 6 hours from the application to the final product - this was also cause I did it over the course of 2 evenings...
What you�ll need:
1) Patience & a steady hand (most important)
2) Vinyl from your local home hardware / Rona / Revy ($10)
3) Exacto-Blade or Razor blade ($5)
4) Stencil / Template (Free � Gotta Love the Internet)
5) VHT Night Shade spray tint ($9.50)
6) Clear Coat Spray ($8 � $10)
7) 1000 + grade sand paper (OPTIONAL - helps w/ VHT adherance)
Step 1) Find an image that you like � Remember to keep it simple � I looked around at a ton of Tribal tattoos and straight black art work � Keep in mind the finer the detail the harder it will be to cut around it and making detatched pieces makes it even harder to line up on both lights.
Step 2) Print off the image and use it as a stencil to cut around on the Vinyl � I personally found cutting on the back of the vinyl to be easier as it didn�t tend to lift or stick as much to the blade.
Step 3) With your cut out patterns � to get a sense of the final product take some time and tape em on a cardboard surface and spray them with the VHT � This will give you a good sense of how the final product will look as you will have to remember the final image will be in red (or white) and the rest in black.
Step 4) Placement - Once you�ve settled on a image that will allow enough light through to avoid getting you pulled over by the Cops � (hence why I went with the Skulls rather than the Spider web design I thought of originally).
Carefully remove the vinyl backing and apply the decal � remember your doing this to both sides so if you as **** as I am try measuring so you have it in almost the same spot on both unless your going for a curved image where it may look cool to have them like �(� one side and �)� on the other.
Step5) After having the vinyl laid down begin painting carefully � for this process I followed the steps here: Appearance HOW TO: TINT YOUR LIGHTS in 10 steps - Cobalt SS Network
Step 6) Once finished tinting and prior to the Clear Coat application � carefully with the razor blade and with light pressure (so you don�t scratch the hell out of the lights) Carefully cut around the vinyl to avoid pulling the tint off with the decal. I found for the skull it was easiest if I sectioned it so I didn�t have to worry about trying to get the whole thing off in one shot � meaning I cut down to the bottom of the eyes and pealed the top off then carried on to the mouth and then to the teeth.
Step 7) After finishing taking the decal off stand back look again and compare, if satisfied apply your clear coat layers � I found for me as you can kind of see in the pics 2 coats of clear coat isn�t enough to keep give the really nice gloss finish so you apply 2 � 3 light coats and 1 heavy coat (which I�ll be doing this weekend to make em shinier.
Step 8) Let dry, re install and try them out �
Day Shots:
From the AB Cobalt Meet in Sylvan � July 21, 2007:
Night Time Shots:
----- ----- ----- ----- ----- ----- ----- ----- ----- ----- ----- ----- ----- -----
That�s it that�s all I hope this has been pretty straight forward and you like mine and have fun playing around with your own. I know for me the longest part of the process was picking / finding an image I�d like to have on the car for the rest of the time I own it and that would fit with my intended theme of a Black Widow (skulls = death, spiders = black widow).
Feel free to ask questions and I�ll do my best to answer them.
Last edited by TommyP; May 23, 2012 at 04:05 PM. Reason: edit image links

Thread Starter
Senior Member
Joined: 05-24-07
Posts: 703
Likes: 0
From: Calgary, Alberta, Canada
Thanks guys its my first attempt and I already see things to improve on for next time... but for someone thats new to this hey I'm pretty happy with the way it turned out.
Senior Member
Joined: 06-02-06
Posts: 10,510
Likes: 0
From: Corpus Christi, TX
thats badass. what do you think about puting a chevy symbol and under the symbol put cobalt. and for the reverse i would leave the reverse with a 2.2
im thinkin bout doin this cause i dont want a ticket
im thinkin bout doin this cause i dont want a ticket
Senior Member
Joined: 06-28-06
Posts: 12,577
Likes: 2
From: Canada
looks good man.
but just so you know, a cop in a bad mood can still pull you over for them.
if you get pulled over for speeding they might give you grief...
In fact you know all those ram covers etc? those are technically not legal either.
I know of 2 guys where i work who were pulled over and made to remove them on the spot by mounties near stoney
Thread Starter
Senior Member
Joined: 05-24-07
Posts: 703
Likes: 0
From: Calgary, Alberta, Canada
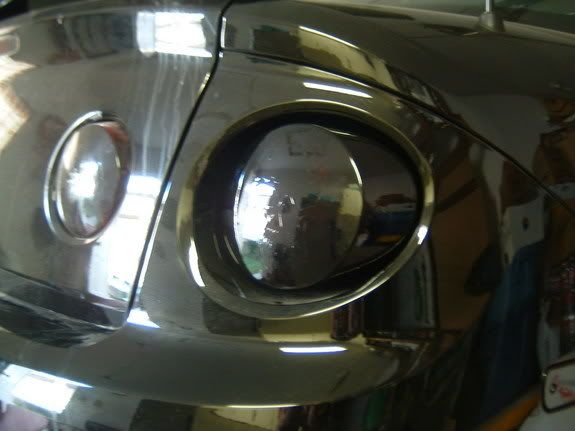
Actually guys the SS looks lit up from the flash but its also "high reflective"
I got it from http://www.westonsigns.com They've got some sweet graphics ^_^
Thanks fo the comments ^_^
---------------------------------------------------
WDSoccer
it sounds easy the shapes are very easy to trace out, I'd say go for it... 1 thing though be unique with your COBALT lettering use some cool looking Font so its unique and stand out.
I was going to do the same to my 3rd brake with "SUPERCHARGED" done in "CHILLER" font but just went with a cheap Ebay vinyl for the time being.
Senior Member
Joined: 06-02-06
Posts: 10,510
Likes: 0
From: Corpus Christi, TX
Actually guys the SS looks lit up from the flash but its also "high reflective"
I got it from http://www.westonsigns.com They've got some sweet graphics ^_^
Thanks fo the comments ^_^
---------------------------------------------------
WDSoccer
it sounds easy the shapes are very easy to trace out, I'd say go for it... 1 thing though be unique with your COBALT lettering use some cool looking Font so its unique and stand out.
I was going to do the same to my 3rd brake with "SUPERCHARGED" done in "CHILLER" font but just went with a cheap Ebay vinyl for the time being.
I got it from http://www.westonsigns.com They've got some sweet graphics ^_^
Thanks fo the comments ^_^
---------------------------------------------------
WDSoccer
it sounds easy the shapes are very easy to trace out, I'd say go for it... 1 thing though be unique with your COBALT lettering use some cool looking Font so its unique and stand out.
I was going to do the same to my 3rd brake with "SUPERCHARGED" done in "CHILLER" font but just went with a cheap Ebay vinyl for the time being.
thanks for the advice. https://www.cobaltss.net/forums/appearance-48/custom-tinted-taillights-68791/ i made a thread about it. prolly gonna end up just doin the bowtie


Senior Member
Joined: 02-25-06
Posts: 2,704
Likes: 0
From: New York
OK i have a question when u said u started cutting it i dont understand that part did u just peel the vinyl off and what u mean it was better if u did it in sections. I think i understand this part but i also think i dont understand this part and can u briefly explain how to take the lights off just pm me plz

Thread Starter
Senior Member
Joined: 05-24-07
Posts: 703
Likes: 0
From: Calgary, Alberta, Canada
OK i have a question when u said u started cutting it i dont understand that part did u just peel the vinyl off and what u mean it was better if u did it in sections. I think i understand this part but i also think i dont understand this part and can u briefly explain how to take the lights off just pm me plz
 This also goes back to the comment about the vinyl in sections... in the case of the skull i trimmed the edges and then cut horizontally in thin spots to ensure i could just take it off section by section since trying to stop it from sticking to both me and the rest of the tint was abit hard.
Hope that answers ur question.
Thread Starter
Senior Member
Joined: 05-24-07
Posts: 703
Likes: 0
From: Calgary, Alberta, Canada
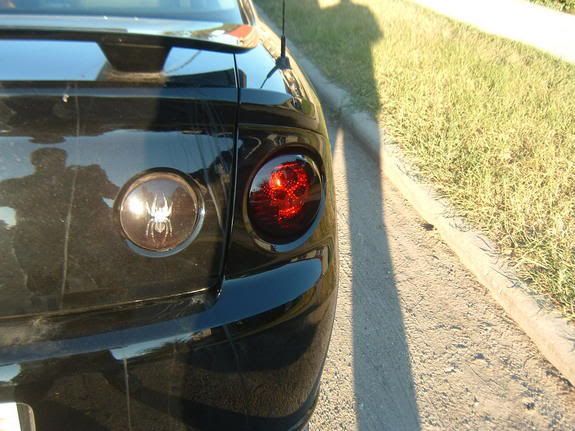
Update:
So I wasn't very happy being able to see some of the lines / ridges on the image so I lightly sanded the image again and put 2 more light coats of VHT and 3 - 4 coats of clear coat... I like the look alot more now its subtle in the day time and visable at night and really looks good and smooth...
Here are new Pics:
Day time w/o brakes:

Day Time w/ brakes:
If there are any questions please feel free to PM me ^_^
EDIT: PS sorry for the dirty car damn road construction dust.
So I wasn't very happy being able to see some of the lines / ridges on the image so I lightly sanded the image again and put 2 more light coats of VHT and 3 - 4 coats of clear coat... I like the look alot more now its subtle in the day time and visable at night and really looks good and smooth...
Here are new Pics:
Day time w/o brakes:
Day Time w/ brakes:
If there are any questions please feel free to PM me ^_^
EDIT: PS sorry for the dirty car

Senior Member
Joined: 04-12-06
Posts: 713
Likes: 0
From: El Paso/Austin, TX
DISCLAIMER: Neither I nor Cobalt SS are held liable if you:
a) F*k up your lights trying this � remember that doing this kind of mod can and probably will void your lease or at least your dealership will charge you to replace the lights � after all the next person who buys your car may be a Granny and not a big fan of Skulls ^_^
b) Choose an image that doesn�t allow enough light to pass through and as a result you get pulled over or rear ended.
c) Tint the reverse so much that you cant see your neighbor behind you and wind up backing over his foot and him suing your ass ^_^ (just kidding but you get the point)
----- ----- ----- ----- ----- ----- ----- ----- ----- ----- ----- ----- ----- -----
Ok so I was very inspired after seeing this thread on tinting my tail lights:
https://www.cobaltss.net/forums/showthread.php?t=21654
However I know in my Province of Alberta it�s illegal to have them fully smoked out � (Or at least you run the risk of being regularly pulled over by the cops)�
Now in Calgary here every 2nd or 3rd vehicle is a Truck and I see them with the �Dodge� emblems / tail light guards over their lights so I figured well if they can do that to theirs why can�t I get away with something similar.
----- ----- ----- ----- ----- ----- ----- ----- ----- ----- ----- ----- ----- -----
That being said here is my 1st How To:
Dificulty - Pretty minimal since I'm new to doing mods and I was able to pull this off with some work and attention to detail.
Total Time: It took about 6 hours from the application to the final product - this was also cause I did it over the course of 2 evenings...
What you�ll need:
1) Patience & a steady hand (most important)
2) Vinyl from your local home hardware / Rona / Revy ($10)
3) Exacto-Blade or Razor blade ($5)
4) Stencil / Template (Free � Gotta Love the Internet)
5) VHT Night Shade spray tint ($9.50)
6) Clear Coat Spray ($8 � $10)
7) 1000 + grade sand paper (OPTIONAL - helps w/ VHT adherance)
Step 1) Find an image that you like � Remember to keep it simple � I looked around at a ton of Tribal tattoos and straight black art work � Keep in mind the finer the detail the harder it will be to cut around it and making detatched pieces makes it even harder to line up on both lights.
Step 2) Print off the image and use it as a stencil to cut around on the Vinyl � I personally found cutting on the back of the vinyl to be easier as it didn�t tend to lift or stick as much to the blade.
Step 3) With your cut out patterns � to get a sense of the final product take some time and tape em on a cardboard surface and spray them with the VHT � This will give you a good sense of how the final product will look as you will have to remember the final image will be in red (or white) and the rest in black.
Step 4) Placement - Once you�ve settled on a image that will allow enough light through to avoid getting you pulled over by the Cops � (hence why I went with the Skulls rather than the Spider web design I thought of originally).
Carefully remove the vinyl backing and apply the decal � remember your doing this to both sides so if you as **** as I am try measuring so you have it in almost the same spot on both unless your going for a curved image where it may look cool to have them like �(� one side and �)� on the other.
Step5) After having the vinyl laid down begin painting carefully � for this process I followed the steps here: https://www.cobaltss.net/forums/showthread.php?t=21654
Step 6) Once finished tinting and prior to the Clear Coat application � carefully with the razor blade and with light pressure (so you don�t scratch the hell out of the lights) Carefully cut around the vinyl to avoid pulling the tint off with the decal. I found for the skull it was easiest if I sectioned it so I didn�t have to worry about trying to get the whole thing off in one shot � meaning I cut down to the bottom of the eyes and pealed the top off then carried on to the mouth and then to the teeth.
Step 7) After finishing taking the decal off stand back look again and compare, if satisfied apply your clear coat layers � I found for me as you can kind of see in the pics 2 coats of clear coat isn�t enough to keep give the really nice gloss finish so you apply 2 � 3 light coats and 1 heavy coat (which I�ll be doing this weekend to make em shinier.
Step 8) Let dry, re install and try them out �
Day Shots:
From the AB Cobalt Meet in Sylvan � July 21, 2007:
Night Time Shots:
----- ----- ----- ----- ----- ----- ----- ----- ----- ----- ----- ----- ----- -----
That�s it that�s all I hope this has been pretty straight forward and you like mine and have fun playing around with your own. I know for me the longest part of the process was picking / finding an image I�d like to have on the car for the rest of the time I own it and that would fit with my intended theme of a Black Widow (skulls = death, spiders = black widow).
Feel free to ask questions and I�ll do my best to answer them.

Thread Starter
Senior Member
Joined: 05-24-07
Posts: 703
Likes: 0
From: Calgary, Alberta, Canada

Thread
Thread Starter
Forum
Replies
Last Post