
Other/Misc: How To: Fix your unresponsive Keyless Entry Remote


Thread Starter
New Member
Joined: 08-09-09
Posts: 144
Likes: 0
From: Atlanta
How To: Fix your unresponsive Keyless Entry Remote
Ok guys. This is my first "how to". I got pretty tired of my keyless entry remote working and not working intermittently, so I opened it up and fixed it.
Tools needed: Small flathead screwdriver, needle nose pliers, soldering iron, and solder.
__________________________________________________ ____________________________________
First, use a small flathead screwdriver to open the remote. There is a spot right by the key ring where you are supposed to do it.

__________________________________________________ ____________________________________
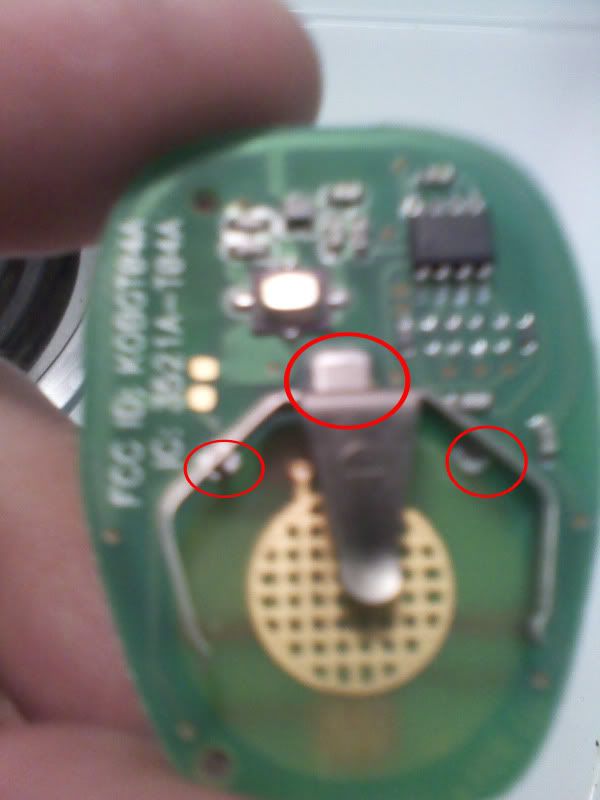
Second, remove the battery and identify the 3 posts that are soldered to the circuit board. These are the points that need to be re-soldered. The factory solder is brittle and breaks, which is not good for conductivity.
__________________________________________________ ____________________________________
Also note the solder points on the backside for two of the posts.

__________________________________________________ ____________________________________
Re-solder all three of these points and you should be good to go. (I think its 60/40 rosin core solder)
__________________________________________________ ____________________________________
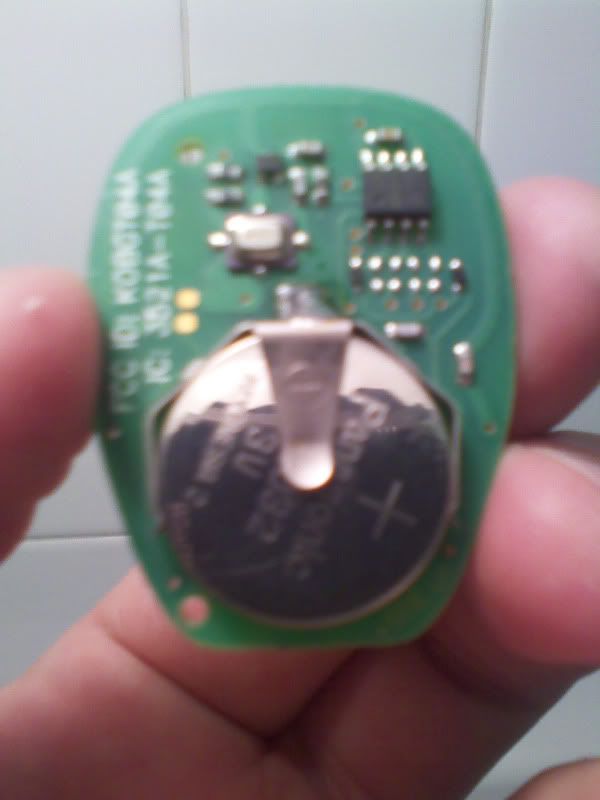
I used needle nose pliers to hold the batter bracket to the circuit board while I soldered. a clamp or small vice will work nicely too. Also, you can lightly scuff the "waffle" looking traces for the bottom "negative" side of the battery. Do it lightly though, because you don't want to break the traces.
Tools needed: Small flathead screwdriver, needle nose pliers, soldering iron, and solder.
__________________________________________________ ____________________________________
First, use a small flathead screwdriver to open the remote. There is a spot right by the key ring where you are supposed to do it.
__________________________________________________ ____________________________________
Second, remove the battery and identify the 3 posts that are soldered to the circuit board. These are the points that need to be re-soldered. The factory solder is brittle and breaks, which is not good for conductivity.
__________________________________________________ ____________________________________
Also note the solder points on the backside for two of the posts.
__________________________________________________ ____________________________________
Re-solder all three of these points and you should be good to go. (I think its 60/40 rosin core solder)
__________________________________________________ ____________________________________
I used needle nose pliers to hold the batter bracket to the circuit board while I soldered. a clamp or small vice will work nicely too. Also, you can lightly scuff the "waffle" looking traces for the bottom "negative" side of the battery. Do it lightly though, because you don't want to break the traces.


Senior Member
Joined: 11-20-07
Posts: 2,961
Likes: 1
From: Pittsburgh, Pistolvania
I suggest covering the parts you're not working on with tape. I accidently melted one of the transistors off toward the top when a cat bumped me and caused solder to drop onto the wrong part of the board.

Member
Joined: 08-23-07
Posts: 304
Likes: 0
From: Idaho
Mine's torn apart now just for this reason. I went through 3 or 4 of them under warranty. So very common for the newer ones to break (I'm a GM Parts Guy), the older style transmitters worked perfectly fine then they had to go and change them.
Thread Starter
New Member
Joined: 08-09-09
Posts: 144
Likes: 0
From: Atlanta
Make sure your soldering iron is hot enough... You shouldn't have to keep heat on the circuit board for too long... thats when you start melting things. And definitely use a soldering pen, and not a gun....


this works for some. most of the people having this issue thou isn't due to the solder points them self alone, its the rubber pad them self, so re soldering them isn't going to be a fix for all. over time and constint pushing of the buttons, the back contact points start to form to the circuit board. simple fix is to change the rubber button pad. i know 100's of people that have, had the problem of there fobs not working, and i told them to do that and problem solved. nice write up thou.

Senior Member
Joined: 02-08-09
Posts: 588
Likes: 0
From: Orange County CA
this works for some. most of the people having this issue thou isn't due to the solder points them self alone, its the rubber pad them self, so re soldering them isn't going to be a fix for all. over time and constint pushing of the buttons, the back contact points start to form to the circuit board. simple fix is to change the rubber button pad. i know 100's of people that have, had the problem of there fobs not working, and i told them to do that and problem solved. nice write up thou.
happened to me i did the same thing.
If you take it apart and take the pad and position another button besides the lock button, over the part of the circuit board where the lock button is and press down, it probably will work real well then its the rubber.

Senior Member
Joined: 07-27-09
Posts: 1,868
Likes: 0
From: Proctorville OH
i had the board out and tryed just touching wear the buttons click down and it didnt really do any thing.. then i licked my finger and kinda rubed it while pushing the battery connect against the board and it will lock and unlock.. like a couple times.. then it wont do anything... i guess i just needa try sodderin it

when taking pictures really up close use macro mode or macro feature in the camera, it will help for up close pictures.
and i need to do this, when i changed my batteries, one of the iron pieces broke off
and i need to do this, when i changed my batteries, one of the iron pieces broke off
Thread Starter
New Member
Joined: 08-09-09
Posts: 144
Likes: 0
From: Atlanta

Senior Member
Joined: 07-12-08
Posts: 989
Likes: 0
From: Burbank, CA
i had the same issue with my lock button not working all the time. took it apart and did the same re-welds you showed. still having the same issue. i'm wondering if the battery is dying or if there's another problem. for now, i just press the lock button on the door twice when i get out.
btw. the unlock button seems to work fine everytime, but the distance to unlock seems to be droppin, again, may be battery related
any suggestions on where to get the rubber? thickness, size, etc i believe i have that issue
btw. the unlock button seems to work fine everytime, but the distance to unlock seems to be droppin, again, may be battery related
this works for some. most of the people having this issue thou isn't due to the solder points them self alone, its the rubber pad them self, so re soldering them isn't going to be a fix for all. over time and constint pushing of the buttons, the back contact points start to form to the circuit board. simple fix is to change the rubber button pad. i know 100's of people that have, had the problem of there fobs not working, and i told them to do that and problem solved. nice write up thou.
Last edited by kevinj4891; Feb 9, 2010 at 12:40 PM. Reason: Automerged Doublepost

Member
Joined: 08-26-07
Posts: 237
Likes: 0
From: Cincinnati, Ohio
Ever since I've had the car it took atleast 5 button presses to get it to respond. Replaced the battery, but still the same issue. I've done this type of fix on fobs for friends when the clip came off completely. Guess I never thought of resoldering it on mine because the solder joints didn't look bad when I had it open before. I opened it up today and sure enough one side had pulled up. Remelted each joint and added more solder for reinforcement.
Just ran out and tried it. Works every press now.. thanks
Just ran out and tried it. Works every press now.. thanks
i had the same issue with my lock button not working all the time. took it apart and did the same re-welds you showed. still having the same issue. i'm wondering if the battery is dying or if there's another problem. for now, i just press the lock button on the door twice when i get out.
btw. the unlock button seems to work fine everytime, but the distance to unlock seems to be droppin, again, may be battery related
any suggestions on where to get the rubber? thickness, size, etc i believe i have that issue
btw. the unlock button seems to work fine everytime, but the distance to unlock seems to be droppin, again, may be battery related
any suggestions on where to get the rubber? thickness, size, etc i believe i have that issue

New Member
Joined: 08-27-07
Posts: 4
Likes: 0
From: san antonio texas
Vendor
My Question is, what if i dont want to deal with the saldering but im thinking of buying replacements on the internet. the local dealer ship quoted the part costing $75.00 and labor for programing $55.00. so far on the internet i've been seeing prices ranging from $25.00-$50.00. i asked the parts salesman from the dealer what risk am i taking if i buy them on the net. he said, "customers have pruchased them from vendors other than the dealer and many were unable to be programed". a reputable vendor wont give me those problems.... or will they. are there any vendors for remotes that are in good standing? also, let it be noted that the dealership asked for the last 8 numbers of the VIN to quote an exact price and the net sites dont. whats the deal with that?
