
Appearance: How to: Glowing interior trim. (long read, pics)


Thread Starter
Senior Member
iTrader: (4)
Joined: 09-07-11
Posts: 3,254
Likes: 117
From: Las Cruces, NM
How to: Glowing interior trim. (long read, pics)
*ALWAYS* err in the side of caution. If you finish the project and want more light to show you can always grind more of the trim away. You can't undo showing too much light without looking ghetto.
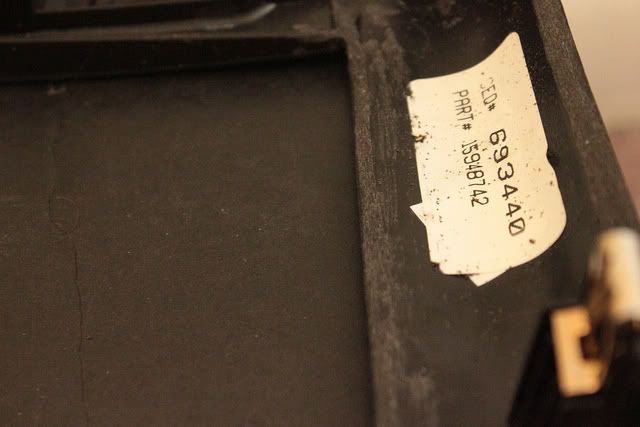
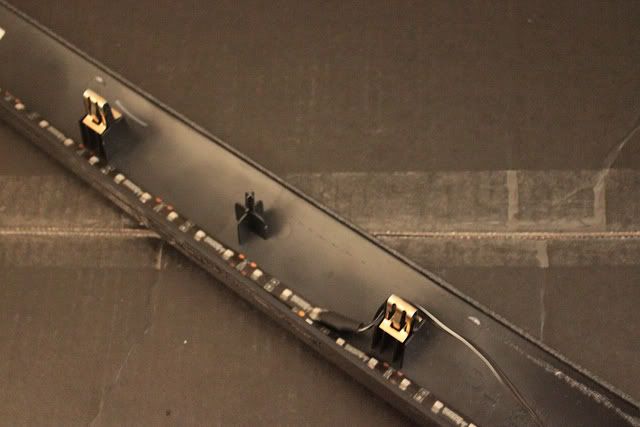
A couple people asked so why not? It's a long read but the info is important so you don't F up your trim and get mad at me. Here's how I got my glowing trim done. First, you need to buy your LEDs then pull all the dash trim off that you want to glow(just pull on it, hard). I strongly suggest sitting the light strips inside, putting the trim back on, and test-fitting them first. Also if you can, test the lights by either leaving the "Try Me" battery pack connected and routing the wires out of the trim, or you can simply push the positive wire into the red/yellow wire in the in-car fusebox(and ground the negative wire of course). All cars are different, so you need to find out where to do your delicate grinding and where to leave it alone. So, this is what we start with.

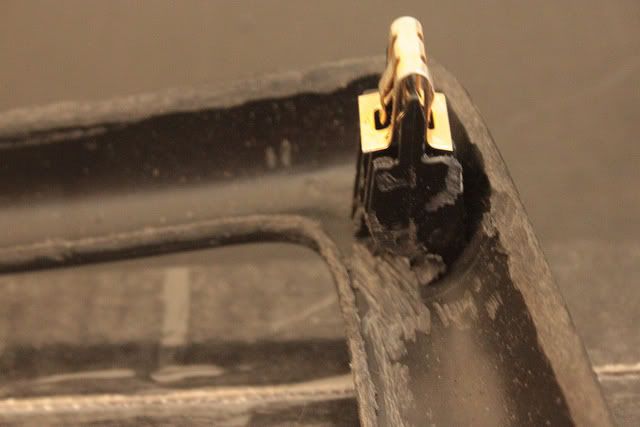
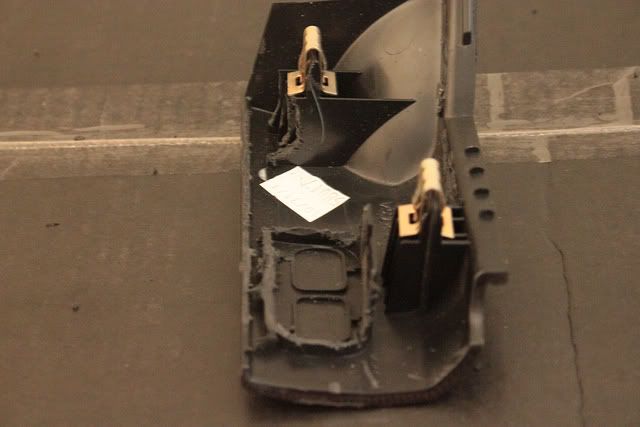
Next step is to start grinding. I used a dremel tool with the rough grit sandpaper drum. Whatever you do, be careful and ease into it. Don't press too hard. It's only plastic. I only had to grind the edges of the passenger trim very minimally, but here is the radio plate. I also shaved away a small portion of the clip support for the light strips to fit. Be careful here or you may break the clip support apart from removing it from the dash.
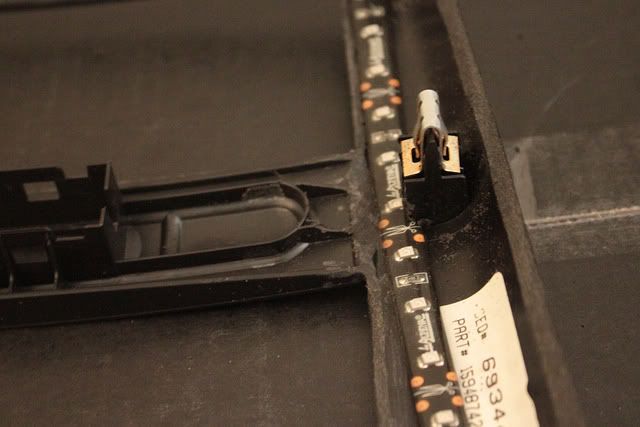
Another very important piece of information: You can alter how much light exits the trim without changing the outside appearance of the trim at all.I depends solely on your ability to grind. For example, this looks exactly the same as a stock piece outside but notice the new angle of the edges. It's essentially changing the edge of the trim from a square to a triangle or point.
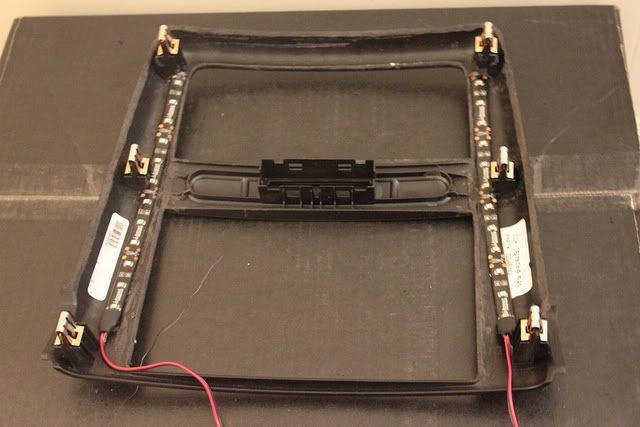
Completed radio trim:
Completed passenger (above glovebox) trim. I cut slots into the bottoms of the trim for ventilation, drainage, and to a lesser extent to shine light through.
Next is the piece to the right of the steering column. I don't have buttons here, so it made my work a lot easier. If you have buttons there get creative! I just shaved the button support off. I literally had to do nothing to the trim with the instrument cluster dimmer except put lights in it just under the dimmer housing, so no pics of it.

Next is wiring. I wired the dimmer-switch trim strip under the steering column trim to the trim just right of the steering column. I then spliced and sealed(electrical tape) + and - wires of the dimmer-switch strip to the + and - wires of the strip to the right of the steering column. The light strip wires just right of the steering column were spliced/sealed into the nearby radio trim strip. The left radio trim light strip was spliced/sealed was wired to the right side radio LED strip. The passenger side trims were both spliced/sealed into the right side radio trim lights as well. Last thing to do was wire the only thing left to wire. The right side radio lights were the connection to a power source and ground.
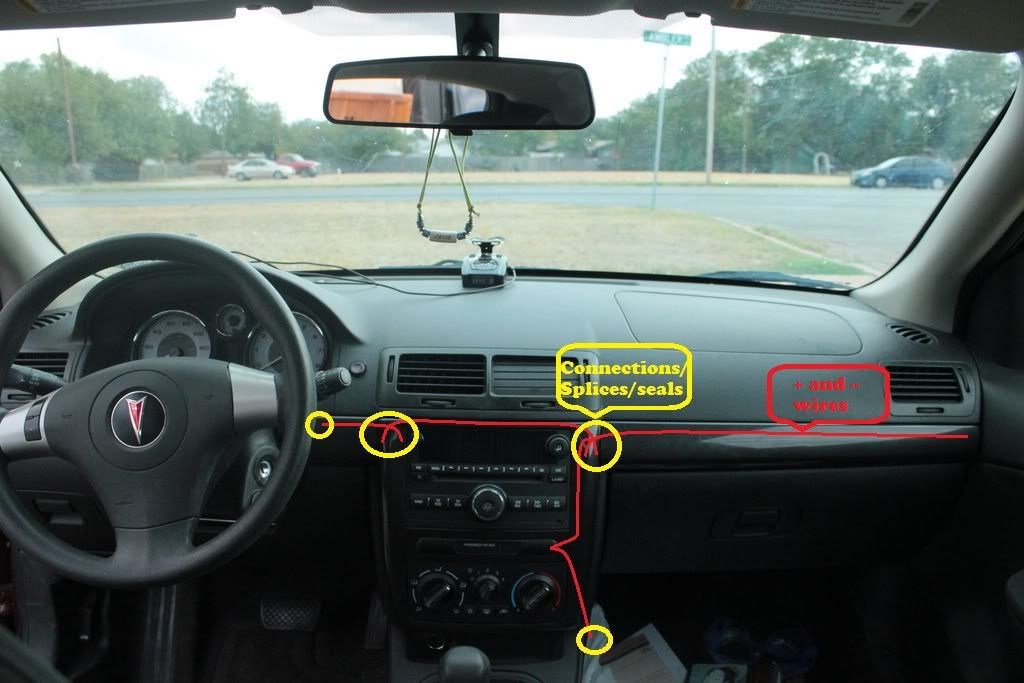
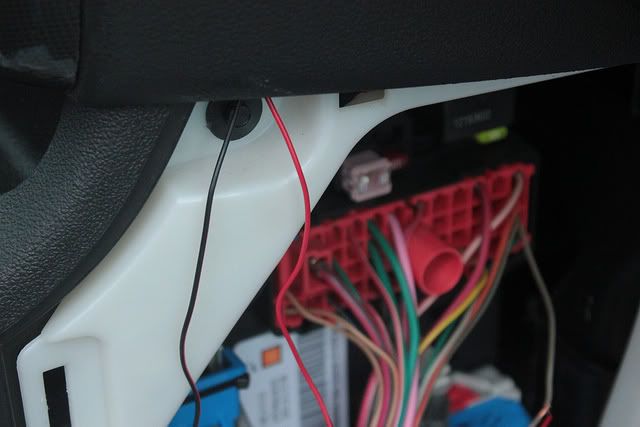
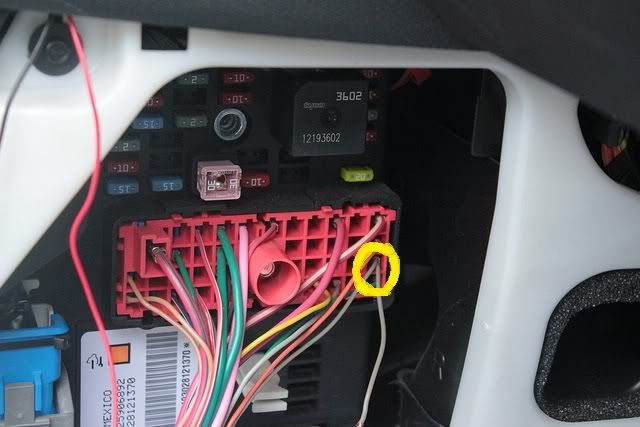
I wanted my lights to come on ONLY at night when the instrument cluster lights did, so I did some prodding and found exactly the wires to use as my power source. See the light brown/tan wires circled? They get power with the instrument cluster lights only. Simply splice and seal the LED strips into one of these wires, or wire it into another spare fuse space, then connect your negative wire to any good ground and you are set!
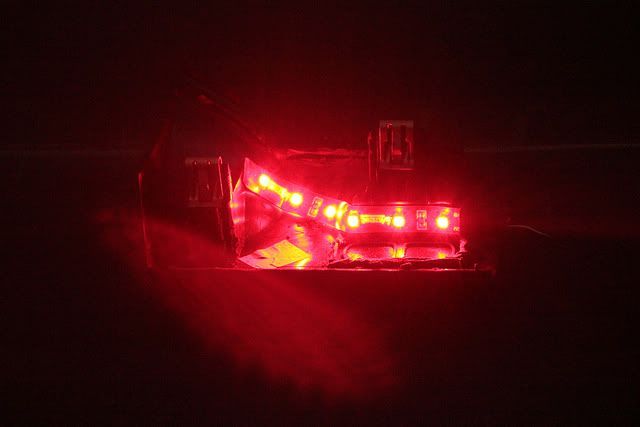
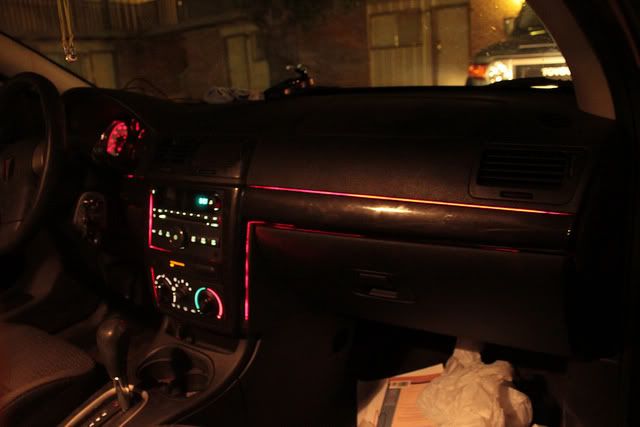
Here's what mine look like. It took me 6 hours start to finish, including grinding. 1 hour of that was freaking out because someone honked while I was under the steering column and *insert stupid #@$%* and my EPS unit was disabled from being shorted? Not sure.
removed + reinstalled EPS fuses and no battery for a couple minutes and the unit worked again.
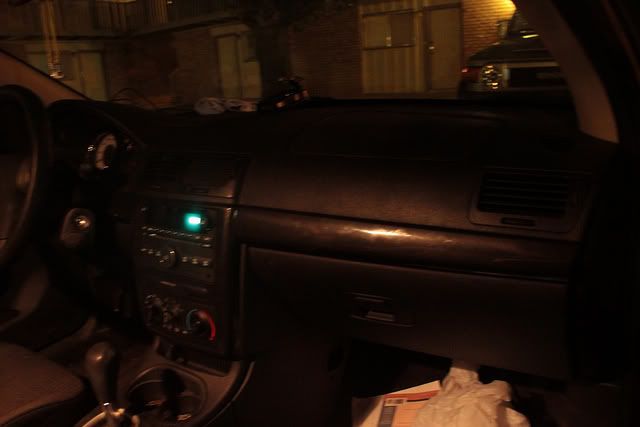
Lights off:
Lights on:
A couple people asked so why not?
Next step is to start grinding. I used a dremel tool with the rough grit sandpaper drum. Whatever you do, be careful and ease into it. Don't press too hard. It's only plastic. I only had to grind the edges of the passenger trim very minimally, but here is the radio plate. I also shaved away a small portion of the clip support for the light strips to fit. Be careful here or you may break the clip support apart from removing it from the dash.
Another very important piece of information: You can alter how much light exits the trim without changing the outside appearance of the trim at all.I depends solely on your ability to grind. For example, this looks exactly the same as a stock piece outside but notice the new angle of the edges. It's essentially changing the edge of the trim from a square to a triangle or point.
Completed radio trim:
Completed passenger (above glovebox) trim. I cut slots into the bottoms of the trim for ventilation, drainage, and to a lesser extent to shine light through.
Next is the piece to the right of the steering column. I don't have buttons here, so it made my work a lot easier. If you have buttons there get creative!
Next is wiring. I wired the dimmer-switch trim strip under the steering column trim to the trim just right of the steering column. I then spliced and sealed(electrical tape) + and - wires of the dimmer-switch strip to the + and - wires of the strip to the right of the steering column. The light strip wires just right of the steering column were spliced/sealed into the nearby radio trim strip. The left radio trim light strip was spliced/sealed was wired to the right side radio LED strip. The passenger side trims were both spliced/sealed into the right side radio trim lights as well. Last thing to do was wire the only thing left to wire. The right side radio lights were the connection to a power source and ground.
I wanted my lights to come on ONLY at night when the instrument cluster lights did, so I did some prodding and found exactly the wires to use as my power source. See the light brown/tan wires circled? They get power with the instrument cluster lights only. Simply splice and seal the LED strips into one of these wires, or wire it into another spare fuse space, then connect your negative wire to any good ground and you are set!
Here's what mine look like. It took me 6 hours start to finish, including grinding. 1 hour of that was freaking out because someone honked while I was under the steering column and *insert stupid #@$%* and my EPS unit was disabled from being shorted? Not sure.
removed + reinstalled EPS fuses and no battery for a couple minutes and the unit worked again.
Lights off:
Lights on:

Thread Starter
Senior Member
iTrader: (4)
Joined: 09-07-11
Posts: 3,254
Likes: 117
From: Las Cruces, NM
That a question or a statement? Lol
Linked to flickr:
Custom glowing trim | Flickr - Photo Sharing!
And a vid:
G5 glowing trim. (Cobalt) - YouTube
Linked to flickr:
Custom glowing trim | Flickr - Photo Sharing!
And a vid:
G5 glowing trim. (Cobalt) - YouTube


New Member
Joined: 12-07-10
Posts: 113
Likes: 0
From: Florence SC
there is nothing hard about pulling the airbag just don't lose the little center positioning clips for the connectors or you will get a code.


looks like too much work and money for such little results.. i like the idea though. definately headed in the right direction. if we were fords this would have already been done in multiple colors  lol
lol
lol

Thread Starter
Senior Member
iTrader: (4)
Joined: 09-07-11
Posts: 3,254
Likes: 117
From: Las Cruces, NM
Didn't take that long. 6 hours to R+D, fix my EPS unit, grind everything, and install. I could do another set in 2 hours flat.
It may be but the lights would have pointed away from the gaps. Plus there isn't a flush mounting surface on the dash, it is indented, etc... pull your trim off an you'll see what I mean.
How so?
Light is escaping from gaps in the plastic between the dash and the trim.
This is probably one of the first times anyone has done this on a cobalt/G5. That definitely sounds like a good idea. I want to wrap my cheap looking trim in carbon fiber or something so I may go through and improve it a bit. Thanks for the idea!
How so?
This is probably one of the first times anyone has done this on a cobalt/G5. That definitely sounds like a good idea. I want to wrap my cheap looking trim in carbon fiber or something so I may go through and improve it a bit. Thanks for the idea!


Senior Member
Joined: 09-08-10
Posts: 575
Likes: 0
From: New Castle IN
Thread Starter
Senior Member
iTrader: (4)
Joined: 09-07-11
Posts: 3,254
Likes: 117
From: Las Cruces, NM
^^This. A lot more expensive than Ebay but I had cash in my pocket, Autozone had red ones, and I didn't want to wait so I bought them. Ebay is about 1/3rd the cost, so if you can wait you would save big money.
How does someone go about doing that? Wire it to the sub?
How does someone go about doing that? Wire it to the sub?
Last edited by Jesse; Sep 12, 2011 at 12:19 PM. Reason: Automerged Doublepost
Joined: 05-18-11
Posts: 39,564
Likes: 87
From: West Chicago, IL
fire waiting to happen my ass as long as u did it right which im sure you did!
looks pretty sweet man, and definately a step up from just slapping leds under ur glovebox and stuff, this is really pretty cool looking!
looks pretty sweet man, and definately a step up from just slapping leds under ur glovebox and stuff, this is really pretty cool looking!