Drivetrain: How to Install Axles and CAB's (56k time to upgrade)
 09-24-2006, 06:55 PM
#1
Senior Member
Thread Starter
Join Date: 03-26-06
Location: Michigan
Posts: 2,271
Likes: 0
Received 0 Likes
on
0 Posts
How to Install Axles and CAB's (56k time to upgrade)
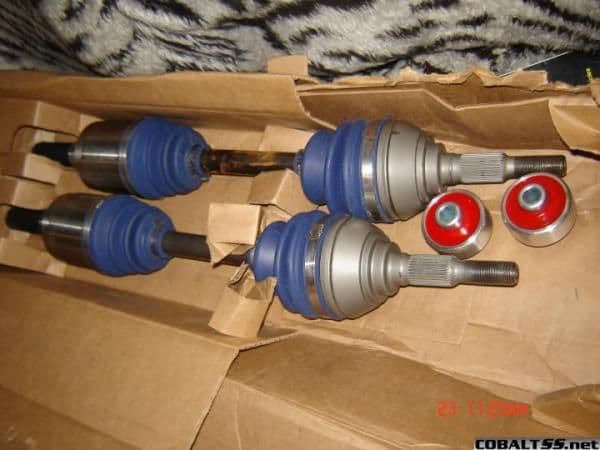
Well as we all know our stock axles are about as strong as toothpicks, so I picked up the Driveshaft Shop level 2 axles, and the poly CAB's from INTENSE Racing. They came through with crazy fast shiping again, so big tanks to them. And thanks to Darren (ENUFPWR) for a few tips
And an even bigger thanks to my awesome gf, who helped me out and made several parts runs for me. Love ya babe.
I absolutely love these mods. The entire car feels more solid and secure now.
On to the fun
1. Support car on jack stands, remove tires
2. Remove Axle retaining nut (deep 29mm-30) I think this is a 29mm nut, but after searching all of Lansing, all I could find was a deepwell 30mm, so that's what I used. I had my gf sit in the car and stand on the brakes, while I loosened this nut.
3. Remove 2 (15mm) Caliper bracket bolts. Slide caliper off of rotor and hang out of the way (I used wire straps to hang it from the springs (You can see 2 of the blue bolts mentioned in step 5 here)

4. Remove rotors, destroying the retaining washers, if you haven�t already

5. Loosen lower ball joint retaining bolt and nut (15 and 16mm). Allow control Arm and ball joint to drop. This will allow for easier removal of the stock axle

6. Remove 3 (15mm) blue hub retaining bolts. These thread in from the back, and hold the hub in place.

7. Pull HUB out from around axle (unclip ABS sensor clip)

8. Push axle through HUB bracket, remove axle
10. Now it is time to re-install the new axles doing everything in reverse. MAKE SURE AXLES ARE COMPLETELY INSTALLED, the step in diameter should seat against the mating surface. It also helps to use MT fluid to lube up the splines prior to assembly
*I had a dificult time getting the new axles all the way in to the intermediate shaft, so I took that assembly out of the car, removing the 3 (15mm) bolts that hold it in place. This is just the way I did, mine,, you may have better luck getting the new axles fully seated without this step. I had to do the assembly out of the car, with "gentle" persuasion from a rubber mallet.
**Note, if you take out the intermediate shaft, have a pan ready to catch the fluid that will drain out,

Re-assembled

IF YOU DO LOSE OR SPILL SOME MT FLUID
The P/N for the fluid we need is 21018899 According to my dealership, our transmissions require this special trans fluid. It is about 12-13 dollars per 32oz container.
The driver's side is the exact same as the Passenger. Except mine took me about 1/10th of the time, as I didn't hafta stop and go buy parts every 20mins
***Be sure to have a pan ready to catch the fluid that will release from the driver's side as well. If you removed the intermediate shaft you won't lose as much on the driver's side.
****When tightening the axle retaining nut, BE SURE TO TIGHTEN COMPLETELY there is approx 1/2" more thread stock than the stock axles had, so there will be an extra 1/2" of thread stock exposed, you want to be damn sure you've tightened this down completely, any play in the assy right here could be catastrophic
LAST STEP. On the drivers side remove the hex head (I believe it is 8mm) trans fill plug, and using a long funnel, (or funnel and a section of tube, like I did) refill with the fluid you dropped, (if you've kept it clean, otherwise refill with the appropriate fluid I listed above. Fill until fluid starts coming out of the fill hole.

run tube to here

Most will just re-assemble at this point, but I went on to do my CAB's,, so those steps will follow
CAB�s
-With ball joint already disconnected
1) Remove 13/16" bolt from rearmost A-arm support

2) Remove 2 (15mm) bolts at front A-arm mount
3) Remove A-arms, depending on how high your car is jacked up you may or may not have a difficult time here, just keep wiggling, they will come out and forward towards the front of the car.

4) Use press or vice and patience, to press out stock bushings. I'm not sure I'd recommend doing them this way,, but what the hell it worked.
I'll try to describe my method. I took two sections of 2 x 6 and cut holes in them just slightly larger than the diamter of the CAB's. I doubled these pieces together and placed them on one side of the control arm. On the other side I used a deep socket to press the stock bushings out of the arms.

You should end up with a stock bushing pressed into the wood spacer(s)

5) Press in new bushings. I reused one of the boards I made from step one on the back side of the control arm, and pressed the new bushings in using another socket and a metal spacer I made. The metal spacer had a 1" hole that the smaller section of the bushing fit through. I placed the spacer against the one side of the bushing, and then placed a socket over that and pressed everything together in the vice.
I didn't get any pics of this step,,, but if you understand how I pressed the stock bushings out you should get this. Feel free to ask questions though.

***If you have access to a press that is the best way to do this. You will still need to make spacers for either side of the control arm to distribute the loads though.
Now just re-assemble in reverse and have some fun bitches. Wheelhop is 100% gonedy for me now. Granted I have the trans mounts and Ingals torque brace already. But it feels like a whole new car now. Power delivery feels smoother and I have confidece I can launch the **** out of it and not hear that dreaded boom again.

Disclaimer: I assume the reader to have a decent level of mechanical competence in this guide. I am not responsible for any damages, injuries, deaths, or embarassment caused from your failure to follow directions. This isn't extremely difficult, but it isn't for the novice either. So if you don't feel comfortable tearing your car apart this far, pay a proffesional to do so.
Comments, criticisms, corrections or suggestions are welcomed.
Thanks
And an even bigger thanks to my awesome gf, who helped me out and made several parts runs for me. Love ya babe.
I absolutely love these mods. The entire car feels more solid and secure now.
On to the fun
1. Support car on jack stands, remove tires
2. Remove Axle retaining nut (deep 29mm-30) I think this is a 29mm nut, but after searching all of Lansing, all I could find was a deepwell 30mm, so that's what I used. I had my gf sit in the car and stand on the brakes, while I loosened this nut.
3. Remove 2 (15mm) Caliper bracket bolts. Slide caliper off of rotor and hang out of the way (I used wire straps to hang it from the springs (You can see 2 of the blue bolts mentioned in step 5 here)
4. Remove rotors, destroying the retaining washers, if you haven�t already
5. Loosen lower ball joint retaining bolt and nut (15 and 16mm). Allow control Arm and ball joint to drop. This will allow for easier removal of the stock axle
6. Remove 3 (15mm) blue hub retaining bolts. These thread in from the back, and hold the hub in place.
7. Pull HUB out from around axle (unclip ABS sensor clip)
8. Push axle through HUB bracket, remove axle
10. Now it is time to re-install the new axles doing everything in reverse. MAKE SURE AXLES ARE COMPLETELY INSTALLED, the step in diameter should seat against the mating surface. It also helps to use MT fluid to lube up the splines prior to assembly
*I had a dificult time getting the new axles all the way in to the intermediate shaft, so I took that assembly out of the car, removing the 3 (15mm) bolts that hold it in place. This is just the way I did, mine,, you may have better luck getting the new axles fully seated without this step. I had to do the assembly out of the car, with "gentle" persuasion from a rubber mallet.
**Note, if you take out the intermediate shaft, have a pan ready to catch the fluid that will drain out,
Re-assembled
IF YOU DO LOSE OR SPILL SOME MT FLUID
The P/N for the fluid we need is 21018899 According to my dealership, our transmissions require this special trans fluid. It is about 12-13 dollars per 32oz container.
The driver's side is the exact same as the Passenger. Except mine took me about 1/10th of the time, as I didn't hafta stop and go buy parts every 20mins
***Be sure to have a pan ready to catch the fluid that will release from the driver's side as well. If you removed the intermediate shaft you won't lose as much on the driver's side.
****When tightening the axle retaining nut, BE SURE TO TIGHTEN COMPLETELY there is approx 1/2" more thread stock than the stock axles had, so there will be an extra 1/2" of thread stock exposed, you want to be damn sure you've tightened this down completely, any play in the assy right here could be catastrophic
LAST STEP. On the drivers side remove the hex head (I believe it is 8mm) trans fill plug, and using a long funnel, (or funnel and a section of tube, like I did) refill with the fluid you dropped, (if you've kept it clean, otherwise refill with the appropriate fluid I listed above. Fill until fluid starts coming out of the fill hole.
run tube to here
Most will just re-assemble at this point, but I went on to do my CAB's,, so those steps will follow
CAB�s
-With ball joint already disconnected
1) Remove 13/16" bolt from rearmost A-arm support
2) Remove 2 (15mm) bolts at front A-arm mount
3) Remove A-arms, depending on how high your car is jacked up you may or may not have a difficult time here, just keep wiggling, they will come out and forward towards the front of the car.
4) Use press or vice and patience, to press out stock bushings. I'm not sure I'd recommend doing them this way,, but what the hell it worked.
I'll try to describe my method. I took two sections of 2 x 6 and cut holes in them just slightly larger than the diamter of the CAB's. I doubled these pieces together and placed them on one side of the control arm. On the other side I used a deep socket to press the stock bushings out of the arms.
You should end up with a stock bushing pressed into the wood spacer(s)
5) Press in new bushings. I reused one of the boards I made from step one on the back side of the control arm, and pressed the new bushings in using another socket and a metal spacer I made. The metal spacer had a 1" hole that the smaller section of the bushing fit through. I placed the spacer against the one side of the bushing, and then placed a socket over that and pressed everything together in the vice.
I didn't get any pics of this step,,, but if you understand how I pressed the stock bushings out you should get this. Feel free to ask questions though.
***If you have access to a press that is the best way to do this. You will still need to make spacers for either side of the control arm to distribute the loads though.
Now just re-assemble in reverse and have some fun bitches. Wheelhop is 100% gonedy for me now. Granted I have the trans mounts and Ingals torque brace already. But it feels like a whole new car now. Power delivery feels smoother and I have confidece I can launch the **** out of it and not hear that dreaded boom again.
Disclaimer: I assume the reader to have a decent level of mechanical competence in this guide. I am not responsible for any damages, injuries, deaths, or embarassment caused from your failure to follow directions. This isn't extremely difficult, but it isn't for the novice either. So if you don't feel comfortable tearing your car apart this far, pay a proffesional to do so.
Comments, criticisms, corrections or suggestions are welcomed.
Thanks
Last edited by TommyP; 05-17-2012 at 08:50 PM.
 09-24-2006, 07:02 PM
#2
Senior Member
Join Date: 09-15-05
Location: OP, KS
Posts: 2,256
Likes: 0
Received 0 Likes
on
0 Posts
Nice Write up!!!! Glad the vice worked for you. And its nice to have some pictures of the axle install.
Also, is that a funnel and a tube......or a beer bong?!!?!!?!?
Also, is that a funnel and a tube......or a beer bong?!!?!!?!?
09-24-2006, 07:21 PM
#3
Senior Member
Thread Starter
Join Date: 03-26-06
Location: Michigan
Posts: 2,271
Likes: 0
Received 0 Likes
on
0 Posts
Originally Posted by patathSS
Also, is that a funnel and a tube......or a beer bong?!!?!!?!?
Seriously though, I was fed up with making trips to the parts store, so I got a little creative. It turned out pretty well though, I think it would have been harder with a real funnel.
Kinda funny. but I waster hours and hours last night fightig with a C-clip that retains the intemediate shaft. DO NOT TRY to pull these C-Clips,
 09-24-2006, 07:45 PM
#5
Senior Member
Thread Starter
Join Date: 03-26-06
Location: Michigan
Posts: 2,271
Likes: 0
Received 0 Likes
on
0 Posts
^^Gracias. I wanna see some shots of your car rockin the CF gear. I've wanted to do the hood and trunk since I bought her. Waiting for a nice vented hood to come out though
09-24-2006, 07:58 PM
#6
Senior Member
Join Date: 07-06-04
Location: Spaceball 1 or better known as CT
Posts: 2,082
Likes: 0
Received 2 Likes
on
2 Posts
Make sure to get the F/E aligned 
Also the c-clips were they on both sides? Should be, how did you make sure the axles were inserted all the way?
Nice WU!
Also how much beefier are the HD axles compared to the old ones
Also the c-clips were they on both sides? Should be, how did you make sure the axles were inserted all the way?
Nice WU!
Also how much beefier are the HD axles compared to the old ones
09-24-2006, 08:11 PM
#8
Senior Member
Thread Starter
Join Date: 03-26-06
Location: Michigan
Posts: 2,271
Likes: 0
Received 0 Likes
on
0 Posts
Originally Posted by SS_SC_Cobalt
Make sure to get the F/E aligned
Also the c-clips were they on both sides? Should be, how did you make sure the axles were inserted all the way?
Nice WU!
Also how much beefier are the HD axles compared to the old ones
Also the c-clips were they on both sides? Should be, how did you make sure the axles were inserted all the way?
Nice WU!
Also how much beefier are the HD axles compared to the old ones
You'll know when the axles are inserted all the way, They will seat against the step up in diameter. At first I tried re-installing without pulling the int/ shaft out (I think that's called an intermediate shaft, anwywho, that's what I'm calling it)
But It wouldn't seat all the way, so pulled everything out just to be safe. The driver's side is easier, as the transfer case is right there,, just keep at them and they will go in all the way. Lube up the splines for re-assembly, it helps,, I'll add that to the write up.
the intermediate shaft is fool proof, it wont bolt back in unless it's in all the way.
And they are way beefier,, probably about 60% heavier in weight (just a guess) But the materials, construction, and size are all a vast improvement over the stockers
Here's Darrens thread with side by side pics
Last edited by SS33; 09-25-2006 at 11:26 AM.
09-25-2006, 09:33 AM
#9
Senior Member
Thread Starter
Join Date: 03-26-06
Location: Michigan
Posts: 2,271
Likes: 0
Received 0 Likes
on
0 Posts
Recipe for ZERO wheel hop
Update:
I was running a little late this morning, and the air was nice and brisk, so what better opportunity for some spirited driving. I absolutely love how the car feels after these mods. Acceleration and power delivery feel far more linear now.
This is my recipe for zero wheel hop
1) Trans mounts. I'm listing these first because I think they helped the most (aside from CAB's) Use Ubergeff's awesome How-To
2) CAB's I think these are making most of the huge difference I'm feeling now.
3) Motor mount. This one I'm unsure about still. I have the Ingal's installed, but think I might switch to a filled mount eventually. I got enough wheel hop to snap an axel with the Ingal's installed and set to 12mm (pre CAB's), so I'm not sure I trust it anymore. Any opinions?
4) Axles, the heavier weight also helps with wheel hop. But having that peace of mind is huge. And they make the entire drivetrain feel more connected and solid in general.
09-25-2006, 09:47 AM
#11
Senior Member

Join Date: 06-28-06
Location: Hopewell Jct.
Posts: 502
Likes: 0
Received 0 Likes
on
0 Posts
Originally Posted by SS33
^^Gracias. I wanna see some shots of your car rockin the CF gear. I've wanted to do the hood and trunk since I bought her. Waiting for a nice vented hood to come out though
RAcingsolutions.com has a nice dual extractor out now, its lole 600+ shipping. which isnt too bad..
nice write up
 09-25-2006, 09:47 AM
#12
Senior Member
Join Date: 09-15-05
Location: OP, KS
Posts: 2,256
Likes: 0
Received 0 Likes
on
0 Posts
Originally Posted by CTCOBALTSSS
Sweet write up. Instant sticky in my opinion. It doesn't sound all that bad as far as the install goes. Sweeeeeeet!
09-25-2006, 09:47 AM
#13
Senior Member
Thread Starter
Join Date: 03-26-06
Location: Michigan
Posts: 2,271
Likes: 0
Received 0 Likes
on
0 Posts
Originally Posted by CTCOBALTSSS
Sweet write up. Instant sticky in my opinion. It doesn't sound all that bad as far as the install goes. Sweeeeeeet!
No it really wasn't that bad at all once I figured out the "How NOT To Install" part, lol.
I think I did the entire driver's side (axle and CAB) in about an hour.
09-25-2006, 09:49 AM
#14
Senior Member
Thread Starter
Join Date: 03-26-06
Location: Michigan
Posts: 2,271
Likes: 0
Received 0 Likes
on
0 Posts
Originally Posted by patathSS
I'll bet it is more spin than stick. But at least its not that damn hopping.

hopping is for rabbits, and I aint drivin a Vdub
 09-25-2006, 09:52 AM
#16
Senior Member
Thread Starter
Join Date: 03-26-06
Location: Michigan
Posts: 2,271
Likes: 0
Received 0 Likes
on
0 Posts
Originally Posted by SilverBalt
RAcingsolutions.com has a nice dual extractor out now, its lole 600+ shipping. which isnt too bad..
nice write up
nice write up
I'll keep looking though because that's exactly what I want eventually
09-25-2006, 09:54 AM
#17
Senior Member
Join Date: 09-15-05
Location: OP, KS
Posts: 2,256
Likes: 0
Received 0 Likes
on
0 Posts
Originally Posted by SS33
Yup alllll spin  At least until I go with DR's next season
hopping is for rabbits, and I aint drivin a Vdub
hopping is for rabbits, and I aint drivin a Vdub
09-25-2006, 09:56 AM
#18
Senior Member
Thread Starter
Join Date: 03-26-06
Location: Michigan
Posts: 2,271
Likes: 0
Received 0 Likes
on
0 Posts
Originally Posted by patathSS
You're my idol Pat. Are you still running the ice box? Or did you toss it when you added the second HE?
Full slick eh? So when are you doing the axles and clutch? Or did you already do the clutch?
09-25-2006, 10:17 AM
#19
Senior Member
Join Date: 09-15-05
Location: OP, KS
Posts: 2,256
Likes: 0
Received 0 Likes
on
0 Posts
Originally Posted by SS33
For sure. Maybe someday I'll grow the juevos to machine down my calipers too.
You're my idol Pat. Are you still running the ice box? Or did you toss it when you added the second HE?
Full slick eh? So when are you doing the axles and clutch? Or did you already do the clutch?
You're my idol Pat. Are you still running the ice box? Or did you toss it when you added the second HE?
Full slick eh? So when are you doing the axles and clutch? Or did you already do the clutch?
09-25-2006, 10:27 AM
#21
Senior Member
Join Date: 09-15-05
Location: OP, KS
Posts: 2,256
Likes: 0
Received 0 Likes
on
0 Posts
Yeah it is a really good write up with very descriptive pictures. One thing Mike said is to make sure you have a pan to catch the oil. Didn't you guys do this already at the track?
09-25-2006, 11:12 AM
#23
Senior Member
Thread Starter
Join Date: 03-26-06
Location: Michigan
Posts: 2,271
Likes: 0
Received 0 Likes
on
0 Posts
Originally Posted by patathSS
Yeah I am still running the icebox, still seems to be helping. That is in addition to the second HE. Axles and Clutch this winter. I want to replace the clutch before winter because then I won't feel like I am wasting track time breaking in the clutch. If I move back to Michigan I'd be happy to help you run 15s too!!!!!
Let me know if you move back here before you do the axles or clutch, I'd be down to help
09-25-2006, 11:15 AM
#24
Senior Member
Thread Starter
Join Date: 03-26-06
Location: Michigan
Posts: 2,271
Likes: 0
Received 0 Likes
on
0 Posts
Originally Posted by 06blackg85ss
nice write up man... looks easy to do in the light with the right tools... I'll be doing mine this week too...
I just wasted lots of times finding out i needed tools, and such. It also took me longer because I was trying to snap pics, and write down tools req'd and other details at each stage. I also saw Tommy Chong at a comedy club the night before,, and had well wayyy to many, lol. But hey, how often is Tommy Chong a block away from your house???
Can anyone confirm what size that axle retaining nut is? I measured it to be close to 29mm. All I could find was a deep 30mm, it was actually made for J-body axles, but it was a little sloppy. So I don't know if the 29mm would be too small or not.
09-25-2006, 11:20 AM
#25
It was 28 or 29 but the only size I could find was 1-1/8 (I think) but it worked.
damn tommy chong... must have been a awesome show...
we had to run out to a parts store 10 miles away 3 times to get tranny fluid and the first socket they got was too big and then we just bought a whole large set to get it done
damn tommy chong... must have been a awesome show...
we had to run out to a parts store 10 miles away 3 times to get tranny fluid and the first socket they got was too big and then we just bought a whole large set to get it done