
2.2 L61 Engine: How to install a vacuum gauge (2.2L or 2.4L)


Thread Starter
Member
Joined: 03-21-09
Posts: 355
Likes: 1
From: Ottawa
How to install a vacuum gauge (2.2L or 2.4L)
Ok so I picked up an SS stock pillar a while back and was originally going to throw in interceptor in it, but then I decided against it as the money was better spent on school.
The other day I picked up a Glowshift tinted 7 colour vacuum gauge for like $40 (about $50 shipped). The gauge comes with everything you need to install it, but the wires on the back are short and there is no add a circuit.
Note: I would recommend disconnecting the negative terminal on the battery for added insurance, since you are working with electricity.
Basically everything you need is as follows:
-A buddy to help. preferably with skinny arms
-10mm socket
-5/16" socket or wrench
-torx bit for the pillar screw
-Mini-fuse add a circuit and a 10amp fuse (from canadian tire. came with several mini-fuses. i opted for the 10amp, but you can try less)
-A good pair of snips
-Wire strippers
-A good wire tap
-1/4" rubber fuel line hose (you can use windshield hose if you want, but since it is vacuum I thought the fuel line hose was a safer choice). Now, if you are a 2.2L, you can get like 4" or so. If you are a 2.4L (2.4 manifold), you'll need about 18"
-2 small hose clamps for the 1/4" fuel line hose if you have a 2.4L manifold, none if 2.2L
-Electrical tape
-Solder (sp?) and soldering iron
-Vice, or something or someone to hold what you're soldering
-About 5' of wire. I don't know what gauge the gauge wires are, but they're fairly small. Chances are you will have some in your house somewhere
Ok, so here we go!
Step 1
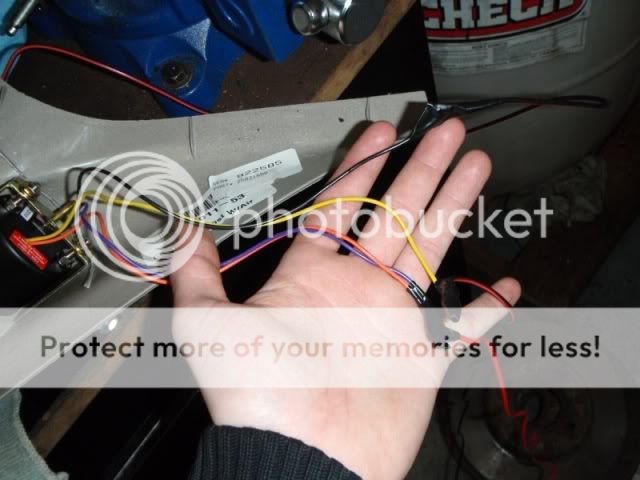
Get about 6-8" of black wire. Get about 2.5' of red wire, and another piece of red wire at about 2' (or yellow if you have it). The gauge wires need to be stripped about another 1/4", so do that. Then strip the extra wires to match. Now twist black to black, then yellow to the shorter red piece. Now take the orange and purple and the longest red piece and twist all 3 together.
Step 2
Now have your buddy/vice/mickey-moused solution hold the wires still, then solder the twisted wires together (you'll be doing this to all 3 so it doesn't matter which one you start with. Just don't burn yourself with the soldering iron. That **** gets hot.). Check YouTube for a how-to on soldering if you don't already know how (don't be discouraged though, because its really easy and the materials will cost you like maybe $10/15 at RadioShack)
Step 3
Unplug the soldering iron and put it somewhere to cool, but make sure it doesn't touch anything. Let the connections you just soldered cool, because they're probably still hot. When they're cool, take your electrical tape and tape the **** out of them for extra protection. It should look something like this:
Step 4
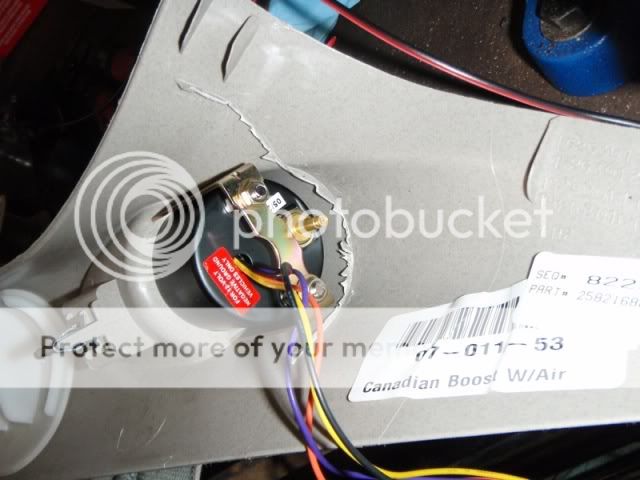
Now take your stock SS pillar, and your snips and cut out the plastic mounting piece for the stock boost gauge. It is in the way, so it has to go. If you have a dremel, use that because the snips are less than pretty in their results. But out of sight out of mind prevailed for me so whatever.
Step 5
Now put the gauge into the pillar, and use the supplied bracket, nuts, and washers to hold it in. I would really recommend getting in the car and trying to hold the pillar where it will be installed so you get the rotation of the gauge just the way you want it. Once you do that, tighten the two nuts on the back with a 5/16" socket or wrench and the gauge is mounted.
Note: You can also do this as step 1 if you like because the gauge being in the pillar lessens the chance of it being damaged while you're soldering everything. I actually did it that way, but you can do it however you want.
You'll end up with this when it's mounted:

Step 6
Now go in the car and remove the plastic trim piece with the trunk button in it. Just pull on the bottom in each corner and it should pop out. Be careful though because the harness for the trunk button is not long and if you pull it too hard you'll rip the trim piece and the harness off. The harness is held on with a little clip on the bottom. Use a small flat head to pry it enough to remove it. Now attach the vacuum line supplied to the back of the gauge. I got mine on like maybe 1/4", so don't bother trying to get it on like mad. Do whatever makes you feel good, but I'd say at least 1/4", like so:
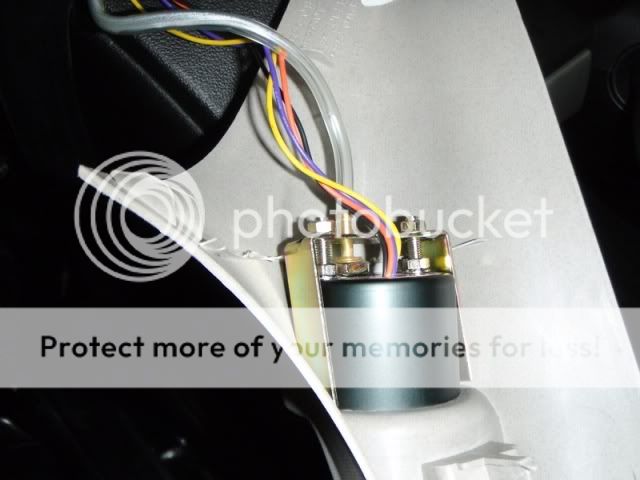
Now run your wire and vacuum tube down the side, pictured here:

The vacuum line will be kind of stiff, so be easy with it. If you kink it, its pretty much done. Not forgiving at all. Just take your time and be careful. If you have a sunroof in your car you will have to fight a bit more with the pillar to get it on there, but she'll go. The brown rubber line is the drainage hose, don't damage it.
Step 7
Now I would recommend running the vacuum line into the engine bay. To do this, you will be using the rubber gromet behind the clutch pedal. Its a bitch to work with, so have fun. Get your buddy with skinny arms to reach in the engine bay, under the harnesses to the left of the ECU and above the transmission, then kind of under the brake booster. You'll feel the gromet eventually. Here is the gromet from inside the car:
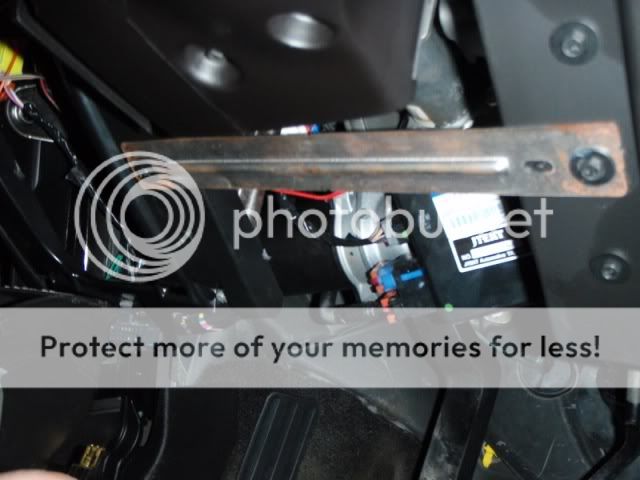
Make sure you run it away from the clutch pedal. Depress it to make sure it will not be touched. Have your buddy pull the line out away from the gromet in the engine bay, but go slow to make sure the line doesn't kink. Do not bother with the wiring at this point.
Choose Your Own Abortion
Ok, so here is where this turns into a 'Choose Your Own Adventure' book, but likely more abortion-ridden. If you have a 2.4L, or if you have the 2.4L intake manifold, continue with Step 8. If you have a 2.2L with the stock 2.2L intake manifold, skip to Step 9.
Step 8
Ok, so now its time to hook up the vacuum line. This is for the 2.4L manifold. The 2.4L manifold does NOT have the little nipple near the throttle body like the 2.2L does. Instead, you have two options. Option 1 is to tap into the brake booster line, but I don't recommend that one, on the off chance something goes sideways and your brakes are compromised. Option 2 is the one I'll discuss here, which involves the removal of a vacuum line from above the throttle body. This hard plastic line goes from the intake manifold to some emissions thing. I don't remember what it is, but its the little plastic canister looking thing to the right of the valve cover. What Dan and I did here was we removed this line and the two fittings all together (just in case it needs to be swapped back), and replaced it with 1/4" fuel line hose (not fuel injector hose like I almost bought mistakenly haha). The stock plastic hose is held on with little clips on each end fitting. It just pops off easily (Don't remove the actual line from the end fittings. Remove the whole thing). You can start with either end, but be very careful because they are plastic ends that you jamming that hose onto. The one on the manifold is the more fragile one, so be careful. We only got the line on like 1/4-1/2", so don't bother trying to get it completely on, because you wont. We used little hose clamps at each end for added insurance, but its on there pretty good even without them. Be careful tightening them though as the fittings are plastic. Now, you can cut the line somewhere near the middle, or the right of the motor so you can insert the T fitting supplied with the gauge. The T fitting supplied has a little brass insert in one of the points. This is where the vacuum line attaches. The other ends go in the new line you've installed. I'll just show the picture here and you can figure out what needs to be done:
This is the fragile fitting. BE CAREFUL.
The emissions (?) thing beside the valve cover:
Step 9
If you have a 2.2L with the stock 2.2L intake manifold then this part is a lot easier. If you look to the bottom right of the throttle body, you will see a little black vacuum cap. Use a small flat head and carefully remove this cap.
Note: If you have a 2005 or 2006 then this is a lot easier because the throttle body is different, and there is no harness in the way like mine has.
The fitting is 1/4" approximately, so the 1/8" tubing supplied will not fit on it. What I did was I used some of the extra 1/4" fuel line hose used on the 2.4 install and just connected that at the intake manifold, then I cut the two smaller ridges off one of the T fitting (NOT THE ONE WITH THE BRASS INSERT) ends, and popped the vacuum cap onto that. Make sure it fits nice and snug. Then I put the other end of the T fitting into the rubber line (again, not the end with the brass fitting). Here the end result. You can use less black hose if you want, but I figured it didn't really make a difference,

Step 10
The clear tubing does fit on the T fitting, but it takes some effort. Just gradually work it on and you should be able to get it to the second ridge. Maybe more, but I gave up because my hands were killing me. At this point we started the car to ensure the gauge worked (the vacuum gauge portion, not the lights and what not) because its a mechanical gauge, so it will work no matter the power status. If all is well then move on. At idle I think its around -22psi or so.
Step 11
Now you can start wiring. The yellow wire off the gauge is the constant power wire. I have confirmed that the gauge draws 40mA, which is negligible at best, so it should not brick your battery. I tapped into the power wire going to the cigarette lighter under the HVAC controls. For this I used a wire tap. Don't close it up completely until the gauge is tested later. Here is it pictured before closing the completely:
All the trim easily comes off, so just search around if you don't know how to remove it all. Everything clips and snaps together like a cheap ass set of LEGO knock-offs.
Step 12
Now its time to run your switched wire. I strongly recommend using an add a circuit thing because you don't harm the factory wiring. You will likely have to crimp the switched wire from the gauge, into the add a circuit. You'll see in a minute if you don't get that explanation. I used the 10amp wiper fuse (fuse #15 IIRC, but double check on the back of the fuse block cover). I also chose to use a 10amp fuse for the gauge, so in the end the add a fuse has 2 10amp fused in it. Here it is:
At this point, I had Dan ground the gauge so I don't know where he grounded it, but you can use any GOOD ground source. Now double check all your connections, then put the car to run, but don't start it. At this point the gauge should light up brightly, and you should be able to switch the colour with the button on the gauge. Also check to make sure your wipers are still working. Turn the car to off, then back to run (again don't start it), and make sure the colour is the same as when it was last on. Now you can begin cleanup and reassembly of everything.
Here is the gauge off, when I finished:

Here is is while waiting for a light, at night:


Even if you aren't installing this gauge specifically, some of the steps should be universal for other gauges.
If you like this how to, please comment and say so. It took a while to write.
Cheers,
DISCLAIMER: I am not responsible for any damage you may cause by following this how to, or any warranties this how to may void. This is a DO AT YOUR OWN RISK modification.
Update: So apparently that isn't a constant power from the cigarette lighter. I'll have to do some searching for a proper constant, or I'll just change it everytime like how I turn my fogs on every time. I'll post an update once I find a suitable constant. Sometimes it remembers the colour and sometimes it doesn't. I need to do some troubleshooting.
The other day I picked up a Glowshift tinted 7 colour vacuum gauge for like $40 (about $50 shipped). The gauge comes with everything you need to install it, but the wires on the back are short and there is no add a circuit.
Note: I would recommend disconnecting the negative terminal on the battery for added insurance, since you are working with electricity.
Basically everything you need is as follows:
-A buddy to help. preferably with skinny arms
-10mm socket
-5/16" socket or wrench
-torx bit for the pillar screw
-Mini-fuse add a circuit and a 10amp fuse (from canadian tire. came with several mini-fuses. i opted for the 10amp, but you can try less)
-A good pair of snips
-Wire strippers
-A good wire tap
-1/4" rubber fuel line hose (you can use windshield hose if you want, but since it is vacuum I thought the fuel line hose was a safer choice). Now, if you are a 2.2L, you can get like 4" or so. If you are a 2.4L (2.4 manifold), you'll need about 18"
-2 small hose clamps for the 1/4" fuel line hose if you have a 2.4L manifold, none if 2.2L
-Electrical tape
-Solder (sp?) and soldering iron
-Vice, or something or someone to hold what you're soldering
-About 5' of wire. I don't know what gauge the gauge wires are, but they're fairly small. Chances are you will have some in your house somewhere
Ok, so here we go!
Step 1
Get about 6-8" of black wire. Get about 2.5' of red wire, and another piece of red wire at about 2' (or yellow if you have it). The gauge wires need to be stripped about another 1/4", so do that. Then strip the extra wires to match. Now twist black to black, then yellow to the shorter red piece. Now take the orange and purple and the longest red piece and twist all 3 together.
Step 2
Now have your buddy/vice/mickey-moused solution hold the wires still, then solder the twisted wires together (you'll be doing this to all 3 so it doesn't matter which one you start with. Just don't burn yourself with the soldering iron. That **** gets hot.). Check YouTube for a how-to on soldering if you don't already know how (don't be discouraged though, because its really easy and the materials will cost you like maybe $10/15 at RadioShack)
Step 3
Unplug the soldering iron and put it somewhere to cool, but make sure it doesn't touch anything. Let the connections you just soldered cool, because they're probably still hot. When they're cool, take your electrical tape and tape the **** out of them for extra protection. It should look something like this:
Step 4
Now take your stock SS pillar, and your snips and cut out the plastic mounting piece for the stock boost gauge. It is in the way, so it has to go. If you have a dremel, use that because the snips are less than pretty in their results. But out of sight out of mind prevailed for me so whatever.
Step 5
Now put the gauge into the pillar, and use the supplied bracket, nuts, and washers to hold it in. I would really recommend getting in the car and trying to hold the pillar where it will be installed so you get the rotation of the gauge just the way you want it. Once you do that, tighten the two nuts on the back with a 5/16" socket or wrench and the gauge is mounted.
Note: You can also do this as step 1 if you like because the gauge being in the pillar lessens the chance of it being damaged while you're soldering everything. I actually did it that way, but you can do it however you want.
You'll end up with this when it's mounted:
Step 6
Now go in the car and remove the plastic trim piece with the trunk button in it. Just pull on the bottom in each corner and it should pop out. Be careful though because the harness for the trunk button is not long and if you pull it too hard you'll rip the trim piece and the harness off. The harness is held on with a little clip on the bottom. Use a small flat head to pry it enough to remove it. Now attach the vacuum line supplied to the back of the gauge. I got mine on like maybe 1/4", so don't bother trying to get it on like mad. Do whatever makes you feel good, but I'd say at least 1/4", like so:
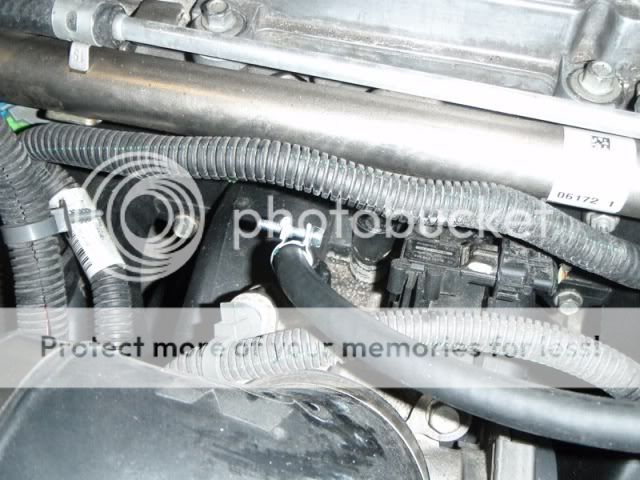
Now run your wire and vacuum tube down the side, pictured here:
The vacuum line will be kind of stiff, so be easy with it. If you kink it, its pretty much done. Not forgiving at all. Just take your time and be careful. If you have a sunroof in your car you will have to fight a bit more with the pillar to get it on there, but she'll go. The brown rubber line is the drainage hose, don't damage it.
Step 7
Now I would recommend running the vacuum line into the engine bay. To do this, you will be using the rubber gromet behind the clutch pedal. Its a bitch to work with, so have fun. Get your buddy with skinny arms to reach in the engine bay, under the harnesses to the left of the ECU and above the transmission, then kind of under the brake booster. You'll feel the gromet eventually. Here is the gromet from inside the car:
Make sure you run it away from the clutch pedal. Depress it to make sure it will not be touched. Have your buddy pull the line out away from the gromet in the engine bay, but go slow to make sure the line doesn't kink. Do not bother with the wiring at this point.
Choose Your Own Abortion
Ok, so here is where this turns into a 'Choose Your Own Adventure' book, but likely more abortion-ridden. If you have a 2.4L, or if you have the 2.4L intake manifold, continue with Step 8. If you have a 2.2L with the stock 2.2L intake manifold, skip to Step 9.
Step 8
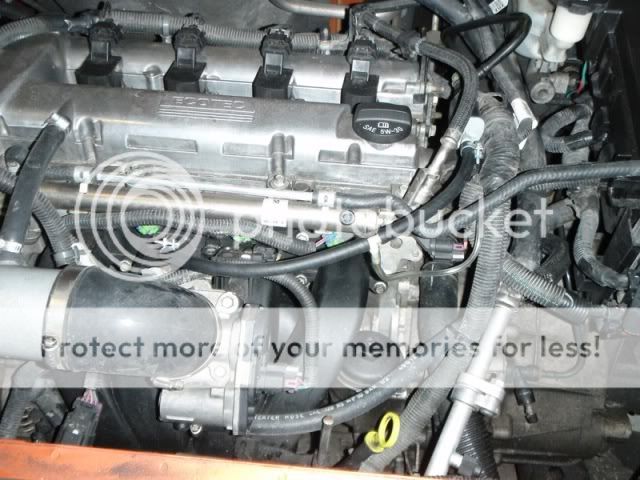
Ok, so now its time to hook up the vacuum line. This is for the 2.4L manifold. The 2.4L manifold does NOT have the little nipple near the throttle body like the 2.2L does. Instead, you have two options. Option 1 is to tap into the brake booster line, but I don't recommend that one, on the off chance something goes sideways and your brakes are compromised. Option 2 is the one I'll discuss here, which involves the removal of a vacuum line from above the throttle body. This hard plastic line goes from the intake manifold to some emissions thing. I don't remember what it is, but its the little plastic canister looking thing to the right of the valve cover. What Dan and I did here was we removed this line and the two fittings all together (just in case it needs to be swapped back), and replaced it with 1/4" fuel line hose (not fuel injector hose like I almost bought mistakenly haha). The stock plastic hose is held on with little clips on each end fitting. It just pops off easily (Don't remove the actual line from the end fittings. Remove the whole thing). You can start with either end, but be very careful because they are plastic ends that you jamming that hose onto. The one on the manifold is the more fragile one, so be careful. We only got the line on like 1/4-1/2", so don't bother trying to get it completely on, because you wont. We used little hose clamps at each end for added insurance, but its on there pretty good even without them. Be careful tightening them though as the fittings are plastic. Now, you can cut the line somewhere near the middle, or the right of the motor so you can insert the T fitting supplied with the gauge. The T fitting supplied has a little brass insert in one of the points. This is where the vacuum line attaches. The other ends go in the new line you've installed. I'll just show the picture here and you can figure out what needs to be done:
This is the fragile fitting. BE CAREFUL.
The emissions (?) thing beside the valve cover:
Step 9
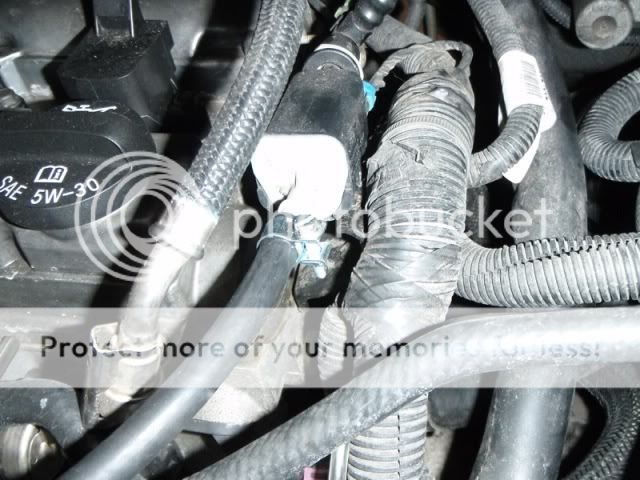
If you have a 2.2L with the stock 2.2L intake manifold then this part is a lot easier. If you look to the bottom right of the throttle body, you will see a little black vacuum cap. Use a small flat head and carefully remove this cap.
Note: If you have a 2005 or 2006 then this is a lot easier because the throttle body is different, and there is no harness in the way like mine has.
The fitting is 1/4" approximately, so the 1/8" tubing supplied will not fit on it. What I did was I used some of the extra 1/4" fuel line hose used on the 2.4 install and just connected that at the intake manifold, then I cut the two smaller ridges off one of the T fitting (NOT THE ONE WITH THE BRASS INSERT) ends, and popped the vacuum cap onto that. Make sure it fits nice and snug. Then I put the other end of the T fitting into the rubber line (again, not the end with the brass fitting). Here the end result. You can use less black hose if you want, but I figured it didn't really make a difference,
Step 10
The clear tubing does fit on the T fitting, but it takes some effort. Just gradually work it on and you should be able to get it to the second ridge. Maybe more, but I gave up because my hands were killing me. At this point we started the car to ensure the gauge worked (the vacuum gauge portion, not the lights and what not) because its a mechanical gauge, so it will work no matter the power status. If all is well then move on. At idle I think its around -22psi or so.
Step 11
Now you can start wiring. The yellow wire off the gauge is the constant power wire. I have confirmed that the gauge draws 40mA, which is negligible at best, so it should not brick your battery. I tapped into the power wire going to the cigarette lighter under the HVAC controls. For this I used a wire tap. Don't close it up completely until the gauge is tested later. Here is it pictured before closing the completely:
All the trim easily comes off, so just search around if you don't know how to remove it all. Everything clips and snaps together like a cheap ass set of LEGO knock-offs.
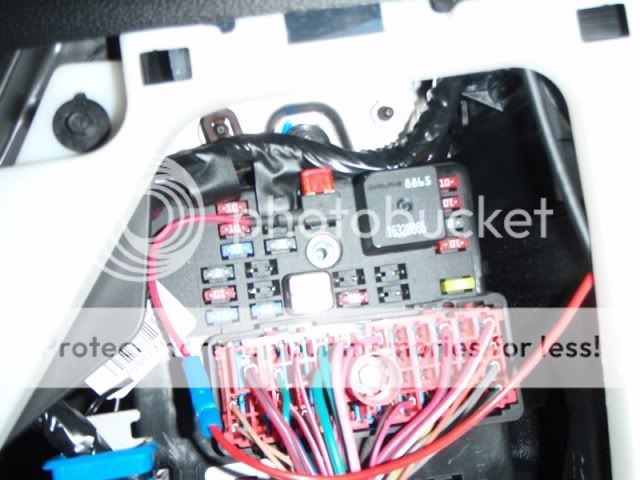
Step 12
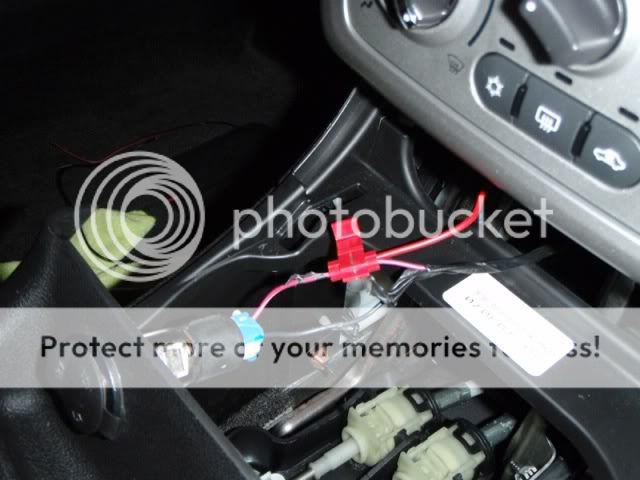
Now its time to run your switched wire. I strongly recommend using an add a circuit thing because you don't harm the factory wiring. You will likely have to crimp the switched wire from the gauge, into the add a circuit. You'll see in a minute if you don't get that explanation. I used the 10amp wiper fuse (fuse #15 IIRC, but double check on the back of the fuse block cover). I also chose to use a 10amp fuse for the gauge, so in the end the add a fuse has 2 10amp fused in it. Here it is:
At this point, I had Dan ground the gauge so I don't know where he grounded it, but you can use any GOOD ground source. Now double check all your connections, then put the car to run, but don't start it. At this point the gauge should light up brightly, and you should be able to switch the colour with the button on the gauge. Also check to make sure your wipers are still working. Turn the car to off, then back to run (again don't start it), and make sure the colour is the same as when it was last on. Now you can begin cleanup and reassembly of everything.
Here is the gauge off, when I finished:
Here is is while waiting for a light, at night:
Even if you aren't installing this gauge specifically, some of the steps should be universal for other gauges.
If you like this how to, please comment and say so. It took a while to write.
Cheers,
DISCLAIMER: I am not responsible for any damage you may cause by following this how to, or any warranties this how to may void. This is a DO AT YOUR OWN RISK modification.
Update: So apparently that isn't a constant power from the cigarette lighter. I'll have to do some searching for a proper constant, or I'll just change it everytime like how I turn my fogs on every time. I'll post an update once I find a suitable constant. Sometimes it remembers the colour and sometimes it doesn't. I need to do some troubleshooting.
Last edited by 2.2balt; Feb 9, 2011 at 08:31 PM.


Thread Starter
Member
Joined: 03-21-09
Posts: 355
Likes: 1
From: Ottawa
The nipple is only on the stock 2.2 manifold. Its near the TB on the right side, and down a bit. I don't know if 2009 and 2010 are different from 2008 though. You'll have to look. There is a little vacuum cap on it.
@Roeder: if you're a 5spd then yes, if youre auto then not so much. It moves more since you're going off and on the gas while shifting, and when you're at speed (like on the highway) it will read constant and you can see when you're on it a bit (ie trying to accelerate a bit in gear, like if you don't notice you're hitting the gas a bit more then its helpful). Overall, its a neat gauge to have for the fact that it actually moves around and ****. Better than a voltmeter. lol
@Roeder: if you're a 5spd then yes, if youre auto then not so much. It moves more since you're going off and on the gas while shifting, and when you're at speed (like on the highway) it will read constant and you can see when you're on it a bit (ie trying to accelerate a bit in gear, like if you don't notice you're hitting the gas a bit more then its helpful). Overall, its a neat gauge to have for the fact that it actually moves around and ****. Better than a voltmeter. lol

So let me see if I understand this, since im a 2.2 theirs already a nipple where I can plug the gauge connector to without using a T fitting?
Last edited by BlackARCA06; Apr 11, 2011 at 12:29 PM.

Thread
Thread Starter
Forum
Replies
Last Post
ThoR294
Wanted - What to buy - All categories
4
Oct 4, 2015 08:44 PM