
Appearance: How to Make a Custom Top Grill

Thread Starter
Senior Member
Joined: 07-08-05
Posts: 6,200
Likes: 0
From: Niceville, FL
How to Make a Custom Top Grill
1. Take stock grill out. Two pop tabs on driver side and few across the top and on the passenger side. There are two square socketed plastic screws on the inside of the grill that can only be accessed from the backside of the bumper.
2. Dremel out center slates carefully (see pic below for idea)
3. Sand smooth
4. Use spot filler Bondo if necessary, a little goes a long way and resand smooth
5. Use plastic primer or good etching primer
6. Check for imperfections and fix if necessary
7. Get Duplicolor spray paint that matches your color code. Mine was Ultrasilver.
8. Mask off the areas you don't want painted
9. Spray several good coats of paint without runs! (4-5 coats)
10. Spray a lot of coats of Duplicolor clear without running (5-10)
11. Custom cut APC mesh to fit top opening and bottom ensuring clearance around the
places that hold it to the bumper. You can attach it using epoxy carefully, which is
probably a better idea than the way I attached my mesh.
12. Paint mesh if desired, (BBQ black here)
12. Carefully reinstall grill and enjoy!
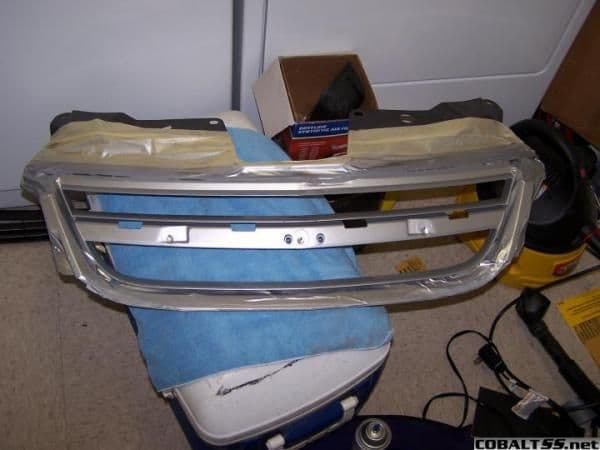
This is the cut, masked, first coat painted, and ready for clear picture. It's the only one I have during the process.

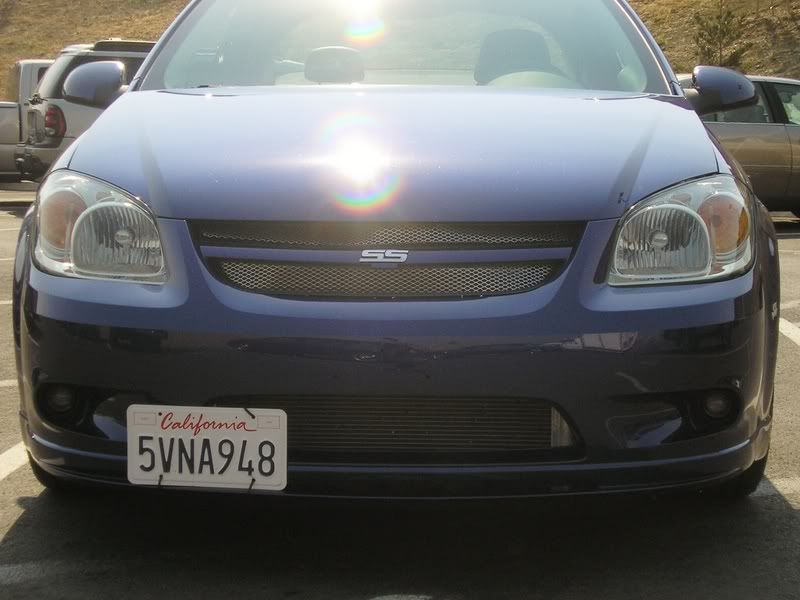
Here is the perfectly matching results
Good Luck!
2. Dremel out center slates carefully (see pic below for idea)
3. Sand smooth
4. Use spot filler Bondo if necessary, a little goes a long way and resand smooth
5. Use plastic primer or good etching primer
6. Check for imperfections and fix if necessary
7. Get Duplicolor spray paint that matches your color code. Mine was Ultrasilver.
8. Mask off the areas you don't want painted
9. Spray several good coats of paint without runs! (4-5 coats)
10. Spray a lot of coats of Duplicolor clear without running (5-10)
11. Custom cut APC mesh to fit top opening and bottom ensuring clearance around the
places that hold it to the bumper. You can attach it using epoxy carefully, which is
probably a better idea than the way I attached my mesh.
12. Paint mesh if desired, (BBQ black here)
12. Carefully reinstall grill and enjoy!
This is the cut, masked, first coat painted, and ready for clear picture. It's the only one I have during the process.
Here is the perfectly matching results
Good Luck!

Thread Starter
Senior Member
Joined: 07-08-05
Posts: 6,200
Likes: 0
From: Niceville, FL
Sorry there are no more pictures during the process. The girlfriend had the camera and went somewhere during the few hours a day for a week process. Yes a week, I am very meticulious with my work when it comes to my car.

how do you attach the mesh to the grill?
i need replies quick coz i need to finish it by saturday
and also is it possible to cut the center bar on the grill and smooth it? ( i have the chrome version so i dont have the cross bar from the bumper)
i need replies quick coz i need to finish it by saturday
and also is it possible to cut the center bar on the grill and smooth it? ( i have the chrome version so i dont have the cross bar from the bumper)

Senior Member
Joined: 08-27-06
Posts: 1,528
Likes: 0
From: MD
Originally Posted by 2K5SS/SC?
1. Take stock grill out. Two pop tabs on driver side and few across the top and on the passenger side. There are two square socketed plastic screws on the inside of the grill that can only be accessed from the backside of the bumper.
2. Dremel out center slates carefully (see pic below for idea)
3. Sand smooth
4. Use spot filler Bondo if necessary, a little goes a long way and resand smooth
5. Use plastic primer or good etching primer
6. Check for imperfections and fix if necessary
7. Get Duplicolor spray paint that matches your color code. Mine was Ultrasilver.
8. Mask off the areas you don't want painted
9. Spray several good coats of paint without runs! (4-5 coats)
10. Spray a lot of coats of Duplicolor clear without running (5-10)
11. Custom cut APC mesh to fit top opening and bottom ensuring clearance around the
places that hold it to the bumper. You can attach it using epoxy carefully, which is
probably a better idea than the way I attached my mesh.
12. Paint mesh if desired, (BBQ black here)
12. Carefully reinstall grill and enjoy!
This is the cut, masked, first coat painted, and ready for clear picture. It's the only one I have during the process.
Here is the perfectly matching results
Good Luck!

Senior Member
Joined: 07-19-06
Posts: 981
Likes: 0
From: Grand Rapids, MI
I keep seeing these posts of custom upper grilles, but I don't understand why everyone is dremeling off the fins of the stock grill and reuse it. Couldn't you just take out the stock grille and then place the mesh in the new opening? That's what I planned on doing, so if there is a reason that won't work, I'd like to know. I'd rather keep the stock piece intact if possible.

Senior Member
Joined: 04-23-06
Posts: 5,165
Likes: 0
From: S. Jersey
If you just take out the upper grill and put mesh in there, there will be about a dozen plastic clips that hold in the stock grill that will be exposed. Also the stock grill has plastic leading all the way under the hood at the top of it, you would have a big hole there and trying to attach the mesh so that it stays in place would be difficult as well. I'm sure its still possible to do that way, but I have yet to see someone try to do it the way that you want to. Best of luck if you choose to go that route and be sure to post some pics of the finished product.


Member
Joined: 07-04-06
Posts: 356
Likes: 0
From: NorCal
Alll I have to say is that paciants(sp) is the key. If you have none find someone who does. I have to ask this much tho....... How did you get the mesh to stay? I know you used glue but I'm little boggled. Also, how did you cut the mesh? This is mine held in with some zip ties.
Although it looks better now but I got no pictures to show.
Although it looks better now but I got no pictures to show.
Senior Member
Joined: 04-23-06
Posts: 5,165
Likes: 0
From: S. Jersey
I used some quick drying Epoxy as my "glue". Then, once I applied it, I got a heat gun to help speed up the drying process. Worked very well. As for cutting, my mesh isn't metal or chicken wire, its actually black gutter guard that can be cut with scissors  .
.
.

New Member
Joined: 08-29-06
Posts: 166
Likes: 0
From: Kansas City
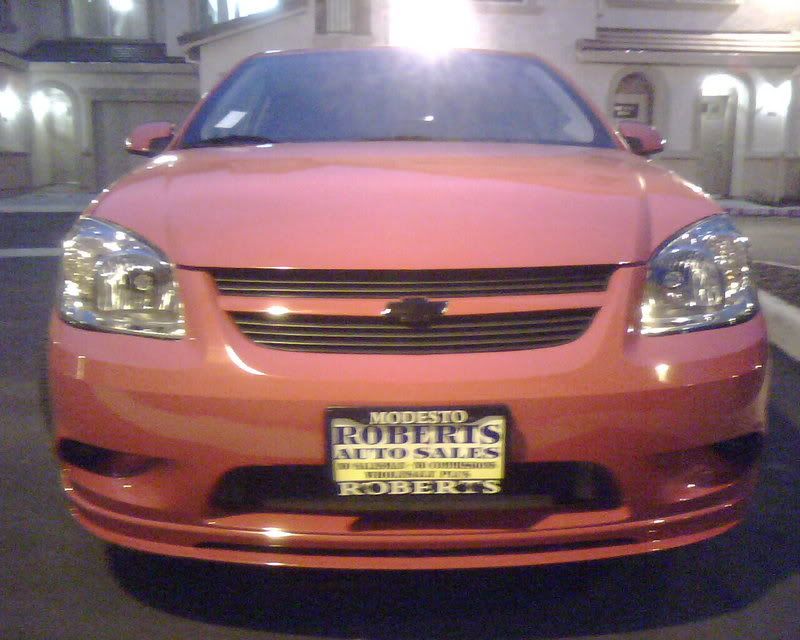
http://i129.photobucket.com/albums/p...antscar008.jpg
http://i129.photobucket.com/albums/p...antscar005.jpg
http://i129.photobucket.com/albums/p...antscar002.jpg
http://i129.photobucket.com/albums/p...antscar007.jpg
Im tryin the bowtie black tonight to see if i like it...people seem to think it will look better
http://i129.photobucket.com/albums/p...antscar005.jpg
http://i129.photobucket.com/albums/p...antscar002.jpg
http://i129.photobucket.com/albums/p...antscar007.jpg
Im tryin the bowtie black tonight to see if i like it...people seem to think it will look better

Banned
Joined: 11-19-06
Posts: 1,411
Likes: 0
From: Orange County CA
Originally Posted by AnthonyHalloran
http://i129.photobucket.com/albums/p...antscar008.jpg
http://i129.photobucket.com/albums/p...antscar005.jpg
http://i129.photobucket.com/albums/p...antscar002.jpg
http://i129.photobucket.com/albums/p...antscar007.jpg
Im tryin the bowtie black tonight to see if i like it...people seem to think it will look better
http://i129.photobucket.com/albums/p...antscar005.jpg
http://i129.photobucket.com/albums/p...antscar002.jpg
http://i129.photobucket.com/albums/p...antscar007.jpg
Im tryin the bowtie black tonight to see if i like it...people seem to think it will look better
i got black ones

New Member
Joined: 05-30-06
Posts: 106
Likes: 0
From: Alberta, Canada
Originally Posted by AnthonyHalloran
http://i129.photobucket.com/albums/p...antscar008.jpg
http://i129.photobucket.com/albums/p...antscar005.jpg
http://i129.photobucket.com/albums/p...antscar002.jpg
http://i129.photobucket.com/albums/p...antscar007.jpg
Im tryin the bowtie black tonight to see if i like it...people seem to think it will look better
http://i129.photobucket.com/albums/p...antscar005.jpg
http://i129.photobucket.com/albums/p...antscar002.jpg
http://i129.photobucket.com/albums/p...antscar007.jpg
Im tryin the bowtie black tonight to see if i like it...people seem to think it will look better