
Appearance: How-To: Paint your reverse lights so you can see while you reverse.


Thread Starter
Senior Member
iTrader: (1)
Joined: 05-22-08
Posts: 3,460
Likes: 3
From: New Lenox, Illinois
How-To: Paint your reverse lights so you can see while you reverse.
For a while, I had my taillights tinted, all of them, including the entire reverse light. I realized it looks incredibly plain, and it is incredibly dangerous. As I stripped the tint off of my reverse lights, I devised a way to have your reverse lights tinted as much as you would like (the red around the clear circle), while leaving the clear part that lights up, unpainted. You can now have the best of both worlds. You have fashionable tinted lights, but are also good in the sense that they are not rendered useless. This is a very easy process, but I had a friend who needed help, so I thought I would post it here.
1. Gather the things you will need:
VHT Nite-Shades, socket wrench, 11mm short-well socket, automotive masking tape, a pen, and a razor.

2. Remove the nuts holding the reverse lights.

3. Remove the power connector.

4. Remove the light bulb so when you set the housing down for paint, they sit flat.

5. Set up your paint station.

6. Use the automotive masking tape to cover JUST the clear circle that is lit up when the car is put into reverse. I covered the entire light, then used a pen to trace around the clear, then cut it out with a razor. Cut very lightly as to not gouge the plastic lens.
7. Paint! Go lightly! I do about 10-15 LIGHT coats as to make sure it does not run or drip at all. It is better to take your time than to rush. Once you are done, and the paint is cured, peel all of the tape off.

8. Wet sanding is completely optional, I do it so I can get a gloss shine, instead of a matte finish. I recommend 600-1500 grit sandpaper. You may clear coat if you desire, I do not.

After that, viola, you're done. My finished pictures are in the next post. Enjoy!

1. Gather the things you will need:
VHT Nite-Shades, socket wrench, 11mm short-well socket, automotive masking tape, a pen, and a razor.
2. Remove the nuts holding the reverse lights.
3. Remove the power connector.
4. Remove the light bulb so when you set the housing down for paint, they sit flat.
5. Set up your paint station.
6. Use the automotive masking tape to cover JUST the clear circle that is lit up when the car is put into reverse. I covered the entire light, then used a pen to trace around the clear, then cut it out with a razor. Cut very lightly as to not gouge the plastic lens.
7. Paint! Go lightly! I do about 10-15 LIGHT coats as to make sure it does not run or drip at all. It is better to take your time than to rush. Once you are done, and the paint is cured, peel all of the tape off.
8. Wet sanding is completely optional, I do it so I can get a gloss shine, instead of a matte finish. I recommend 600-1500 grit sandpaper. You may clear coat if you desire, I do not.
After that, viola, you're done. My finished pictures are in the next post. Enjoy!
Last edited by xxxxsh4d0wxxxx; Jun 25, 2009 at 02:51 PM.
Thread Starter
Senior Member
iTrader: (1)
Joined: 05-22-08
Posts: 3,460
Likes: 3
From: New Lenox, Illinois
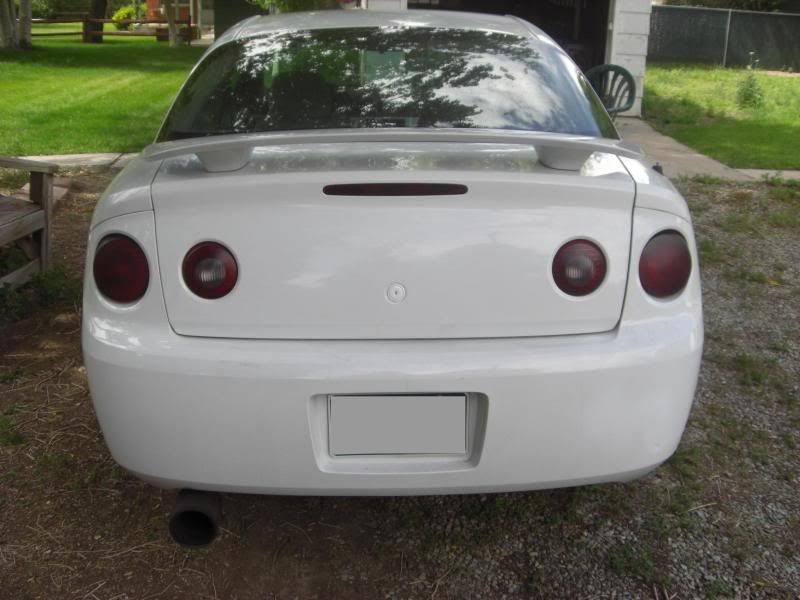
Here is the finished product. Yes, I know they are still a matte finish, this is due to the paint taking 24 hours to cure. I let them fully cure before I mess with them. The pictures were taken about 30 minutes after the last coat.


Last edited by xxxxsh4d0wxxxx; Jun 25, 2009 at 11:20 AM.


Thread Starter
Senior Member
iTrader: (1)
Joined: 05-22-08
Posts: 3,460
Likes: 3
From: New Lenox, Illinois
Welcome!

New Member
Joined: 12-30-07
Posts: 106
Likes: 0
From: Colorado Springs
I just took mine out, lightly sprayed some clear coat on, then some black, then another coat of clear and it came out pretty good.
Did this like 5 minutes ago, lol. Thanks for the idea Shadow!
With Paint
Did this like 5 minutes ago, lol. Thanks for the idea Shadow!
With Paint


Senior Member
Joined: 04-21-09
Posts: 2,846
Likes: 0
From: vero beach fl
i did this and it looks sick. ur best bet to get the proper outline is to put tape across the whole reverse light area then stick a flashlight in the middle of the reverse light cut out and then trace the circle. make sure after you do the night shade to use a razor to edge off the tape and then clear coat after the tape is off. the clear part will fog up for about 30 mins then become fine
What i dont understand is after you paint and you wetsand it doesnt look glossy. It looks flat b/c of the sandpaper. Do you use like a polishing compound or buffer ont hem to make them look that glossy? only way I could get mine to be that glossy is with a heavy coat of clear
Senior Member
Joined: 05-01-09
Posts: 2,361
Likes: 1
From: Hudson County, NJ
What i dont understand is after you paint and you wetsand it doesnt look glossy. It looks flat b/c of the sandpaper. Do you use like a polishing compound or buffer ont hem to make them look that glossy? only way I could get mine to be that glossy is with a heavy coat of clear
Last edited by Shez; Aug 5, 2009 at 02:25 PM. Reason: Automerged Doublepost
Thread Starter
Senior Member
iTrader: (1)
Joined: 05-22-08
Posts: 3,460
Likes: 3
From: New Lenox, Illinois
What i dont understand is after you paint and you wetsand it doesnt look glossy. It looks flat b/c of the sandpaper. Do you use like a polishing compound or buffer ont hem to make them look that glossy? only way I could get mine to be that glossy is with a heavy coat of clear
Oh, yeah, I have no clue what he was talking about.