
Interior: How to: recover door inserts w/ new materials

Senior Member
Joined: 06-30-06
Posts: 2,647
Likes: 0
From: Langley AFB, VA
Wow, I'd like to see a pic of that! I figured the panels were way too thin for that.
LOL! Thanks! I appreciate it no only 2,000 more to catch up to NHJK and Jackalope!
Glad you like it!
Glad you like it!

If there is anyone that can help me out with this I am stuck. When trying to lay the new vinyl on the insert, the corner where the material bend really sharp I can't get it to lay down without folding on top of itself...any ideas?


Thread Starter
Senior Member
Joined: 07-15-06
Posts: 3,765
Likes: 0
From: Pocomoke City, MD
i would have to take a look at them
depends on how bad they are
someone i let watch over my car and keep the fluids pumping fucked mine up and im just going to order 2 SS/SC doorpanels that have red inserts in them and save the hastle
depends on how bad they are
someone i let watch over my car and keep the fluids pumping fucked mine up and im just going to order 2 SS/SC doorpanels that have red inserts in them and save the hastle
Member
Joined: 03-20-07
Posts: 300
Likes: 0
From: Virginia
Well I haven't start the project yet anyway I looked at the door panel trying to figure out how to take it out and aside from painting it, I know I'll screw it up so I too thought about getting the SS/SC door panels but the question is, would that fit on 07 LS??

Senior Member
Joined: 02-09-08
Posts: 883
Likes: 0
From: Tampa, FL
where can i find blue vinyl????
i think ima hit up that joannes fabrics...im going to do this and its going to looking SICK!! blue door inserts wth blue dash peices, blue momo shift boot...and blue radio faceplate blue pedals...damn man, im getting hard thinking about this..lol
(note: im not really getting hard) lol
this how too is the ****!

Senior Member
Joined: 07-29-07
Posts: 509
Likes: 0
From: Gallatin,tn
I attempted this...and failed lol. I got them covered ok but i cant keep the panel in there. I used hot glue and it worked for about a day, I went to shut the door and had my arm on it and it pushed the panel in, I was like ******* sweeeet

Member
Joined: 07-15-07
Posts: 336
Likes: 0
From: Wantagh, New York
I had the same problem with the glue not holding...i used an interesting combination of machine screws and washers and drove the screws into those posts...so far its holding real strong and its been about 2 weeks so we will see how it goes...ill get pics up of mine later tonight
Thread Starter
Senior Member
Joined: 07-15-06
Posts: 3,765
Likes: 0
From: Pocomoke City, MD
i noticed a lot of you broke off the entire plastic rivit. you just need to scrape off the melted part, not the whole post and everything. If need be you can use small screws to hold them in. I had the same issue with the passanger door after a year of the glue holding up. I didnt want to deal with having to re glue it again in a year or so.... so i took one of the guys IDEAs they posted here and used the small screws to hold the panel in. works very well and can hold up.... put all my body weight onto it to make sure it would hold up.
Senior Member
Joined: 07-29-07
Posts: 509
Likes: 0
From: Gallatin,tn
I redid mine today and used screws came out much better, except one of the screws started to poke through the door panelso i had to use some washers and then some magic work on the door panel lol

New Member
Joined: 08-21-08
Posts: 18
Likes: 0
From: Edwards, CA
I appreciate this post more and more after today...
I posted my lil rant on ***************..long and short of it... I went to an auto upholstery place to see how much they would charge to do this...
$225 PER DOOR PANEL!?!?! INSANE!!!
Big props again to the originator of this post... Pimp on... Pimp Strong
I posted my lil rant on ***************..long and short of it... I went to an auto upholstery place to see how much they would charge to do this...
$225 PER DOOR PANEL!?!?! INSANE!!!
Big props again to the originator of this post... Pimp on... Pimp Strong
When I get a good deal on a junker car to practice with, I'll upload all my stuff as a how-to. Then, when I finally get my SS/TC in Dec 09, I'll start leather wrapping key interior pieces


New Member
Joined: 05-02-06
Posts: 38
Likes: 0
From: Canada
Hi xCobalt05x,
The link on the instruction is not working. Would you be able to pm me the correct link? I'm planning to replace my door speaker.
Thanks in advance
Danny
dan_garduce at hotmail dot com
The link on the instruction is not working. Would you be able to pm me the correct link? I'm planning to replace my door speaker.
Thanks in advance
Danny
dan_garduce at hotmail dot com
or what ever material you want for that matter.
first off use this link to take the door panels off.
https://www.cobaltss.net/forums/how-guide-43/how-remove-install-door-speakers-9833/
materials needed:
1 or 2 cans of body shop spray heavy duty headliner and carpet adhesive
at least 1 or 1.5 yards of material you want to use
something to cut material with
hot glue gun
super glue
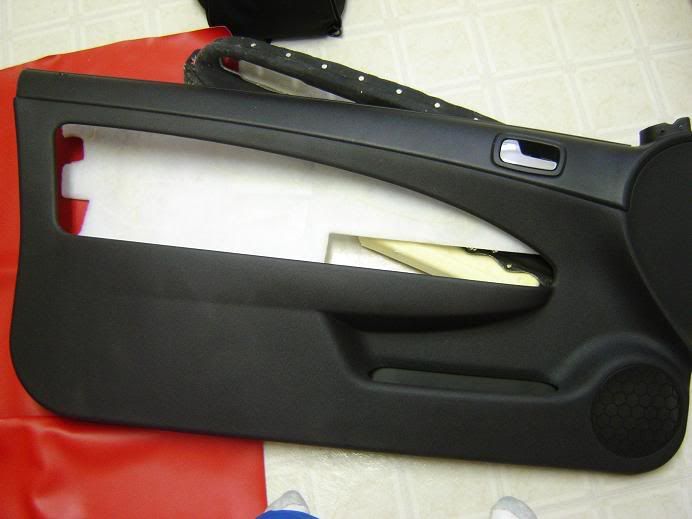
Step 1.
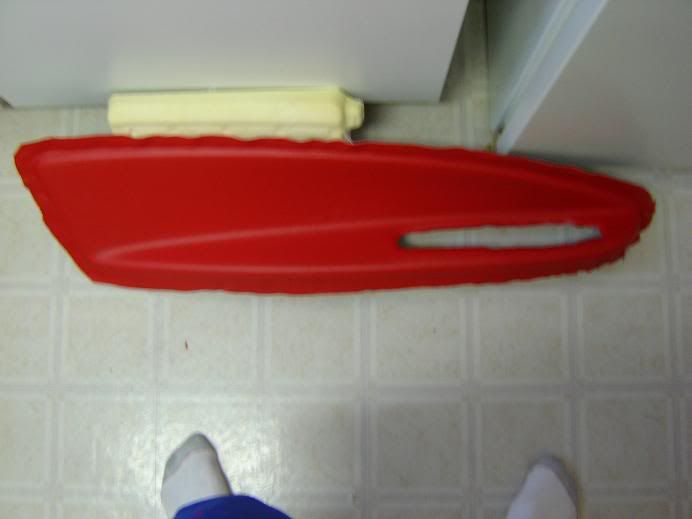
flip the door panel over and scrap off the melted rivits that hold the insert in place, notice the inserts are made of carbon fiber.
Step 2
remove the insert from door panel
Step 3
Cut the material to size for the door insert, not exact size you will need slack for stretching and trimming
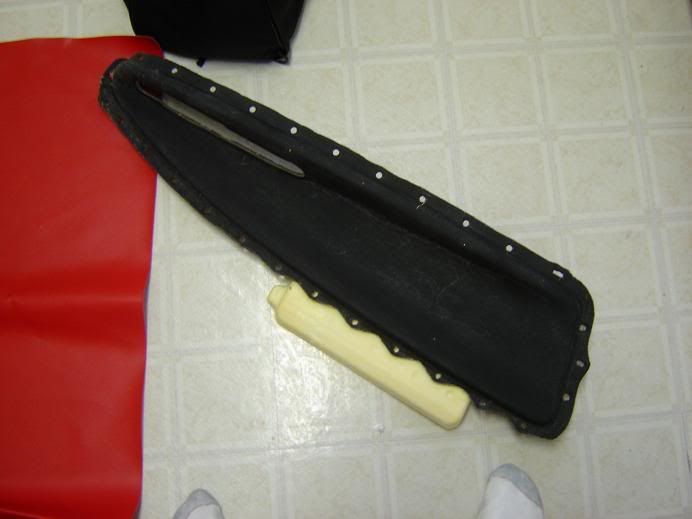
Step 4
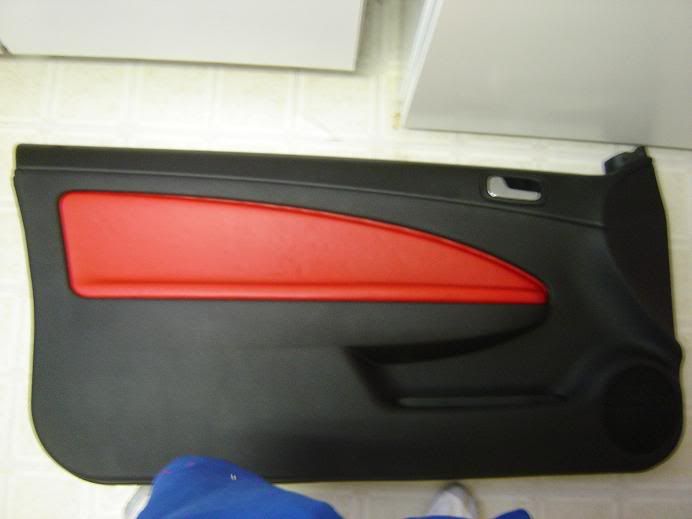
spray adhesive 1 coat on the door insert over the material on the insert, spray 1 coat on the back side of material you are appling. Let dry for 5 min, repeat this step for as many coats as you want. I used 2 thick coats. Let dry for 5-10 min.
Step 5
Start appling the material starting with the bottom edge of the insert and work your way to the top from rear to forward of insert.
Step 6
after appling material, cut out the hole for the window/lock controls
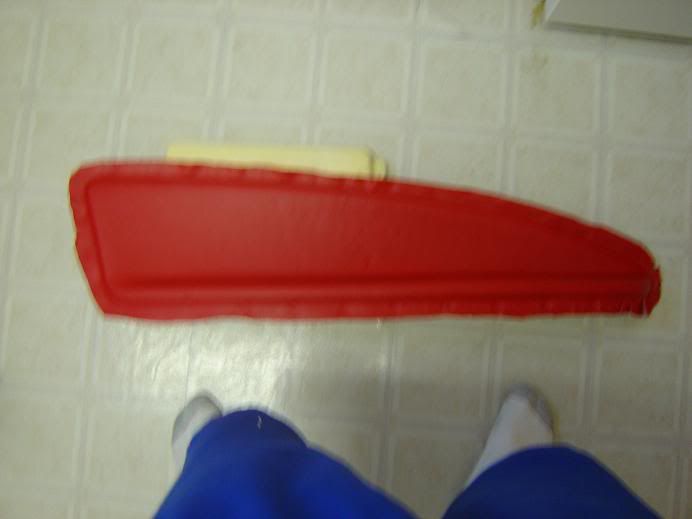
Step 7
place the insert back into the door panel, you may need help for this. clean up the rough edges of the studs that are left over. place super glue on the studs. press fit the insert back on. you will have to hold the insert in place in multiple places and this is where i had help. after superglue is holding, place hot glue over the holes onthe studs of insert.
Step 8
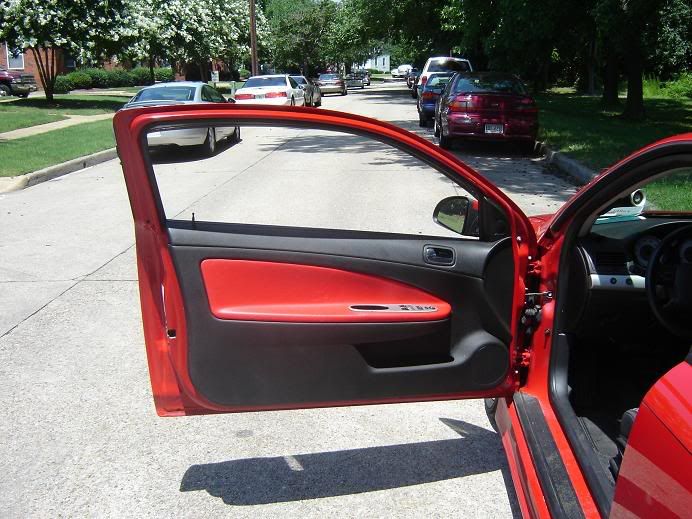
Place door panel back on and you are done
ive done this to many of my old cars, my favorate was the black velvot w/ red satin flames on my door panels, w/ black velvot with large red satin flames on the overhead. All plastic in the car was fiberglassed and painted red. Looked really good till i blew the motor up.
first off use this link to take the door panels off.
https://www.cobaltss.net/forums/how-guide-43/how-remove-install-door-speakers-9833/
materials needed:
1 or 2 cans of body shop spray heavy duty headliner and carpet adhesive
at least 1 or 1.5 yards of material you want to use
something to cut material with
hot glue gun
super glue
Step 1.
flip the door panel over and scrap off the melted rivits that hold the insert in place, notice the inserts are made of carbon fiber.
Step 2
remove the insert from door panel
Step 3
Cut the material to size for the door insert, not exact size you will need slack for stretching and trimming
Step 4
spray adhesive 1 coat on the door insert over the material on the insert, spray 1 coat on the back side of material you are appling. Let dry for 5 min, repeat this step for as many coats as you want. I used 2 thick coats. Let dry for 5-10 min.
Step 5
Start appling the material starting with the bottom edge of the insert and work your way to the top from rear to forward of insert.
Step 6
after appling material, cut out the hole for the window/lock controls
Step 7
place the insert back into the door panel, you may need help for this. clean up the rough edges of the studs that are left over. place super glue on the studs. press fit the insert back on. you will have to hold the insert in place in multiple places and this is where i had help. after superglue is holding, place hot glue over the holes onthe studs of insert.
Step 8
Place door panel back on and you are done
ive done this to many of my old cars, my favorate was the black velvot w/ red satin flames on my door panels, w/ black velvot with large red satin flames on the overhead. All plastic in the car was fiberglassed and painted red. Looked really good till i blew the motor up.

New Member
Joined: 07-12-08
Posts: 131
Likes: 0
From: Arkansas
Has anyone in a sunburst orange car done this?
If so, what color did you recover the inserts in?
I'm thinking maybe a bright orange, or something as close to sunburst orange as i can find if possible.
If so, what color did you recover the inserts in?
I'm thinking maybe a bright orange, or something as close to sunburst orange as i can find if possible.
Watching your "signature" I noticed to the untrained eye it looks real. In fact watch how the guy who did the move lands on the ground. He landed on his side with his arm out. This is the way to land in martial arts. I thought it was really cool, and I love how real it looks. Awesome! Where did you find it??