
Appearance: How-To: Remove glare spots above cut-off line with 3rd Gen. Projectors


Thread Starter
Senior Member
Joined: 06-29-07
Posts: 619
Likes: 0
From: Toronto, Ontario
How-To: Remove glare spots above cut-off line with 3rd Gen. Projectors
Well I posted this on Saturday morning in the how-to section, and it still hasn't been approved by a moderator for some reason, so I'll drop it in this section for now.
--------------------------------------------------------------------------------------------------
So I've been told the glare spots don't show up as well with halogens as they do with HIDs. This post will show you exactly what you need to get rid of the ugly glare spots that you're probably being highbeamed for as you drive.
A big thanks to EvilSS for giving me this info, I would still be pissed with my headlights if I hadn't found his post!
Tools needed:
- 10mm socket (to remove headlight)
- Philips screwdriver (to remove reflector screw)
- coathanger or something skinny (to hold reflector in place)
- Muffler Putty, high temp silicone, or other filler (to fill the hole left by the screw)
- a pen or something with a flat end (to push the filler into the screw hole)
- patience
- a few beers
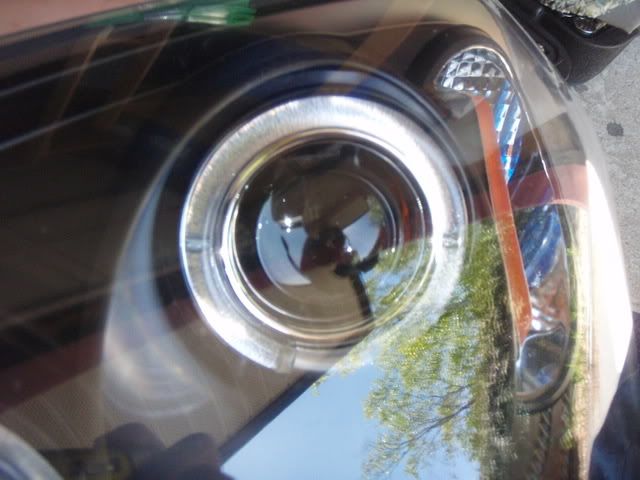
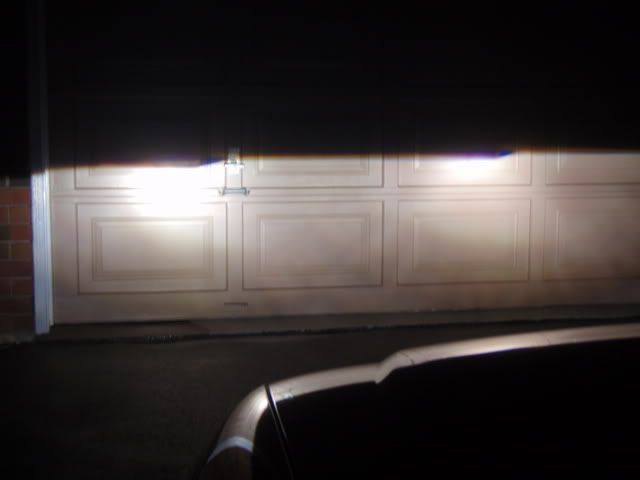
So when you first installed your HIDs in your 3rd gens, you were probably all excited, until you saw this
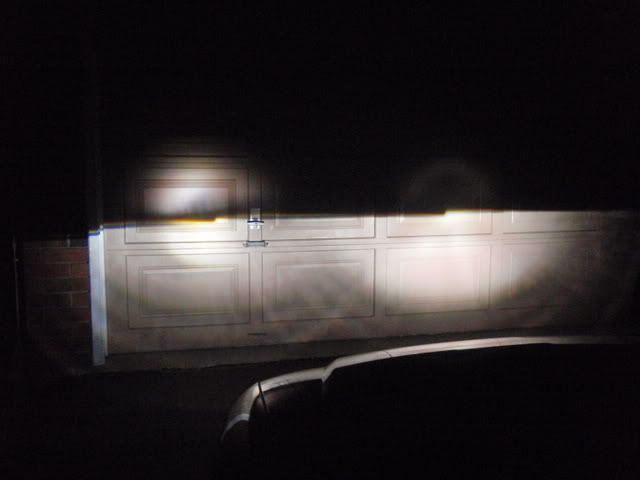
and said WTF?!??!? I tired everything to get rid of this, to no avail, and then one day last week I read a post of EvilSS's which told me what to do. So here it is in how-to form!
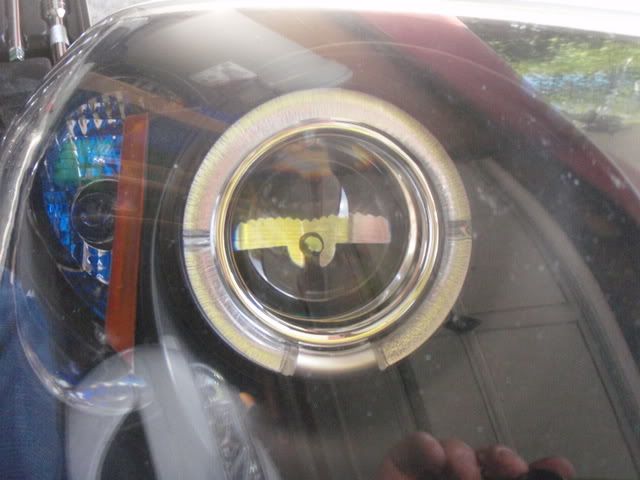
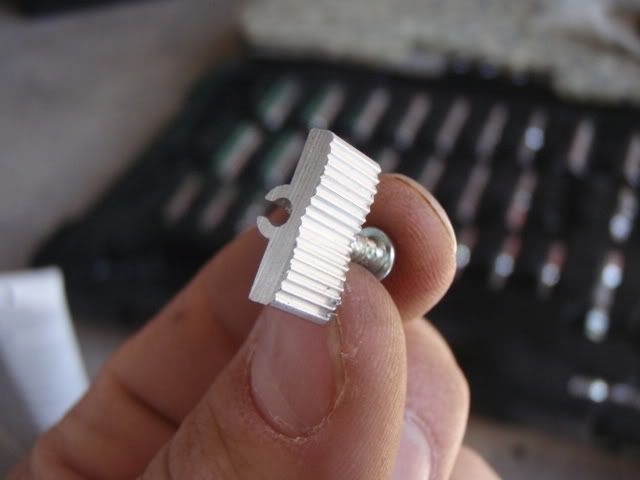
The shiny piece in the reflector housing is the bastard which creates the spots:
So let's start. Grab your 10mm socket and get those headlights out. Since you put the new ones in, I'm gonna figure you're not retarded and know how to do it. Hopefully you wired em up so you can disconnect them easily
Take the lowbeam bulb out of the projector and set it aside. Look inside the headlight and this is what you see:
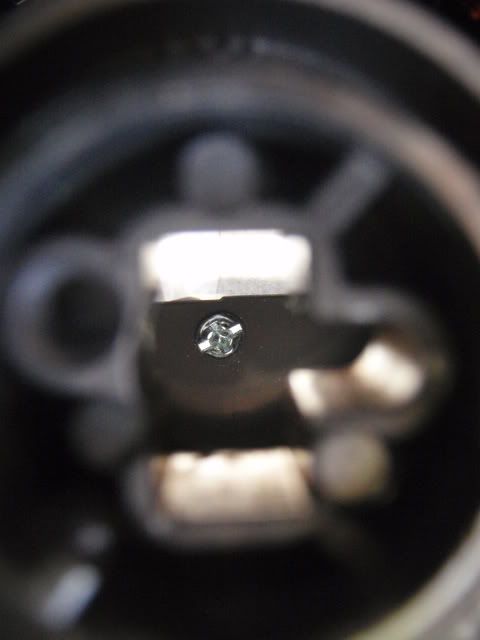
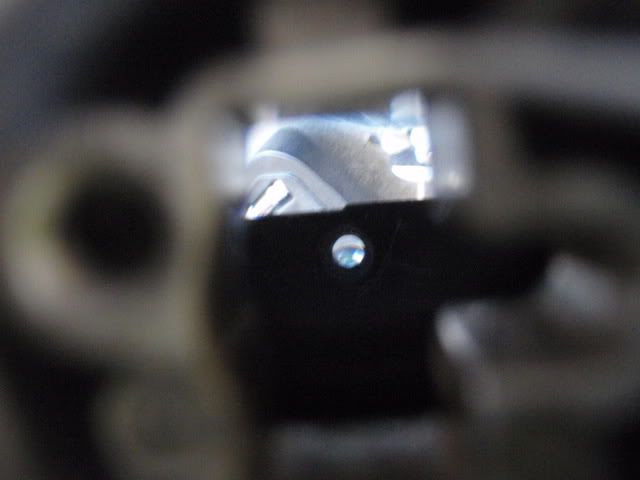
So grab your philips and start unscrewing it. At one point the reflector piece will start to spin, so grab your coathanger, straighten it out, and shove it down inside to stop the piece from spinning around.
If you need to you can look through the front of the headlight to see where the hanger and reflector are. Either way this was a bitch for me, the first light took me 20 min to get the piece off, the 2nd was like 30 secs lol.
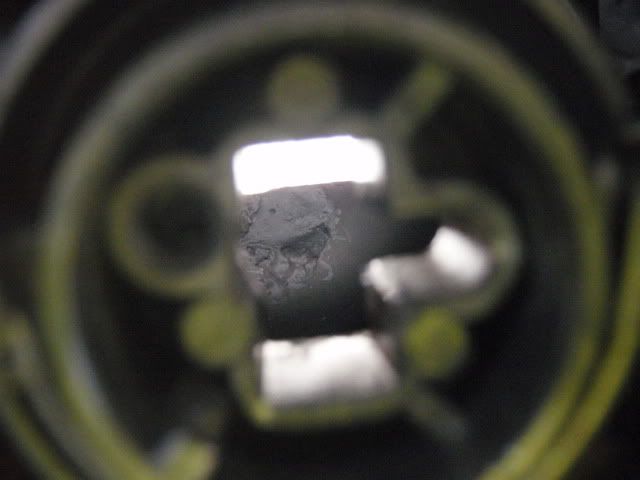
The piece should fall off, so start shaking the headlight to get the reflector and screw to fall out. This is what you're left with:
This is the little reflector:
Front of your light should look like this now (reflector piece is missing):
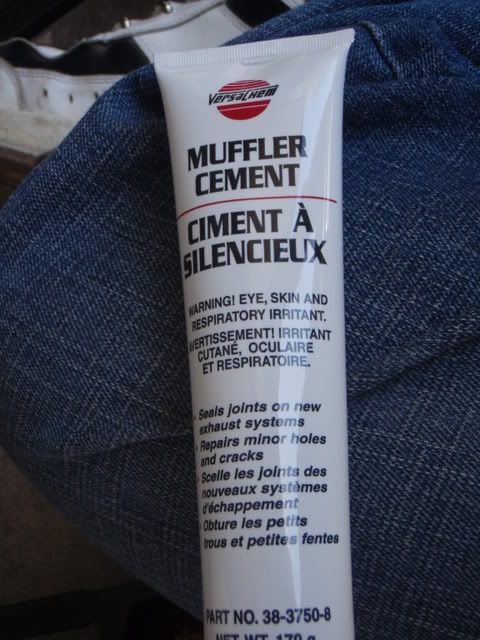
So grab your high temp filler. I grabbed muffler putty from partsource but I don't think you guys have that in the states. Autozone will prolly have some. It cost me about $4 for a tube. It goes on like jelly and hardens up quite fast.. do this part in a shady spot!
Grab your pen or flatheaded object and smear some on the flat side, and press it down into the headlight on to the cut-off shield where the hole is. Try not to get it on the edge of the cutoff shield or itll show up when you turn your lights on. It took me a few tries but I got them both filled:

Make sure theres no filler left on where the bulb sits, I'm not sure xenon lights would like muffler cement
So now you're done! Easy, would've taken me about 30 min if I didn't have to run out and get the putty, I was hoping the screw would just go back in the hole by itself... but no dice.
And the finished result:
I had leftover time since I did this so fast, I did this:
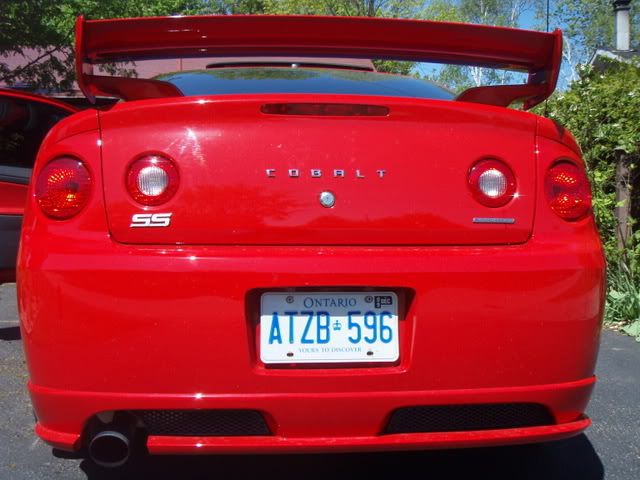
She just needs some wax over where the bowtie was, and one hell of a wash.
I hope this guide helps, any questions or suggestions, PM me. This is my first how-to
--------------------------------------------------------------------------------------------------
So I've been told the glare spots don't show up as well with halogens as they do with HIDs. This post will show you exactly what you need to get rid of the ugly glare spots that you're probably being highbeamed for as you drive.
A big thanks to EvilSS for giving me this info, I would still be pissed with my headlights if I hadn't found his post!
Tools needed:
- 10mm socket (to remove headlight)
- Philips screwdriver (to remove reflector screw)
- coathanger or something skinny (to hold reflector in place)
- Muffler Putty, high temp silicone, or other filler (to fill the hole left by the screw)
- a pen or something with a flat end (to push the filler into the screw hole)
- patience
- a few beers
So when you first installed your HIDs in your 3rd gens, you were probably all excited, until you saw this
and said WTF?!??!? I tired everything to get rid of this, to no avail, and then one day last week I read a post of EvilSS's which told me what to do. So here it is in how-to form!
The shiny piece in the reflector housing is the bastard which creates the spots:
So let's start. Grab your 10mm socket and get those headlights out. Since you put the new ones in, I'm gonna figure you're not retarded and know how to do it. Hopefully you wired em up so you can disconnect them easily
Take the lowbeam bulb out of the projector and set it aside. Look inside the headlight and this is what you see:
So grab your philips and start unscrewing it. At one point the reflector piece will start to spin, so grab your coathanger, straighten it out, and shove it down inside to stop the piece from spinning around.
If you need to you can look through the front of the headlight to see where the hanger and reflector are. Either way this was a bitch for me, the first light took me 20 min to get the piece off, the 2nd was like 30 secs lol.
The piece should fall off, so start shaking the headlight to get the reflector and screw to fall out. This is what you're left with:
This is the little reflector:
Front of your light should look like this now (reflector piece is missing):
So grab your high temp filler. I grabbed muffler putty from partsource but I don't think you guys have that in the states. Autozone will prolly have some. It cost me about $4 for a tube. It goes on like jelly and hardens up quite fast.. do this part in a shady spot!
Grab your pen or flatheaded object and smear some on the flat side, and press it down into the headlight on to the cut-off shield where the hole is. Try not to get it on the edge of the cutoff shield or itll show up when you turn your lights on. It took me a few tries but I got them both filled:
Make sure theres no filler left on where the bulb sits, I'm not sure xenon lights would like muffler cement
So now you're done! Easy, would've taken me about 30 min if I didn't have to run out and get the putty, I was hoping the screw would just go back in the hole by itself... but no dice.
And the finished result:
I had leftover time since I did this so fast, I did this:
She just needs some wax over where the bowtie was, and one hell of a wash.
I hope this guide helps, any questions or suggestions, PM me. This is my first how-to
Last edited by TommyP; May 17, 2012 at 09:04 PM.
Junior Member
Joined: 01-09-08
Posts: 437
Likes: 0
From: Garner NC
wow thanks! will be doing this soon but with silicon that i have sitting around from my last headlight painting job on my old car.
Thats neat - you but the SS and the supercharged logos in the same place that i did!! I dont have cobalt on there though.
Thats neat - you but the SS and the supercharged logos in the same place that i did!! I dont have cobalt on there though.

New Member
Joined: 08-10-06
Posts: 63
Likes: 0
From: Toronto
Glad I could help and that everything worked out for you
Theres a nice purple color in the cutoff now as well.
I bet you feel alot better driving around at night knowing your not blinding everyone anymore
Theres a nice purple color in the cutoff now as well.
I bet you feel alot better driving around at night knowing your not blinding everyone anymore
Thread Starter
Senior Member
Joined: 06-29-07
Posts: 619
Likes: 0
From: Toronto, Ontario
Thats neat - you but the SS and the supercharged logos in the same place that i did!! I dont have cobalt on there though.
Glad I could help and that everything worked out for you
Theres a nice purple color in the cutoff now as well.
I bet you feel alot better driving around at night knowing your not blinding everyone anymore
Theres a nice purple color in the cutoff now as well.
I bet you feel alot better driving around at night knowing your not blinding everyone anymore

Senior Member
Joined: 12-21-07
Posts: 3,741
Likes: 0
From: lucedale, ms
second gen doesnt have a glare spot like the third gen do. the second gen has that swoosh on the passenger side light and im not sure how that would be fixed other than to take the projector lens apart and cut the cutoff shield so that it doesnt make the swoosh effect.
Senior Member
Joined: 09-01-05
Posts: 2,382
Likes: 0
From: Delaware
Nice right up, but I am not going to lie and say I am confused. So I take out the reflector piece, and then I put the putty where?
The way I am reading it, is you take out the reflector piece. You put the putty (Purpose of this is to keep light from reflecting off of it) onto the reflector, and then put the reflector back into the housing? Its just the one side though?
The way I am reading it, is you take out the reflector piece. You put the putty (Purpose of this is to keep light from reflecting off of it) onto the reflector, and then put the reflector back into the housing? Its just the one side though?
New Member
Joined: 08-10-06
Posts: 63
Likes: 0
From: Toronto
its called a squirrel spotter and because these and most aftermarket projectors are made to use with halogen bulbs it reflects the weaker halogen light up to light up road signs etc... but when you put it a much brighter HID bulb the reflection of light is much greater and thus creates all that bad glare above the cut off line which blinds people and just looks terrible. hope that explains it for you. good luck.

Senior Member
Joined: 06-28-06
Posts: 1,890
Likes: 0
From: No man's land
I did this mod the other night and boy am i glad i did. My cut off line is way cleaner and that damn glare is GONE. Also, since the light is not being re directed onto that squirrel spotter, the light output with the HIDs appears greater.
Can't wait till i get my 50 watt ballasts
haha, on a side note, I fired up the headlights with the screw hole not filled to see what it would look like and there was a crisp, super bright beam of round light haha.
Big thanks to Operatic. Not only are his HID kits sweet, he was a big help fixing these projectors.
Senior Member
Joined: 01-22-06
Posts: 8,396
Likes: 0
From: S.FL
I did this mod the other night and boy am i glad i did. My cut off line is way cleaner and that damn glare is GONE. Also, since the light is not being re directed onto that squirrel spotter, the light output with the HIDs appears greater.
Can't wait till i get my 50 watt ballasts
haha, on a side note, I fired up the headlights with the screw hole not filled to see what it would look like and there was a crisp, super bright beam of round light haha.
Big thanks to Operatic. Not only are his HID kits sweet, he was a big help fixing these projectors.
Can't wait till i get my 50 watt ballasts
haha, on a side note, I fired up the headlights with the screw hole not filled to see what it would look like and there was a crisp, super bright beam of round light haha.
Big thanks to Operatic. Not only are his HID kits sweet, he was a big help fixing these projectors.
Senior Member
Joined: 06-28-06
Posts: 1,890
Likes: 0
From: No man's land
I'm planning on going to atleast a 6k bulb with the 50 watt ballasts. The light output is about 40% greater over the 35 watt ballasts.
The reasoning for the bump up in bulb color temp from 5k to 6k is because the higher wattage will drop the color temperature down about 1k. I like to have a really close to OEM HID appearance.
The reasoning for the bump up in bulb color temp from 5k to 6k is because the higher wattage will drop the color temperature down about 1k. I like to have a really close to OEM HID appearance.
Thread Starter
Senior Member
Joined: 06-29-07
Posts: 619
Likes: 0
From: Toronto, Ontario
haha, on a side note, I fired up the headlights with the screw hole not filled to see what it would look like and there was a crisp, super bright beam of round light haha.
I put the lights back in cuz I thought I might get pulled over or something for missing the complete headlights from my car, and I was getting 2 nice round circles on the back of other peoples cars


thanks so much for the write up i just did this literraly 1 min ago. and it took all of 5. (i got the putty before hand  )
)
i used quick steel for my filler. worked great. thanks again man great write up.
lol!
i used quick steel for my filler. worked great. thanks again man great write up.
Lol I had to run to the store without the screw holes filled in because I didn't grab the putty, hoping the screw would just screw back in the hole.
I put the lights back in cuz I thought I might get pulled over or something for missing the complete headlights from my car, and I was getting 2 nice round circles on the back of other peoples cars
I put the lights back in cuz I thought I might get pulled over or something for missing the complete headlights from my car, and I was getting 2 nice round circles on the back of other peoples cars
Last edited by ilovecars; Apr 16, 2009 at 12:27 PM. Reason: Automerged Doublepost