
Drivetrain: Intense TransAxle Mount HoW-to (56k get a beer)


Thread Starter
New Member
Joined: 06-03-06
Posts: 21
Likes: 0
From: Alaska
Intense TransAxle Mount HoW-to (56k get a beer)
Okay so I just got my motormounts in (Transaxle Mounts), and I thought I would share with everyone how I (and 3 of my buddies) put in these new polyurethane INTENSE motormounts. The Install toke roughly 2 hours and takes a little muscle. Not at all challenging to install.
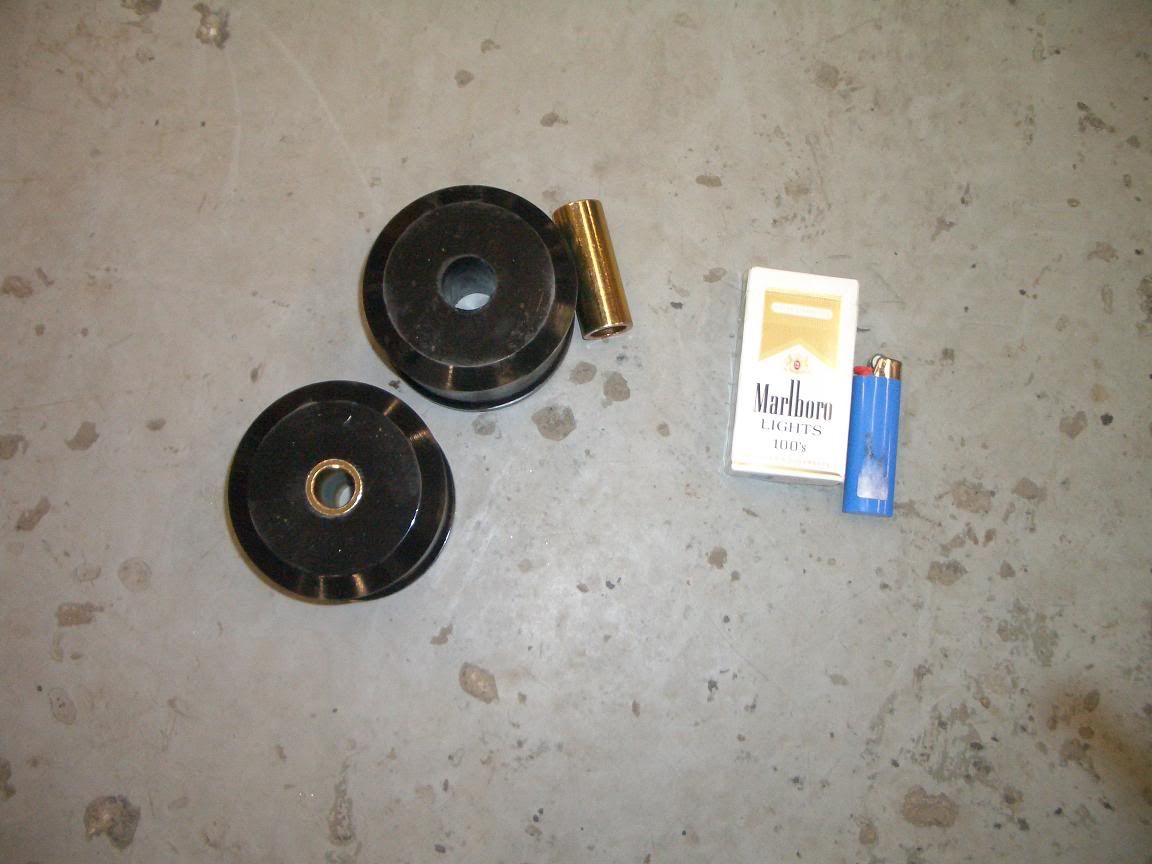
These Are the Motormounts, and of course some smokes.
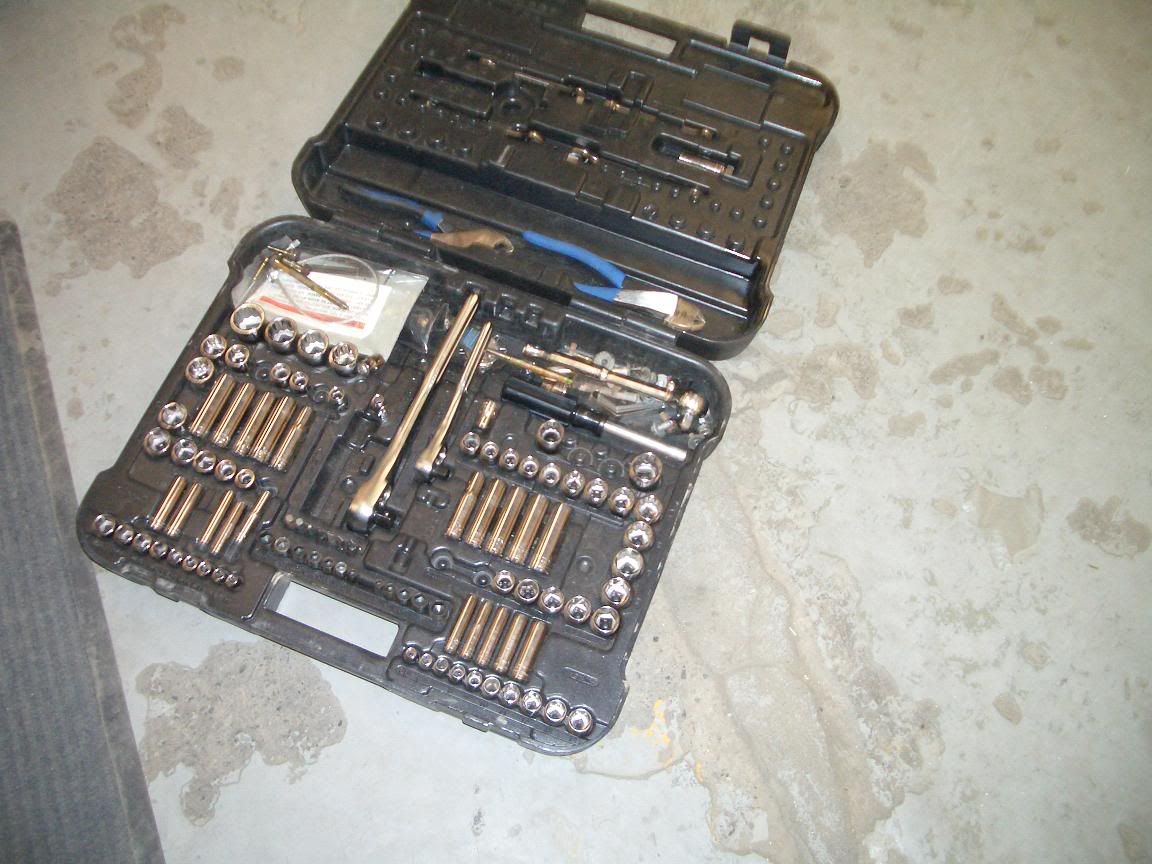
We used these basic tools along with a jackstand and vice grip.
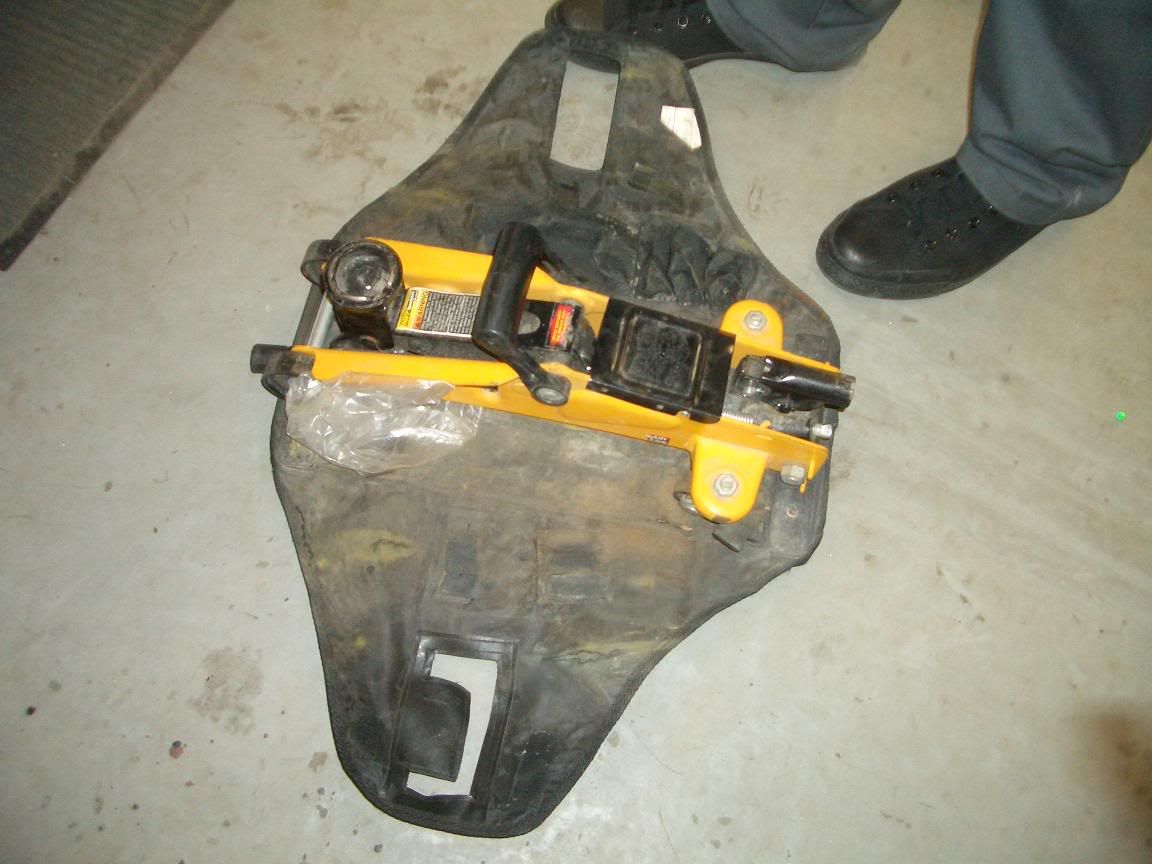
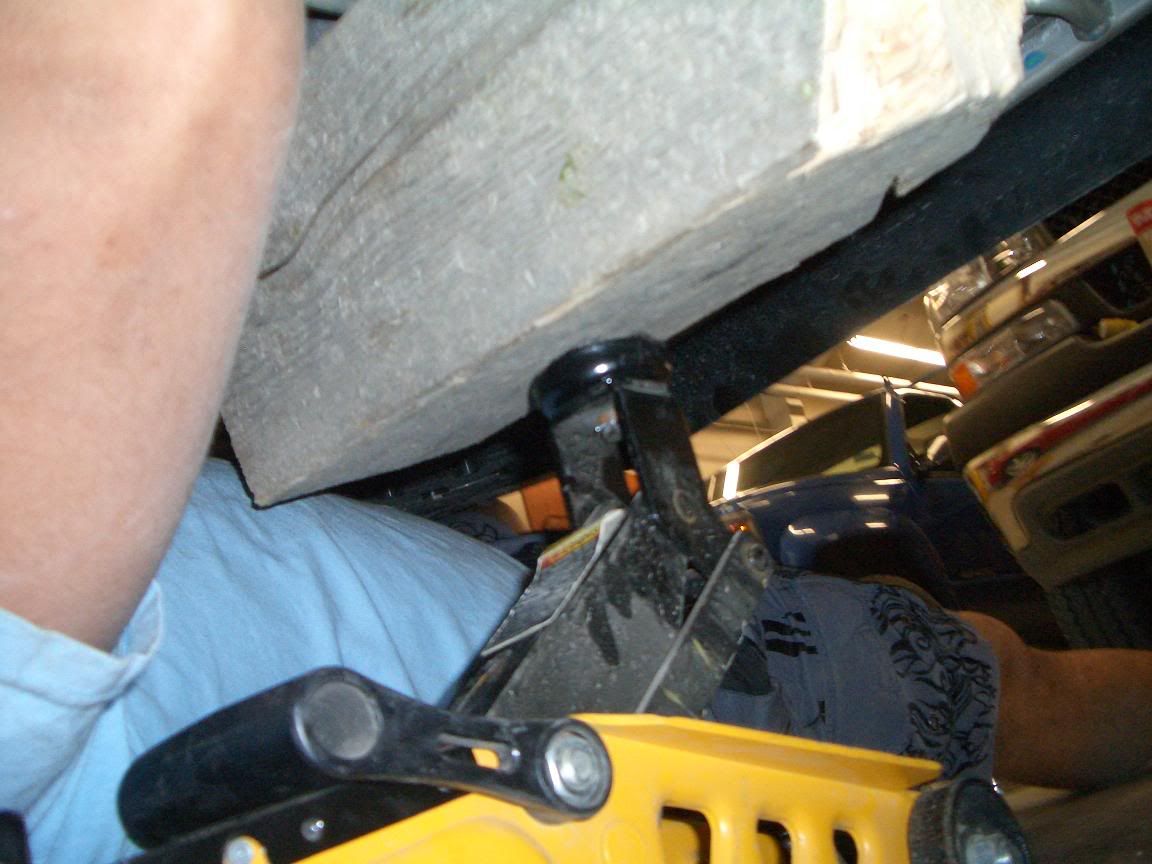
We rolled the SS on to some stand and then with the jack and a large piece of wood we supported the engine while taking out the mounts (I HIGHLY RECOMMEND NOT SKIPPING THIS STEP, SO THAT THE OTHER MOUNTS DON'T POSSIBLY BREAK). Now im not sure if they would break but why not play it safe. The jack and wood was place here to support the motor
Here is the jack and support
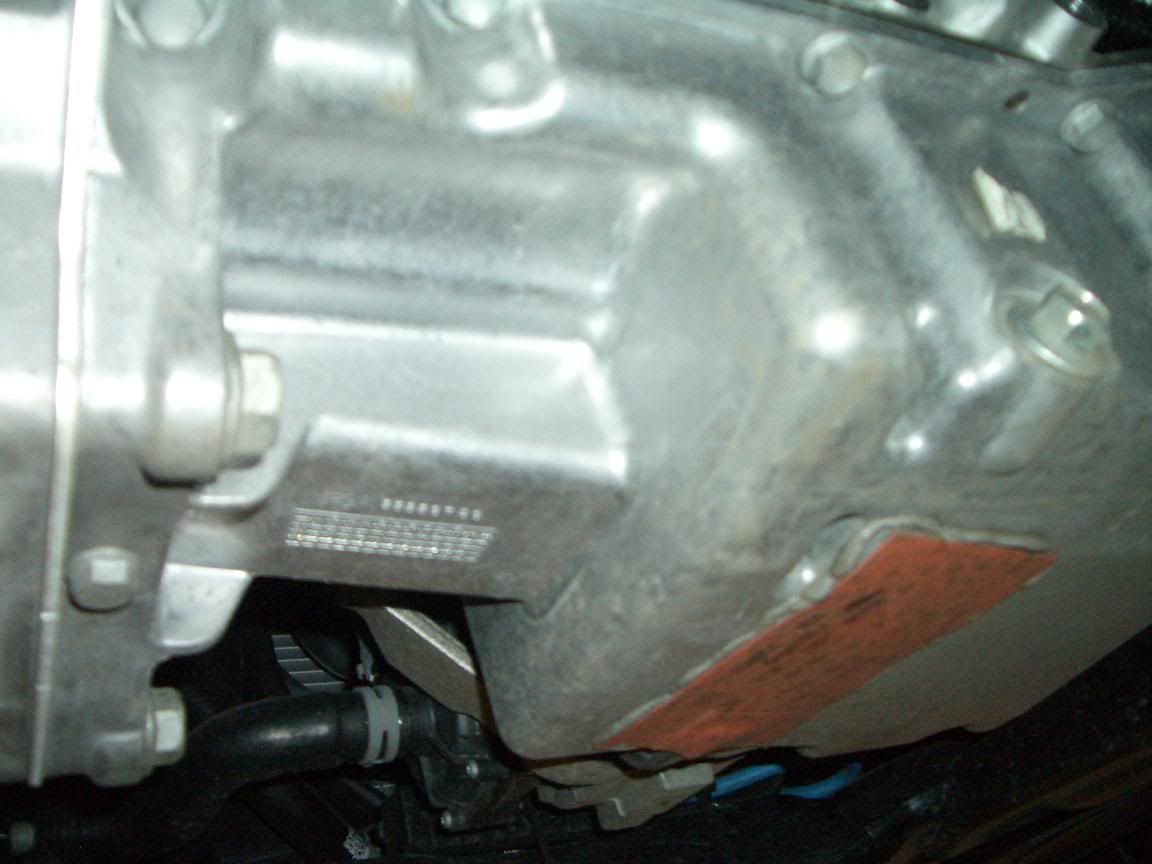
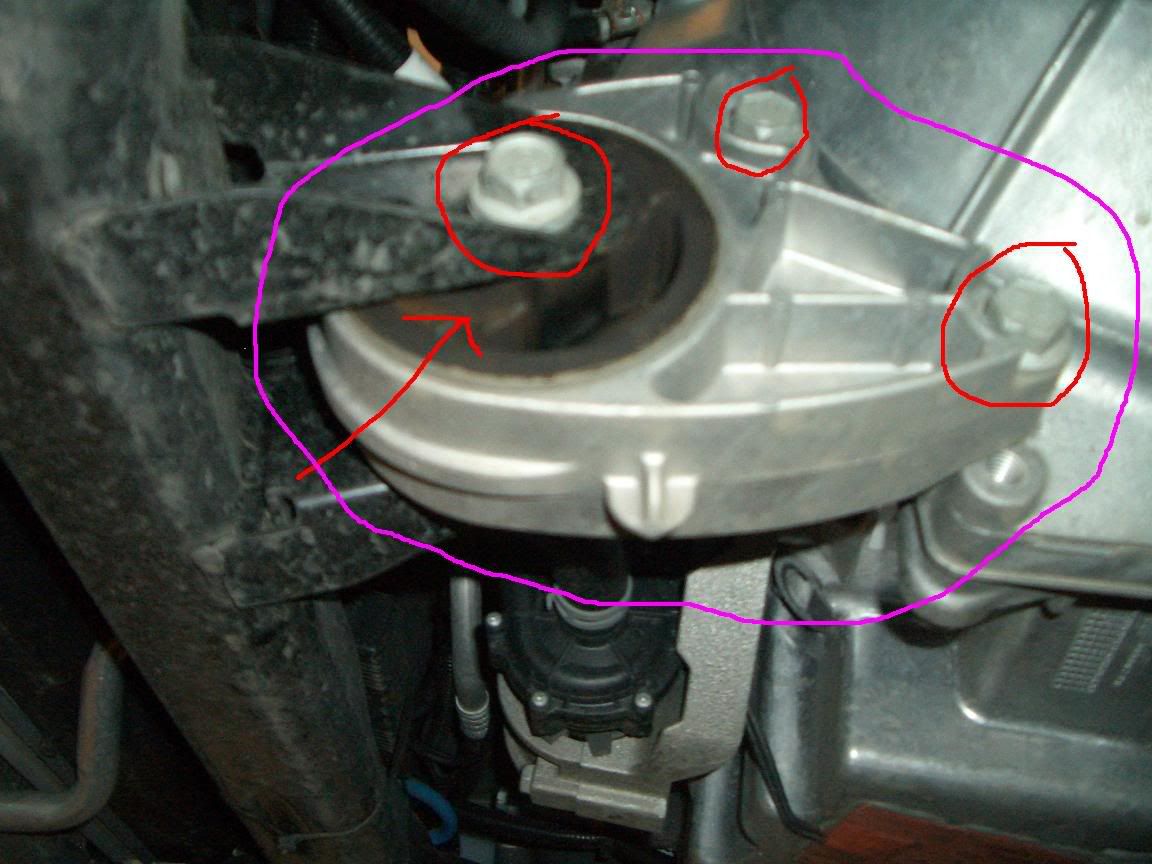
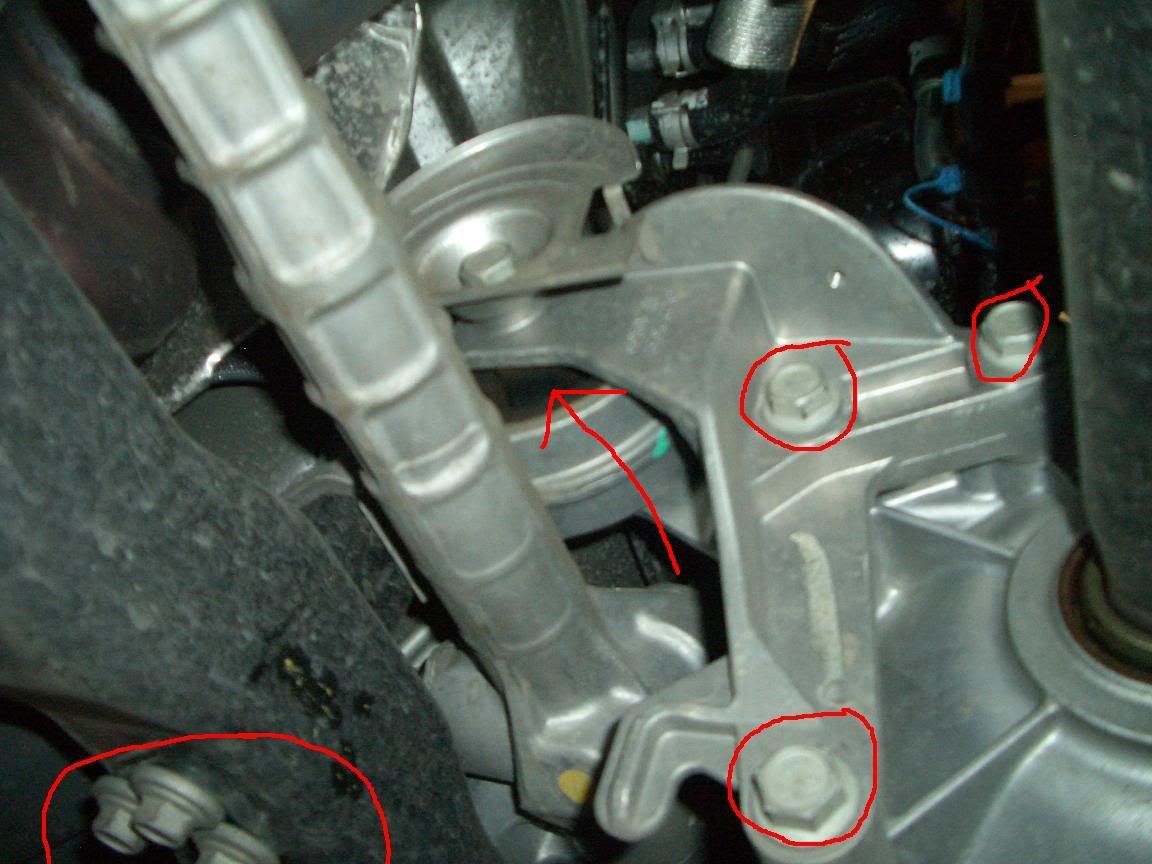
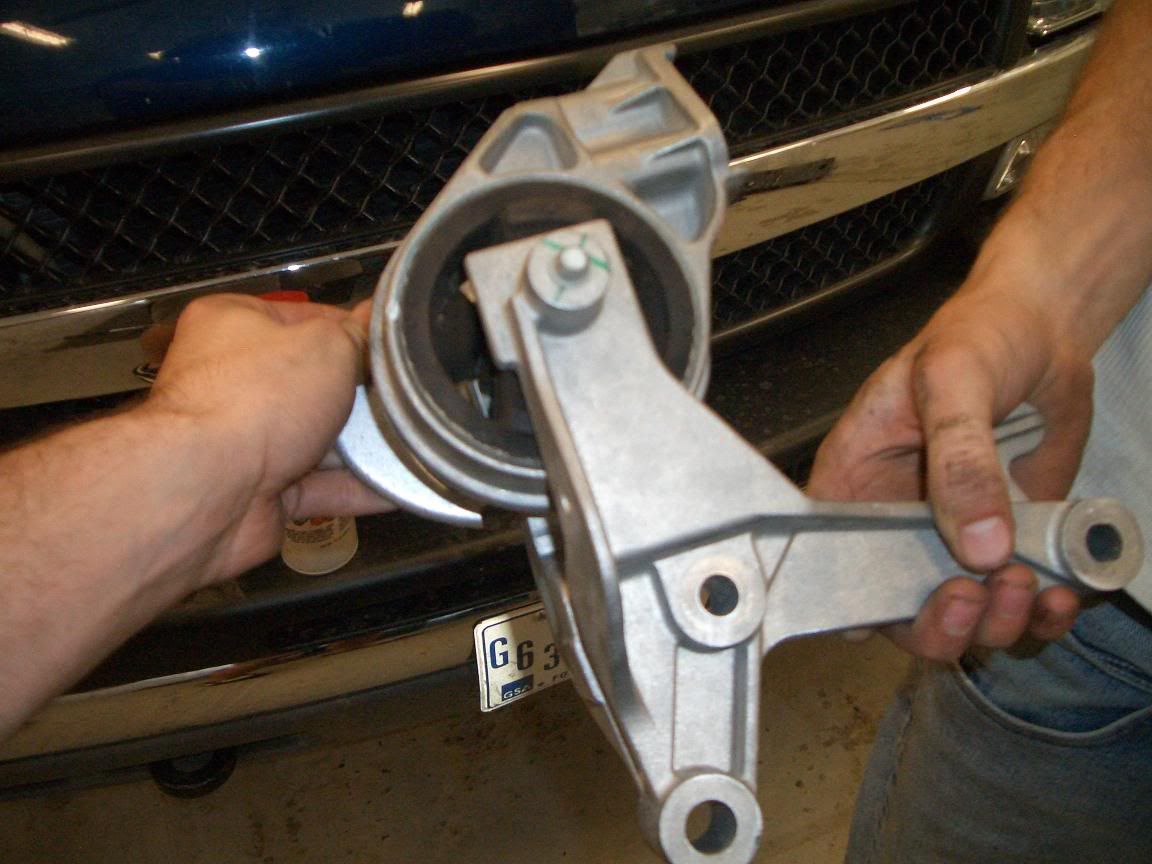
The mounts are located in the undercarriage in the front of the motor and the rear and both are bolt to the tranny. This is the front motor mount and the one i recommend takeing off first. We removed each mount, then replaced the bushing, and reinstalled the mount before moving to the next mount.
The colorcode in the picture goes as followed
-The red circles are the bolts the need to be removed to take the mount out
-the red arrow is the bushing that will be replaced
-and the purple circle is the mount that is coming out
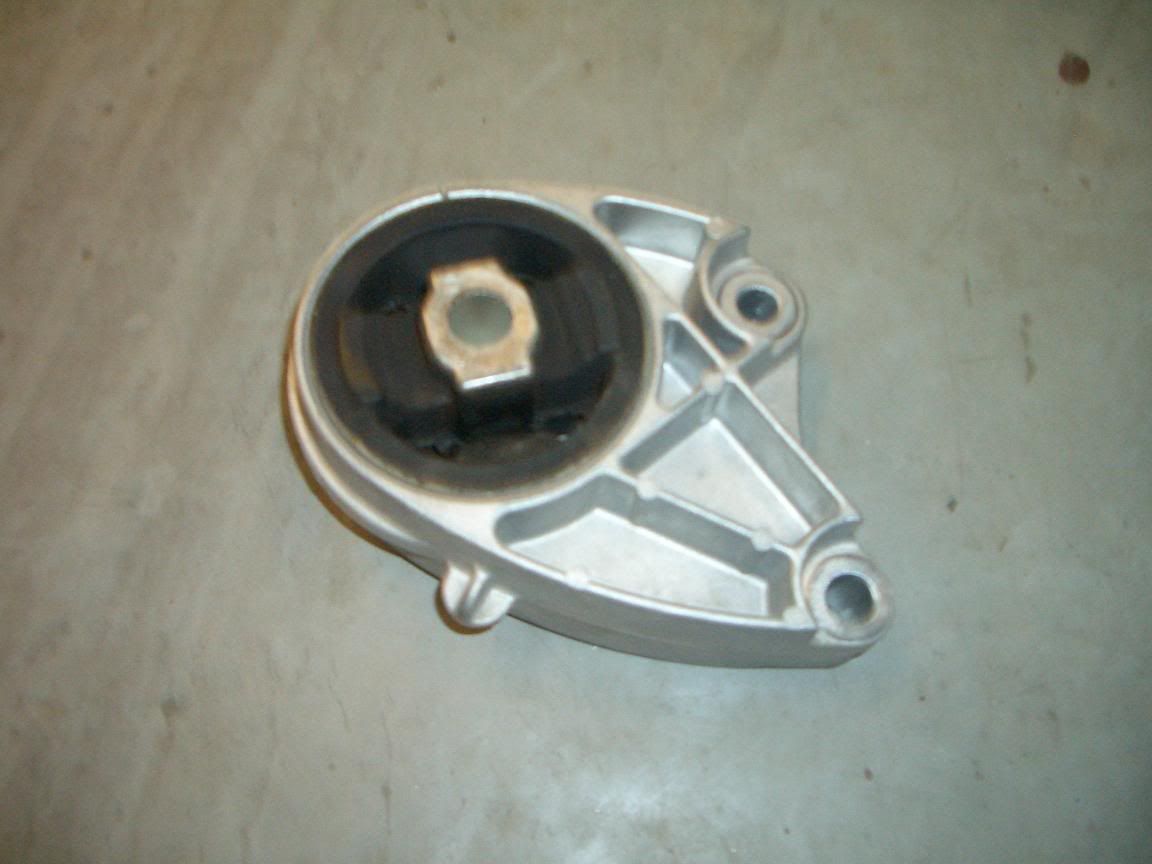
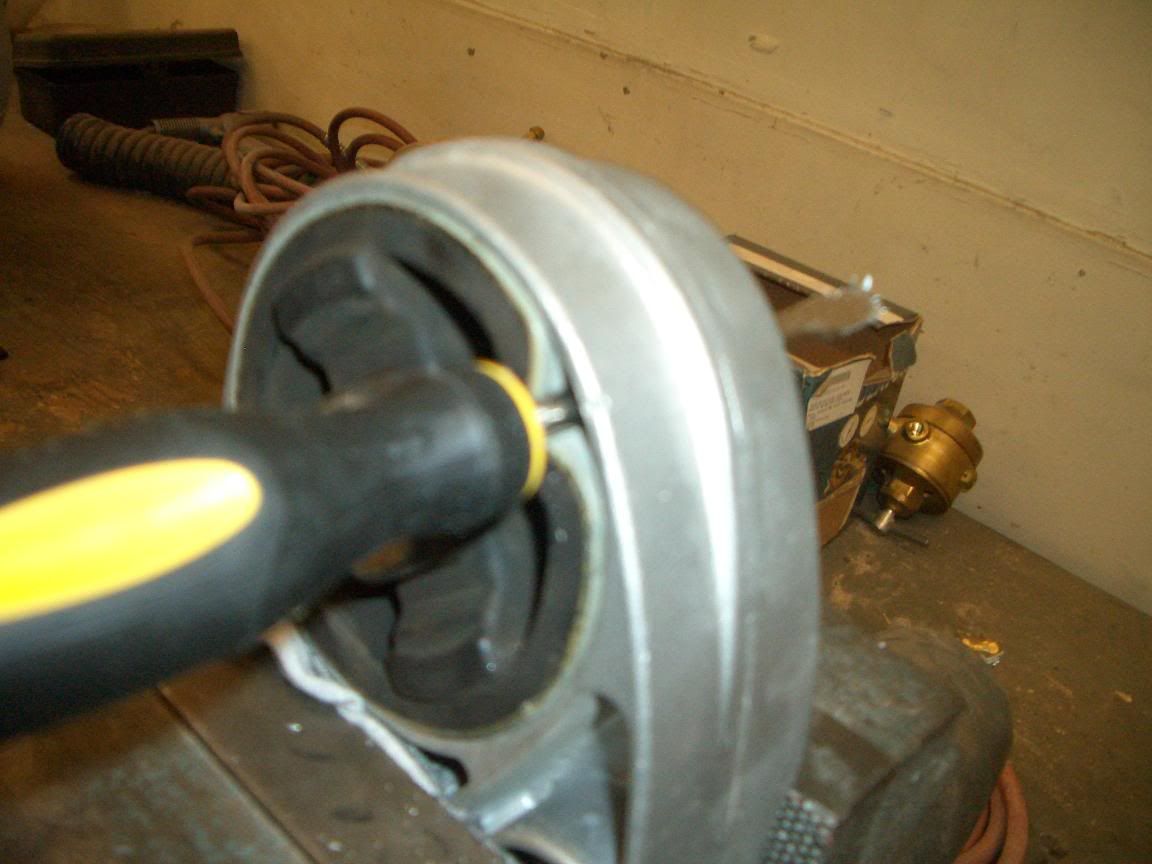
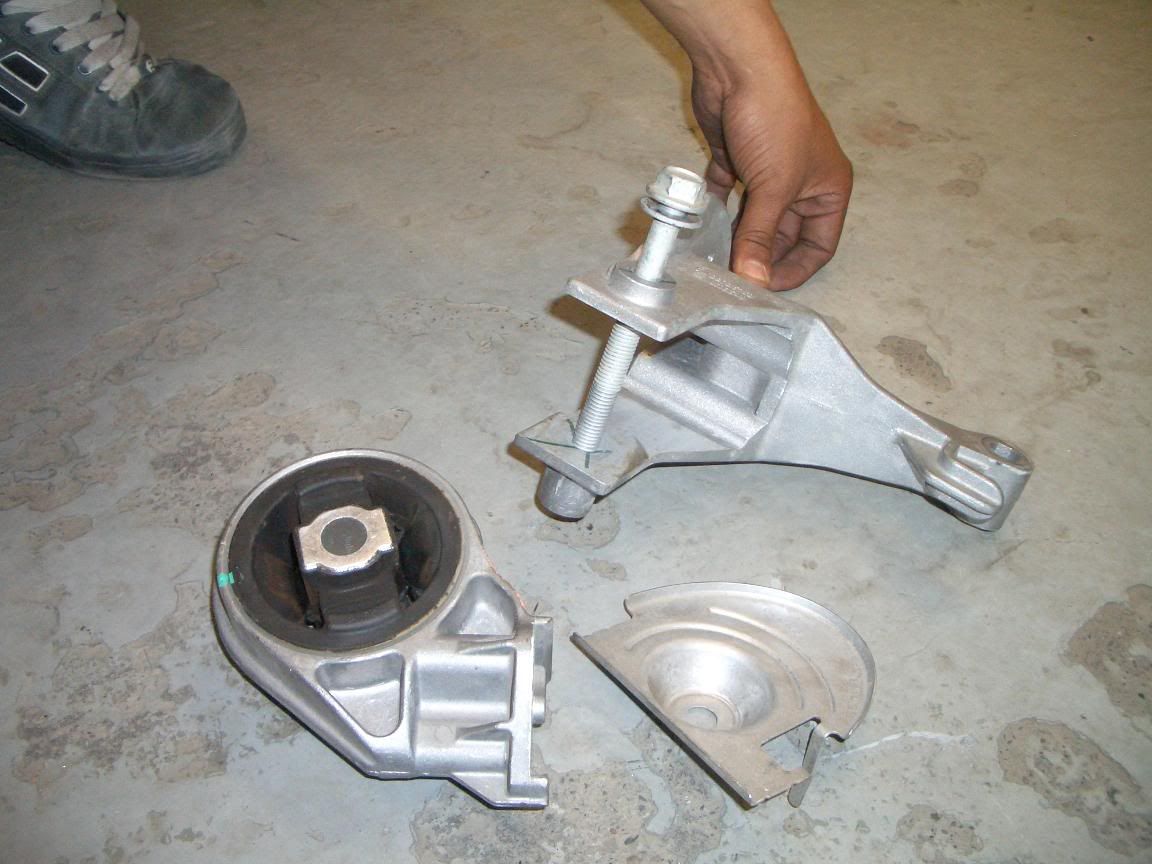
Here is what the mount looks like removed.
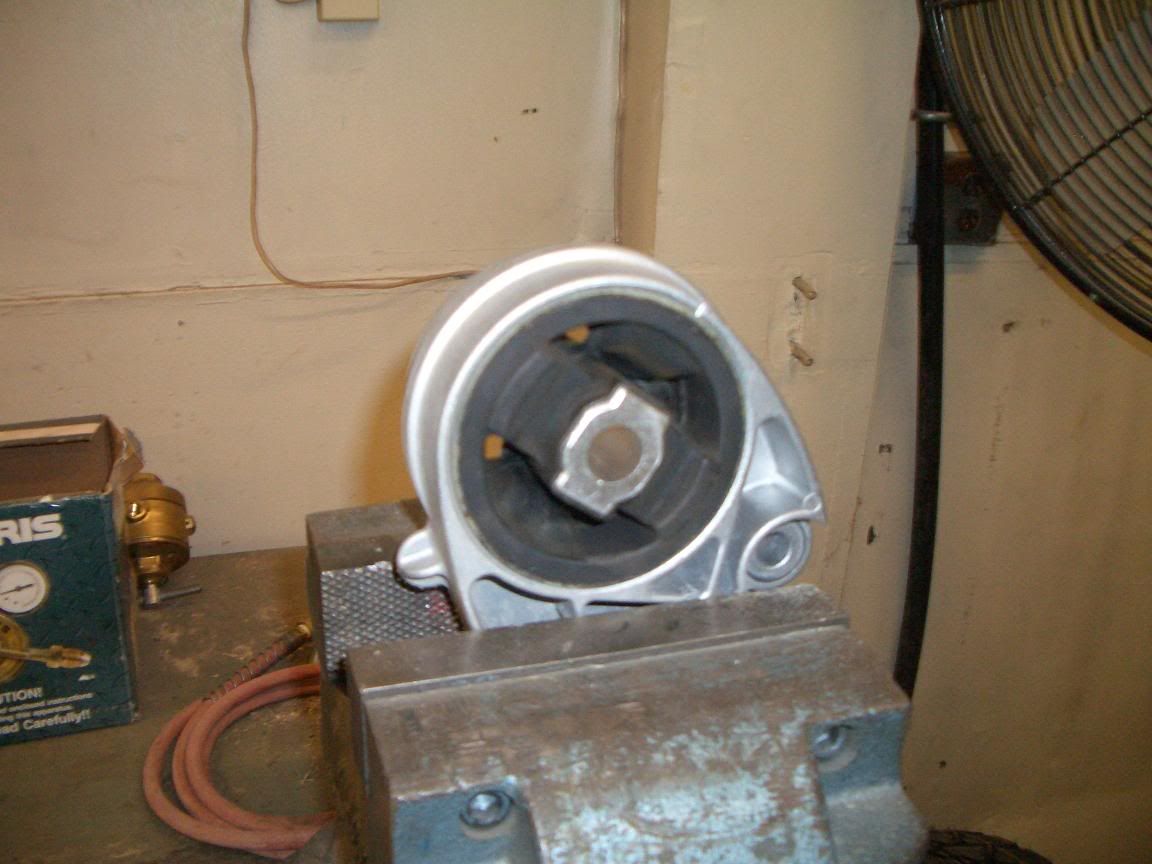
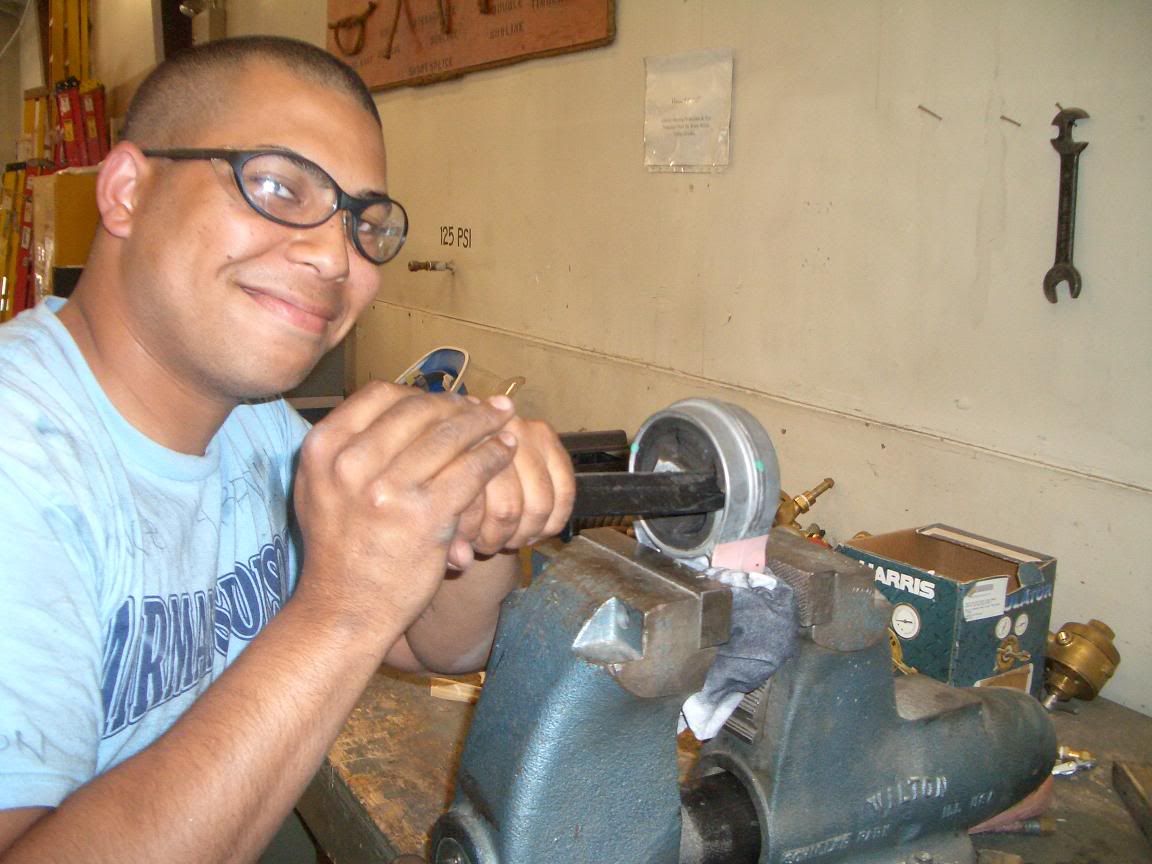
We then placed the mount in then Vice so that we could remove the OEM bushing.
We placed a screwdriver inbetween the mount and bushing to try and pry it out but we had little luck.
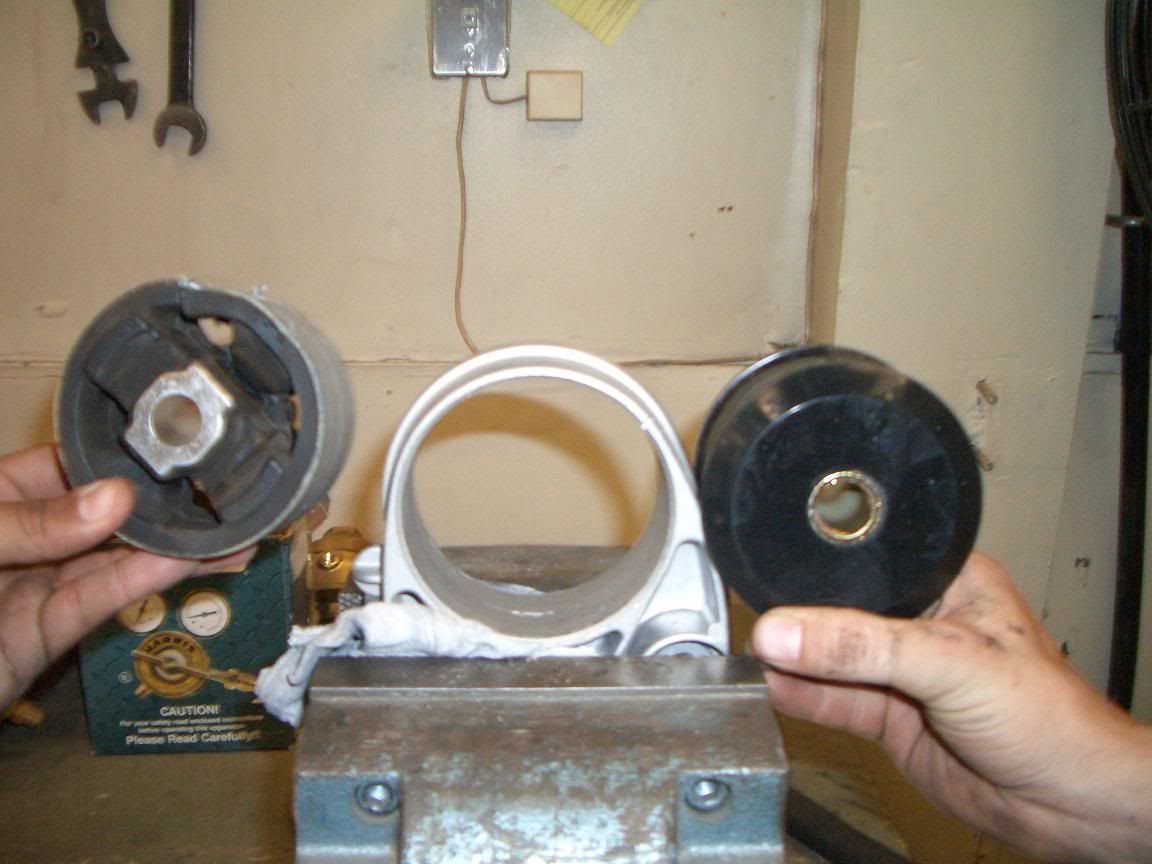
So we tried this method instead. Used a kabarr knife to instead cut the thing to pieces and remove it that way. You may be able to purchase special tools to remove such an item as this. But we had no such thing though so we just use brute force.
Now out with the OLD and in with the NEW
These Are the Motormounts, and of course some smokes.
We used these basic tools along with a jackstand and vice grip.
We rolled the SS on to some stand and then with the jack and a large piece of wood we supported the engine while taking out the mounts (I HIGHLY RECOMMEND NOT SKIPPING THIS STEP, SO THAT THE OTHER MOUNTS DON'T POSSIBLY BREAK). Now im not sure if they would break but why not play it safe. The jack and wood was place here to support the motor
Here is the jack and support
The mounts are located in the undercarriage in the front of the motor and the rear and both are bolt to the tranny. This is the front motor mount and the one i recommend takeing off first. We removed each mount, then replaced the bushing, and reinstalled the mount before moving to the next mount.
The colorcode in the picture goes as followed
-The red circles are the bolts the need to be removed to take the mount out
-the red arrow is the bushing that will be replaced
-and the purple circle is the mount that is coming out
Here is what the mount looks like removed.
We then placed the mount in then Vice so that we could remove the OEM bushing.
We placed a screwdriver inbetween the mount and bushing to try and pry it out but we had little luck.
So we tried this method instead. Used a kabarr knife to instead cut the thing to pieces and remove it that way. You may be able to purchase special tools to remove such an item as this. But we had no such thing though so we just use brute force.
Now out with the OLD and in with the NEW
Last edited by TommyP; Oct 3, 2012 at 01:11 PM.
Thread Starter
New Member
Joined: 06-03-06
Posts: 21
Likes: 0
From: Alaska
Getting the new bushing in is a pain in the ass. So we lubed it up and used the vice to force the mount and bushing together. We lubed the bushing ends and the inside of the mount with vasoline, we were a little excessive with the vasoline. But hey its didn't hurt.
The lube
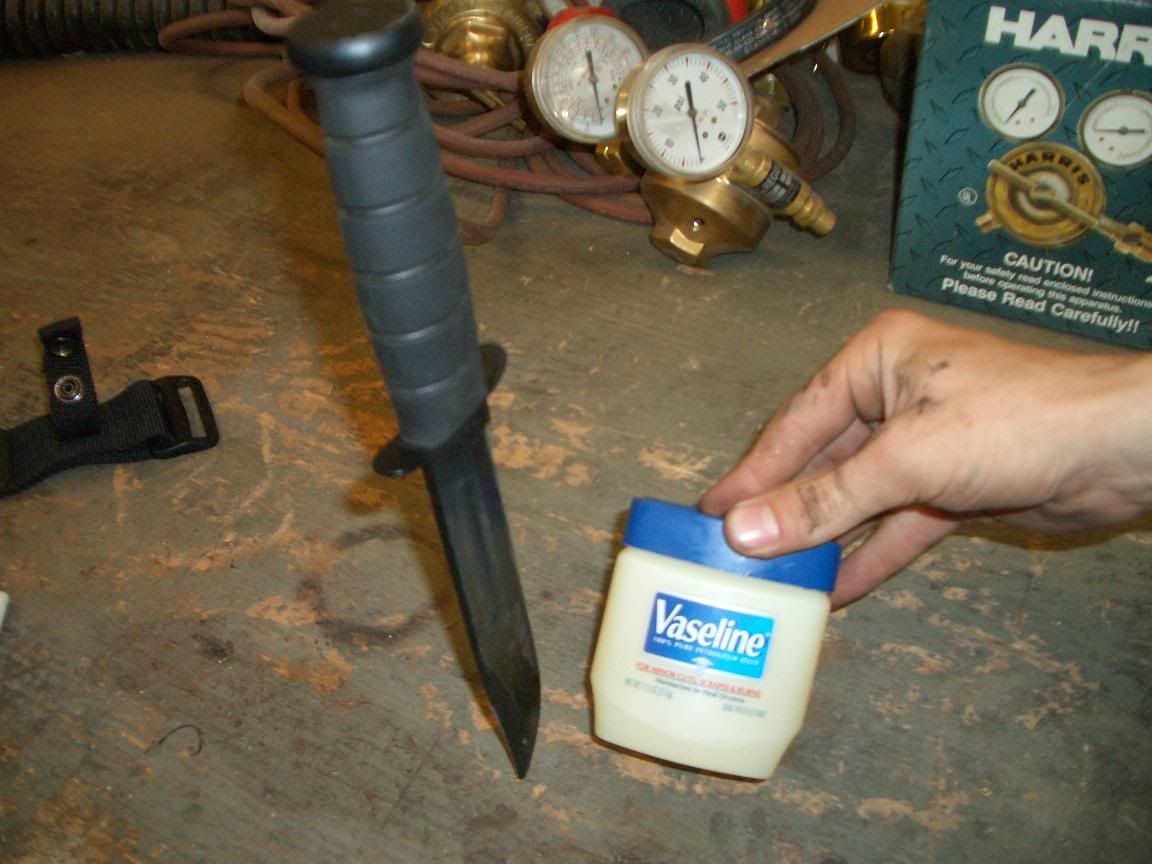
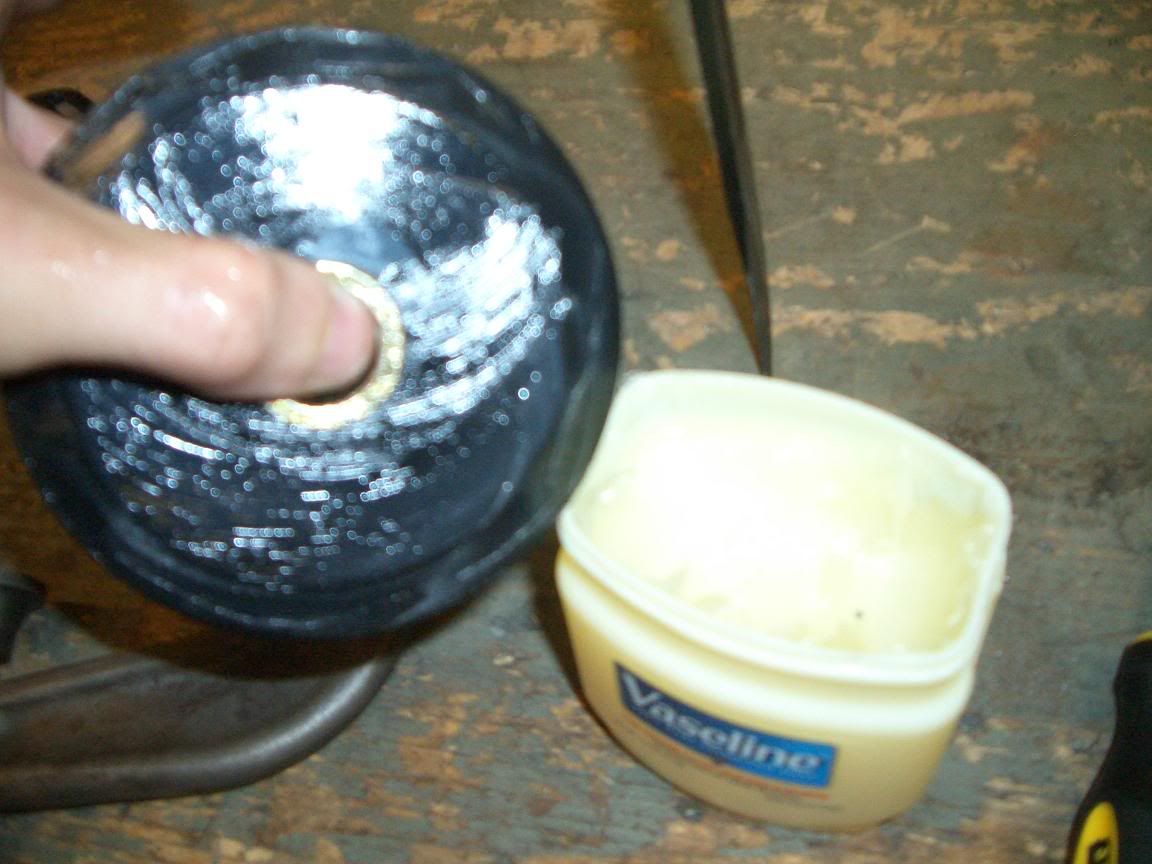
The Vice
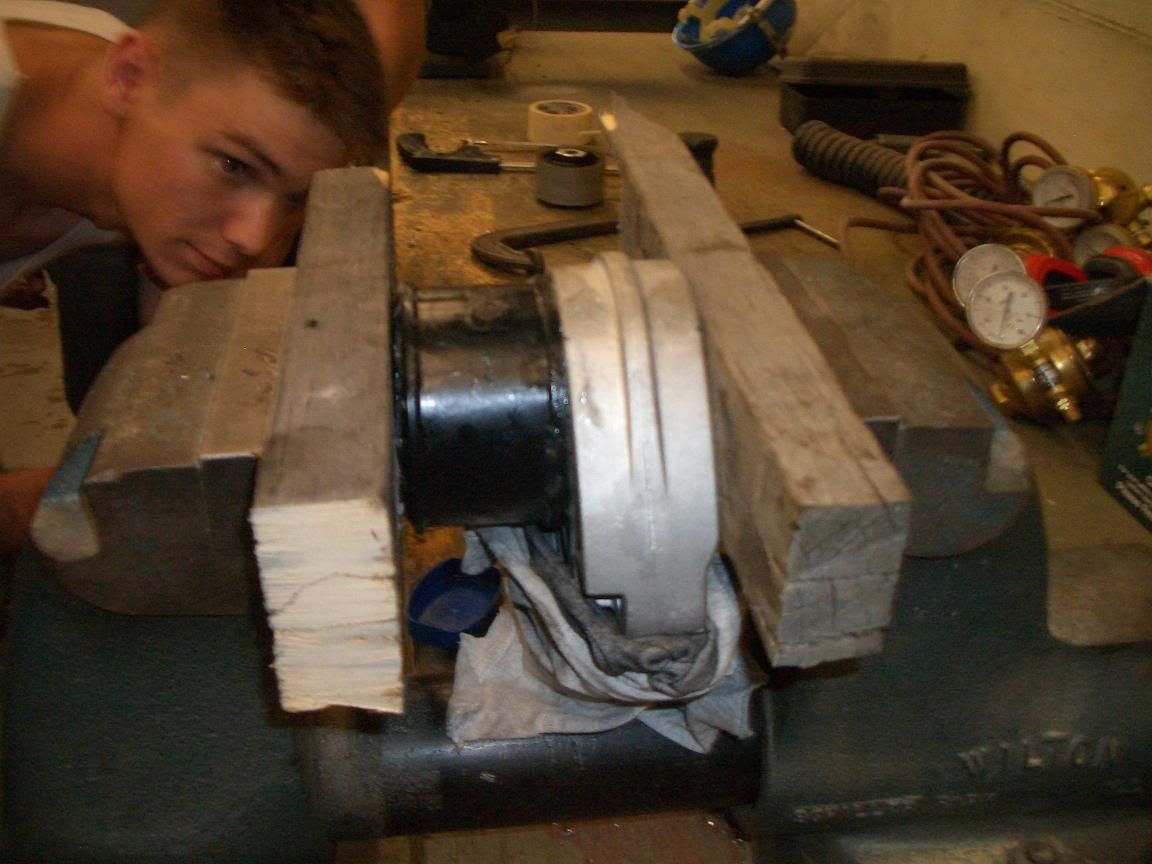
We could not get the entire busing in with the vice just because of the lip located on the busing. So a little wood and hammer.
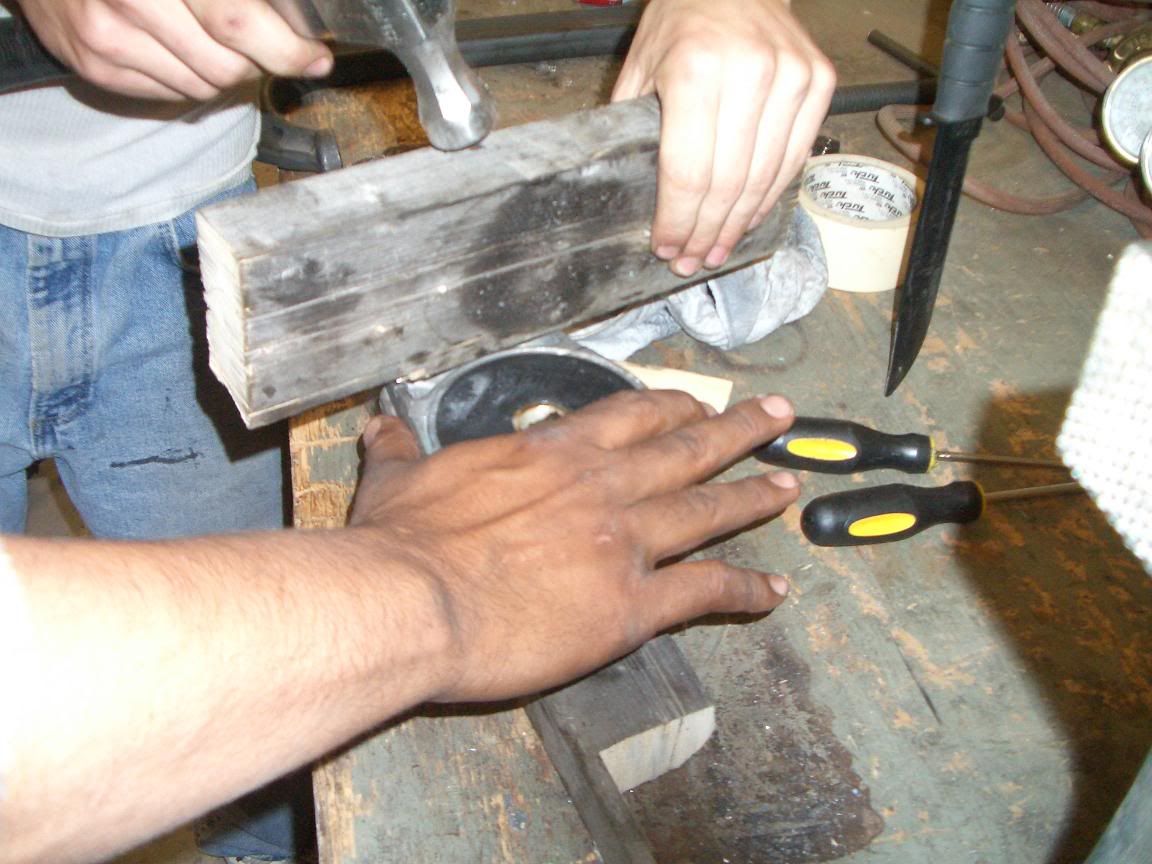
After more brute force we got the bushing in!
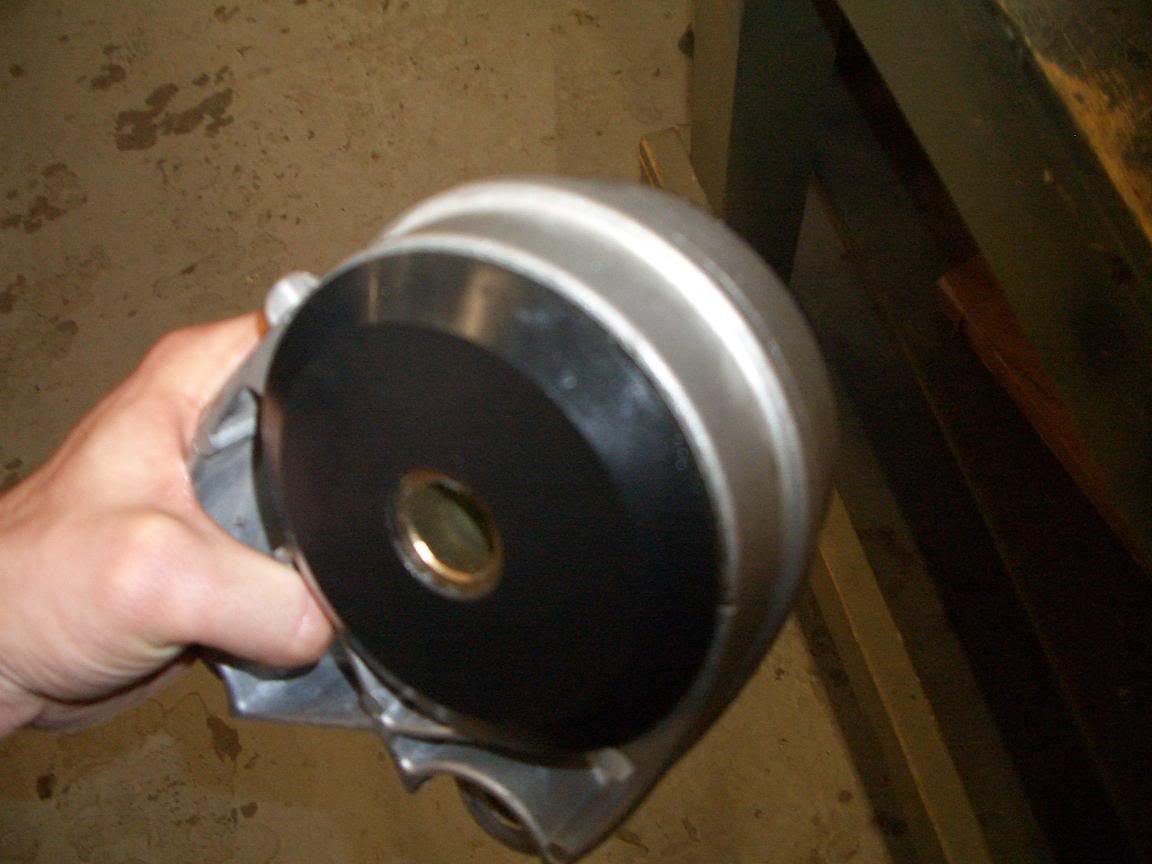
We now reversed what we dide to take the mount off and moved to the rear mount. We repostioned the jack and went to work.This is the rear motormount which once you get it off takes a little work to get it out of that tight squezze. And again the color codes goes
The colorcode in the picture goes as followed
-The red circles are the bolts the need to be removed to take the mount out
-the red arrow is the bushing that will be replaced
-and the purple circle is the mount that is coming out
Here The blues represent the bolts. They go through the frame and bolt into the mount.
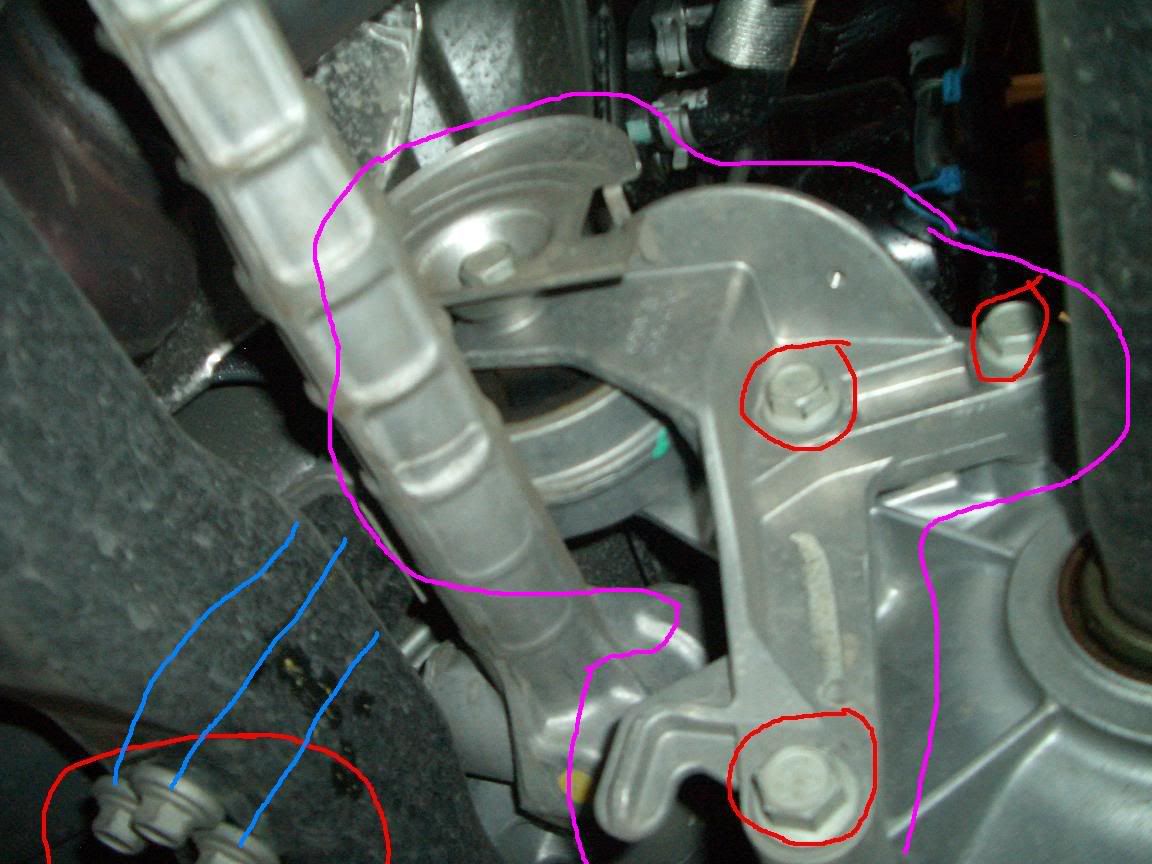
Another shot of the bolts on the frame that need to be removed
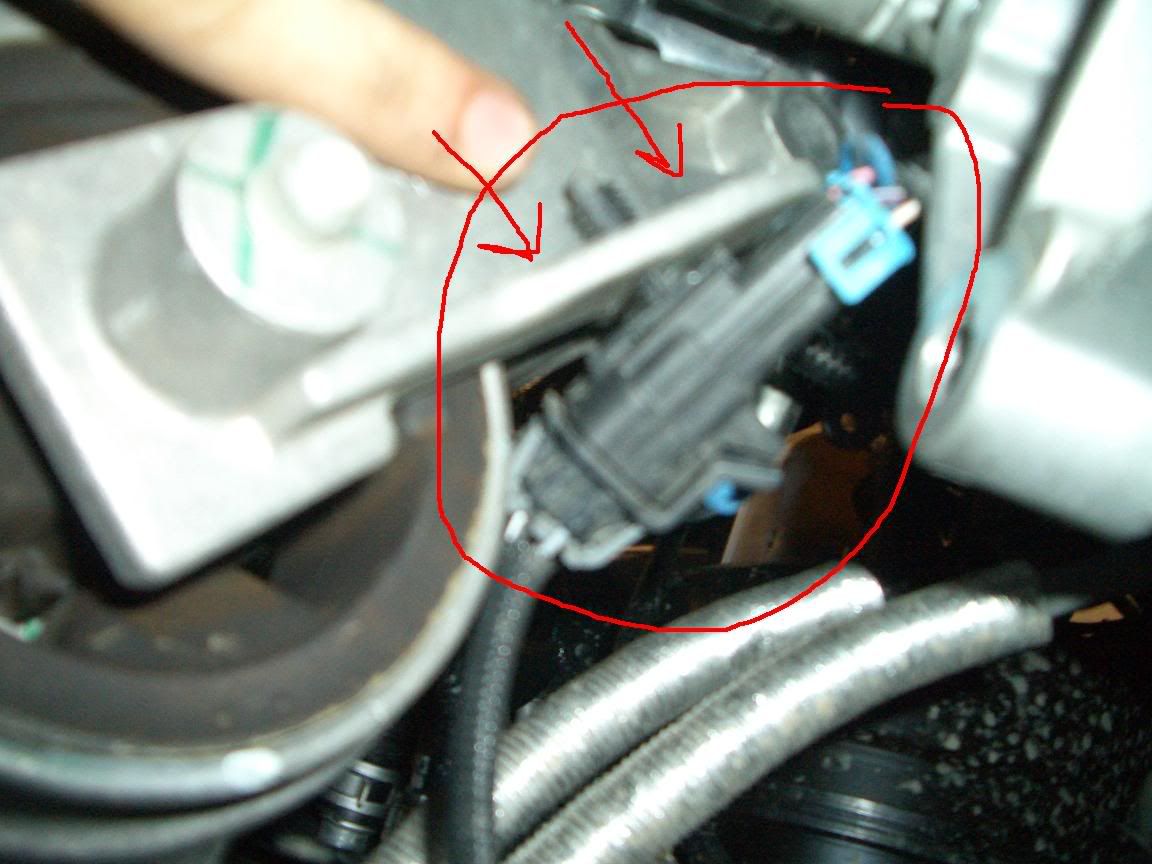
Once you have taken all the bolts out wiring for the rear mounted O2 sensor is attached to this mount. With some strength it can just be pulled out and reattached when you put the mount back in.
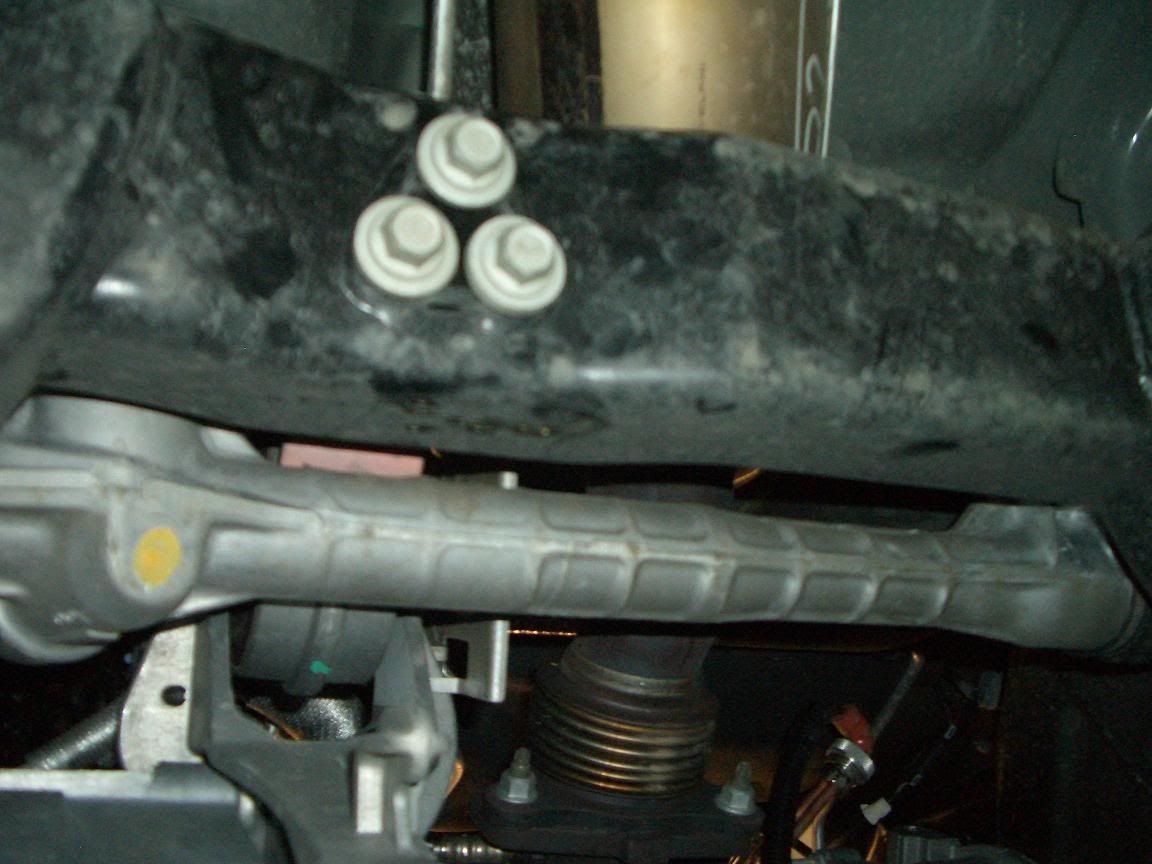
With the entire rear motormount out it will look like this. Notice the the flimsy piece of metal that is located on the bolt holding in the bushing. Remeber how this is attached, it's a heat shield, it protects the bushing from melting because it's located so close to the headed
Once it is takin apart it will look like this and again use the same method to remove the bushing as you did the front mount.
Again reverse what you did when you removed it, and you are finished.
After installing these and starting the motor I instantly noticed a difference with the car. vibrations from the motor is exceedingly more notciable. It felt like the car was beefier. Afterwards we went outside and just did some take offs, dropping the car from 2k then 3.5 and just spun the tires we had no wheel hop it seemed. Best 100 bucks i ever spent.
The lube
The Vice
We could not get the entire busing in with the vice just because of the lip located on the busing. So a little wood and hammer.
After more brute force we got the bushing in!
We now reversed what we dide to take the mount off and moved to the rear mount. We repostioned the jack and went to work.This is the rear motormount which once you get it off takes a little work to get it out of that tight squezze. And again the color codes goes
The colorcode in the picture goes as followed
-The red circles are the bolts the need to be removed to take the mount out
-the red arrow is the bushing that will be replaced
-and the purple circle is the mount that is coming out
Here The blues represent the bolts. They go through the frame and bolt into the mount.
Another shot of the bolts on the frame that need to be removed
Once you have taken all the bolts out wiring for the rear mounted O2 sensor is attached to this mount. With some strength it can just be pulled out and reattached when you put the mount back in.
With the entire rear motormount out it will look like this. Notice the the flimsy piece of metal that is located on the bolt holding in the bushing. Remeber how this is attached, it's a heat shield, it protects the bushing from melting because it's located so close to the headed
Once it is takin apart it will look like this and again use the same method to remove the bushing as you did the front mount.
Again reverse what you did when you removed it, and you are finished.
After installing these and starting the motor I instantly noticed a difference with the car. vibrations from the motor is exceedingly more notciable. It felt like the car was beefier. Afterwards we went outside and just did some take offs, dropping the car from 2k then 3.5 and just spun the tires we had no wheel hop it seemed. Best 100 bucks i ever spent.
Banned
Joined: 02-23-06
Posts: 1,287
Likes: 0
From: Mo-town, WV
For reference, the three bolts that hold the front mount on are 17mm. The three bolts that hold the rear mount to the subframe are 15mm and the three bolts that hold the rear mount to the block are 17mm. The one going through the rubber in the rear mount is a 17mm also. If you don't have a vise and vaseline they can be put in with a small rubber mallet and a flat head screwdriver, works fine.
Since someone already beat me to the write-up I will just expand on this and add my thoughts/comments. Overall feel on the mounts is GREAT. Makes me feel more connected to my motor, which I like. Fast gear changes are much more solid and direct. Little time is lost in torque transfer from the stiffness of the mounts. This is also combind with an upper torque brace (Torque Forward Inc. makes them) which I HIGHLY recommend. Watch your upper transmission mount below the air intake and such though. I cracked mine where it mount to the transmission a while back and with all this stifness you are adding it's a wise idea to keep an idea on it. GM isn't to highly developed in this aspect as we have been able to tell. These were a great investment and the guys at Intense do an awesome job with these cars. I don't really understand why you would go anywhere else for anything.
Since someone already beat me to the write-up I will just expand on this and add my thoughts/comments. Overall feel on the mounts is GREAT. Makes me feel more connected to my motor, which I like. Fast gear changes are much more solid and direct. Little time is lost in torque transfer from the stiffness of the mounts. This is also combind with an upper torque brace (Torque Forward Inc. makes them) which I HIGHLY recommend. Watch your upper transmission mount below the air intake and such though. I cracked mine where it mount to the transmission a while back and with all this stifness you are adding it's a wise idea to keep an idea on it. GM isn't to highly developed in this aspect as we have been able to tell. These were a great investment and the guys at Intense do an awesome job with these cars. I don't really understand why you would go anywhere else for anything.
Senior Member
Joined: 03-03-06
Posts: 4,958
Likes: 0
From: Pittsburgh, PA
OK, just did mine, used the how to, and went smoothly. Couple things. First, takes about 30 seconds to pry out the old bushing with a very large flathead screwdriver if ya have one, rather than cutting. Second, the bolt sizes for my '06 were all 18mm except for the three on the bottom of the rear mount, which were 15mm. Again, thanks for the excellent how to. 

Member
Joined: 02-08-06
Posts: 365
Likes: 0
From: Shelby Twp MI
Here are a few helpful tips on a 04 Ion Redline that I helped put these into. Front mount is slightly different on an 04 Ion Redline compared to the Cobalts.
Originally Posted by max_boost
I got them installed today but it wasn't easy (the 2004 Red Line has a different front mount so it has nothing to do with the product, it is great) The rear one fits fine but the insert on the front 04 mount is a bit smaller then the 05+ mount so it took a little modification, some power tools, and a lot of patience to get the insert in.
We (when I say we, I mean Enufpwr ) had to trim the leading edge on the front of the mount, even then it was pretty difficult to get the insert into the mount. Once it was installed we had to cut about a half inch off the back of the insert so it would fit back on the car. It took a blow torch, razor knife, big ass rubber hammer, vice, and a saws-all to get that front one in, but it's in now and that's all that matters.
Thanks to Enufpwr for spending so much time on my car and to Intense for the free mounts.
Senior Member
Joined: 03-26-06
Posts: 2,271
Likes: 0
From: Michigan
Awesome how to man 
I used it a month or two ago, and forgot to come in here and give you the due props.
I have recommended and linked to it several times though, lol
I think I even linked it in my recipe for zero wheel hop in my axle how-to
I used it a month or two ago, and forgot to come in here and give you the due props.
I have recommended and linked to it several times though, lol
I think I even linked it in my recipe for zero wheel hop in my axle how-to


