
Electrical: Utilize Factory Roof Mounted XM Antenna


Thread Starter
New Member
Joined: 06-06-05
Posts: 114
Likes: 0
From: asdf
Utilize Factory Roof Mounted XM Antenna
Heres my how-to on utilizing the factory roof mounted XM antenna for a XM receiver. Might also work with Sirius satellite radio.
This how-to will show you how to connect a SkyFi XM receiver with a single lead car cradle through a SA10003 Delphi FM Modulator. Will also work with SkyFi2 XM receiver. Can be adapted for other XM receivers and possibly Sirius receivers. This method will eliminate the 12v accessory plug power connector for car cradle power, 12v accessory plug aftermarket FM modulator and/or cassette style signal input.
Once completed all you will have to do is plug your SkyFi into the car cradle and turn it on. It will play through 1 of 3 radio stations that are selected from the FM Modulator. Sound clarity will be better than a FM transmitter as the SA10003 uses a in-line antenna connection for direct input.
Parts required:
10, 15 or 20 foot antenna extension. 20 foot ($20) was used in this guide. Varies due to routing preferences.
Delphi FM Modulator $50
Metra Antennaworks 40-GM30 GM FM Antenna adapter $15
Single antenna lead Delphi SkyFi/SkyFi2 car cradle $20
You can choose from among many car cradle mounts. The site below has a great selection. This guide does not cover mounting the cradle due to personal preference of location.
All parts obtained from www.myradiostore.us
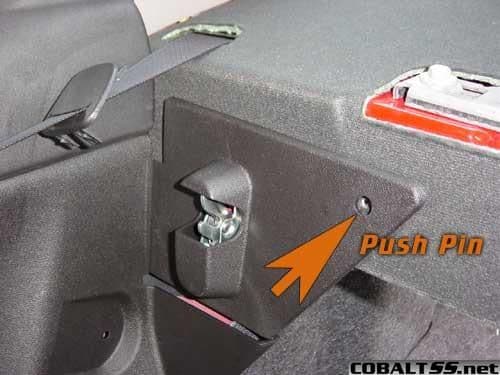
To begin, we need to disconnect the wiring harness that comes from the roof mounted antenna at the point it connects to the XM receiver module. This module is located between the two rear speakers under the package tray. To access this module, first fold down both rear seats and remove the rear head rests. To do this, pull the lower cover straight up and it will reveal the two bolts holding each head rest in place. You can optionally remove the bezels for the rear seat belts and the child restraint anchors. Now pry out two plastic push clips from the plastic panel near each seat lock.
The package tray is now as free as its going to get.
It may help at this point to find someone with small hands. You need to place your hand at the center of the package tray and at the bottom where it folds down next to the sheet metal (same vertical plane as the seats). Insert your hand between the metal and cardboard like package tray panel. Raise up the package tray very gently to creat a dome so you can get your arm in toward the back where the module is located. The package tray should warp nicely and the only slight bend will be on the vertical surface where your arm is going in. This is covered by the seats and is not readily noticeable.
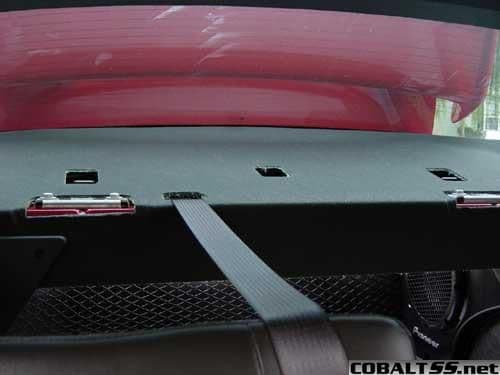
The module has two connectors, you will want to disconnect the rear connector. It is blue and has two wires going to it (tan and black).

This picture shows the front harness. The antenna harness is already removed.

Press on the top rear portion of the connector while pulling and it will disengage. Now you need to trace it back along the wire and slip it up and out of the wire retainer. This retainer is behind the 6x9 speaker along the glass edge. Then go past the speaker along the glass edge and slip it out of the second retainer. Now with your other hand reach up behind the speaker from the underside of the speaker and try to feed and pull this harness out of the speaker wiring hole. Once enough wire is pulled through you can go around from the trunk side and gently pull the blue connector from the hole in the sheet metal. Now you are done with this portion and you can reassemble the package tray.

Take your 10, 15 or 20 foot extension and connect the male end to the tan wire on the blue connector we just freed. Then pass it through a folded down seat and up toward the console for later testing.
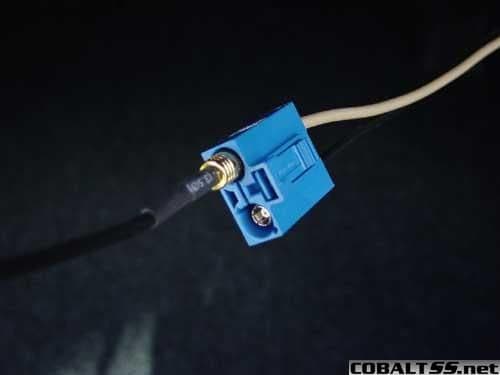
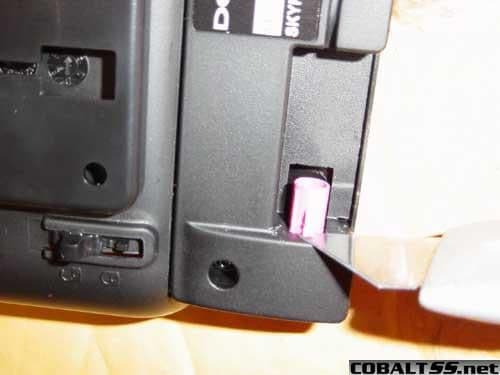
Lets make our car cradle ready to accept the antenna extension. Take a sharp utility knife and very carefully press it into the pink plastic that surrounds the metal antenna connector. Work the knife blade around so you have cut through as much of the pink plastic then carefully press it to make it snap off. Now test that the female connection of the antenna extension cable snaps on. Now we are done securing the antenna connection.

The SA10003

Grab your SA10003 Delphi FM Modulator and a ring and quick connect connector. For the red wire, cut off the connectors that came on the wire. Cut off the small ring on the black wire. Strip off 1/2 inch insulation, twist the strands, fold once to make it 1/4 inch long and insert and clamp the connectors on. Ring for black and quick connect on the red.
Plug both antenna adapters into the corresponding ends of the antenna leads coming from the SA10003.
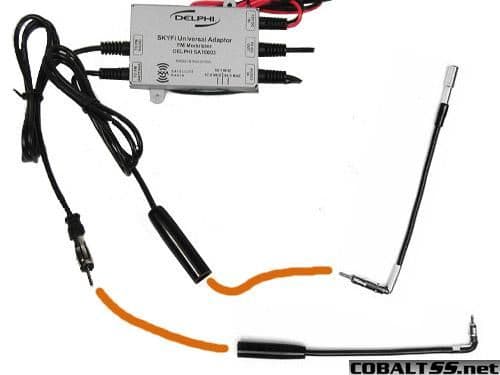
Now our SA10003 is ready.
Follow my Dashboard Disassembly how-to and remove all panels in the guide.
Take out the four 7mm screws that hold the radio in. Leave in place for now.
Follow my 12v how-to and connect the SA10003 ground wire then red power wire to the switched source.
I put my SA10003 here. This is under the radio, in the space between the console side panels or behind the interior fuse panel.
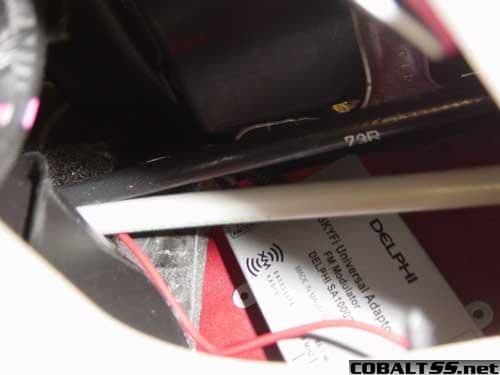
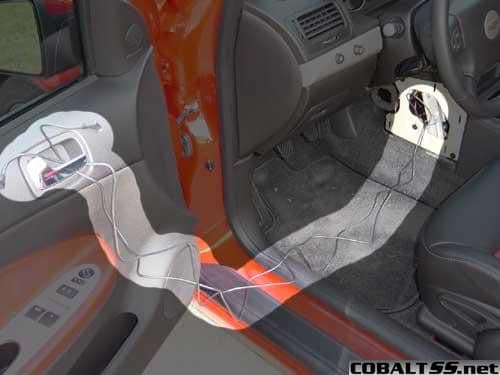
And routed the wires in such a way to keep the excess wire above the SA10003. You can then route the SkyFi cradle power and signal lead where you need it to go for where ever you chose to mount your car cradle. They give you a good length of cable as seen here.
Push your antenna leads up toward the back of the radio. Pull out your radio just enough to disconnect the antenna lead. Connect the car antenna to the corresponding antenna adapter end. Then plug the other antenna adapter into the radio.

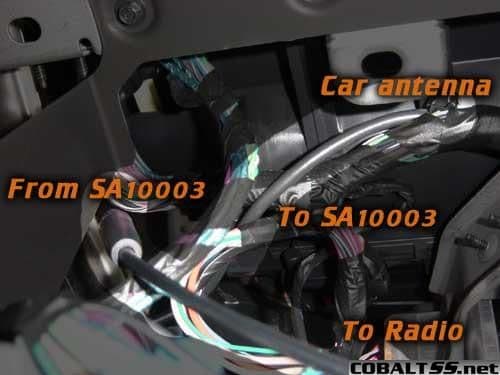
Push the radio back in, make sure the wire harnesses at the back bottom of the radio are free from crimping as you slide the radio back into position. Replace the screws that hold in the radio.
Go ahead and plug in your cradle and XM unit. Test for signal and music. All should be well.
Now route your antenna wire from the trunk area up to the console in such a way to hide it. Like under the passenger seat and along under the edge of the plastic sill plate and rear trim. Mount your car cradle securely, route and connect the power, signal and antenna wires.

Enjoy your XM SkyFi utilizing the factory car antenna, avoiding a third antenna pod on the roof and saving $7 monthly (additional $7/month for your factory XM car radio I.D. to be added to your current XM plan).

This how-to will show you how to connect a SkyFi XM receiver with a single lead car cradle through a SA10003 Delphi FM Modulator. Will also work with SkyFi2 XM receiver. Can be adapted for other XM receivers and possibly Sirius receivers. This method will eliminate the 12v accessory plug power connector for car cradle power, 12v accessory plug aftermarket FM modulator and/or cassette style signal input.
Once completed all you will have to do is plug your SkyFi into the car cradle and turn it on. It will play through 1 of 3 radio stations that are selected from the FM Modulator. Sound clarity will be better than a FM transmitter as the SA10003 uses a in-line antenna connection for direct input.
Parts required:
10, 15 or 20 foot antenna extension. 20 foot ($20) was used in this guide. Varies due to routing preferences.
Delphi FM Modulator $50
Metra Antennaworks 40-GM30 GM FM Antenna adapter $15
Single antenna lead Delphi SkyFi/SkyFi2 car cradle $20
You can choose from among many car cradle mounts. The site below has a great selection. This guide does not cover mounting the cradle due to personal preference of location.
All parts obtained from www.myradiostore.us
To begin, we need to disconnect the wiring harness that comes from the roof mounted antenna at the point it connects to the XM receiver module. This module is located between the two rear speakers under the package tray. To access this module, first fold down both rear seats and remove the rear head rests. To do this, pull the lower cover straight up and it will reveal the two bolts holding each head rest in place. You can optionally remove the bezels for the rear seat belts and the child restraint anchors. Now pry out two plastic push clips from the plastic panel near each seat lock.
The package tray is now as free as its going to get.
It may help at this point to find someone with small hands. You need to place your hand at the center of the package tray and at the bottom where it folds down next to the sheet metal (same vertical plane as the seats). Insert your hand between the metal and cardboard like package tray panel. Raise up the package tray very gently to creat a dome so you can get your arm in toward the back where the module is located. The package tray should warp nicely and the only slight bend will be on the vertical surface where your arm is going in. This is covered by the seats and is not readily noticeable.
The module has two connectors, you will want to disconnect the rear connector. It is blue and has two wires going to it (tan and black).
This picture shows the front harness. The antenna harness is already removed.
Press on the top rear portion of the connector while pulling and it will disengage. Now you need to trace it back along the wire and slip it up and out of the wire retainer. This retainer is behind the 6x9 speaker along the glass edge. Then go past the speaker along the glass edge and slip it out of the second retainer. Now with your other hand reach up behind the speaker from the underside of the speaker and try to feed and pull this harness out of the speaker wiring hole. Once enough wire is pulled through you can go around from the trunk side and gently pull the blue connector from the hole in the sheet metal. Now you are done with this portion and you can reassemble the package tray.
Take your 10, 15 or 20 foot extension and connect the male end to the tan wire on the blue connector we just freed. Then pass it through a folded down seat and up toward the console for later testing.
Lets make our car cradle ready to accept the antenna extension. Take a sharp utility knife and very carefully press it into the pink plastic that surrounds the metal antenna connector. Work the knife blade around so you have cut through as much of the pink plastic then carefully press it to make it snap off. Now test that the female connection of the antenna extension cable snaps on. Now we are done securing the antenna connection.
The SA10003
Grab your SA10003 Delphi FM Modulator and a ring and quick connect connector. For the red wire, cut off the connectors that came on the wire. Cut off the small ring on the black wire. Strip off 1/2 inch insulation, twist the strands, fold once to make it 1/4 inch long and insert and clamp the connectors on. Ring for black and quick connect on the red.
Plug both antenna adapters into the corresponding ends of the antenna leads coming from the SA10003.
Now our SA10003 is ready.
Follow my Dashboard Disassembly how-to and remove all panels in the guide.
Take out the four 7mm screws that hold the radio in. Leave in place for now.
Follow my 12v how-to and connect the SA10003 ground wire then red power wire to the switched source.
I put my SA10003 here. This is under the radio, in the space between the console side panels or behind the interior fuse panel.
And routed the wires in such a way to keep the excess wire above the SA10003. You can then route the SkyFi cradle power and signal lead where you need it to go for where ever you chose to mount your car cradle. They give you a good length of cable as seen here.
Push your antenna leads up toward the back of the radio. Pull out your radio just enough to disconnect the antenna lead. Connect the car antenna to the corresponding antenna adapter end. Then plug the other antenna adapter into the radio.
Push the radio back in, make sure the wire harnesses at the back bottom of the radio are free from crimping as you slide the radio back into position. Replace the screws that hold in the radio.
Go ahead and plug in your cradle and XM unit. Test for signal and music. All should be well.
Now route your antenna wire from the trunk area up to the console in such a way to hide it. Like under the passenger seat and along under the edge of the plastic sill plate and rear trim. Mount your car cradle securely, route and connect the power, signal and antenna wires.
Enjoy your XM SkyFi utilizing the factory car antenna, avoiding a third antenna pod on the roof and saving $7 monthly (additional $7/month for your factory XM car radio I.D. to be added to your current XM plan).
Last edited by TommyP; May 19, 2012 at 08:49 PM.

Thread Starter
New Member
Joined: 06-06-05
Posts: 114
Likes: 0
From: asdf
Reason is this...
I already have a XM account for $13 a month. Its a SkyFi I use at work with a home kit. This SkyFi has its own unique radio I.D. It is the primary and only radio on my account.
The Pioneer car radio has its own unique XM I.D. To activitate that radio and be able to receive the XM signal I will need to add its I.D. to my account, for the additional radio it will cost me an additional $7 a month, its not worth it. Especially since my SkyFi is such a portable device. I can carry it to the car and back to work.

Thread
Thread Starter
Forum
Replies
Last Post
2.0 LSJ Engine: aem wideband,zzp front mount exhanger,stock exchanger
n20saturn
Parts
7
Sep 30, 2015 12:26 AM