
Interior LED Swap:


Thread Starter
Senior Member
Joined: 11-05-11
Posts: 1,665
Likes: 5
From: Stratford, Ontario
Interior LED Swap:
I got bored at 3AM, I found Blue 12V LED's laying in my tool box, So i decided to start changing my bulbs to LED's. I ordered 15 5 & 3 MM Led's from LED-Switch,
Anywho.. This is how to change the HVAC to LED (5MM), I have ordered blue led's and a Blackcatcustom gauge face from Black Cat Custom Automotive - Gauge Faces for all makes and models of cars and trucks - LED Lighting Upgrades, Should be here this week hopefully. and 3MM for the doors and fog button. I already have my steering wheel controls done.
Here's how I did it (I know there's a how to, but here anyway.)
Tools Needed:
Flat head
Soldering Iron
Solder
4, 5MM LED's
Needle Nose Plyers
1 Cobalt HVAC


1. Remove Face with flat head:

2. Remove clear plastic rings:

3.
Here is the Board Un-labelled, & Labelled:


4. Use soldering iron to head up solder and use needle nose plyers to remove old bulbs, & replace with new ones. Remember, LED's are Diodes, and only work one way (Flat side is positive/Longer prong)

5. Installed & Working

6. Face back on, They're not as bright with the face on.. but if you order a blackcatcustom gauge face that is clear, it will shine through a lot better.

Thanks for looking!
Anywho.. This is how to change the HVAC to LED (5MM), I have ordered blue led's and a Blackcatcustom gauge face from Black Cat Custom Automotive - Gauge Faces for all makes and models of cars and trucks - LED Lighting Upgrades, Should be here this week hopefully. and 3MM for the doors and fog button. I already have my steering wheel controls done.
Here's how I did it (I know there's a how to, but here anyway.)
Tools Needed:
Flat head
Soldering Iron
Solder
4, 5MM LED's
Needle Nose Plyers
1 Cobalt HVAC
1. Remove Face with flat head:
2. Remove clear plastic rings:
3.
Here is the Board Un-labelled, & Labelled:
4. Use soldering iron to head up solder and use needle nose plyers to remove old bulbs, & replace with new ones. Remember, LED's are Diodes, and only work one way (Flat side is positive/Longer prong)
5. Installed & Working
6. Face back on, They're not as bright with the face on.. but if you order a blackcatcustom gauge face that is clear, it will shine through a lot better.
Thanks for looking!


Joined: 05-18-11
Posts: 39,564
Likes: 87
From: West Chicago, IL
looks good! for my hvac, i taped off a fin between blue and red and gave red its own light for the hot/hold hvac effect
Thread Starter
Senior Member
Joined: 11-05-11
Posts: 1,665
Likes: 5
From: Stratford, Ontario
As I put in the how to... LED's are Diodes, and only work one way + to +, - to -...
If you put them in backwards, they don't work. I did it so i put them in right, and for future reference of people who are going to do this.
If you put them in backwards, they don't work. I did it so i put them in right, and for future reference of people who are going to do this.

New Member
Joined: 10-18-12
Posts: 3
Likes: 0
From: Nashville, TN
ahh that makes sense, my bad. as for the cold air, defrost and recirculation buttons, do those light up blue when pressed as well? and how did you change out the lights in the steering wheel? thanks.

Senior Member
Joined: 12-05-10
Posts: 3,877
Likes: 3
From: newmarket
Steering wheel u just pop out the switches, unscrew the bulb holder
From the back take out old bulb, but in new les the same way the old one came out
U can also swap the recirculating, ac, defrost button indicator lights to what ever color u want
From the back take out old bulb, but in new les the same way the old one came out
U can also swap the recirculating, ac, defrost button indicator lights to what ever color u want
Thread Starter
Senior Member
Joined: 11-05-11
Posts: 1,665
Likes: 5
From: Stratford, Ontario
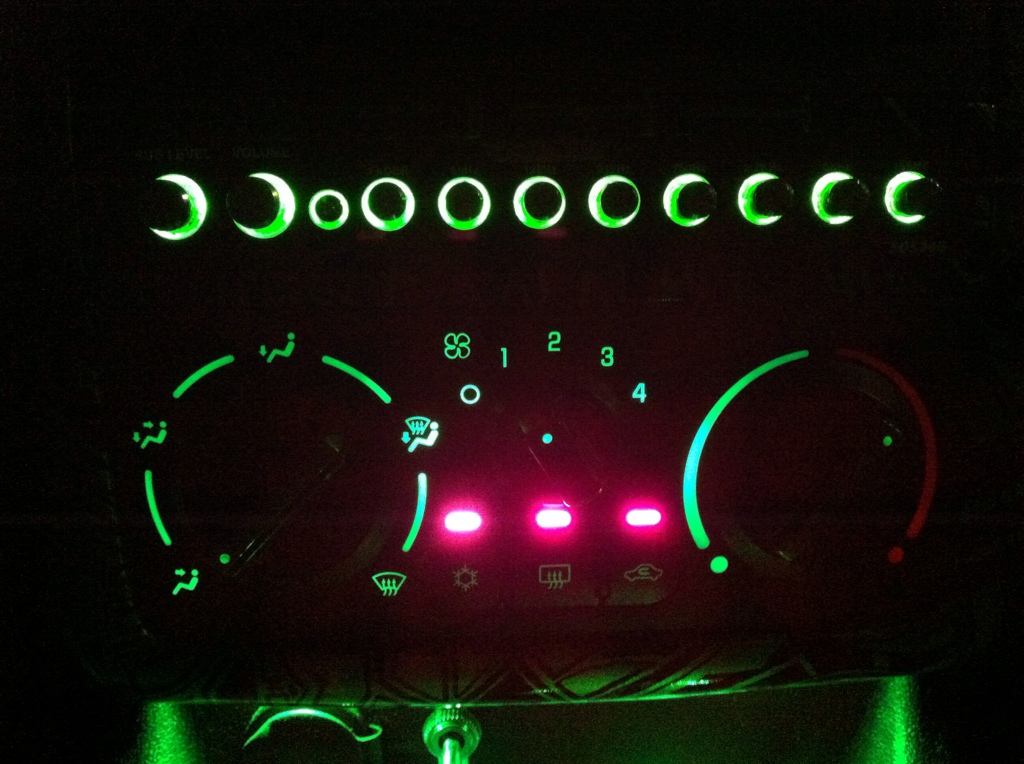
I got my 5 & 3 MM LED's today in the mail, Will be switching everything else over. I decided I wanted to keep it somewhat OEM, So i kept the Orange led's for the indicators. I may change them to red in the future, as that is my theme (Blue with red accents)
Thread Starter
Senior Member
Joined: 11-05-11
Posts: 1,665
Likes: 5
From: Stratford, Ontario
Here's it all finished, This is with my new Blackcatcustom gauge face, but it's the wrong one (only goes to 220 kph) So I sold it, and bought a new one (260 KPH) should be here in a few weeks.


Thread
Thread Starter
Forum
Replies
Last Post