


Stage 3 Treadstone install walkthrough


Thread Starter
Senior Member
Joined: 07-23-10
Posts: 3,451
Likes: 0
From: Carlsbad, CA
Stage 3 Treadstone install walkthrough
Ok so after making time on my days off I finally got around to installing the whole Treadstone Stage 3 kit. My kit includes the following parts however you can customize your kit as you see fit:
Cold Air Intake (CAI)
Hot Side Pipe (2 Pieces)
52MM Blow off Valve (BOV)
Intercooler
Cold Side
Block off Plate (BOP)
3 Inch Downpipe (DP) and straight exhaust.
Ok so first of all let me recommend that you should probably have someone to help you if you can. I did not have anyone to help me and it took a little longer but wasn't too bad. There are pictures at the bottom of the post just to clarify.
Tools you might need, that I used are sockets, ratchets, allen drivers, threading tools, impact gun, and my favorite is a sawz-all (only for hte exhaust).
The exhaust is easy, one note I had to unbolt the DP first to get enough room to get to the bolts that connect wht DP with the rest of the exhaust. Remember to take off the O2 sensor. The sawzall comes in when you try to get the exhaust over the axle, I don't have a car lift and I am doing it in the parking lot of my appartment complex. I just cut it to get it out. The rebolt the exhaust up.
First of all on the intake side, jack up the car and take off the tires. Then take off hte bumper. Remove all of your stock pieces first. Take a special consideration for the MAF (in the intake) and the Manifold Air Pressure sensor (MAP) and put them in a safe, clean place for the time being. Also the hotside pipe's stock fastener uses a star bolt. If you just use a hex driver you should be fine, use care not to strip it.
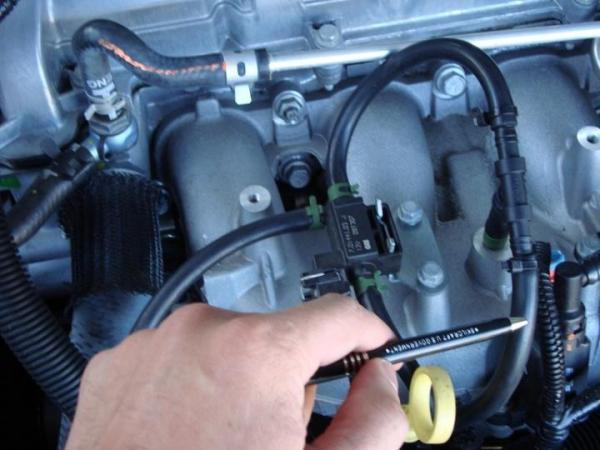
Right above where the intake connects with the turbo is the tan plastic bypass valve (BPV). Remove the 3 bolts and take the cap, spring, and diaphram off. Then go ahead and pull off the vaccum line. If you did it before that's fine but if you do it after, the vaccum in the line keeps all 3 pieces together until you can hanlde them better. The BOP with the Treadstone kit does NOT reuse the spring or diaphram (Picture 1). The kit includes 3 new shiny allen bolts to fasten the new BOP to the turbo. The finished product should look like Picture 2. The vac line removed from the BPV goes to the BOV. The VAC leading to the lower CP comes off and will get "T-ed" into the manifold vac line. Its the one right next to the vac solenoid. See pictures 3, 4, and 5.
Special note real quick, mostly becuase I wasn't paying attention... There are 3 sizes of "T" bolt band clamps that come with the kit, one is a 220, there are a bunch of 275, and one 300. Separate them so as not to confuse them. The 220 is used on the turbo outlet to clamp on the silicone tube. The 275s are used for all the charge piping and the intercooler connections. The 300 is used to connect the cold side pipe to the throttle body.
The hotside pipe came next. Before you put it on the motor, put on the BOV if you bought one or the block off plate for the hotside pipe. The 220 as stated above is ussed to clamp the silicone fitting onto the turbo outlet and then start with the 275s as you work your way down. The hotside connects to the top of the engine using a valve cover bolt. This is pictured in #6. Take it out and put the charge pipe down and re-tighten the bolt. The second piece of the hotside pipe comes in from the bottom. Remember it is the 275s that connects the fittings to the CPs.
After the hotside pipe is on, go ahead and start the cold side. There are 2 new bolts for the MAP sensor. Once again I like to make sure the threads and bolts are clean so use you thread tap kit and make sure the threads are clear. The AMP sensor has 2 brass fittings in them, treadstone says to drill them out but I just removed the ones in mine and it works fine. Use care when bolting it in. It will rub on one side but don't worry about it, the sensor will be fine. Use the 300 band clamp and the appropriate silicone fitting and don't forget to hook up the MAP sensor. The CP is kind of a pain to get in but it fits, just gotta be gentle and go in from beneath the car, it will follow the smae path as the stocker.
Now with the CPs in, yoyu have a kind of a guide to see where you need to bolt the intercooelr. The intercooler is tricky and I forgot to take pictures before I put the bumper on so I'll try to explain it as good as I can. First take the thread tap kit and make sure that the threads on the aluminum of the cooler and bolts are clear. Aluminum does not like rought threads and can strip easily (totally optional). The crash bar has to be loosened. There are 3 bolts per side. The bolts closest to the center of the crash bar must be taken out. Don't remove the rest of the bolts. There are 2 "L" shaped mounting brackets. They have 2 elongated grooves machined in them. The long grooves are mounted to the crash bar and the intercooler bolts to the brackets via a bolt on each side. Its kind of a tight squeeze but be as patient and as gentle as you can. Make sure everything is tight... You are almost there.
If you followed, you should now be getting to the CAI. The filter is huge and kind of get in the way with the lower CP install. Well not really but I ended up taking it off so as to not damage it. There are 2 pieces to the CAI. The longer one with the MAF sensor in it is the one connecting to turbo, picture #7. The worm clamps included in the kit are used on the CAI. Use the stock nuts and mounting bolts, then clamp the silicon onto the turbo and the pipe, this part was a huge PITA because of my big dumb meat hands dropping **** behind the motor. The pipe ends in the hole the stock snorkel comes through. Take the (hopefully) last pipe and put it on. The Filter goes on the end of that. You will have to manipulate the cone in order to get the pumper on or it wil hit the fog lamp.
Now wrestle the bumper back on and TUNE your ride.
Here are pictures to clarify...




Here is the Intercooler as you can see it is mounted nice and high. None of it protrudes from the bottom. The measurements are on Treadstone's Website

Ok well this is my first real writeup on this site so if you have any input let me know. I have more pictures if you want some specifice let me know.
I do know some are interested in the trims of the intake. I have seen a -23 at wot. my car isn't tuned yet but it will be tuned my Term. It will have a Trifecta/HP layered tune.
Like I said any questions let me know.
-Ryan
Cold Air Intake (CAI)
Hot Side Pipe (2 Pieces)
52MM Blow off Valve (BOV)
Intercooler
Cold Side
Block off Plate (BOP)
3 Inch Downpipe (DP) and straight exhaust.
Ok so first of all let me recommend that you should probably have someone to help you if you can. I did not have anyone to help me and it took a little longer but wasn't too bad. There are pictures at the bottom of the post just to clarify.
Tools you might need, that I used are sockets, ratchets, allen drivers, threading tools, impact gun, and my favorite is a sawz-all (only for hte exhaust).
The exhaust is easy, one note I had to unbolt the DP first to get enough room to get to the bolts that connect wht DP with the rest of the exhaust. Remember to take off the O2 sensor. The sawzall comes in when you try to get the exhaust over the axle, I don't have a car lift and I am doing it in the parking lot of my appartment complex. I just cut it to get it out. The rebolt the exhaust up.
First of all on the intake side, jack up the car and take off the tires. Then take off hte bumper. Remove all of your stock pieces first. Take a special consideration for the MAF (in the intake) and the Manifold Air Pressure sensor (MAP) and put them in a safe, clean place for the time being. Also the hotside pipe's stock fastener uses a star bolt. If you just use a hex driver you should be fine, use care not to strip it.
Right above where the intake connects with the turbo is the tan plastic bypass valve (BPV). Remove the 3 bolts and take the cap, spring, and diaphram off. Then go ahead and pull off the vaccum line. If you did it before that's fine but if you do it after, the vaccum in the line keeps all 3 pieces together until you can hanlde them better. The BOP with the Treadstone kit does NOT reuse the spring or diaphram (Picture 1). The kit includes 3 new shiny allen bolts to fasten the new BOP to the turbo. The finished product should look like Picture 2. The vac line removed from the BPV goes to the BOV. The VAC leading to the lower CP comes off and will get "T-ed" into the manifold vac line. Its the one right next to the vac solenoid. See pictures 3, 4, and 5.
Special note real quick, mostly becuase I wasn't paying attention... There are 3 sizes of "T" bolt band clamps that come with the kit, one is a 220, there are a bunch of 275, and one 300. Separate them so as not to confuse them. The 220 is used on the turbo outlet to clamp on the silicone tube. The 275s are used for all the charge piping and the intercooler connections. The 300 is used to connect the cold side pipe to the throttle body.
The hotside pipe came next. Before you put it on the motor, put on the BOV if you bought one or the block off plate for the hotside pipe. The 220 as stated above is ussed to clamp the silicone fitting onto the turbo outlet and then start with the 275s as you work your way down. The hotside connects to the top of the engine using a valve cover bolt. This is pictured in #6. Take it out and put the charge pipe down and re-tighten the bolt. The second piece of the hotside pipe comes in from the bottom. Remember it is the 275s that connects the fittings to the CPs.
After the hotside pipe is on, go ahead and start the cold side. There are 2 new bolts for the MAP sensor. Once again I like to make sure the threads and bolts are clean so use you thread tap kit and make sure the threads are clear. The AMP sensor has 2 brass fittings in them, treadstone says to drill them out but I just removed the ones in mine and it works fine. Use care when bolting it in. It will rub on one side but don't worry about it, the sensor will be fine. Use the 300 band clamp and the appropriate silicone fitting and don't forget to hook up the MAP sensor. The CP is kind of a pain to get in but it fits, just gotta be gentle and go in from beneath the car, it will follow the smae path as the stocker.
Now with the CPs in, yoyu have a kind of a guide to see where you need to bolt the intercooelr. The intercooler is tricky and I forgot to take pictures before I put the bumper on so I'll try to explain it as good as I can. First take the thread tap kit and make sure that the threads on the aluminum of the cooler and bolts are clear. Aluminum does not like rought threads and can strip easily (totally optional). The crash bar has to be loosened. There are 3 bolts per side. The bolts closest to the center of the crash bar must be taken out. Don't remove the rest of the bolts. There are 2 "L" shaped mounting brackets. They have 2 elongated grooves machined in them. The long grooves are mounted to the crash bar and the intercooler bolts to the brackets via a bolt on each side. Its kind of a tight squeeze but be as patient and as gentle as you can. Make sure everything is tight... You are almost there.
If you followed, you should now be getting to the CAI. The filter is huge and kind of get in the way with the lower CP install. Well not really but I ended up taking it off so as to not damage it. There are 2 pieces to the CAI. The longer one with the MAF sensor in it is the one connecting to turbo, picture #7. The worm clamps included in the kit are used on the CAI. Use the stock nuts and mounting bolts, then clamp the silicon onto the turbo and the pipe, this part was a huge PITA because of my big dumb meat hands dropping **** behind the motor. The pipe ends in the hole the stock snorkel comes through. Take the (hopefully) last pipe and put it on. The Filter goes on the end of that. You will have to manipulate the cone in order to get the pumper on or it wil hit the fog lamp.
Now wrestle the bumper back on and TUNE your ride.
Here are pictures to clarify...
Here is the Intercooler as you can see it is mounted nice and high. None of it protrudes from the bottom. The measurements are on Treadstone's Website
Ok well this is my first real writeup on this site so if you have any input let me know. I have more pictures if you want some specifice let me know.
I do know some are interested in the trims of the intake. I have seen a -23 at wot. my car isn't tuned yet but it will be tuned my Term. It will have a Trifecta/HP layered tune.
Like I said any questions let me know.
-Ryan

Senior Member
Joined: 10-05-10
Posts: 805
Likes: 1
From: A.B.E. PA & Jacksonville FL
Ok so after making time on my days off I finally got around to installing the whole Treadstone Stage 3 kit. My kit includes the following parts however you can customize your kit as you see fit:
Cold Air Intake (CAI)
Hot Side Pipe (2 Pieces)
52MM Blow off Valve (BOV)
Intercooler
Cold Side
Block off Plate (BOP)
3 Inch Downpipe (DP) and straight exhaust.
Ok so first of all let me recommend that you should probably have someone to help you if you can. I did not have anyone to help me and it took a little longer but wasn't too bad. There are pictures at the bottom of the post just to clarify.
Tools you might need, that I used are sockets, ratchets, allen drivers, threading tools, impact gun, and my favorite is a sawz-all (only for hte exhaust).
The exhaust is easy, one note I had to unbolt the DP first to get enough room to get to the bolts that connect wht DP with the rest of the exhaust. Remember to take off the O2 sensor. The sawzall comes in when you try to get the exhaust over the axle, I don't have a car lift and I am doing it in the parking lot of my appartment complex. I just cut it to get it out. The rebolt the exhaust up.
First of all on the intake side, jack up the car and take off the tires. Then take off hte bumper. Remove all of your stock pieces first. Take a special consideration for the MAF (in the intake) and the Manifold Air Pressure sensor (MAP) and put them in a safe, clean place for the time being. Also the hotside pipe's stock fastener uses a star bolt. If you just use a hex driver you should be fine, use care not to strip it.
Right above where the intake connects with the turbo is the tan plastic bypass valve (BPV). Remove the 3 bolts and take the cap, spring, and diaphram off. Then go ahead and pull off the vaccum line. If you did it before that's fine but if you do it after, the vaccum in the line keeps all 3 pieces together until you can hanlde them better. The BOP with the Treadstone kit does NOT reuse the spring or diaphram (Picture 1). The kit includes 3 new shiny allen bolts to fasten the new BOP to the turbo. The finished product should look like Picture 2. The vac line removed from the BPV goes to the BOV. The VAC leading to the lower CP comes off and will get "T-ed" into the manifold vac line. Its the one right next to the vac solenoid. See pictures 3, 4, and 5.
Special note real quick, mostly becuase I wasn't paying attention... There are 3 sizes of "T" bolt band clamps that come with the kit, one is a 220, there are a bunch of 275, and one 300. Separate them so as not to confuse them. The 220 is used on the turbo outlet to clamp on the silicone tube. The 275s are used for all the charge piping and the intercooler connections. The 300 is used to connect the cold side pipe to the throttle body.
The hotside pipe came next. Before you put it on the motor, put on the BOV if you bought one or the block off plate for the hotside pipe. The 220 as stated above is ussed to clamp the silicone fitting onto the turbo outlet and then start with the 275s as you work your way down. The hotside connects to the top of the engine using a valve cover bolt. This is pictured in #6. Take it out and put the charge pipe down and re-tighten the bolt. The second piece of the hotside pipe comes in from the bottom. Remember it is the 275s that connects the fittings to the CPs.
After the hotside pipe is on, go ahead and start the cold side. There are 2 new bolts for the MAP sensor. Once again I like to make sure the threads and bolts are clean so use you thread tap kit and make sure the threads are clear. The AMP sensor has 2 brass fittings in them, treadstone says to drill them out but I just removed the ones in mine and it works fine. Use care when bolting it in. It will rub on one side but don't worry about it, the sensor will be fine. Use the 300 band clamp and the appropriate silicone fitting and don't forget to hook up the MAP sensor. The CP is kind of a pain to get in but it fits, just gotta be gentle and go in from beneath the car, it will follow the smae path as the stocker.
Now with the CPs in, yoyu have a kind of a guide to see where you need to bolt the intercooelr. The intercooler is tricky and I forgot to take pictures before I put the bumper on so I'll try to explain it as good as I can. First take the thread tap kit and make sure that the threads on the aluminum of the cooler and bolts are clear. Aluminum does not like rought threads and can strip easily (totally optional). The crash bar has to be loosened. There are 3 bolts per side. The bolts closest to the center of the crash bar must be taken out. Don't remove the rest of the bolts. There are 2 "L" shaped mounting brackets. They have 2 elongated grooves machined in them. The long grooves are mounted to the crash bar and the intercooler bolts to the brackets via a bolt on each side. Its kind of a tight squeeze but be as patient and as gentle as you can. Make sure everything is tight... You are almost there.
If you followed, you should now be getting to the CAI. The filter is huge and kind of get in the way with the lower CP install. Well not really but I ended up taking it off so as to not damage it. There are 2 pieces to the CAI. The longer one with the MAF sensor in it is the one connecting to turbo, picture #7. The worm clamps included in the kit are used on the CAI. Use the stock nuts and mounting bolts, then clamp the silicon onto the turbo and the pipe, this part was a huge PITA because of my big dumb meat hands dropping **** behind the motor. The pipe ends in the hole the stock snorkel comes through. Take the (hopefully) last pipe and put it on. The Filter goes on the end of that. You will have to manipulate the cone in order to get the pumper on or it wil hit the fog lamp.
Now wrestle the bumper back on and TUNE your ride.
Here are pictures to clarify...
Here is the Intercooler as you can see it is mounted nice and high. None of it protrudes from the bottom. The measurements are on Treadstone's Website
Ok well this is my first real writeup on this site so if you have any input let me know. I have more pictures if you want some specifice let me know.
I do know some are interested in the trims of the intake. I have seen a -23 at wot. my car isn't tuned yet but it will be tuned my Term. It will have a Trifecta/HP layered tune.
Like I said any questions let me know.
-Ryan
Cold Air Intake (CAI)
Hot Side Pipe (2 Pieces)
52MM Blow off Valve (BOV)
Intercooler
Cold Side
Block off Plate (BOP)
3 Inch Downpipe (DP) and straight exhaust.
Ok so first of all let me recommend that you should probably have someone to help you if you can. I did not have anyone to help me and it took a little longer but wasn't too bad. There are pictures at the bottom of the post just to clarify.
Tools you might need, that I used are sockets, ratchets, allen drivers, threading tools, impact gun, and my favorite is a sawz-all (only for hte exhaust).
The exhaust is easy, one note I had to unbolt the DP first to get enough room to get to the bolts that connect wht DP with the rest of the exhaust. Remember to take off the O2 sensor. The sawzall comes in when you try to get the exhaust over the axle, I don't have a car lift and I am doing it in the parking lot of my appartment complex. I just cut it to get it out. The rebolt the exhaust up.
First of all on the intake side, jack up the car and take off the tires. Then take off hte bumper. Remove all of your stock pieces first. Take a special consideration for the MAF (in the intake) and the Manifold Air Pressure sensor (MAP) and put them in a safe, clean place for the time being. Also the hotside pipe's stock fastener uses a star bolt. If you just use a hex driver you should be fine, use care not to strip it.
Right above where the intake connects with the turbo is the tan plastic bypass valve (BPV). Remove the 3 bolts and take the cap, spring, and diaphram off. Then go ahead and pull off the vaccum line. If you did it before that's fine but if you do it after, the vaccum in the line keeps all 3 pieces together until you can hanlde them better. The BOP with the Treadstone kit does NOT reuse the spring or diaphram (Picture 1). The kit includes 3 new shiny allen bolts to fasten the new BOP to the turbo. The finished product should look like Picture 2. The vac line removed from the BPV goes to the BOV. The VAC leading to the lower CP comes off and will get "T-ed" into the manifold vac line. Its the one right next to the vac solenoid. See pictures 3, 4, and 5.
Special note real quick, mostly becuase I wasn't paying attention... There are 3 sizes of "T" bolt band clamps that come with the kit, one is a 220, there are a bunch of 275, and one 300. Separate them so as not to confuse them. The 220 is used on the turbo outlet to clamp on the silicone tube. The 275s are used for all the charge piping and the intercooler connections. The 300 is used to connect the cold side pipe to the throttle body.
The hotside pipe came next. Before you put it on the motor, put on the BOV if you bought one or the block off plate for the hotside pipe. The 220 as stated above is ussed to clamp the silicone fitting onto the turbo outlet and then start with the 275s as you work your way down. The hotside connects to the top of the engine using a valve cover bolt. This is pictured in #6. Take it out and put the charge pipe down and re-tighten the bolt. The second piece of the hotside pipe comes in from the bottom. Remember it is the 275s that connects the fittings to the CPs.
After the hotside pipe is on, go ahead and start the cold side. There are 2 new bolts for the MAP sensor. Once again I like to make sure the threads and bolts are clean so use you thread tap kit and make sure the threads are clear. The AMP sensor has 2 brass fittings in them, treadstone says to drill them out but I just removed the ones in mine and it works fine. Use care when bolting it in. It will rub on one side but don't worry about it, the sensor will be fine. Use the 300 band clamp and the appropriate silicone fitting and don't forget to hook up the MAP sensor. The CP is kind of a pain to get in but it fits, just gotta be gentle and go in from beneath the car, it will follow the smae path as the stocker.
Now with the CPs in, yoyu have a kind of a guide to see where you need to bolt the intercooelr. The intercooler is tricky and I forgot to take pictures before I put the bumper on so I'll try to explain it as good as I can. First take the thread tap kit and make sure that the threads on the aluminum of the cooler and bolts are clear. Aluminum does not like rought threads and can strip easily (totally optional). The crash bar has to be loosened. There are 3 bolts per side. The bolts closest to the center of the crash bar must be taken out. Don't remove the rest of the bolts. There are 2 "L" shaped mounting brackets. They have 2 elongated grooves machined in them. The long grooves are mounted to the crash bar and the intercooler bolts to the brackets via a bolt on each side. Its kind of a tight squeeze but be as patient and as gentle as you can. Make sure everything is tight... You are almost there.
If you followed, you should now be getting to the CAI. The filter is huge and kind of get in the way with the lower CP install. Well not really but I ended up taking it off so as to not damage it. There are 2 pieces to the CAI. The longer one with the MAF sensor in it is the one connecting to turbo, picture #7. The worm clamps included in the kit are used on the CAI. Use the stock nuts and mounting bolts, then clamp the silicon onto the turbo and the pipe, this part was a huge PITA because of my big dumb meat hands dropping **** behind the motor. The pipe ends in the hole the stock snorkel comes through. Take the (hopefully) last pipe and put it on. The Filter goes on the end of that. You will have to manipulate the cone in order to get the pumper on or it wil hit the fog lamp.
Now wrestle the bumper back on and TUNE your ride.
Here are pictures to clarify...
Here is the Intercooler as you can see it is mounted nice and high. None of it protrudes from the bottom. The measurements are on Treadstone's Website
Ok well this is my first real writeup on this site so if you have any input let me know. I have more pictures if you want some specifice let me know.
I do know some are interested in the trims of the intake. I have seen a -23 at wot. my car isn't tuned yet but it will be tuned my Term. It will have a Trifecta/HP layered tune.
Like I said any questions let me know.
-Ryan

Senior Member
Joined: 10-05-10
Posts: 805
Likes: 1
From: A.B.E. PA & Jacksonville FL
different vendors make there own "stage kits", but until GMPP comes out with another stage kit [holding my breath] , your best option is going with a vendor [ZZP/ TSP/ Werks/ etc] who has put in R&D in putting there kit together..
, your best option is going with a vendor [ZZP/ TSP/ Werks/ etc] who has put in R&D in putting there kit together..
Thread Starter
Senior Member
Joined: 07-23-10
Posts: 3,451
Likes: 0
From: Carlsbad, CA
Thanks. I am calling tomorrow to get a dyno time for next week to see if I can get some numbers up here for you guys.

I have a dyno date this Wed...not positive, but looks like a go for me. I only added the Hahn Catted DP and Catback since last dyno ( shown here on my *pics* link). No other mods at all. Will be interesting to compare with your mods.


Thread Starter
Senior Member
Joined: 07-23-10
Posts: 3,451
Likes: 0
From: Carlsbad, CA
Thanks


Thread Starter
Senior Member
Joined: 07-23-10
Posts: 3,451
Likes: 0
From: Carlsbad, CA
Seriously though, if you get it have a buddy help you out. Having an extra set of hands would have taken like 2 hours off the install time.

Senior Member
Joined: 07-18-08
Posts: 1,346
Likes: 0
From: Maple Syrup Land
It won't directly bolt up to the stock stuff. You could call and ask to see if they have if you want to bolt up to the stock IC. They might have some silicone fittings that can make it work.
I like it. The pipes, IC and BOV look sexy. It went on pretty easily.
Seriously though, if you get it have a buddy help you out. Having an extra set of hands would have taken like 2 hours off the install time.
I like it. The pipes, IC and BOV look sexy. It went on pretty easily.
Seriously though, if you get it have a buddy help you out. Having an extra set of hands would have taken like 2 hours off the install time.
The worst is when your holding something and your like ****, I need something over there... how the hell do I keep this suspended, well I reach for another tool

Thread Starter
Senior Member
Joined: 07-23-10
Posts: 3,451
Likes: 0
From: Carlsbad, CA
Yea thats what happened when I installed the intercooler. I was holding it up when I discovered that the tool I needed was about 6 inches out of reach so I had to take it back off. I would sell my soul for a chassis lift.
Senior Member
Joined: 07-18-08
Posts: 1,346
Likes: 0
From: Maple Syrup Land

Yea. I would say maybe not a whole lot of difference but Terminator is going to be tuning my car so it should be pretty beastly. Do you ever go to the SoCal Ecotecs meets? We can compare via the street dyno sometime also if you wish. They went to Irwindale last week. I couldn't go cuz I was working on my car but I am going next month.
 ) in 3RD from 60-100..or even 60-90 and let me know what ya get. I have #s for both runs.
Thread Starter
Senior Member
Joined: 07-23-10
Posts: 3,451
Likes: 0
From: Carlsbad, CA
I will for sure. I want to make sure that everything is tuned right though. I am taking it to the dyno after that, probably like next week or something. Its throwing a MAF code right now so once I figure that out I'll be good to go. I may have messed up the wires when I was installing the CAI or something we shall see.

Senior Member
Joined: 05-13-09
Posts: 2,951
Likes: 0
From: Davie, Fl
Your throwing the maf code because your changed its location on the pipe and because your venting premeasured air via the bov. Probly also gonna get a code for the bpv solenoid seeing as now its not actuating anything even though it still thinks its there.
Thread Starter
Senior Member
Joined: 07-23-10
Posts: 3,451
Likes: 0
From: Carlsbad, CA
The BPV mech code (I don't remember the number) is no biggie. The maf will probably be fine after I tune it. I cant wait to get this thing on the dyno and show my dad that a little 4 banger is making more power than his LS1 Vette hehe.

Around 300WHP (5600RPM) and 360Ft lbs (@3000 RPM). He said silencer was costing me 5-10HP, but I'm not taking it off (a pain) and declined to do so at the dyno. I love the response now...taking the silencer off makes it sluggish down low and I'm not a fan of the level of sound.
Thread Starter
Senior Member
Joined: 07-23-10
Posts: 3,451
Likes: 0
From: Carlsbad, CA
Negatron. The BOV opens perfectly. The only thing is I'm not done with the tune yet. When I am I will video it on the dyno and hopefully it will give everyone an idea about how the whole thing runs and sounds with the BOV and the exhaust. I do have a piece of crap camera so you will have to forgive the low quality of the video. Maybe I'll see how my new droid X records.
All you have is the exhasut right? I thought you are GMS1 as well but I could have forgotten. Those are pretty encouraging number for me. Were you on 91 octane?
I hope to be a few more above that when everything is said and done. My tuner in AZ shipped my cable to me today so it should be here on Saturday. I'll do some logging on Sunday for sure and try to get to the dyno by Wednesday or Thursday next week.
Went to dyno car today with DP and Catback+Silencer. No change over previous dyno..almost identical in fact.
Around 300WHP (5600RPM) and 360Ft lbs (@3000 RPM). He said silencer was costing me 5-10HP, but I'm not taking it off (a pain) and declined to do so at the dyno. I love the response now...taking the silencer off makes it sluggish down low and I'm not a fan of the level of sound.
Around 300WHP (5600RPM) and 360Ft lbs (@3000 RPM). He said silencer was costing me 5-10HP, but I'm not taking it off (a pain) and declined to do so at the dyno. I love the response now...taking the silencer off makes it sluggish down low and I'm not a fan of the level of sound.
I hope to be a few more above that when everything is said and done. My tuner in AZ shipped my cable to me today so it should be here on Saturday. I'll do some logging on Sunday for sure and try to get to the dyno by Wednesday or Thursday next week.
All you have is the exhasut right? I thought you are GMS1 as well but I could have forgotten. Those are pretty encouraging number for me. Were you on 91 octane?
I hope to be a few more above that when everything is said and done. My tuner in AZ shipped my cable to me today so it should be here on Saturday. I'll do some logging on Sunday for sure and try to get to the dyno by Wednesday or Thursday next week.
I hope to be a few more above that when everything is said and done. My tuner in AZ shipped my cable to me today so it should be here on Saturday. I'll do some logging on Sunday for sure and try to get to the dyno by Wednesday or Thursday next week.

Senior Member
Joined: 10-13-10
Posts: 598
Likes: 0
From: Washougal, WA
I have HP Tuners holds 20lbs +. 91 Octane only. I thought DP and Catback would add something...even though I had silencer in tail pipe, modified for more flow. Oh well, I KNOW throttle response is better for sure. So I'm happy with the car. You should see higher #s...with intake. I have stock intake.