
OTTP Heat Exchanger (4th Version/Newest Version)

Thread Starter

Joined: 12-30-07
Posts: 14,079
Likes: 197
From: NEPA
OTTP Heat Exchanger (4th Version/Newest Version)
I'm in the market for an additional heat exchanger, and have been looking into OTTP's newest offering. Their new heat exchanger is a radiator style core which replaces their 3rd versions bar & plate type core. Some info. I have gotten from Sean are as follows:
It uses a raditor style core (all fins not bar and plate).
The core is actually larger then zzp's as well
Core Dimensions
28"x7"x3.125"
Overall Dimensions
32"x7"x3.125"
This unit weighs 8.4 lbs vs 14.5 of the last unit.
End fittings are metal and welded to the unit itself (ZZP's are plastic).
Does anyone here have this new version yet, and if so how do they like it? Thanks guys!

Thread Starter
Joined: 12-30-07
Posts: 14,079
Likes: 197
From: NEPA

New Member
Joined: 04-26-10
Posts: 146
Likes: 0
From: Michigan
i have it and its pretty nice. i was told its about 30% more efficient and its a lot lighter. the only thing i didnt really like to much about it was the nozzle to drain it is directly on the bottom and is like 5 inches from the ground..but i havent had any problems with it rubbing, the handle to drain it was bent back and that little plastic strips saves it from hitting the ground.
Thread Starter
Joined: 12-30-07
Posts: 14,079
Likes: 197
From: NEPA
i have it and its pretty nice. i was told its about 30% more efficient and its a lot lighter. the only thing i didnt really like to much about it was the nozzle to drain it is directly on the bottom and is like 5 inches from the ground..but i havent had any problems with it rubbing, the handle to drain it was bent back and that little plastic strips saves it from hitting the ground.
How was the install ? Did you remove the bumper to install it ?
New Member
Joined: 04-26-10
Posts: 146
Likes: 0
From: Michigan
umm i havent checked out the IAT2's but the install literally took about 30 mins. bumper didnt come off. just took the plastic off under the hood so i could see down there better and those are just those clips. it fits tight but slides in with ease. ill take a picture for you if you would like but give me about 15 mins to get it taken and uploaded.
Thread Starter
Joined: 12-30-07
Posts: 14,079
Likes: 197
From: NEPA
umm i havent checked out the IAT2's but the install literally took about 30 mins. bumper didnt come off. just took the plastic off under the hood so i could see down there better and those are just those clips. it fits tight but slides in with ease. ill take a picture for you if you would like but give me about 15 mins to get it taken and uploaded.

New Member
Joined: 04-26-10
Posts: 146
Likes: 0
From: Michigan
heres the shity pics the bugs beat it up
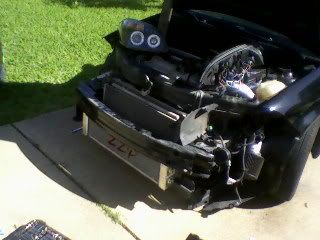
heres front view
http://i886.photobucket.com/albums/a...o/DSCN0553.jpg
heres the bottom i jusr discover the nozzle rubbed a hole through the plastic. i even bent it up so it wasnt lower. i drive my car very easy and its not lowered
http://i886.photobucket.com/albums/a...o/DSCN0552.jpg
heres a pic to show gap between bumper its tight but fit in easy. also shows the mount area a little bit
http://i886.photobucket.com/albums/a...o/DSCN0551.jpg
heres a pic to show gap between rad and new h/e like 3inches apart
http://i886.photobucket.com/albums/a...o/DSCN0555.jpg
its not really hard on the install might get a little coolant on you running the hoses. then you gotta keep filling it and driving it and filling it throughout the week to get all the coolant down in the new h/e. jack stands and taking off the plastic cover over top the radiator is all you really need to do it..
Last edited by Black2.0; Jun 28, 2010 at 03:48 PM. Reason: Automerged Doublepost


Thread Starter
Joined: 12-30-07
Posts: 14,079
Likes: 197
From: NEPA
heres the shity pics the bugs beat it up
heres front view
http://i886.photobucket.com/albums/a...o/DSCN0553.jpg
heres the bottom i jusr discover the nozzle rubbed a hole through the plastic. i even bent it up so it wasnt lower. i drive my car very easy and its not lowered
http://i886.photobucket.com/albums/a...o/DSCN0552.jpg
heres a pic to show gap between bumper its tight but fit in easy. also shows the mount area a little bit
http://i886.photobucket.com/albums/a...o/DSCN0551.jpg
heres a pic to show gap between rad and new h/e like 3inches apart
http://i886.photobucket.com/albums/a...o/DSCN0555.jpg
its not really hard on the install might get a little coolant on you running the hoses. then you gotta keep filling it and driving it and filling it throughout the week to get all the coolant down in the new h/e. jack stands and taking off the plastic cover over top the radiator is all you really need to do it..
I'll look into this. Thanks !
Last edited by Staged07SS; Jun 28, 2010 at 04:17 PM. Reason: Automerged Doublepost


Joined: 08-27-07
Posts: 21,561
Likes: 4
From: Jacksonville, FL


However re-designing a HE and not putting the drain plug IN the PROPER location = fail
Thread Starter
Joined: 12-30-07
Posts: 14,079
Likes: 197
From: NEPA
I'm trying to see if anyone has it, and what they think about it.
By the way the 4th version is different than the one you have. Not saying it will fit better, because I have yet to buy one and install it
I agree with that.
Last edited by Staged07SS; Jun 28, 2010 at 04:50 PM. Reason: Automerged Doublepost
Joined: 08-27-07
Posts: 21,561
Likes: 4
From: Jacksonville, FL
Yea I think I have the 3rd


Thread Starter
Joined: 12-30-07
Posts: 14,079
Likes: 197
From: NEPA
This heat exchanger works wonderfully. IAT2s recover very quickly (even when in 100 octane mode). I don't know how anyone could properly and perfectly fit; also drill the holes to mount the HE without removing the bumper cover or front valance.
Last edited by shadowfaxss; Jun 29, 2010 at 11:41 AM.

Senior Member
Joined: 07-16-09
Posts: 742
Likes: 2
From: akrowdy (akron Ohio)
you fail no you fail no fail is fail wait i fail... haha
I fail in finding this price for this said item.. me need bigger cooling so my engine dont fail.. haha
rodimus don't make me fail how much was this?
I fail in finding this price for this said item.. me need bigger cooling so my engine dont fail.. haha
rodimus don't make me fail how much was this?