
x8xViperx6x's OFFICIAL 2.2SC build

ok, well finally collected/have all the parts on their way. Had to get a few misc. things just yesterday, but now the official date of build is Sunday, August 30th. for which I will have my days off work to build.
I will try to take lots of pictures of everything I do, if anyone would like any specific pictures,(i.e. of a build step or any parts, etc) please PM me and I will see what I can do.
I will be running the M62 2.9" pulley on 42# w/ a cobra h/e. So I hope all goes well, if anyone has any questions or advice, please let me know. wish me luck.
EDIT: up and running! First start up: http://s19.photobucket.com/albums/b1...t=MOV06482.flv
Last edited by x8xViperx6x; Sep 9, 2009 at 05:35 PM.

yep, thats right!
Thanks alot it should come in handy. 
ha, ive been making a pile of tools/parts, this gonna be fun. lol.
Thanks all.
Hey Jn2 (or Gene!), on that site (posted above) where you have that diagram in the first post does anyone know the part number for part: 522 i think I need another one of those. The one i have doesnt seem to fit very well, not sure if it was due to heat and it expanded or something.. probably when i took it off to paint, and forgot outside..
Thanks in advance.
Last edited by x8xViperx6x; Aug 28, 2009 at 10:30 AM.

522: intake manifold seal
part#:12584355
correct u have to squeeze it in thereit will seemed oversized at first, but spread the slack thru out the entire thing and it'll fit
part#:12584355
correct u have to squeeze it in thereit will seemed oversized at first, but spread the slack thru out the entire thing and it'll fit
Last edited by Jn2; Aug 28, 2009 at 05:23 PM. Reason: Automerged Doublepost
That thing was a pain in the ass to reinstall. I reconditioned my whole intake manifold. I got new seals for the laminova cores and all. Some of my seals were out of shape and squished flat. Since that gasket was so expensive, I just reused it and I must have wrestled with that gasket for about a half hour or more, at least.
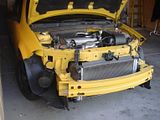
Ok, todays update, just got my friends garage cleaned out, so I could actually start. So purty much all I did was disassemble the front bumper and headlights, and preped everything, tools, parts, table etc. So tomorrow bright and early going to start to disassemble the rest. Then depending on how late it is going to reassemble. 
Yeah after I found out it could fit, i just got as much as I could in, then I held both sides and just shoved it in, it was a tight fit, but i set quite nicely took maybe fifteen min. So far so good Ill have some pictures in a few. I also painted the SC the IM and the TB looks good imo.
Pics of the SC here,
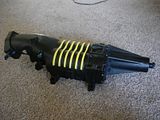
Let me know what you guys think..
That thing was a pain in the ass to reinstall. I reconditioned my whole intake manifold. I got new seals for the laminova cores and all. Some of my seals were out of shape and squished flat. Since that gasket was so expensive, I just reused it and I must have wrestled with that gasket for about a half hour or more, at least.

Pics of the SC here,

Let me know what you guys think..
Last edited by x8xViperx6x; Aug 30, 2009 at 11:26 PM.
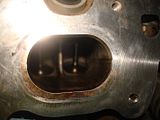
, ok, going to go finish disassembly.Ok, so I was working on my car and when I thought everything seemed to be going smoothly, I got the Intake manifold off with no problems. Then, after I get it off I see inside, its coated with oil! wtf? how? why? that does not look normal...... please help, anyone, k, thanks.
I wiped this one, but its on there good..

looks terrible.

any ideas, what do i do?
Last edited by x8xViperx6x; Aug 31, 2009 at 03:28 PM. Reason: Automerged Doublepost
wow that looked like mine back when i did mine :p all i can say is
get a catch can :p
you need to use throttle body cleaner or brake cleaner, let is soak up, than wipe it off...
also be sure you cut ur intake manifold gasket like pictured below

and heres the diagram for the 8pin throttle body...

get a catch can :p
you need to use throttle body cleaner or brake cleaner, let is soak up, than wipe it off...
also be sure you cut ur intake manifold gasket like pictured below
and heres the diagram for the 8pin throttle body...
Last edited by Jn2; Aug 31, 2009 at 04:50 PM. Reason: Automerged Doublepost
sweet so im not alone when i got oil in there huh?? I got plenty of brake clean, just spray right in there? or how do I go about cleaning it out? Thanks for the help/info great help. I was ****'n bricks I thought something was really bad broke.. *sigh*
I got plenty of brake clean, just spray right in there? or how do I go about cleaning it out? Thanks for the help/info great help. I was ****'n bricks I thought something was really bad broke.. *sigh*
you should see the pics i have from just taking off my intake. our PCV loves throwing oil in our motors
brake cleaner and throttle cleaner evaporates fast....u wont haqve to whipe it off, just whipe the oil off, spray the **** out of it, whipe some more, once all clean, spray it some more and leave it alone, it will evaportae on its on....
Mine with 4,000 miles had oil in it already. I couldn't believe it.
I don't know about that gasket business. I bought the updated LSJ intake manifold gasket and installed and I haven't had any issues.
I don't know about that gasket business. I bought the updated LSJ intake manifold gasket and installed and I haven't had any issues.
yeah but ur suppose to make that cut in it , of course this is per GM's instructions :p its in the build book for installing the blower on a 2.2 eco....bc of were we have our PCV port thinger magigger hole and the LSJ having up higher
ok, thats such a relief! Im so glad you guys are here to help!! lol.. I took a break, had to pick up my friend from work(borrow his car), we are back now, going to take a min, will start back up in an hour or so. I also ordered the LSJ intake manifold gasket(18$), will I still have to modify it or is that the stock L61 gasket?
EDIT: oh just read ^^
EDIT: oh just read ^^
Last edited by Gene Culley; Aug 31, 2009 at 08:10 PM. Reason: Automerged Doublepost
Ahh. I see. Well I didn't do that, lol. I will have to check my block when I do dual pass or something.
The L61 and my LAP had the o-rings so they don't have that type of gasket, so you'd have to modify the LSJ gasket. I'd like to see a pic of the stock LSJ gasket. Can you snap one?
The L61 and my LAP had the o-rings so they don't have that type of gasket, so you'd have to modify the LSJ gasket. I'd like to see a pic of the stock LSJ gasket. Can you snap one?
looks like the one i posted but with out the cut giong from the top circle downwwards
Last edited by Jn2; Aug 31, 2009 at 08:12 PM. Reason: Automerged Doublepost

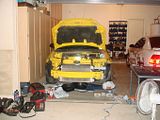
just a quick update made some progress cleaning up the oil, everything is disassembled, coolant is drained. All ready for installation bright and early tomorrow morning, will probably start rewiring as well. So far, its all going well.. but we will see for sure tomorrow!
some more pics:
Clean! well clean'er ish..
much better than before

the work area, thanks to pyskotikpyro, my buddy who is helping me out.
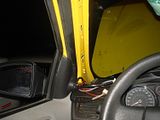
got the pillar on the way, but for now, wiring them all up.
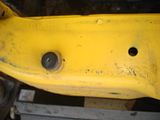
Also, under the plastic cover on the front bumper, the paint looks to be rubbing off, thats not good, could be a weak spot for future rust.. just something to think about, anyone elses doing this??
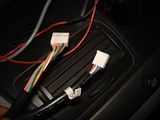
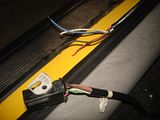
Does anyone have the AEM uego? I have no idea where to wire it.. obviously the big connector goes to the o2 sensor, the other has four different color wires.. anyone have any idea? if not, gotta do some more research..
both of these go in the back of the gauge..
the four loose wires in this pic.. i dont know where they go.
So, now im waiting for parts to arrive.... .... IM gasket, cobra h/e, and alt bracket, I expect to get them all today, we will see tomorrow!
some more pics:
Clean! well clean'er ish..

much better than before

the work area, thanks to pyskotikpyro, my buddy who is helping me out.

got the pillar on the way, but for now, wiring them all up.

Also, under the plastic cover on the front bumper, the paint looks to be rubbing off, thats not good, could be a weak spot for future rust.. just something to think about, anyone elses doing this??

Does anyone have the AEM uego? I have no idea where to wire it.. obviously the big connector goes to the o2 sensor, the other has four different color wires.. anyone have any idea? if not, gotta do some more research..
both of these go in the back of the gauge..

the four loose wires in this pic.. i dont know where they go.

So, now im waiting for parts to arrive....
.... IM gasket, cobra h/e, and alt bracket, I expect to get them all today, we will see tomorrow!
Last edited by x8xViperx6x; Sep 1, 2009 at 04:07 AM. Reason: Automerged Doublepost