Official Powell Harness Bar Thread


 06-23-2013, 11:34 AM
#27
Junior Member

Join Date: 02-09-12
Location: Green Bay, WI
Posts: 433
Likes: 0
Received 0 Likes
on
0 Posts

 07-15-2013, 12:24 AM
#31

He was stupid and confused a worse OTTP hardcore swaybar for harness bar. I have the Powell Hardcore swaybar as well as YYZ V3 springs and I'm very happy I spend the extra money to get a great product. The instructors at the autocross event I attend were quite surprised at how well it handled. It's amazing the difference going from completely stock FE1 to adding the swaybar then adding koni shocks at all four corners and YYZ springs. They made a comment about not being able to oversteer in a FWD car, I proved them wrong.
 07-15-2013, 07:10 AM
#35
Harness bars are 449.00 plus shipping, come with all stainless button head hardware and spherical rod ends required to install. Powder-coat does not follow automotive paint code, but it is possible to approximate red sport tint. Custom color to your choice (standard pc colors) is included
09-04-2013, 10:27 PM
#36
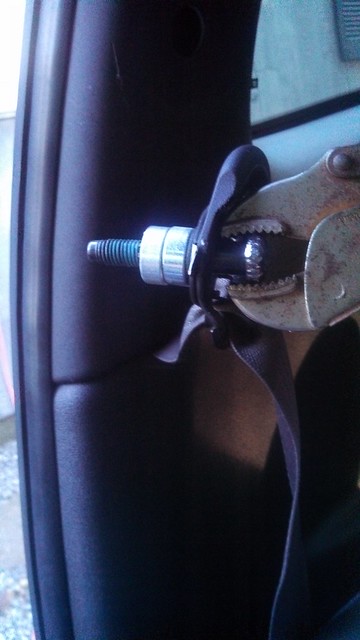
After stripping the passenger upper seat belt bolt
destroying/stripping 1 Home cheapo bolt extractor
snapping 1 Craftsman bolt extractor off inside the bolt
i finally was able to remove the bolt with the help of a blow dryer and vise grips
destroying/stripping 1 Home cheapo bolt extractor
snapping 1 Craftsman bolt extractor off inside the bolt
i finally was able to remove the bolt with the help of a blow dryer and vise grips
09-04-2013, 10:30 PM
#37
https://www.cobaltss.net/forums/appe...talled-256839/
remove seat belt shoulder straps from holder; move both front seats forward and tilt back forward also.
remove bottom seat belt anchor at the B pillar. T 47
unclip plastic cover carefully remove top seat belt anchor, removing carefully to not leave behind the two spacers; these should be secured with a captive speed nut.
unwind captive nut,remove spacers, and place top belt assembly onto the hockey stick shaped down bar. stock bolt/seat belt
NOTE IF BELT ANCHORS ARE VERY HARD TO REMOVE USE LIGHT HEAT TO SOFTEN LOCKTITE ON BOLT.
Using top bolt as a guide, install top belt/washer/down bar/two spacers/speed nut and install into upper b pillar do not torque down.
install lower belt connection. first make sure the rod end is adjusted so the new lower belt slips easily into the anchor and threads without any tension on it from the down bar. adjust rod end as needed.
then assemble onto bolt: belt assembly/rod end/spacer and thread into lower mount.
repeat other side.
assemble bar onto down bars. rotate end for end and on itself to line it up properly. If you have to force it you have not got it lined up correctly. belt guides face up.
snug bolts easily each side.
torque bolts. done.
Added to OP


