
remove emblems help!


Thread Starter
New Member
Joined: 06-06-07
Posts: 44
Likes: 0
From: Canada
remove emblems help!
Hey,
sorry i don know too much bout cars, but i've been having troubles removing the front chevy emblem on grill, i tried using a 10mm ratchet and it wouldnt work, 9 mm is too small, any ideas? And also I want to remove the back one as well, if you could hlep me out with that too thanks guys.
sorry i don know too much bout cars, but i've been having troubles removing the front chevy emblem on grill, i tried using a 10mm ratchet and it wouldnt work, 9 mm is too small, any ideas? And also I want to remove the back one as well, if you could hlep me out with that too thanks guys.

Senior Member
Joined: 03-04-07
Posts: 865
Likes: 0
From: Canada
get tooth floss or a fishing string, and a hair dryer,
put hair dryer on emblem for like a min or 2
slide the tooth floss or fishing string between the emblem
spray goo gone
let it sit for 5min
use ur finger to remove the stcky stuff
put hair dryer on emblem for like a min or 2
slide the tooth floss or fishing string between the emblem
spray goo gone
let it sit for 5min
use ur finger to remove the stcky stuff
Banned
Joined: 12-18-05
Posts: 17,838
Likes: 1
From: North Jersey
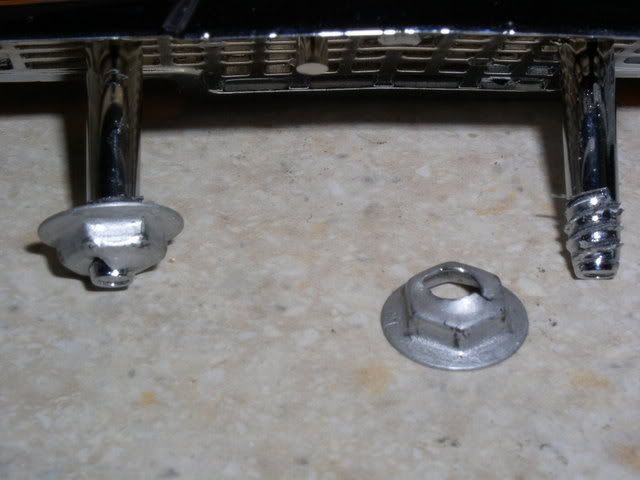
the front one has a weird type of "bolt" on it. i don't know how to describe it other than it twists once or twice, and pushes on. twist a couple times i believe with the 10mm, then just pull it off.

Member
Joined: 05-07-07
Posts: 380
Likes: 0
From: Norcal east bay area
The front one really isnt a typical nut. Its a half twist fastener thats I think 10mm but it comes off easy. I just took the front emblem off, but the idiots somewhere along assy drilled 4 holes for the 2 stud emblem.
Fishing line works excellent and the hair dryer only needs to be held on it for 20 seconds or if its on a hot day sitting in the sun hair dryer is not needed. It took 10 mins to remove all the emblems.
Fishing line works excellent and the hair dryer only needs to be held on it for 20 seconds or if its on a hot day sitting in the sun hair dryer is not needed. It took 10 mins to remove all the emblems.

Member
Joined: 05-07-07
Posts: 380
Likes: 0
From: Norcal east bay area
Credit card is the worst f-ing way to remove badges unless you want scrapes on your clear coat. Get a blow dryer and hold it over badge for 30 seconds and then take some low strength fishing line (it might break a few times, but no big deal) under/against the badge between the badge and badge side of glued foam and saw it back and forth holding the line outward (do not saw it back and forth resting agains the paint). It will cut the badge away from the foam leaving the foam on the car and paint untouched.
Took my son and me a whole 10 minutes to remove all the badging and another 30 minutes to remove the foam off the paint and clean it afterwards. The only badging foam that required goo gone to remove the foam was the small gm emblems on the side. All the others the foam just peeled away very easily, but the rear large Chevy emblem took a while longer as the foam wasnt as thick and harder to pull off.
Took my son and me a whole 10 minutes to remove all the badging and another 30 minutes to remove the foam off the paint and clean it afterwards. The only badging foam that required goo gone to remove the foam was the small gm emblems on the side. All the others the foam just peeled away very easily, but the rear large Chevy emblem took a while longer as the foam wasnt as thick and harder to pull off.
Thread Starter
New Member
Joined: 06-06-07
Posts: 44
Likes: 0
From: Canada
The front one really isnt a typical nut. Its a half twist fastener thats I think 10mm but it comes off easy. I just took the front emblem off, but the idiots somewhere along assy drilled 4 holes for the 2 stud emblem.
Fishing line works excellent and the hair dryer only needs to be held on it for 20 seconds or if its on a hot day sitting in the sun hair dryer is not needed. It took 10 mins to remove all the emblems.
Fishing line works excellent and the hair dryer only needs to be held on it for 20 seconds or if its on a hot day sitting in the sun hair dryer is not needed. It took 10 mins to remove all the emblems.
Member
Joined: 05-07-07
Posts: 380
Likes: 0
From: Norcal east bay area
It'l turn if you are going the right direction removing it and it only takes 1/2 turn or so to release it. It might be stuck on but it will eventually turn. The 10mm fastener/nut doesnt have any threads so it sorta cuts into/fits tightly onto the plastic stud threads, so it sticks very tightly alot of times.

Member
Joined: 05-07-07
Posts: 380
Likes: 0
From: Norcal east bay area
Man if you guys cant get those fasteners off with a simple twist of a 10mm socket, then you got some serious simple mechanical deficiencies and I dont even wanna think about you trying to change the oil filter...

Member
Joined: 04-19-07
Posts: 364
Likes: 0
From: Anchorage Alaska
You can do the method that I used... I drove off the parking lot after purchasing it, looked at it when I got home and realized it was being held on by glue, the bolt holes were drilled, but nothing was there. It was just sort of dangling there... so I bolted it in and now I'm thinking about removing it. ;0
Member
Joined: 05-07-07
Posts: 380
Likes: 0
From: Norcal east bay area
Once removing the front emblem does anyone else have 4 holes under it also? Im guessing some robot misdrilled from a bad setup program for the front badge and they had to be redrilled by hand after the fact to install the emblem later on down the line.

Banned
Joined: 11-23-06
Posts: 3,182
Likes: 0
From: south of Pittsburgh, Pennsylvania
Thread Starter
New Member
Joined: 06-06-07
Posts: 44
Likes: 0
From: Canada
haha no i don't have mechanical defficiancies. I know it's a simple job but for some reason with whatever size socket and whoever tries, the botl wont twst, but yea lolz thanx guys for tha info i guess ima have to keep tryin then =S
Senior Member
Joined: 01-01-07
Posts: 1,728
Likes: 0
From: Henderson, NV
Trying to remember when I painted mine, I noticed the holes also. There are two other little pegs (beside the little screw ones) on the back of the emblem that go inside of those two extra holes. So they aren't there for nothing.
Member
Joined: 05-07-07
Posts: 380
Likes: 0
From: Norcal east bay area
Mine only has one extra peg on the backside. Its a typical design foul up typical on all cars. 3 studs 4 holes... yea thats correct... LOL

Thread
Thread Starter
Forum
Replies
Last Post
Decepticon06ss/sc
New Members Check In!!
19
Oct 16, 2015 09:24 PM
katahdin_lubricants
General Cobalt
3
Sep 20, 2015 07:24 PM
Getaway_Driver
Problems/Service/Maintenance
41
Sep 8, 2015 09:41 AM

