
2.0 LNF Suspension: Brembo Caliper Rebuild


Thread Starter
Senior Member
Joined: 07-12-09
Posts: 794
Likes: 15
From: NJ
Brembo Caliper Rebuild
After looking around I've seen folks reference rebuilding their Brembo brake calipers but haven't seen any write ups for it, only for the rear. So I figured I would post my experience with recently rebuilding my front Brembo calipers.
What I needed was the following:
Parts:
Pin kit (ordered from ZZP)
Caliper rebuild kit (ordered from Rockauto)
Brake lubricant
Carb cleaner
Brake cleaner
DOT4 brake fluid (I used ATE Type 200)
Tools:
7/16" wrench for bleeder screws
1/2" socket for banjo bolt
wire brush for cleaning
torque wrench (banjo bolt is 35ft-lbs or 420 inch-lbs)
Small screw driver
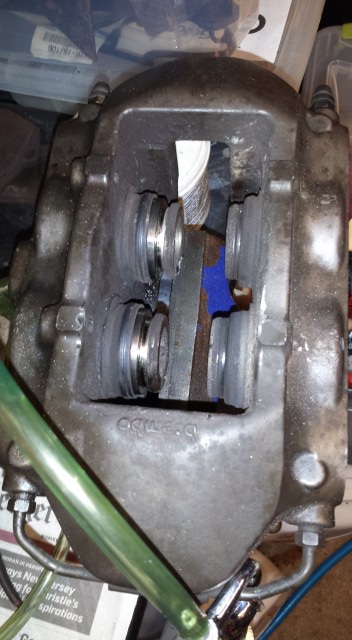
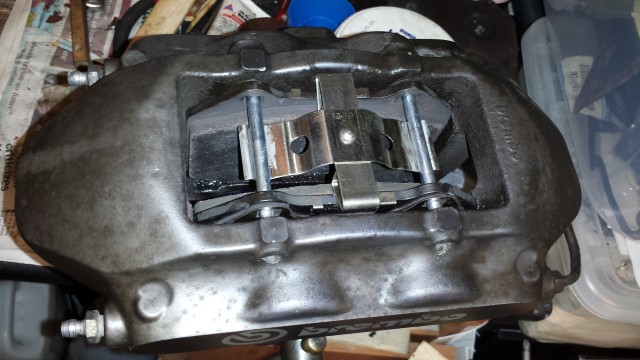
I'm not going to go in to the details for changing pads/rotors up front, I'm assuming this is already known. So, starting with the calipers on a work bench.
Just a side note, I saw a lot of back-and-forth regarding brake fluid leaking from the now exposed brake hose connection. A somewhat popular solution to stopping it from leaking while working on the brakes is to crimp or compress the brake hose. I would never consider kinking or compressing my brake line. Instead I had a very simple fix. I took a hose that fit in banjo bolt hole in the brake hose, just a bit smaller than the hole. I cut it to about 1/8" longer length, placed a screw through it with washers on both ends and tightened it down. As it tightned the washers forced the hose to compress, forcing the hose's sides against the walls of brake line fitting, stopping the leak. I had it sitting for almost a full week like this without a single drop.
The first step I took was to have a plastic tub. I did all my cleaning and dissassembly in the tub to catch everything and all reassembly on a clean bench. I opened both bleeder screws and drained as much fluid as possible from caliper. Then using carb cleaner and a wire brush I cleaned around the pistons and side guides to get all debris off. I wasn't careful around the pistons or boots since I knew I was replacing them.
Next I was ready to start pulling all the components off the caliper. I stuffed a 2x4 in the caliper between the pistons and using around 40psi of air from a compressor I ejected all 4 pistons.
The top right piston was binding and I was unable to remove it completely this way. The other 3 came out without issue. Next I removed the rubber boots from the pistons and the caliper body. These are pressed in. What I did was take a small screw drive and worked it slowly around each piston. They are tight but just be patient and don't use too much force. Once they are removed each piston came be pulled out.
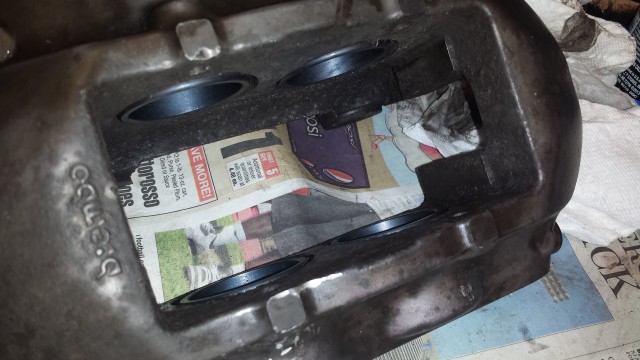
Next there is a small seal inside each piston bore. This seal sits in a groove. Do *NOT* use anything metal to attempt to remove this seal. Any scratch in the bore will ruin the caliper. What I used was a sharpened pencil to work my way under the seal. Once I popped it up a bit the seal would create a small "loop", which I was able to very carefully grab with a long nose plyers.
With each seal removed I then cleaned the inside of the calpier with denatured alcohol. Using a small funnel I poured some in to the piston bore, covered all exit ways with my hands and shook it and dumped it. I closely inspected everything and if there was any debris I did this again. Once everything was confirmed to be spotless in there, I started rebuilding.
These are the kits I purchased from Rockauto. Two kits, one per caliper:

The kits contained the following:
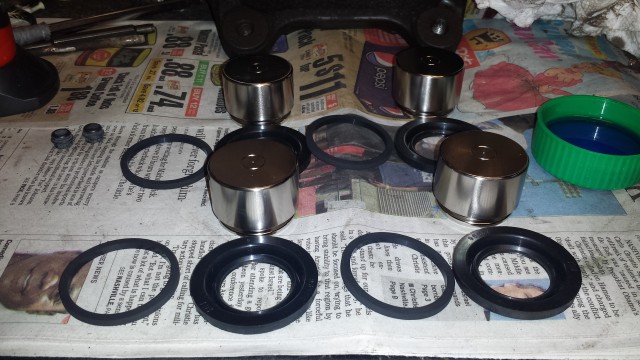
We have 4 new pistons, 4 new inner seals, 4 new outer boots, 2 new bleeder caps and 2 new seals for the pipe that goes between the caliper sides; I did not take this pipe apart as I did not have the proper brake line wrenches for this. Using a regular wrench can round off these fittings.
I poured a small amount of DOT4 brake fluid into a cap and dipped the inner seal in that. Also, using my finger with brake fluid on it I wiped it along the inside of each bore. I then inserted each inner seal in to each bore. Inspect closely to make sure they are fully in and nothing is twisted. Next coat each piston in a bit of brake fluid and slowy insert them in to each bore. They will stop when they hit the inner seal. Once it hits this point, using a c-clamp and a something to protect the face of the piston and to spread pressure evenly, compress the piston in about 1/2". You do NOT want to compress it entirely as of yet, the outter boot still needs to be installed. Take each boot, spread some brake fluid on the inside and slide it over the piston making sure it's seated in the groove of the piston. Then extend the boot and press the ring into the caliper's body. Once all 4 are at this clean wipe them off with a clean rag, chances are there's some brake fluid on them. Then apply brake lubricant to the rubber to protect it.
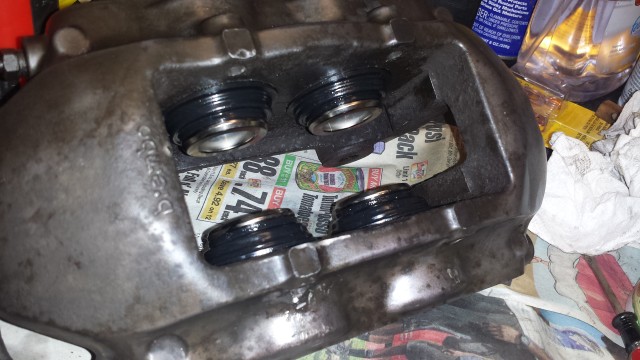
Finally, compress each piston fully in.

At this stage the rebuild is complete. Install your pads, pins, etc..
The calipers are ready to be installed back on the car. I did hit a snag with the reinstall. I needed new crush washers for the brake lines. I had no issue with the left side, but when I installed the right side it leaked, badly. After much frustration I discovered the generic sized crush washers I picked up from autozone, while the same thickness and inner diamater had a larger outer diameter. Normally this wouldn't be a problem, as both the hose and caliper can accomodate a larger washer but mine had severe salt corrosion. This is after cleaning it:
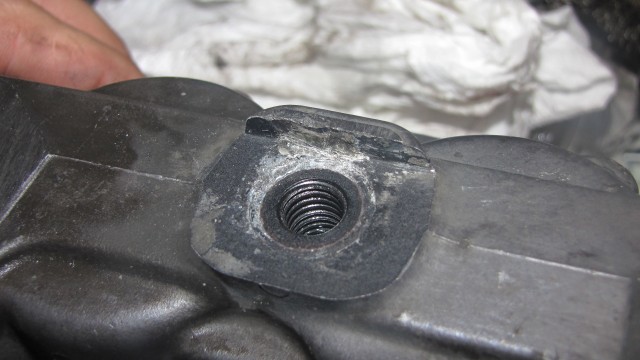
What you see there is the clean surface the old washer was on. The new washer, being larger, was getting caught on the corrosion preventing it from sealing properly. Using the original OEM washers resolved this issue. The generic washer I used was a Dorman brand crush washer, size 25/64" inner x outter diamater 37/64" x thickness 1/32". This sealed fine on the right side as the corrosion wasn't as bad.
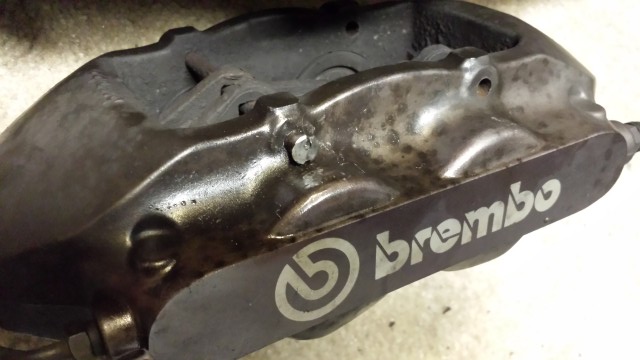
Another note regarding the pins. I did remove the pins from the caliper prior to removing from the car, except for one which was seized in there. I let it soak 2 days with PB Blaster, then with the caliper in a vice, I heated it with an acetelyn torch and managed to loosen it. I had mushroomed the other end of the pin though, so with a dremel I cut a 1" section from the pin and had to punch out both sides seperatly. You can see the mushroomed pin here:
I used anti-seize on the ends of the new pins. I plan on popping them out twice a year, cleaning and re-applying anti-seize as necessary, regardless if I am doing my brakes.
Overall, this wasn't too difficult of a job, but it took me considerable time as I took my time (I had an alternate vehicle to use in the interm).
What I needed was the following:
Parts:
Pin kit (ordered from ZZP)
Caliper rebuild kit (ordered from Rockauto)
Brake lubricant
Carb cleaner
Brake cleaner
DOT4 brake fluid (I used ATE Type 200)
Tools:
7/16" wrench for bleeder screws
1/2" socket for banjo bolt
wire brush for cleaning
torque wrench (banjo bolt is 35ft-lbs or 420 inch-lbs)
Small screw driver
I'm not going to go in to the details for changing pads/rotors up front, I'm assuming this is already known. So, starting with the calipers on a work bench.
Just a side note, I saw a lot of back-and-forth regarding brake fluid leaking from the now exposed brake hose connection. A somewhat popular solution to stopping it from leaking while working on the brakes is to crimp or compress the brake hose. I would never consider kinking or compressing my brake line. Instead I had a very simple fix. I took a hose that fit in banjo bolt hole in the brake hose, just a bit smaller than the hole. I cut it to about 1/8" longer length, placed a screw through it with washers on both ends and tightened it down. As it tightned the washers forced the hose to compress, forcing the hose's sides against the walls of brake line fitting, stopping the leak. I had it sitting for almost a full week like this without a single drop.
The first step I took was to have a plastic tub. I did all my cleaning and dissassembly in the tub to catch everything and all reassembly on a clean bench. I opened both bleeder screws and drained as much fluid as possible from caliper. Then using carb cleaner and a wire brush I cleaned around the pistons and side guides to get all debris off. I wasn't careful around the pistons or boots since I knew I was replacing them.
Next I was ready to start pulling all the components off the caliper. I stuffed a 2x4 in the caliper between the pistons and using around 40psi of air from a compressor I ejected all 4 pistons.
The top right piston was binding and I was unable to remove it completely this way. The other 3 came out without issue. Next I removed the rubber boots from the pistons and the caliper body. These are pressed in. What I did was take a small screw drive and worked it slowly around each piston. They are tight but just be patient and don't use too much force. Once they are removed each piston came be pulled out.
Next there is a small seal inside each piston bore. This seal sits in a groove. Do *NOT* use anything metal to attempt to remove this seal. Any scratch in the bore will ruin the caliper. What I used was a sharpened pencil to work my way under the seal. Once I popped it up a bit the seal would create a small "loop", which I was able to very carefully grab with a long nose plyers.
With each seal removed I then cleaned the inside of the calpier with denatured alcohol. Using a small funnel I poured some in to the piston bore, covered all exit ways with my hands and shook it and dumped it. I closely inspected everything and if there was any debris I did this again. Once everything was confirmed to be spotless in there, I started rebuilding.
These are the kits I purchased from Rockauto. Two kits, one per caliper:
The kits contained the following:
We have 4 new pistons, 4 new inner seals, 4 new outer boots, 2 new bleeder caps and 2 new seals for the pipe that goes between the caliper sides; I did not take this pipe apart as I did not have the proper brake line wrenches for this. Using a regular wrench can round off these fittings.
I poured a small amount of DOT4 brake fluid into a cap and dipped the inner seal in that. Also, using my finger with brake fluid on it I wiped it along the inside of each bore. I then inserted each inner seal in to each bore. Inspect closely to make sure they are fully in and nothing is twisted. Next coat each piston in a bit of brake fluid and slowy insert them in to each bore. They will stop when they hit the inner seal. Once it hits this point, using a c-clamp and a something to protect the face of the piston and to spread pressure evenly, compress the piston in about 1/2". You do NOT want to compress it entirely as of yet, the outter boot still needs to be installed. Take each boot, spread some brake fluid on the inside and slide it over the piston making sure it's seated in the groove of the piston. Then extend the boot and press the ring into the caliper's body. Once all 4 are at this clean wipe them off with a clean rag, chances are there's some brake fluid on them. Then apply brake lubricant to the rubber to protect it.
Finally, compress each piston fully in.
At this stage the rebuild is complete. Install your pads, pins, etc..
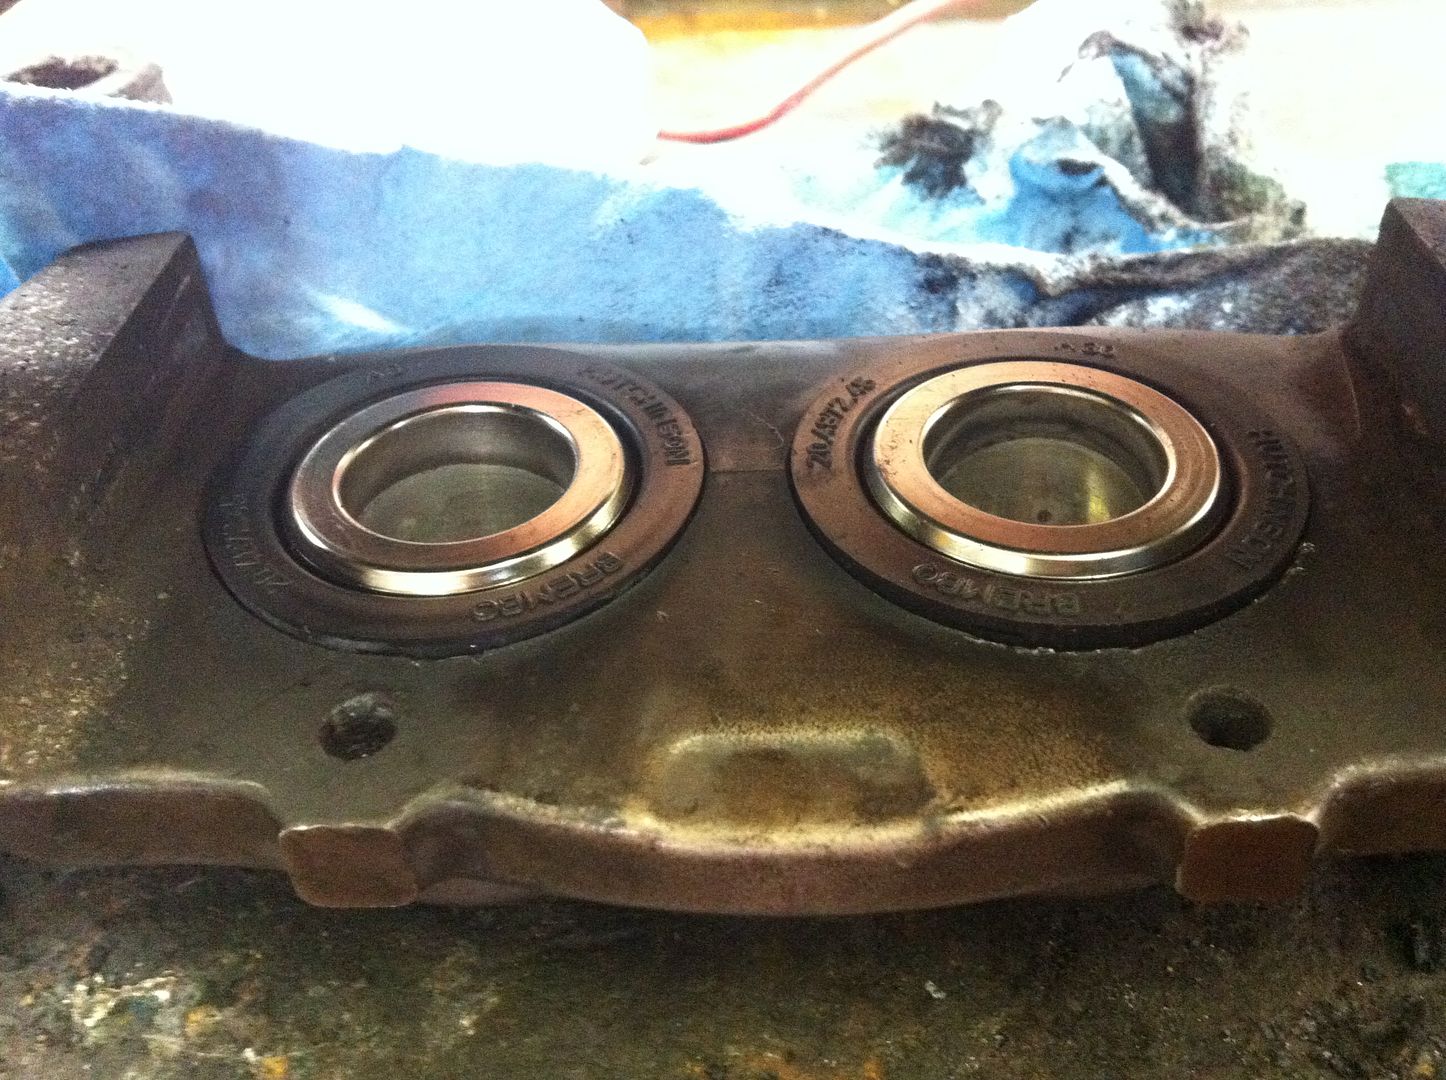
The calipers are ready to be installed back on the car. I did hit a snag with the reinstall. I needed new crush washers for the brake lines. I had no issue with the left side, but when I installed the right side it leaked, badly. After much frustration I discovered the generic sized crush washers I picked up from autozone, while the same thickness and inner diamater had a larger outer diameter. Normally this wouldn't be a problem, as both the hose and caliper can accomodate a larger washer but mine had severe salt corrosion. This is after cleaning it:
What you see there is the clean surface the old washer was on. The new washer, being larger, was getting caught on the corrosion preventing it from sealing properly. Using the original OEM washers resolved this issue. The generic washer I used was a Dorman brand crush washer, size 25/64" inner x outter diamater 37/64" x thickness 1/32". This sealed fine on the right side as the corrosion wasn't as bad.
Another note regarding the pins. I did remove the pins from the caliper prior to removing from the car, except for one which was seized in there. I let it soak 2 days with PB Blaster, then with the caliper in a vice, I heated it with an acetelyn torch and managed to loosen it. I had mushroomed the other end of the pin though, so with a dremel I cut a 1" section from the pin and had to punch out both sides seperatly. You can see the mushroomed pin here:
I used anti-seize on the ends of the new pins. I plan on popping them out twice a year, cleaning and re-applying anti-seize as necessary, regardless if I am doing my brakes.
Overall, this wasn't too difficult of a job, but it took me considerable time as I took my time (I had an alternate vehicle to use in the interm).


So I have a 2009 with 60k miles pads are ready to be changed. I want to just jack it un in the driveway, swap pads and rotors but worried ill get stuck with them seized while apart. I don't have the time or want to mess with rebuilding the calipers myself Id rather pay a mechanic at my dealership to do that.
What are the odds, ill need a rebuild on both calipers at 60k on a 2009?
What are the odds, ill need a rebuild on both calipers at 60k on a 2009?
Thread Starter
Senior Member
Joined: 07-12-09
Posts: 794
Likes: 15
From: NJ
So I have a 2009 with 60k miles pads are ready to be changed. I want to just jack it un in the driveway, swap pads and rotors but worried ill get stuck with them seized while apart. I don't have the time or want to mess with rebuilding the calipers myself Id rather pay a mechanic at my dealership to do that.
What are the odds, ill need a rebuild on both calipers at 60k on a 2009?
What are the odds, ill need a rebuild on both calipers at 60k on a 2009?

Member
Joined: 04-18-14
Posts: 376
Likes: 0
From: Dunnville, ON
Not necessarily, I've seen a couple LNF's that were winter driven that had seized pistons with like 40-60k km's on them.

Member
Joined: 04-18-14
Posts: 376
Likes: 0
From: Dunnville, ON
Thread Starter
Senior Member
Joined: 07-12-09
Posts: 794
Likes: 15
From: NJ

CARLSON 41285 $5.22
RAYBESTOS WK2897 $7.99
A careful search uncovered the piston kit on RockAuto, but you'd still need the boot kit GMPN: 25900780
ACDELCO 25900776 $39.89 -same part as the 1st CED link below.
If you want to do the whole shebang, you'll want the GM kits from CED, you will need 2 of each kit to cover both calipers.
Cobalt Brembo Caliper Piston Kit 25900776 $49.84
Cobalt Brembo Caliper Boot Kit 25900780 $18.91


Senior Member
iTrader: (4)
Joined: 01-12-10
Posts: 2,692
Likes: 171
From: Greater Denver Area, Colorado
Legit write-up. I was planning to do one when I rebuilt mine a couple years ago but never got around to it. My pistons were fine and did not really need replacing; my reason for the rebuild was molten boots from track braking lol:
Before:
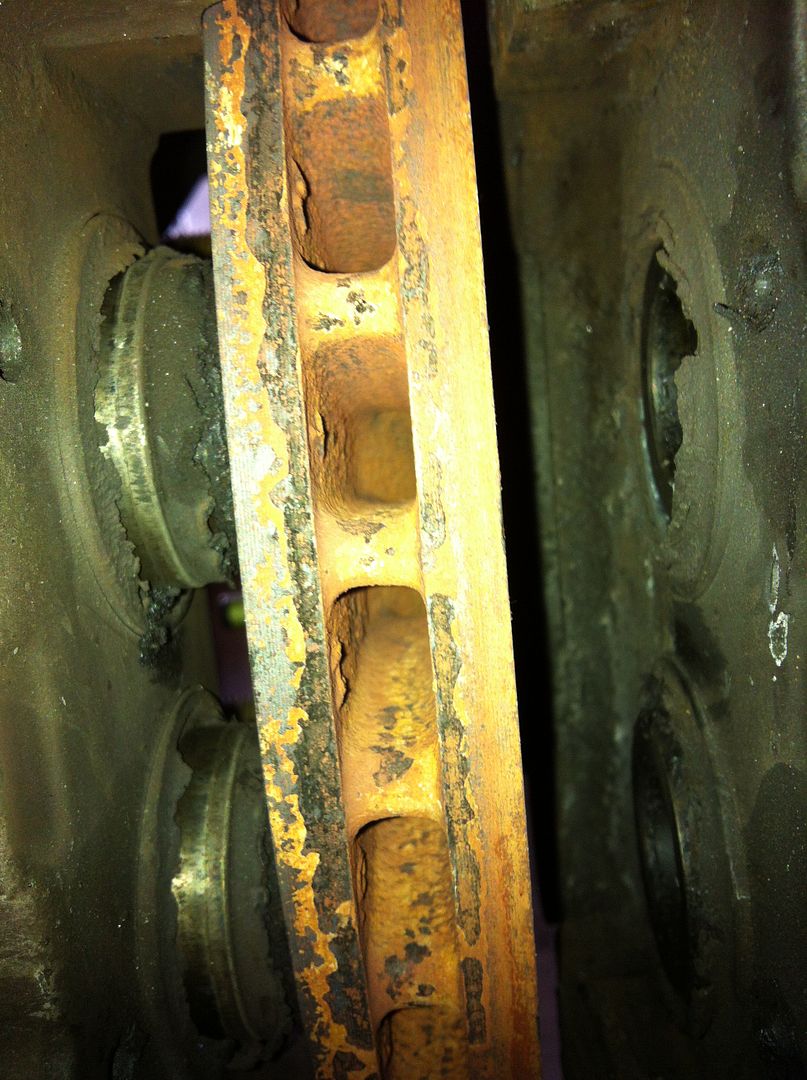
After:
Before:

After:


Thread
Thread Starter
Forum
Replies
Last Post
DANRICKARD
Problems/Service/Maintenance
8
Oct 1, 2015 12:08 AM
QuickSilver_SS
08-10 SS Turbocharged General Discussion
2
Sep 17, 2015 05:38 PM
QuickSilver_SS
Wanted - What to buy - All categories
0
Sep 17, 2015 11:23 AM