
General Suspension: Front strut and spring R&R

Thread Starter
I'm old school
Joined: 02-16-05
Posts: 6,905
Likes: 3
From: Nashville
Front strut and spring R&R
Front Strut and Spring Removal and Replacement How-To.
Tools you will need:
A typical socket driver set (ratchets, extensions, breaker bar, preferrably 1/2" drive)
Metric Deep well sockets
Torx Key set or Metric Allen key set
Jacks
Stands
Spring Compressors
Strap wrench (or other suitable tool)
Ball peen hammer
Start with the simple but often overlooked stuff. Have a level, safe place to work. Have all of your tools and parts available ahead of time. This is a one man job, and will take about 2-4 hours for both sides if you work straight through. If you are lowering the car using aftermarket springs, you will need an alignment right afterward, so have that arranged. You can safely drive the car to the shop afterward for that part of the job.

Jack and support the car on a stand. Do not just use the jack to support the vehicle. You only have to do one side at a time, but you can do both if you wish. Remove the wheel.

Loosen the stabilizer link nut, but don't remove it. It is under load from the other side.
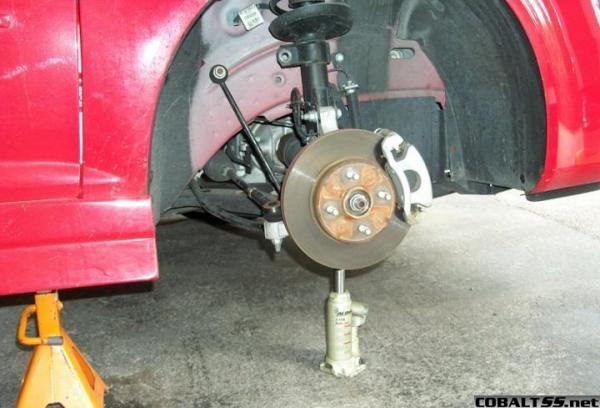
Use a jack and lift the hub assembly until the nut and link slide out easily. Put the nut back on the link so as not to lose it, and simply push it back out of the way.
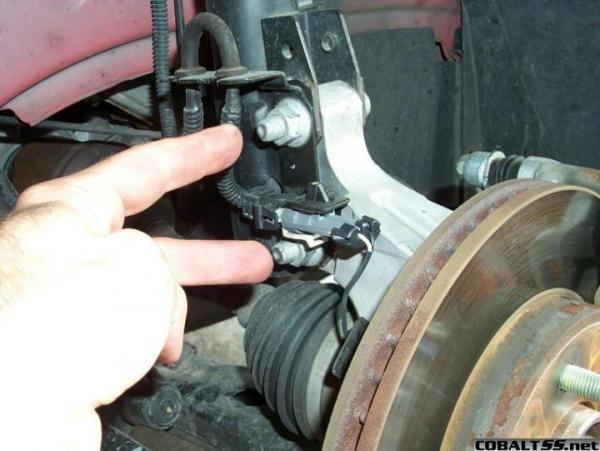
Remove the two strut-to-knuckle nuts.

Move the Anti-Lock wire harness aside, and hammer out the bolts. They are press fit, and safe to hammer out.
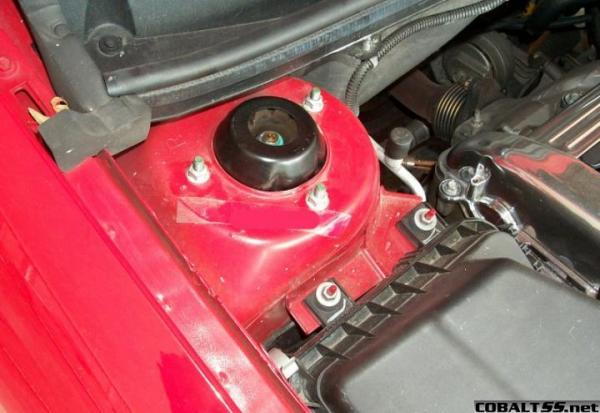
Remove the three strut tower nuts. As you do this, the strut will fall out, so don't let it drop. The strut is now free.

Place a jack stand under the hub assembly to support the weight. Don't let the weight pull on the half shaft. This could pull the CV joint out of the boot, and that would be bad.

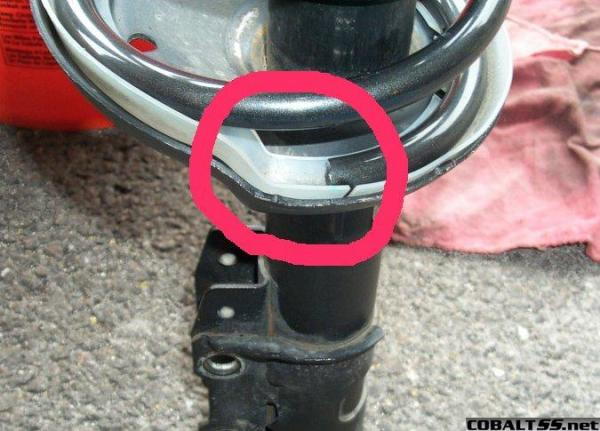
Here is the removed strut assembly. Now take it apart.
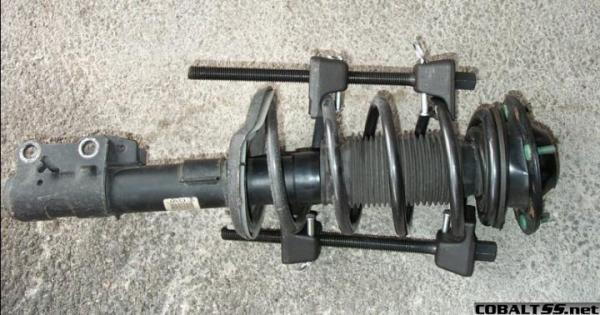
Using the spring compressor set, compress the spring until it can be freely moved by hand without any load on the top or bottom spring buckets.
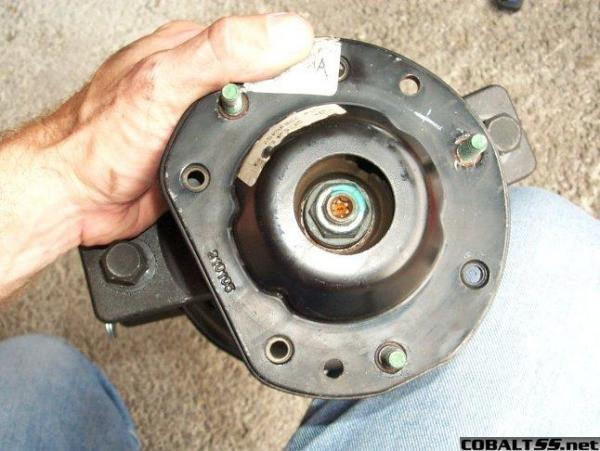
This is the top hub, and where the first tricky part is. You have to take off that nut, but if you just start ratcheting it, the strut just spins. You have to hold the strut still with a Torx or allen key while spinning the nut. You can't get a wrench on the nut because it's recessed inside the hub. There is more then one way to do this, but here is how I did it:
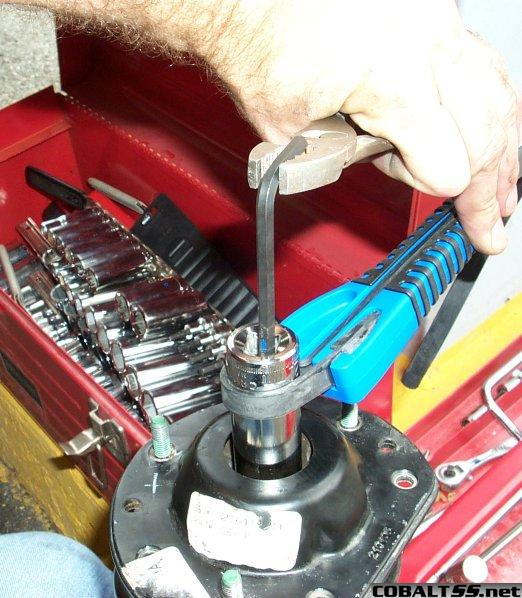
Place your 21mm deep well socket on the nut. Insert your allen key through the hole. And then ratchet the socket with a strap wrench while holding the allen key still. Works like a champ. You will need to do this for reassembly as well. If you have access to Pneumatic tools, most people take this nut off using an impact wrench.
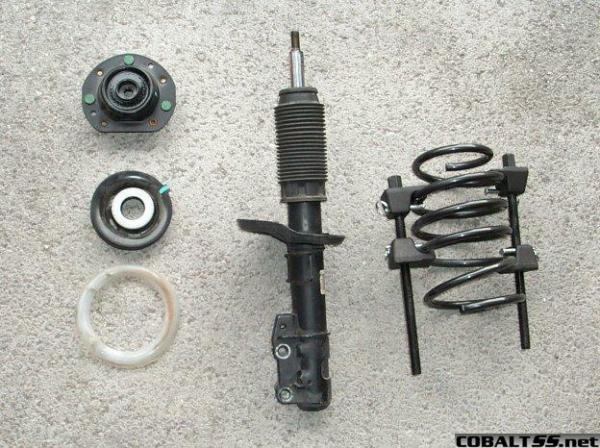
The assembly parts are the strut top hub, the top bucket (with bearing assembly and rubber spring seat still attached), the lower spring seat, the strut itself (with boot still on the shaft), and the still compressed spring. The bump stop for the strut is underneath the boot. Only cut it if your spring instructions specifically tell you to. Otherwise leave it alone.
Don't mess with the bearing. It has to be installed correct side facing up, and there are no marks on it to indicate which way that is, so just leave it installed.
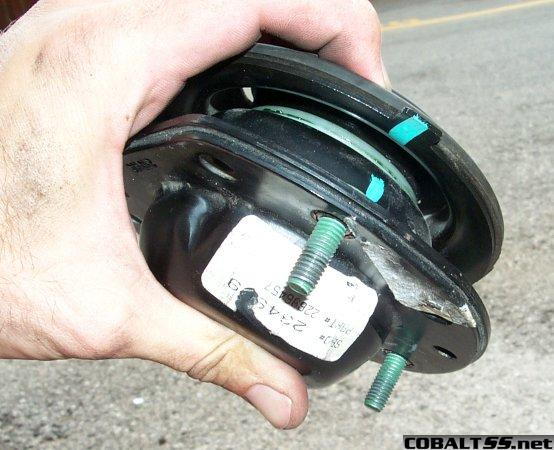
This is the top hub, bearing, and bucket assembly. You can plainly see the white alignment mark on the top hub and bucket. Keep those aligned during reassembly. It doesn't have to be perfect, just close. This will put the top bucket in the correct alignment with the top of the spring. During assembly this mark should face toward the engine and away from the wheel. This is an important step for proper spring installation.
Reassembly is the reverse of removal. All you need to be careful of is seating the spring correctly. The top bucket was just discussed above.
This is the bottom bucket. Notice the gap between the spring and the notch in the bucket. That's bad, don't do that. Seat the spring completely in the notch.
Torque specs for reinstallation:
Strut tower nuts: 15 ft/lbs
Strut to steering knuckle nuts: 89 ft/lbs
Stabilizer link to strut nut: 48 ft/lbs
Now go get your alignment. Your toe setting will be off. The more you lowered it, the more it will be. It's an easy alignment, and should be cheap. They only need to adjust the steering tie rods.
Tools you will need:
A typical socket driver set (ratchets, extensions, breaker bar, preferrably 1/2" drive)
Metric Deep well sockets
Torx Key set or Metric Allen key set
Jacks
Stands
Spring Compressors
Strap wrench (or other suitable tool)
Ball peen hammer
Start with the simple but often overlooked stuff. Have a level, safe place to work. Have all of your tools and parts available ahead of time. This is a one man job, and will take about 2-4 hours for both sides if you work straight through. If you are lowering the car using aftermarket springs, you will need an alignment right afterward, so have that arranged. You can safely drive the car to the shop afterward for that part of the job.
Jack and support the car on a stand. Do not just use the jack to support the vehicle. You only have to do one side at a time, but you can do both if you wish. Remove the wheel.
Loosen the stabilizer link nut, but don't remove it. It is under load from the other side.
Use a jack and lift the hub assembly until the nut and link slide out easily. Put the nut back on the link so as not to lose it, and simply push it back out of the way.
Remove the two strut-to-knuckle nuts.
Move the Anti-Lock wire harness aside, and hammer out the bolts. They are press fit, and safe to hammer out.
Remove the three strut tower nuts. As you do this, the strut will fall out, so don't let it drop. The strut is now free.
Place a jack stand under the hub assembly to support the weight. Don't let the weight pull on the half shaft. This could pull the CV joint out of the boot, and that would be bad.
Here is the removed strut assembly. Now take it apart.
Using the spring compressor set, compress the spring until it can be freely moved by hand without any load on the top or bottom spring buckets.
This is the top hub, and where the first tricky part is. You have to take off that nut, but if you just start ratcheting it, the strut just spins. You have to hold the strut still with a Torx or allen key while spinning the nut. You can't get a wrench on the nut because it's recessed inside the hub. There is more then one way to do this, but here is how I did it:
Place your 21mm deep well socket on the nut. Insert your allen key through the hole. And then ratchet the socket with a strap wrench while holding the allen key still. Works like a champ. You will need to do this for reassembly as well. If you have access to Pneumatic tools, most people take this nut off using an impact wrench.
The assembly parts are the strut top hub, the top bucket (with bearing assembly and rubber spring seat still attached), the lower spring seat, the strut itself (with boot still on the shaft), and the still compressed spring. The bump stop for the strut is underneath the boot. Only cut it if your spring instructions specifically tell you to. Otherwise leave it alone.
Don't mess with the bearing. It has to be installed correct side facing up, and there are no marks on it to indicate which way that is, so just leave it installed.
This is the top hub, bearing, and bucket assembly. You can plainly see the white alignment mark on the top hub and bucket. Keep those aligned during reassembly. It doesn't have to be perfect, just close. This will put the top bucket in the correct alignment with the top of the spring. During assembly this mark should face toward the engine and away from the wheel. This is an important step for proper spring installation.
Reassembly is the reverse of removal. All you need to be careful of is seating the spring correctly. The top bucket was just discussed above.
This is the bottom bucket. Notice the gap between the spring and the notch in the bucket. That's bad, don't do that. Seat the spring completely in the notch.
Torque specs for reinstallation:
Strut tower nuts: 15 ft/lbs
Strut to steering knuckle nuts: 89 ft/lbs
Stabilizer link to strut nut: 48 ft/lbs
Now go get your alignment. Your toe setting will be off. The more you lowered it, the more it will be. It's an easy alignment, and should be cheap. They only need to adjust the steering tie rods.
Last edited by TommyP; May 17, 2012 at 08:44 PM.
Senior Member
Joined: 05-29-06
Posts: 1,519
Likes: 1
From: Glen Ellyn, Illinois
Originally Posted by Halfcent
This is the top hub, and where the first tricky part is. You have to take off that nut, but if you just start ratcheting it, the strut just spins. You have to hold the strut still with an allen key while spinning the nut. You can't get a wrench on the nut because it's recessed inside the hub. There is more then one way to do this, but here is how I did it:
By the way, I've always recommended loosening that 21mm nut a little while the strut is still bolted there in the strut tower; that way you aren't having to use a free hand to hold it still. Helps a lot having it mounted securely.
Gotta love rust-free new cars! Sometimes the worst part of this job is getting those strut bolts out; on my Fiero I had to remove the struts with the knuckles still attached, and lay the whole assembly down on the driveway while I beat the bolts out with a sledge hammer. Heating the knuckle with a torch helps too.
Senior Member
Joined: 05-29-06
Posts: 1,519
Likes: 1
From: Glen Ellyn, Illinois
Originally Posted by kyyankee
Halfcent, where did you get your spring compressors?
I bought a set at Sears, just to be able to have them without making an extra trip to the store.


Senior Member
Joined: 09-16-05
Posts: 1,150
Likes: 0
From: Florida
is there any other way to get that nut off with the allen key? Since the bolt is so deep inside the strut I dont' know how i'm going to get that bolt off with a wrench and allen key at the same time?
Thread Starter
I'm old school
Joined: 02-16-05
Posts: 6,905
Likes: 3
From: Nashville
You will not be able to get a wrench on the nut. You must use a socket. One other way I know of is to use an impact wrench, and just hit it until it spins loose. But if you don't have air tools, then the way I showed above works just great.
Thread Starter
I'm old school
Joined: 02-16-05
Posts: 6,905
Likes: 3
From: Nashville
Actually, thats not a dumb question. There are unibody channels under the car that would appear to be perfect spots to put your jack or stands. But when I started lifting there, those channel will actually start to collapse. They can't handle jack loads. You can lift at the unibody welded seem right under the door, or at control arm fitting locations.
Senior Member
Joined: 09-16-05
Posts: 1,150
Likes: 0
From: Florida
is there any way u can get a picture of those locations on where to jack? halfcent, do you have any problems now with the car vibrating or weird noises now that u lowered ur car. There a few members on this forum saying that there car vibrates when accelerating and also makes some sort of clicking noise now that they installed eibach sportlines. What do u think about this? I'm kind of worried to lower my car now..

Senior Member
Joined: 03-02-06
Posts: 620
Likes: 0
From: Fleetwood, PA
Originally Posted by Halfcent
Actually, thats not a dumb question. There are unibody channels under the car that would appear to be perfect spots to put your jack or stands. But when I started lifting there, those channel will actually start to collapse. They can't handle jack loads. You can lift at the unibody welded seem right under the door, or at control arm fitting locations.


Senior Member
Joined: 10-28-05
Posts: 589
Likes: 1
From: Upstate NY
Originally Posted by BlackLS
Thanks for the answer but a picture would help greatly if you don't mind getting one. Thanks
For you guys looking for pictures of where to jack, look at my tire rotation how-to. There's pics of where I put a jack on the front and back of the car.
Senior Member
Joined: 09-16-05
Posts: 1,150
Likes: 0
From: Florida
does the strut have to be put back together a certain way? how do align the strut perfectly? Also for the rear of the car do I only have to loosen up the bolt to the bottom of the shock and the rear spring will fall out?


Senior Member
Joined: 10-16-05
Posts: 696
Likes: 0
From: Denville, NJ
ok great how to..i only have one point. those spring compressors are like death in a package. if you do not align them right or you strip that shaft when using them, they can fly off. that spring is under enormous load. my suggestion is to take your struts out and bring them, along with your new springs, to a shop and have them swap them in for you. cost you 25- 30 bucks..then just go home and mount your stuts back in


Thread Starter
I'm old school
Joined: 02-16-05
Posts: 6,905
Likes: 3
From: Nashville
Why would you not get an alignment? A toe adjustment is part of an alignment. If you didn't, you would have excessive tow in, and really shitty steering, excess drag, and rapid tire wear.

Air guns help cut things in half. And when i did my spring install i tried to keep everything straight and lined up when i install everything and didn't get an alignment. Car felt just like it did before and no uneven tire wear. Now i do recommend getting an alignment cause later when koni used my car for their testing they did one then. But you can get it pretty close when installing everything.