
Appearance: How to: Antenna shave!!


Thread Starter
New Member
Joined: 02-18-11
Posts: 111
Likes: 0
From: virginia
How to: Antenna shave!!
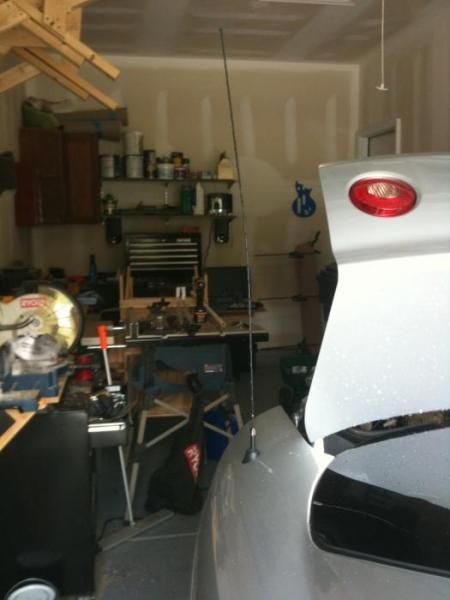
I hate the antenna on the back of cobalt's. I think it makes them look too much
like an R/C car, so I decided I will shave it and put in a shark fin.
Ok here we go.
Estimated time: 4-6 hrs.
Tool needed:
1. T-15 ( to take out the quarter panels)
2. T-20 (for the sun visors and clothing hooks)
3. T-30 (for the "OH CRAP" bar)
4. T-50 (for the top seatbelt bolts)
5. Socket wrench
6. Vise grips
7. Wire cutters
8. Wire stripers
9. Panel puller
10. Sanding block
11. Drill
12. Unibit
13. Orbital sander "optional"
Material needed:
1. Sand paper
150 grit (for orbital sander)
600 grit
1000 grit
2000 grit
2. Painters tape
3. Prep all
4. Bondo
5. Dupli Color perfect match paint
6. Peal-N-Stick tie down (can buy a lowes)
7. Zip Ties
8. Buffing compound
Part needed:
1. Metra 44-UA42 Amplified Roof Antenna
Steps:
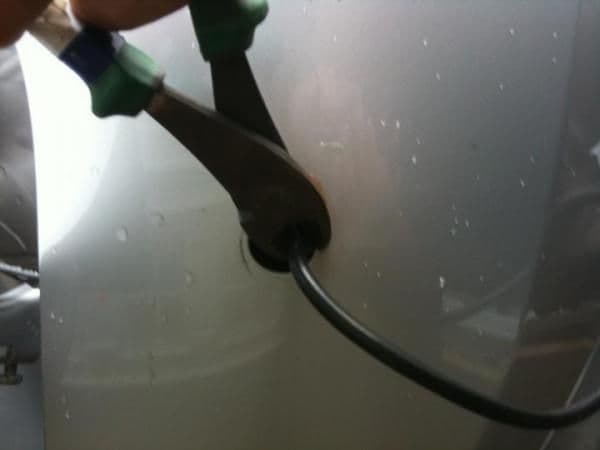
1. With the vise grips grab the rubber surround on the old antenna and pull.
Might need to wiggle is as your pulling, but it will pop out.

2. After pulling the antenna out either cut the wire or pull with wire out of
the car through the hole you just made. I chose to cut it because there is a lot
of tie downs and is taped to other wires, I didn't want that hassle. I will pull
this wire later.
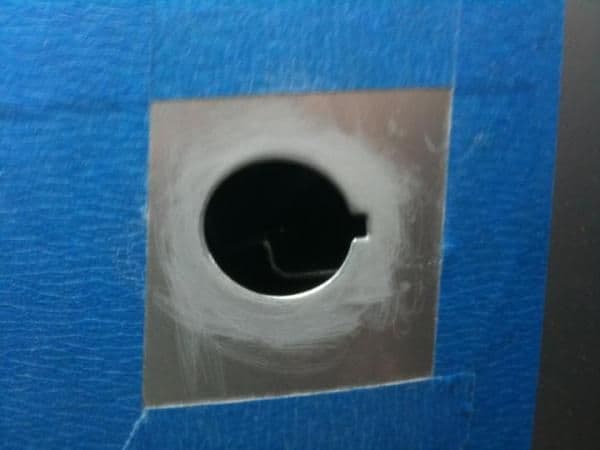
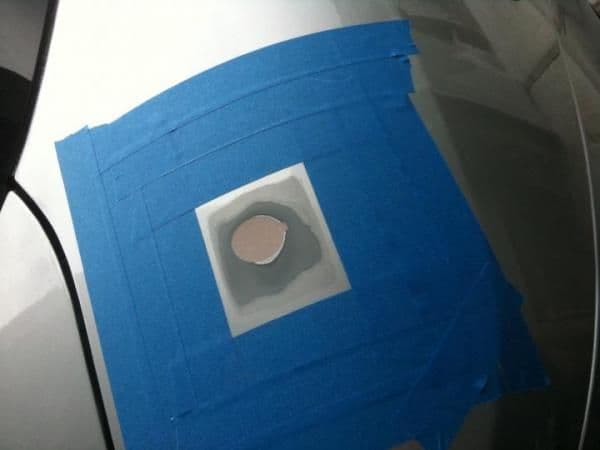
3. Using the painters tape, tape around the hole. Give yourself a 2'' square to
work with. Then use the 150 grit sand paper scuff up the hole to give the Bondo
something to grab onto. You might want to put some paper towels in the hole so
the Bondo doesn't fall threw.

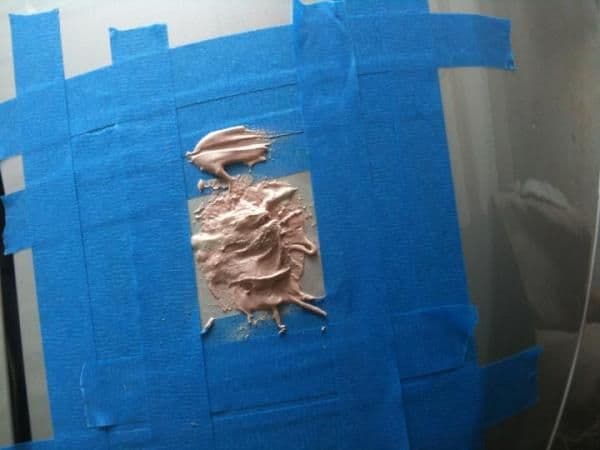
4. Mix the Bondo with the hardener and put the Bondo over the hole. Use a
generous amount to ensure that you cover the entire hole. Once this has been
done move to the anterior of the car.

5. Take pull the necessary dash pieces off to pull out the stereo and the upper
passenger piece of the dash by the door. This will be the best place to run the
antenna wire and its power wire. Once you pull the upper passenger you will see
a hole the runs across the dash to the radio.
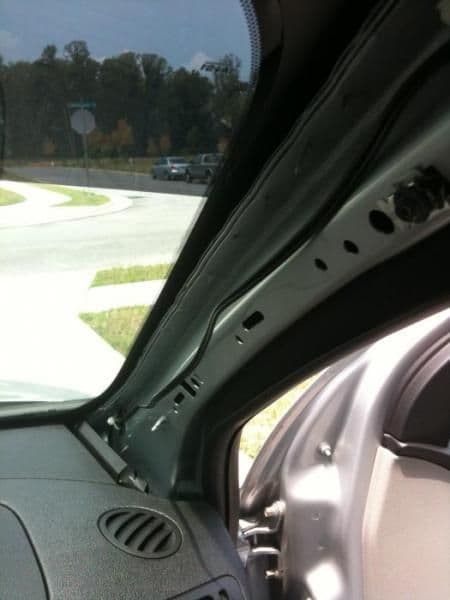
6. Take off the passenger A pillar using the T-15 bit and run the antenna wire
up through the dash. This may be a little tricky but it will go up threw.
7. Take out the radio and disconnect all the connectors. Run the antenna wire
across the hole in the dash as in step 5. For the power wire for the new antenna
tap into the accessory wire for the radio. Once this is complete hook everything
back up to the radio including the new antenna wire. Put all the dash pieces
back on.
8. Remove the sun visors, rear view mirror, clothing hooks with the T-20 bit,
remove the "OH CRAP" bar with the T-30 bit. There is a plastic tab in the rear
of the head liner that will need to come off using you panel puller. Be careful
not to break it. Then remove the dome light. There are 3 tabs to remove this,
and disconnect the wire. Remove the Top Bolt for the Front Seat Belts using the
T-50 bit (you can buy at advanced auto parts). Remove both A, top part of B, and
C pillars using the T-15 bit. There is a wire for the dome light that is taped
to the head liner just remove the tap. Pull out the head liner.
9. If you in the middle of the back seat and look up you will see a hole in the
roof support. This is where you will drill your hole. Using your drill and
unibit drill the hole from the inside. Just enough to get the hole started. Once
you get the hole started go outside the car and finish drilling. You may want to
drill the hole to 13/16''.
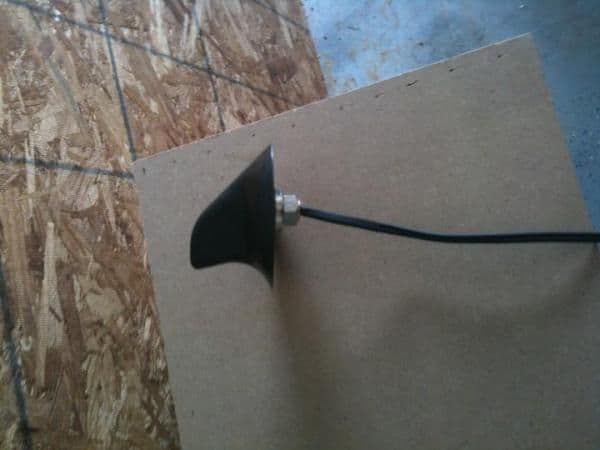
10. Take the Metra 44-UA42 Amplified Roof antenna and put on the rubber gasket
and take off the bolt and washer. Feed the wire connected to the antenna and
feed it down through the hole. Go back into the car and put the washer on first
and the bolt. Tighten the bolt just a little bit then go back out of the car to
align the antenna. Might need to do this a few times. Than tighten.
11. Connect the antenna wire and power wire to the connectors on the antenna.
12. Using Peal -N- Stick tie downs (us as many as you want), attach them to the
roofs along with zip ties and fasten the wire to them. There will be extra wire
and is up to you were you want to put that. I put the excess in the dash.

13. After all is cleaned up inside do the reverse of step 8.
14. The reason I did the Bondo first than the interior, is so the Bondo has
plenty of time to dry. Put some more painters tape around were you taped to
protect the paint when you're sanding. Using the 150 grit sand paper and orbital
sander, sand away at the Bondo will you are roughly close to being flat. Then
use the 600 grit to sand it smooth. If you feel any dips you may want to add
more Bondo and re-sand till its flat.
15. Once everything is smooth use prep all to remove wax or dirt from the car.
You paper towels of paper and surround the square you made of tap to protect the
car from over spray .Using very thin coats of paint, paint over the spot. Let
dry. Then use water and 1000 grit sand paper sand each coat. May need to do this
several times.
16. Once you are satisfied with the paint. Peel off the tape and tape a bigger
square. About 4-6" and wet sand with 1000 grit sand paper the pain to blend it
in with the car.
17. Once smooth use the 2000 grit sand paper and wet sand. Once that is done use
buffing compound to smoothen it even more.
i still need to do step 16 and 17. ill post more pix when im done.

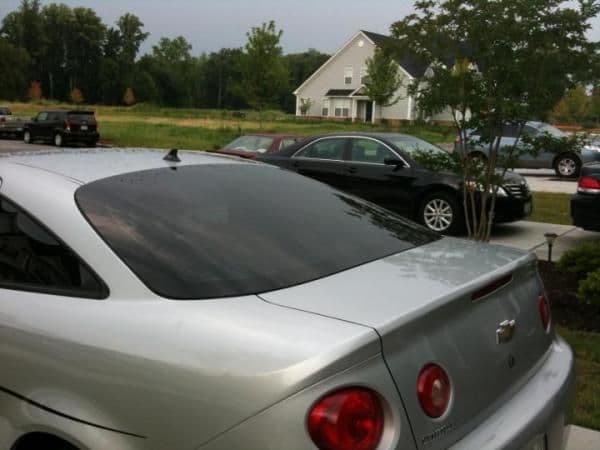
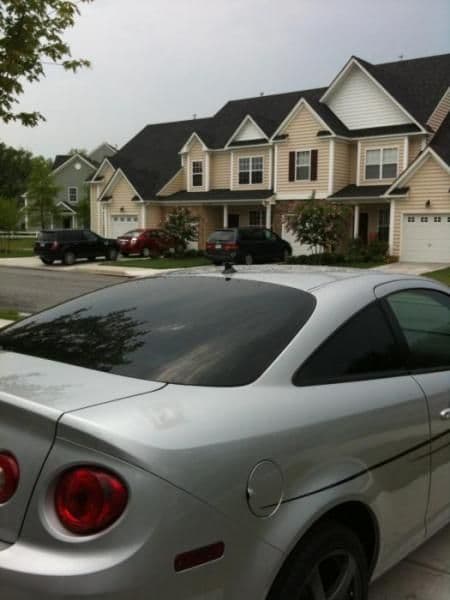
after the rainy weather let up. i resanded every thing and this is the final result!!!!!!!!!!!!!!!!!!!!!!!!!!!!!
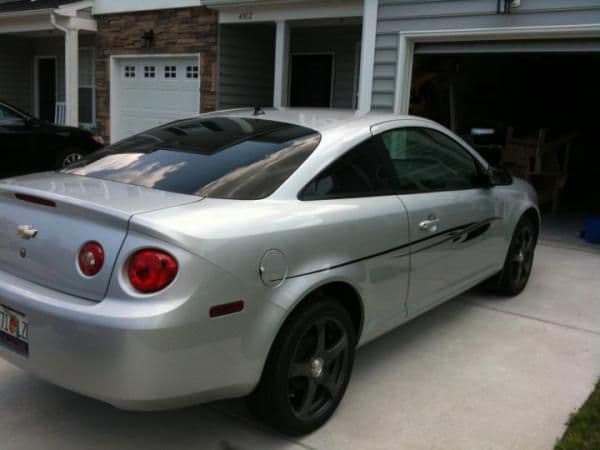
Let me know what you think of the finished product!!
like an R/C car, so I decided I will shave it and put in a shark fin.
Ok here we go.
Estimated time: 4-6 hrs.
Tool needed:
1. T-15 ( to take out the quarter panels)
2. T-20 (for the sun visors and clothing hooks)
3. T-30 (for the "OH CRAP" bar)
4. T-50 (for the top seatbelt bolts)
5. Socket wrench
6. Vise grips
7. Wire cutters
8. Wire stripers
9. Panel puller
10. Sanding block
11. Drill
12. Unibit
13. Orbital sander "optional"
Material needed:
1. Sand paper
150 grit (for orbital sander)
600 grit
1000 grit
2000 grit
2. Painters tape
3. Prep all
4. Bondo
5. Dupli Color perfect match paint
6. Peal-N-Stick tie down (can buy a lowes)
7. Zip Ties
8. Buffing compound
Part needed:
1. Metra 44-UA42 Amplified Roof Antenna
Steps:
1. With the vise grips grab the rubber surround on the old antenna and pull.
Might need to wiggle is as your pulling, but it will pop out.
2. After pulling the antenna out either cut the wire or pull with wire out of
the car through the hole you just made. I chose to cut it because there is a lot
of tie downs and is taped to other wires, I didn't want that hassle. I will pull
this wire later.
3. Using the painters tape, tape around the hole. Give yourself a 2'' square to
work with. Then use the 150 grit sand paper scuff up the hole to give the Bondo
something to grab onto. You might want to put some paper towels in the hole so
the Bondo doesn't fall threw.
4. Mix the Bondo with the hardener and put the Bondo over the hole. Use a
generous amount to ensure that you cover the entire hole. Once this has been
done move to the anterior of the car.
5. Take pull the necessary dash pieces off to pull out the stereo and the upper
passenger piece of the dash by the door. This will be the best place to run the
antenna wire and its power wire. Once you pull the upper passenger you will see
a hole the runs across the dash to the radio.
6. Take off the passenger A pillar using the T-15 bit and run the antenna wire
up through the dash. This may be a little tricky but it will go up threw.
7. Take out the radio and disconnect all the connectors. Run the antenna wire
across the hole in the dash as in step 5. For the power wire for the new antenna
tap into the accessory wire for the radio. Once this is complete hook everything
back up to the radio including the new antenna wire. Put all the dash pieces
back on.
8. Remove the sun visors, rear view mirror, clothing hooks with the T-20 bit,
remove the "OH CRAP" bar with the T-30 bit. There is a plastic tab in the rear
of the head liner that will need to come off using you panel puller. Be careful
not to break it. Then remove the dome light. There are 3 tabs to remove this,
and disconnect the wire. Remove the Top Bolt for the Front Seat Belts using the
T-50 bit (you can buy at advanced auto parts). Remove both A, top part of B, and
C pillars using the T-15 bit. There is a wire for the dome light that is taped
to the head liner just remove the tap. Pull out the head liner.
9. If you in the middle of the back seat and look up you will see a hole in the
roof support. This is where you will drill your hole. Using your drill and
unibit drill the hole from the inside. Just enough to get the hole started. Once
you get the hole started go outside the car and finish drilling. You may want to
drill the hole to 13/16''.
10. Take the Metra 44-UA42 Amplified Roof antenna and put on the rubber gasket
and take off the bolt and washer. Feed the wire connected to the antenna and
feed it down through the hole. Go back into the car and put the washer on first
and the bolt. Tighten the bolt just a little bit then go back out of the car to
align the antenna. Might need to do this a few times. Than tighten.
11. Connect the antenna wire and power wire to the connectors on the antenna.
12. Using Peal -N- Stick tie downs (us as many as you want), attach them to the
roofs along with zip ties and fasten the wire to them. There will be extra wire
and is up to you were you want to put that. I put the excess in the dash.
13. After all is cleaned up inside do the reverse of step 8.
14. The reason I did the Bondo first than the interior, is so the Bondo has
plenty of time to dry. Put some more painters tape around were you taped to
protect the paint when you're sanding. Using the 150 grit sand paper and orbital
sander, sand away at the Bondo will you are roughly close to being flat. Then
use the 600 grit to sand it smooth. If you feel any dips you may want to add
more Bondo and re-sand till its flat.
15. Once everything is smooth use prep all to remove wax or dirt from the car.
You paper towels of paper and surround the square you made of tap to protect the
car from over spray .Using very thin coats of paint, paint over the spot. Let
dry. Then use water and 1000 grit sand paper sand each coat. May need to do this
several times.
16. Once you are satisfied with the paint. Peel off the tape and tape a bigger
square. About 4-6" and wet sand with 1000 grit sand paper the pain to blend it
in with the car.
17. Once smooth use the 2000 grit sand paper and wet sand. Once that is done use
buffing compound to smoothen it even more.
i still need to do step 16 and 17. ill post more pix when im done.
after the rainy weather let up. i resanded every thing and this is the final result!!!!!!!!!!!!!!!!!!!!!!!!!!!!!
Let me know what you think of the finished product!!
Last edited by Ccadet02; Jul 17, 2011 at 06:14 PM.


Member
Joined: 03-20-11
Posts: 263
Likes: 0
From: Akron, OH
Instead of using just body filler. use fiberglass cloth and resin. One piece of cloth on the outside, one on the inside. Resin the whole thing and make sure they stay together. Then body filler, sand, prime, sand, paint, clear, wetsand, and polish. Eventually vibration is going to work that bondo plug loose and start cracking and lifting around the edges.

looks great, im glad you took the time to do this mod because i never regret since ive done it. i shaved my antenna because i took auto body and the oppurtunity was there, definately looks so much cleaner.


Thread Starter
New Member
Joined: 02-18-11
Posts: 111
Likes: 0
From: virginia
Instead of using just body filler. use fiberglass cloth and resin. One piece of cloth on the outside, one on the inside. Resin the whole thing and make sure they stay together. Then body filler, sand, prime, sand, paint, clear, wetsand, and polish. Eventually vibration is going to work that bondo plug loose and start cracking and lifting around the edges.
fiberglass was the first thought but i was worried that the fiber glass would be too thick on the paint and there was a support in the middle of the hole and would make it a pain in the butt so i just did the bondo. i will watch for cracks though.
Member
Joined: 03-20-11
Posts: 263
Likes: 0
From: Akron, OH
The fiberglass would sand down just the same as the filler would. Basically you're trying to make filler have some structural integrity, which it was never meant to do. Not trying to bust your *****, just providing insight for people who look up the thread. And to those who don't know, I run a shop and am I-CAR certified.


Thread Starter
New Member
Joined: 02-18-11
Posts: 111
Likes: 0
From: virginia
The fiberglass would sand down just the same as the filler would. Basically you're trying to make filler have some structural integrity, which it was never meant to do. Not trying to bust your *****, just providing insight for people who look up the thread. And to those who don't know, I run a shop and am I-CAR certified.
Thread Starter
New Member
Joined: 02-18-11
Posts: 111
Likes: 0
From: virginia
the first time i did it i only did around the hole and it left an in dent at the hole. so i redid it and i sanded to bare metal about an in. around the hole much better now. ill post the new pix tonight when the sun sets a lil.


Senior Member
iTrader: (1)
Joined: 02-08-08
Posts: 3,726
Likes: 0
From: Fayetteville/Linden, NC/Myrtle Beach, SC
One thing, why did you pull the antenna out and cut it? Why didn't you just undo the two bracket bolts in the trunk and pull it down, then you just have the thin rubber surround still in the trunk hole and can pull that from the top by hand... Since you had to custom wire things I guess it doesn't matter but pulling from the top could dent the surface around the hole...
Just a thought.
Just a thought.


Thread Starter
New Member
Joined: 02-18-11
Posts: 111
Likes: 0
From: virginia
One thing, why did you pull the antenna out and cut it? Why didn't you just undo the two bracket bolts in the trunk and pull it down, then you just have the thin rubber surround still in the trunk hole and can pull that from the top by hand... Since you had to custom wire things I guess it doesn't matter but pulling from the top could dent the surface around the hole...
Just a thought.
Just a thought.
Thread Starter
New Member
Joined: 02-18-11
Posts: 111
Likes: 0
From: virginia
Still need to repost the new pix. I redid the paint and the body work. After u used the buffing compound and waxed the car. A lot less noticeable. However. The duplicator perfect Match paint wasnt such a perfect Match. I do agree with going with pros. This is a temp. fix. I want to all stuff to the body and bumpers. I want to get it all painted at one time. Saves mine this way.


Thread Starter
New Member
Joined: 02-18-11
Posts: 111
Likes: 0
From: virginia
you dont see the hole any more just the color difference between the car paint and the duplicolor. i want to do more stuff to the body. i will get it all repainted when im done with it all.