


All Engines: How-to Install header and downpipe


^what happened was going back in the bolts would not line up right so the bottom of the bolts physically touched the header so i couldnt get a socket around them. 3 bolts did this. 1 i got tight and i left one half tight, ended up being fine no leaks.
Now i need to know if getting a retune for $150 is actually going to do anything or just be a waste of money with 1.75 primaries on my 2.2..........
Now i need to know if getting a retune for $150 is actually going to do anything or just be a waste of money with 1.75 primaries on my 2.2..........


did all my exhaust except for the header, getting to the bolts with the SAI pump in the way is a pain in the ass, we were running out of sunlight so we did the rest since everything was off. Should i just get the SAI pump out of the way next time?

New Member
Joined: 04-02-11
Posts: 32
Likes: 0
From: Brooklyn Park, MN
Got everything up and in. Headers were a bit of a hassle with only able to use the box end wrench for the top 4 nuts. Started up the car after and something just doesn't seem right. Cant seem to get a proper seal. Talked to a buddy and he thinks i should have a gasket for the headers... anyone have an idea? Also the car started sounding real putty when i hit the gas a little harder. Feel like im in an old pickup lol.
New Member
Joined: 04-02-11
Posts: 32
Likes: 0
From: Brooklyn Park, MN
After talking to ZZP and them going on about how you dont need a gasket for the headers. Finally said screw it and went to Remflex Gaskets and wow that thing is thick Just fixed my audio system, but I dont think ill be listening to the radio anytime soon. Now that I have full exhaust. Sound is pure bliss! ZZP is a pain to install but Totally worth it. cant wait for a tune. Thx for the help!
Just fixed my audio system, but I dont think ill be listening to the radio anytime soon. Now that I have full exhaust. Sound is pure bliss! ZZP is a pain to install but Totally worth it. cant wait for a tune. Thx for the help!

Thread Starter
Senior Member
Joined: 11-07-07
Posts: 1,012
Likes: 0
From: SL,UT

Senior Member
Joined: 10-09-06
Posts: 1,967
Likes: 0
From: Rochester NH
Sweet exactly what I did  bad mab header install was a success. I think I have to tighten down the oxygen sensor another half a turn. Just a small amount of gases coming out after the test drive.
bad mab header install was a success. I think I have to tighten down the oxygen sensor another half a turn. Just a small amount of gases coming out after the test drive.



Finally installed my badmab yesterday, question is, my 09 LAP stock exhaust manifold didn't have the O2 on the header but near it, as in I didn't have to remove O2 for removal or install, should I leave O2 in the same place? It's at the bottom right of the header if standing in front of the car
Thread Starter
Senior Member
Joined: 11-07-07
Posts: 1,012
Likes: 0
From: SL,UT
Finally installed my badmab yesterday, question is, my 09 LAP stock exhaust manifold didn't have the O2 on the header but near it, as in I didn't have to remove O2 for removal or install, should I leave O2 in the same place? It's at the bottom right of the header if standing in front of the car

New Member
Joined: 04-09-12
Posts: 20
Likes: 0
From: indiana
Interferance with the coolant line on driver side of engine
http://i107.photobucket.com/albums/m...Header/061.jpg
I installed my header yesterday and noticed that the coolant port and the header tube on the drive side seems to be really close. the picture above is from the write up but just to give you guys an idea of what im talking about. I was wondering if anyone else has run into this or know of what im talking about and if there is something that should be done. I had thoughts of maybe using header wrap on just that tube to keep some heat away.
thanks for the input and help
I installed my header yesterday and noticed that the coolant port and the header tube on the drive side seems to be really close. the picture above is from the write up but just to give you guys an idea of what im talking about. I was wondering if anyone else has run into this or know of what im talking about and if there is something that should be done. I had thoughts of maybe using header wrap on just that tube to keep some heat away.
thanks for the input and help

Member
Joined: 08-31-13
Posts: 231
Likes: 0
From: Quebec, Canada
i'm just waiting for my OBX to come in. i bought it with the dp from frankc90(forum member), great guy to deal with. i originally searched this on my iphone and only got the first 2 steps. so, logged on to my pc. this forum is so much better on pc than on iphone.
anyways.this how to is simply awesome. very well done. even though it was done years ago.i have done this kind of stuff before, but on V8's. so i wanted to know the specifics. no question has been left unanswered.
again, great job. i'll repost after the job is done.


anyways.this how to is simply awesome. very well done. even though it was done years ago.i have done this kind of stuff before, but on V8's. so i wanted to know the specifics. no question has been left unanswered.
again, great job. i'll repost after the job is done.
Member
Joined: 08-31-13
Posts: 231
Likes: 0
From: Quebec, Canada
Header is here. Is it that much of an improvement to do the inside flange welds? Also on the inside of the drivers side of the head flange, there is a empty space running from the outlet. What's that?

I see that at least one person had luck doing this install without even lifting the car! I'm hoping this is possible because my friend who has a lift in his garage is a wee bit flaky and I don't have much patience for that! lol





Great directions but it was still a horrible job. My car is a daily driver with 180,000km on it. Doesn't help that I drive in Toronto where instead of using salt they spray brine so you can watch your car rust in real-time.
Had to cut the bottom bolt holding on the top heat shield as well as the two stud's connecting the dp to the cat back. Bottom heat shield was missing from when some one put in a new flex pipe for me a few years ago.
A spark plug ratchet was a big help for getting at some of the more difficult bolts on the header.
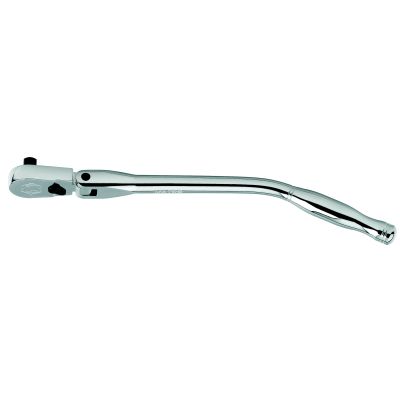 That and my friends 1/4" torque wrench made the install part of this a cake walk.
Put in a badmab header and a 2.5" catted zzp downpipe. Feels a little stronger but that may just be my imagination because it's a little deeper sounding.
Had to cut the bottom bolt holding on the top heat shield as well as the two stud's connecting the dp to the cat back. Bottom heat shield was missing from when some one put in a new flex pipe for me a few years ago.
A spark plug ratchet was a big help for getting at some of the more difficult bolts on the header.
That and my friends 1/4" torque wrench made the install part of this a cake walk.Put in a badmab header and a 2.5" catted zzp downpipe. Feels a little stronger but that may just be my imagination because it's a little deeper sounding.

Member
Joined: 04-05-14
Posts: 347
Likes: 1
From: lake village
This guide helped alot. I was able to bring my long tube in from the bottom with some wiggling I got into place. One stud broke but after closer examination it appears that it was broken the whole time from the factory. What do u guys think for now I don't ha e the tools to fix but in a few months I'll get that fixed along with my new clutch

New Member
Joined: 05-10-15
Posts: 32
Likes: 0
From: Long beach
TOOLS NEEDED
10MM RATCHET WRENCH
13MM DEEP SOCKET
14MM DEEP SOCKET & BOX END WRENCH
15MM DEEP SOCKET
13MM SOCKET & OPEN BOX END WRENCH
15MM SOCKET & OPEN BOX END WRENCH
JACK AND STANDS, OR RAMPS (or a car lift if your lucky)
RATCHET AND 6" & 3" EXTENSION
FLASHLIGHT
PENETRATING FLUID
O2 SENSOR SOCKET, OR 7/8 BOX END WRENCH
(Step 1)
Jack up the car and put on jack stands and make sure care is secure. Let the car cool down. (If you have a strut bar, this is a good time to remove it. Makes install much easier)
(Step 2)
Remove top and bottom heat shields. (Top = 3 13MM bolts) (Bottom = 1 15MM bolt & 10MM bolt) Remove the 10mm bolt from the top.
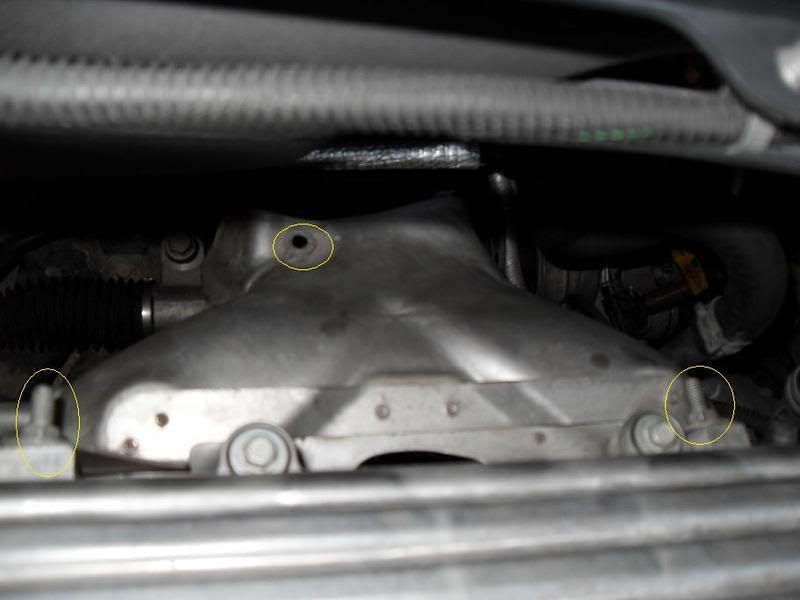
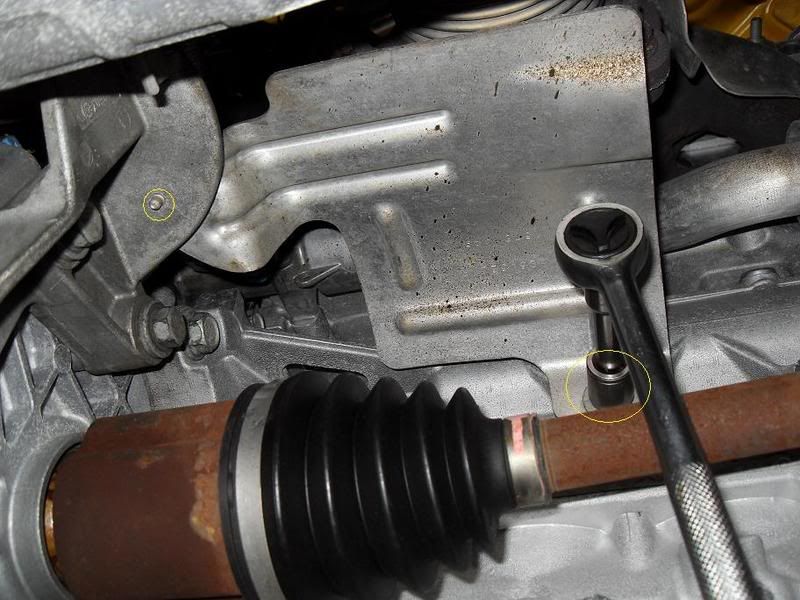
(Step 3)
Spray down all 10 bolts on the manifold, the 3 bolts on the manifold/downpipe and the 2 bolts on the downpipe/catback with penetrating fluid. (This will make this whole process much easier!)
(Step 4)
Unclip the oxygen sensors, There is a little blue tab that has to be pushed out which acts like a lock holding the 2 snaps together. The lower clip is to the downpipe sensor. The upper one is to the one on the manifold. (removing the downpipe makes this much easier, even if your just installing the header) Do not remove the sensor from the manifold yet. This will be done after the manifold is out.
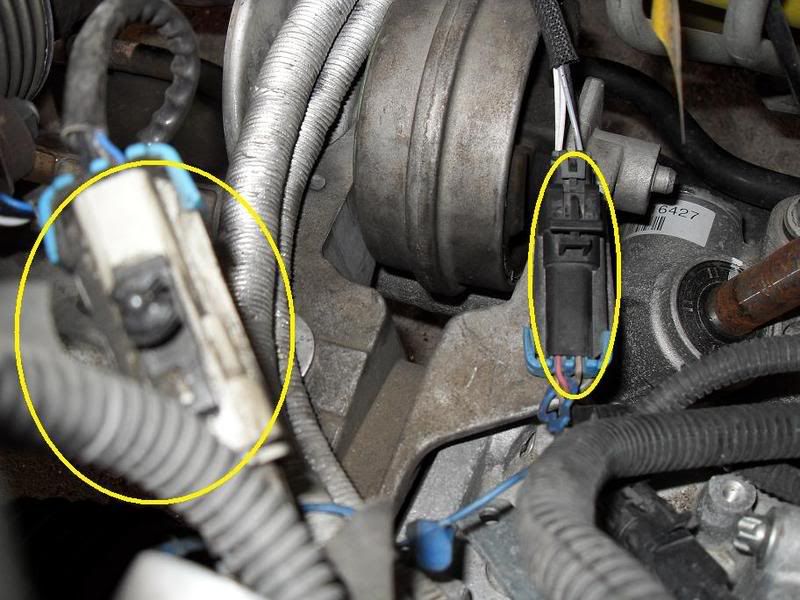
(Step 5)
Remove the downpipe, Starting with the 2 rear 14MM bolts. You will need a wrench for the nut and the socket for the bolt.
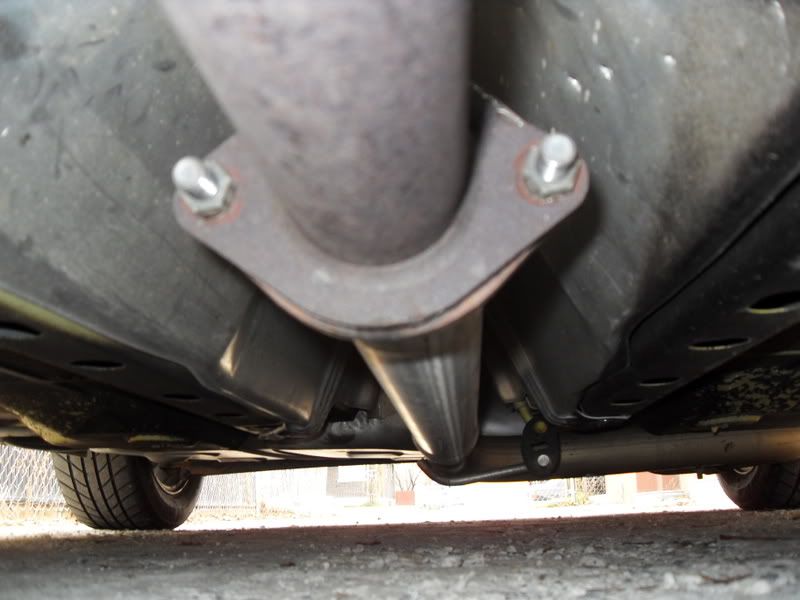
Then use your 15 MM deep socket to remove the front 3 15MM nuts from the manifold/downpipe
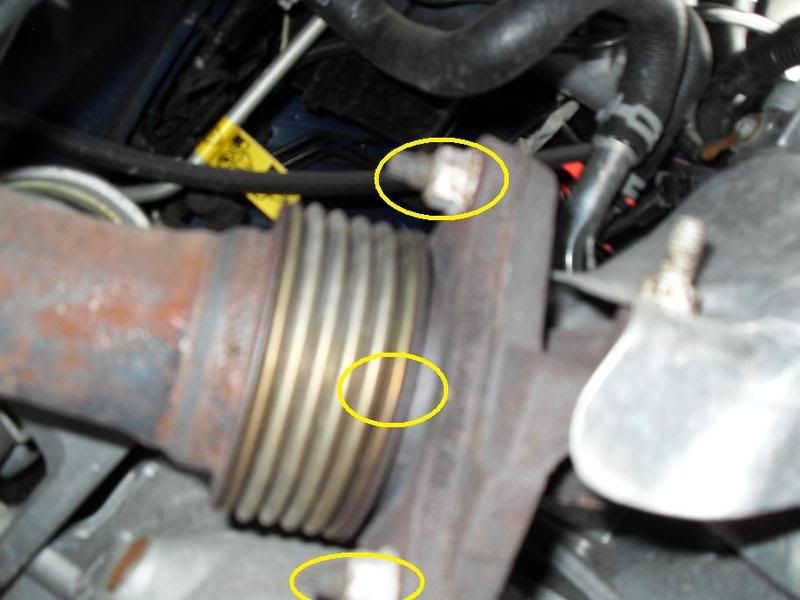
Once you have the downpipe off the car, place it aside.
(Step 6)
Removing the manifold, There are 10, 13MM nuts holding on the manifold that need to be removed. All but the 3 middle bottom nuts can be removed from the top. The others are easier to remove from the bottom. (ON AUTO's MOST OF THE WORK CAN BE DONE FROM THE TOP) The very middle bottom nut is a PITA! You will need a long extension and go at it above the manifold but still from under the car.
(Here is a pic that gives you an idea of the nuts to be removed. Sorry I do not have any pics with the stock manifold on)

The nut circled is the PITA one
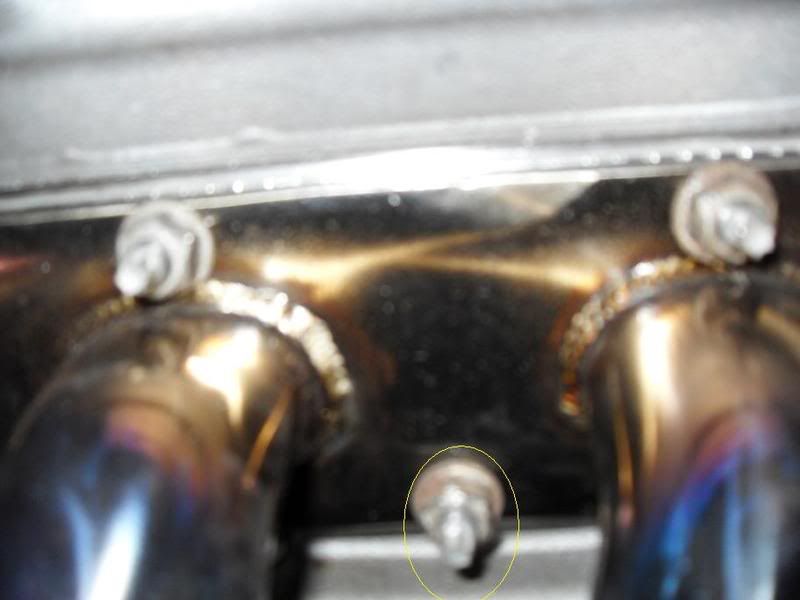
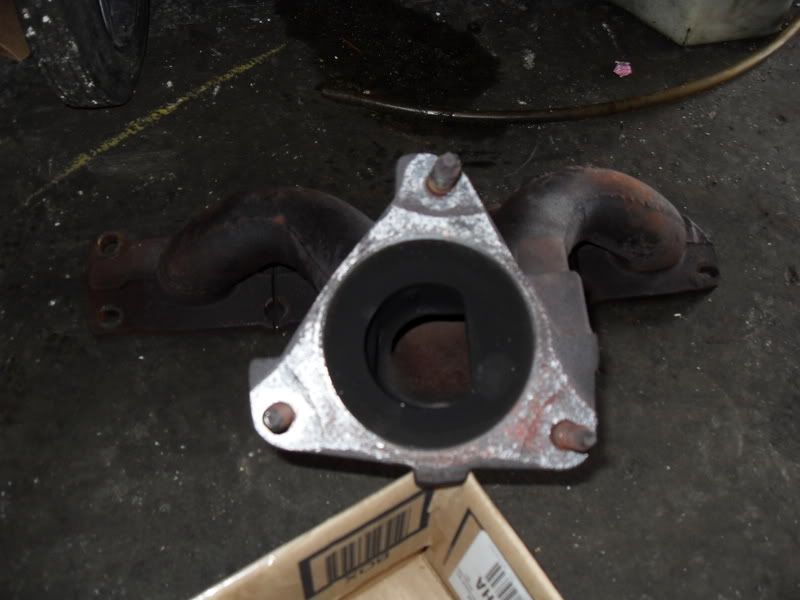
Once all nuts are removed, remove stock manifold and gasket. Inspect the head to be sure the area is clean and there are no obstructions that could cause leaks. Here is a pic of the manifold removed. (Very restrictive)
(Step 7)
Installing the header, Place the new gasket and the header on the head bolts and finger tighten down all 10, of the 13MM nuts so the header sits in place like so.. (DO NOT USE ANY KIND OF GASKET SEALER!)
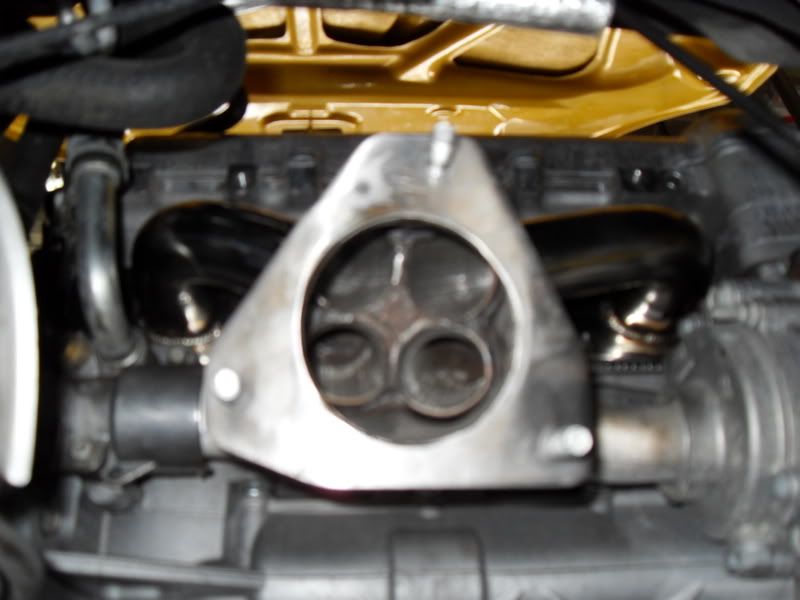
Go in order of the diagram below, torquing all 10 nuts down to 106in/lbs, followed by a 2nd pass, again in order, and make sure they're all at 106in/lbs the 89in/lbs is for the exhaust shield studs.

(Step 8 )
Remove oxygen sensor from the stock manifold, Using either an O2 sensor socket (A 7/8 deep socket with a slit down the side for the wires) or simply a 7/8 box end wrench. Next, take the sensor and screw it into the bung on the header. And give it just a little "snug" with the 7/8 wrench.
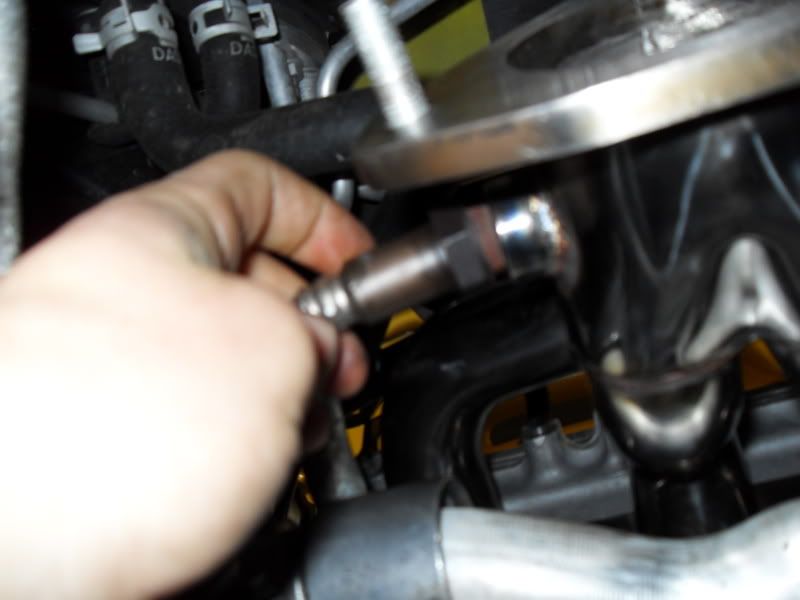
(If installing a new downpipe, Repeat this step for the O2 sensor on the downpipe.)
(STEP 9)
Installing the downpipe, This particular header came with 3 double threaded bolts and 3 nuts like so..
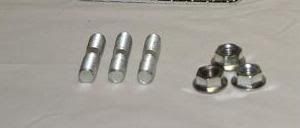
You will want to screw these bolts into the bottom flange of the header so there is only about 1/8 inch of threads before the middle non threaded part of the bolt.
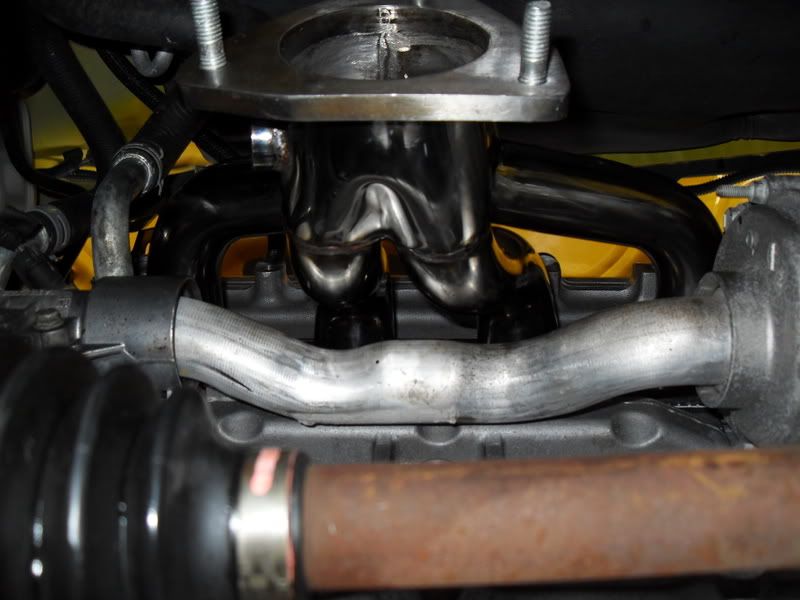
Next, pair the downpipe and header flanges together along with the new gasket. Finger tighten on all 3 of the 15MM nuts onto the bolts, and then tighten them with a ratchet. (Do not over tighten!) Be sure there are threads exposed on both sides, the header and beyond the nuts like this.
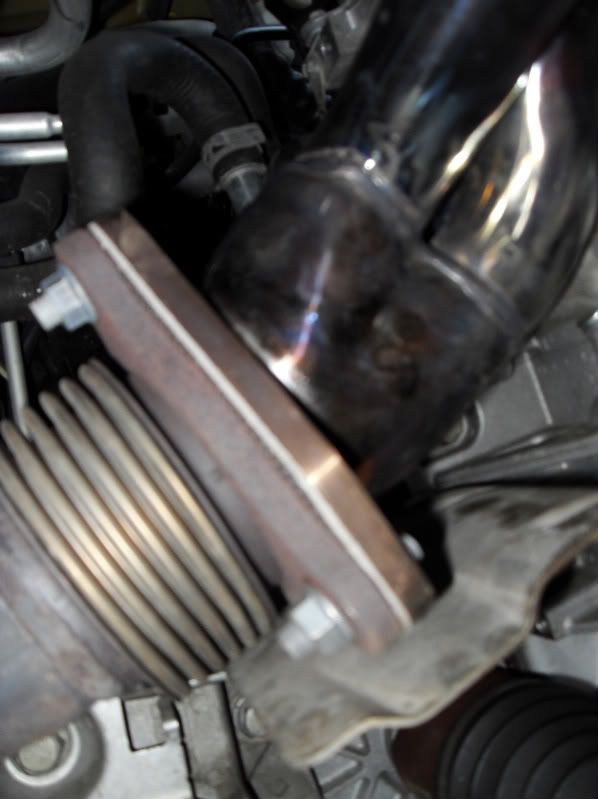
Once those bolts are tightened on, the rear downpipe flange should be pretty much mated up with the flange for the rest of the exhaust. Reinstall the 2, 14MM bolts.
(Step 10) Reclip both sensors, and reinstall the bottom heat shield. The top heat shield will take a little hand bending and manipulating but it can be reinstalled also, with the exception of one bolt.
Now start the car and check for leaks. If there are none, Go rip down the street and enjoy your new header!
10MM RATCHET WRENCH
13MM DEEP SOCKET
14MM DEEP SOCKET & BOX END WRENCH
15MM DEEP SOCKET
13MM SOCKET & OPEN BOX END WRENCH
15MM SOCKET & OPEN BOX END WRENCH
JACK AND STANDS, OR RAMPS (or a car lift if your lucky)
RATCHET AND 6" & 3" EXTENSION
FLASHLIGHT
PENETRATING FLUID
O2 SENSOR SOCKET, OR 7/8 BOX END WRENCH
(Step 1)
Jack up the car and put on jack stands and make sure care is secure. Let the car cool down. (If you have a strut bar, this is a good time to remove it. Makes install much easier)
(Step 2)
Remove top and bottom heat shields. (Top = 3 13MM bolts) (Bottom = 1 15MM bolt & 10MM bolt) Remove the 10mm bolt from the top.
(Step 3)
Spray down all 10 bolts on the manifold, the 3 bolts on the manifold/downpipe and the 2 bolts on the downpipe/catback with penetrating fluid. (This will make this whole process much easier!)
(Step 4)
Unclip the oxygen sensors, There is a little blue tab that has to be pushed out which acts like a lock holding the 2 snaps together. The lower clip is to the downpipe sensor. The upper one is to the one on the manifold. (removing the downpipe makes this much easier, even if your just installing the header) Do not remove the sensor from the manifold yet. This will be done after the manifold is out.
(Step 5)
Remove the downpipe, Starting with the 2 rear 14MM bolts. You will need a wrench for the nut and the socket for the bolt.
Then use your 15 MM deep socket to remove the front 3 15MM nuts from the manifold/downpipe
Once you have the downpipe off the car, place it aside.
(Step 6)
Removing the manifold, There are 10, 13MM nuts holding on the manifold that need to be removed. All but the 3 middle bottom nuts can be removed from the top. The others are easier to remove from the bottom. (ON AUTO's MOST OF THE WORK CAN BE DONE FROM THE TOP) The very middle bottom nut is a PITA! You will need a long extension and go at it above the manifold but still from under the car.
(Here is a pic that gives you an idea of the nuts to be removed. Sorry I do not have any pics with the stock manifold on)
The nut circled is the PITA one
Once all nuts are removed, remove stock manifold and gasket. Inspect the head to be sure the area is clean and there are no obstructions that could cause leaks. Here is a pic of the manifold removed. (Very restrictive)
(Step 7)
Installing the header, Place the new gasket and the header on the head bolts and finger tighten down all 10, of the 13MM nuts so the header sits in place like so.. (DO NOT USE ANY KIND OF GASKET SEALER!)
Go in order of the diagram below, torquing all 10 nuts down to 106in/lbs, followed by a 2nd pass, again in order, and make sure they're all at 106in/lbs
the 89in/lbs is for the exhaust shield studs.(Step 8 )
Remove oxygen sensor from the stock manifold, Using either an O2 sensor socket (A 7/8 deep socket with a slit down the side for the wires) or simply a 7/8 box end wrench. Next, take the sensor and screw it into the bung on the header. And give it just a little "snug" with the 7/8 wrench.
(If installing a new downpipe, Repeat this step for the O2 sensor on the downpipe.)
(STEP 9)
Installing the downpipe, This particular header came with 3 double threaded bolts and 3 nuts like so..
You will want to screw these bolts into the bottom flange of the header so there is only about 1/8 inch of threads before the middle non threaded part of the bolt.
Next, pair the downpipe and header flanges together along with the new gasket. Finger tighten on all 3 of the 15MM nuts onto the bolts, and then tighten them with a ratchet. (Do not over tighten!) Be sure there are threads exposed on both sides, the header and beyond the nuts like this.
Once those bolts are tightened on, the rear downpipe flange should be pretty much mated up with the flange for the rest of the exhaust. Reinstall the 2, 14MM bolts.
(Step 10) Reclip both sensors, and reinstall the bottom heat shield. The top heat shield will take a little hand bending and manipulating but it can be reinstalled also, with the exception of one bolt.
Now start the car and check for leaks. If there are none, Go rip down the street and enjoy your new header!
Please let me know thanks again !!