
Interior: How to install IRL Recaros in a Cobalt

How to install IRL Recaros in a Cobalt
Hey guys, so I picked up some pretty beat up redline recaros for a really good price the other day. I wasn't exactly sure how the weight sensor and seatbelt sensors were going to work and I couldn't find anything online so I decided to take pictures to show how to. Before I start I must say I bought them very dirty, but with just a little tuff stuff (walmart) they came out looking great.
Tools Needed:
15mm Socket Wrench
13mm
Flathead Screwdriver
Rubber Mallet
Pliers
T20 Allen Wrench (optional
Drill
Electrical Tape
Solder and Soldering Iron (optional but very recommended)
Wire Caps (optional)
18 Gauge wire
Tuff Stuff (optional)
Meguiars Leather Clean/ Conditioner (optional)
First I started by cleaning the Recaros. Make sure to use the tuff stuff only on the cloth parts. Spray it on, let it sit for 30 seconds then rub it in with a brush. Then wipe it dry with a clean cloth, this last part is what really gets the seat clean. After doing each seat I used the leather conditioner on each.
BEFORE


AFTER


It helps to do the rear seats after you remove the front seats, then installing the front seats. The order doesn't really matter though, it can be done in any order.
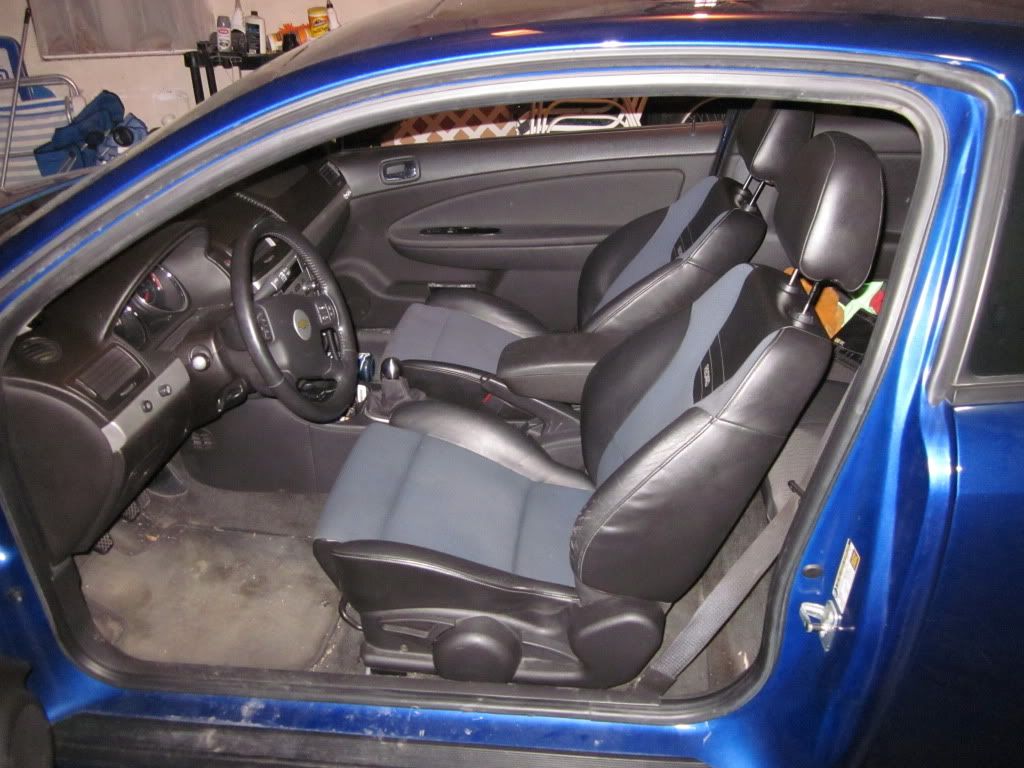
Now comes the fun part. First unbolt the stock seats by the 2 15mm bolts in back of each seat. Push the seat forward then they should just pop out. Remember on the driver seat the seat belt sensor must be disconnected and on the passenger side the entire harness must be disconnected from the car. Here is the picture of the passenger harness for reference.

Before we get to the passenger seat first you can do the driver seat, being very easy. All work is done from under the seats. You must cut the stock connector from the car's harness, connect the red wire to one of the irl's seat belt sensor wires, and the black to the other. There is no indication on what wire is which for the IRL therefore simply guess and check here. I recommend to solder the wires after testing then tape over the wire.
After the drivers seat is installed you must remove the weight sensor from the underside stock passenger seat. In the picture it is the white plastic bag that is covered by the blue foam, and the thick black wire leads to. This is actually an air hose so make sure not to puncture or cut it.

The wire tensioner must be disconnected to removed the weight sensor air bag. there are four spring in each corner that are holding the square metal piece against the foam. Use the screw driver to disconnect the springs. There are also two green plastic rivets going thru the seat bracket and weight sensor air bag. Pop these two rivets out then gently fold the weight sensor a corner to get it out of the seat. After the weight sensor air bag is out, drill out the metal rivets holding the weight sensor controller to the bottom of the seat.

Once this is all done you should have these parts off the stock seat, this is all you will need.
weight sensor air bag with covers
metal wire tensioner
passenger seat harness
weight sensor controller
4 springs

Re assemble everything from the stock seat back into the underside of the IRL recaro passenger seat. The weight sensor is somewhat hard to get into the IRL but with patience it is possible. The metal wire tensioner is the biggest pain in the ass, but I found if you do 3 springs then use pliers and a screw driver you can get the third spring to latch to the metal wire tensioner. Make sure not to pinch the air line on the metal wires also. Here is the weight sensor air bag installed.

Then attact the weight sensor controller and harness to the seat (I used zip ties) and connect the wires. My seats had the passenger side seat belt sensor missing, so if you just put caps on the sensor wires (same wires as the drivers side seat belt sensor) then the pcm thinks the seat belt is always hooked up. Here is a picture of the entire assembly attached to the seat.

Plug in the harness to the engine and you are good to go! Here are my seats installed with no airbag warning lights or seat belt lights


Next is the backseat, this is probably easier with the fronts out but doable either way. First you must unbolt the four 15mm bolts holding the upper rear seat bracket to the car. Once these are unbolted you can take out the bottom rear bench by pushing in on the bench then pulling up and out. No bolts or rivets hold the rear bench in. After this is done you can take out the rear upper seat by pushing in on one side of the bracket, pulling up on the other side. Once both rear seats are out it will look like this.

Here is a close up of the brackets that hold the rear bench in for reference to see how the seats come out.

After the seats are in you can remove the headrests or you can remove them before. This is done by pulling up on the plastic covers then removing the 13 mm bolts holding them done. The metal brackets under the plastic covers must be reused to hold the plastic cover so they must be freed from the headrests. I did this by pulling on the headrest bars until they didn't move any more from the metal bracket then used a rubber mallet to free the bracket from the headrest. After they are removed bolt the metal brackets back down and clip the plastic covers to them. Sorry but no pictures of this part, it is pretty straightforward. And boom, your done! Here is a picture of the finished work.


Hope this helps someone! Any questions just ask or pm me. Also don't make fun of my grammar im an engineer not an english major

Tools Needed:
15mm Socket Wrench
13mm
Flathead Screwdriver
Rubber Mallet
Pliers
T20 Allen Wrench (optional
Drill
Electrical Tape
Solder and Soldering Iron (optional but very recommended)
Wire Caps (optional)
18 Gauge wire
Tuff Stuff (optional)
Meguiars Leather Clean/ Conditioner (optional)
First I started by cleaning the Recaros. Make sure to use the tuff stuff only on the cloth parts. Spray it on, let it sit for 30 seconds then rub it in with a brush. Then wipe it dry with a clean cloth, this last part is what really gets the seat clean. After doing each seat I used the leather conditioner on each.
BEFORE
AFTER
It helps to do the rear seats after you remove the front seats, then installing the front seats. The order doesn't really matter though, it can be done in any order.
Now comes the fun part. First unbolt the stock seats by the 2 15mm bolts in back of each seat. Push the seat forward then they should just pop out. Remember on the driver seat the seat belt sensor must be disconnected and on the passenger side the entire harness must be disconnected from the car. Here is the picture of the passenger harness for reference.
Before we get to the passenger seat first you can do the driver seat, being very easy. All work is done from under the seats. You must cut the stock connector from the car's harness, connect the red wire to one of the irl's seat belt sensor wires, and the black to the other. There is no indication on what wire is which for the IRL therefore simply guess and check here. I recommend to solder the wires after testing then tape over the wire.
After the drivers seat is installed you must remove the weight sensor from the underside stock passenger seat. In the picture it is the white plastic bag that is covered by the blue foam, and the thick black wire leads to. This is actually an air hose so make sure not to puncture or cut it.
The wire tensioner must be disconnected to removed the weight sensor air bag. there are four spring in each corner that are holding the square metal piece against the foam. Use the screw driver to disconnect the springs. There are also two green plastic rivets going thru the seat bracket and weight sensor air bag. Pop these two rivets out then gently fold the weight sensor a corner to get it out of the seat. After the weight sensor air bag is out, drill out the metal rivets holding the weight sensor controller to the bottom of the seat.
Once this is all done you should have these parts off the stock seat, this is all you will need.
weight sensor air bag with covers
metal wire tensioner
passenger seat harness
weight sensor controller
4 springs
Re assemble everything from the stock seat back into the underside of the IRL recaro passenger seat. The weight sensor is somewhat hard to get into the IRL but with patience it is possible. The metal wire tensioner is the biggest pain in the ass, but I found if you do 3 springs then use pliers and a screw driver you can get the third spring to latch to the metal wire tensioner. Make sure not to pinch the air line on the metal wires also. Here is the weight sensor air bag installed.
Then attact the weight sensor controller and harness to the seat (I used zip ties) and connect the wires. My seats had the passenger side seat belt sensor missing, so if you just put caps on the sensor wires (same wires as the drivers side seat belt sensor) then the pcm thinks the seat belt is always hooked up. Here is a picture of the entire assembly attached to the seat.
Plug in the harness to the engine and you are good to go! Here are my seats installed with no airbag warning lights or seat belt lights
Next is the backseat, this is probably easier with the fronts out but doable either way. First you must unbolt the four 15mm bolts holding the upper rear seat bracket to the car. Once these are unbolted you can take out the bottom rear bench by pushing in on the bench then pulling up and out. No bolts or rivets hold the rear bench in. After this is done you can take out the rear upper seat by pushing in on one side of the bracket, pulling up on the other side. Once both rear seats are out it will look like this.
Here is a close up of the brackets that hold the rear bench in for reference to see how the seats come out.
After the seats are in you can remove the headrests or you can remove them before. This is done by pulling up on the plastic covers then removing the 13 mm bolts holding them done. The metal brackets under the plastic covers must be reused to hold the plastic cover so they must be freed from the headrests. I did this by pulling on the headrest bars until they didn't move any more from the metal bracket then used a rubber mallet to free the bracket from the headrest. After they are removed bolt the metal brackets back down and clip the plastic covers to them. Sorry but no pictures of this part, it is pretty straightforward. And boom, your done! Here is a picture of the finished work.
Hope this helps someone! Any questions just ask or pm me. Also don't make fun of my grammar im an engineer not an english major
Last edited by noorj; Mar 15, 2012 at 08:29 PM.


Thanks man
how the **** did u remove that without taking the top of the seat off? i just removed mine from my tc seats today but took off the top and unscrewed that metal bar (easier for removing only but not really if ur putting them in the irl seats)
You mean the actual weight sensor air bag? it has a cut in the middle bottom of it so it can be folded at those two corners, then just pull it out. It takes a little but isnt too hard.


GREAT write up!! i did the SAME thing i have the black and white checkered irl recaro's. my buddy helped me get the weight sensor in. those springs are suchhh a pain! we shoved the weightsensor up there while that thing was still held in with the springs! deff one of the best mods ive done for my car!
i also haad to swap the seatbelt buckles from my stock seats to the recaros because the connector at the end of the buckle didnt match the floor harness.
so i just unbolted the buckle from my stock seat ( needed a friend and wd40 to get the bolts loose) and put them on the recaros
i also haad to swap the seatbelt buckles from my stock seats to the recaros because the connector at the end of the buckle didnt match the floor harness.
so i just unbolted the buckle from my stock seat ( needed a friend and wd40 to get the bolts loose) and put them on the recaros
i didnt remove the spring thing when puting the weight sensor on. i just shoved the pad up under the grille thing. was so anoying. used a huge bar and 2 other friends to get it done.
taking the springs off the stock seat was the hardest part. just got my seats detailed they look so much better
taking the springs off the stock seat was the hardest part. just got my seats detailed they look so much better

Thread
Thread Starter
Forum
Replies
Last Post
Turbo Johnny
2.0L LNF Performance Tech
18
Feb 21, 2019 09:41 AM
Decepticon06ss/sc
New Members Check In!!
19
Oct 16, 2015 09:24 PM
RedLined
2.0L LSJ Performance Tech
2
Sep 9, 2015 09:11 PM

