
Appearance: How to Make & Install Lower Grill

Thread Starter
Senior Member
Joined: 10-08-05
Posts: 5,295
Likes: 0
From: AZ
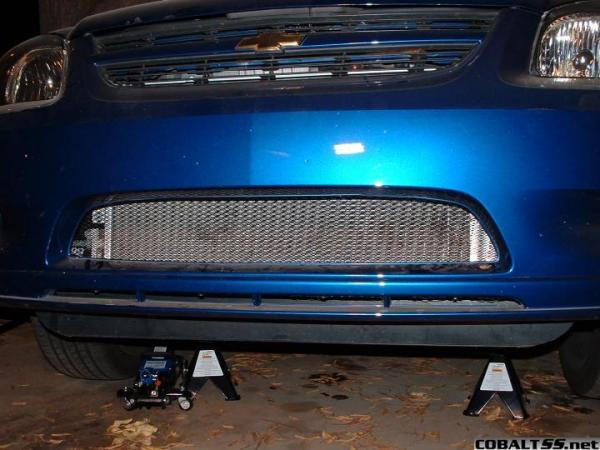
How to Make & Install Lower Grill
Ok there have been a few posts asking how to do this, well here is one answer tha does not require any drilling and is not visibly held in place.
After reading about small critters causing upwards of $2,000 in damage by running out infront of our cars, I decided to try and prevent/reduce this expense.
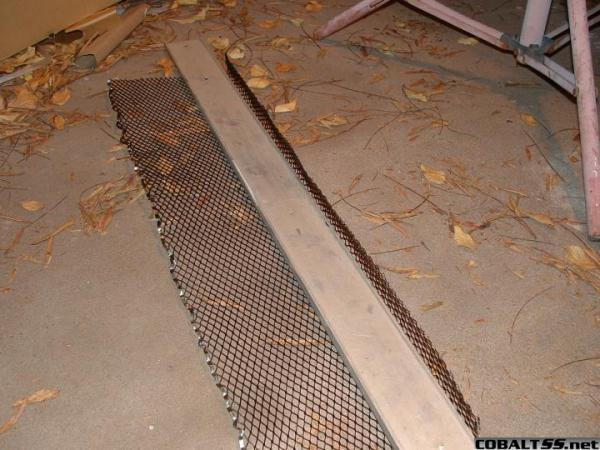
As done by others, I bought a sheet of metal lathe at a building materials supply. ( Home Depot, Lowes, some Ace Hardwares, etc.) It is used for applying stucco to homes, so look in that general area. I paid about $6 for a 2.5' x 8' sheet.
I cut out a piece about 10" x 33", that leaves a little extra room for fitment. Look at the mesh and decide which way you want it to face. One way is less visible from above than the other.
I first made a bend 2" wide across the longest side. This both makes the mesh more rigid and gives you a lip to fasten it with. I used a straight edge to make the bend.
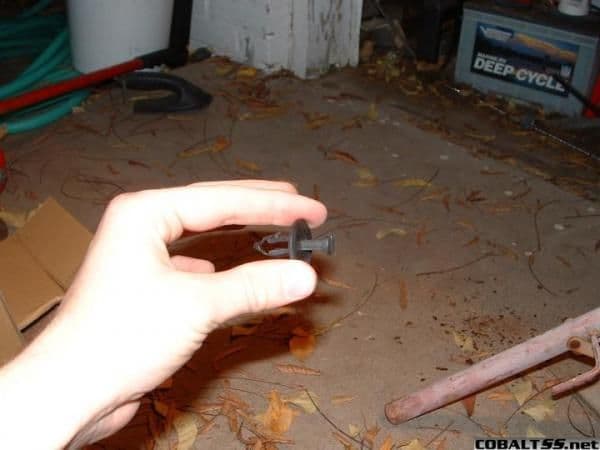
Next I took out the 6 retaining clips out and fitted the grill for the next bend.


These clips don't just pull out. They have a lock to them. Took me a while to figure that out.
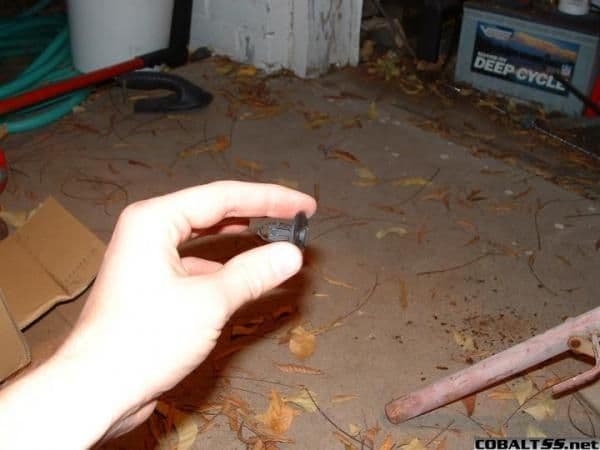
Trick is to pull out the center and that unlocks the clip to be removed.
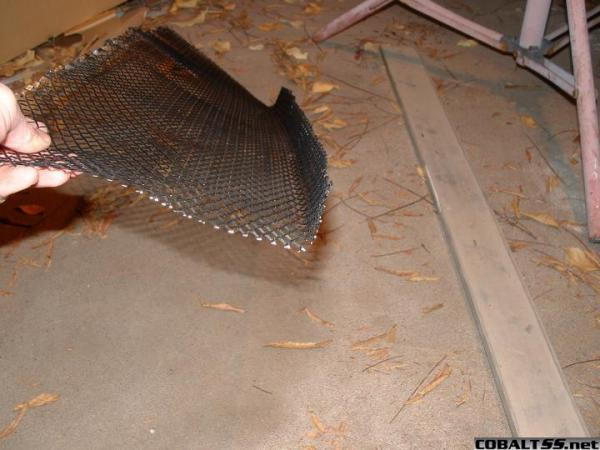
Put the mesh in place with the two larger top clips (you have to make bigger holes for them to fit throught the mesh) and mark where the mesh needs to be bent for the lower set of clips. Then using the straight edge bent it the opposite direction of the first bend.
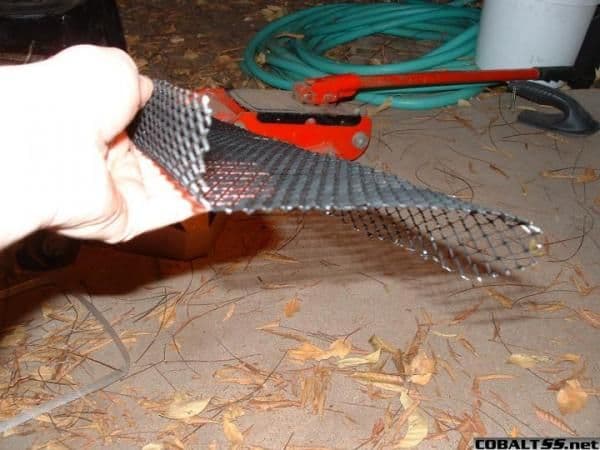
Try fitting the mesh in place and trim where needed.
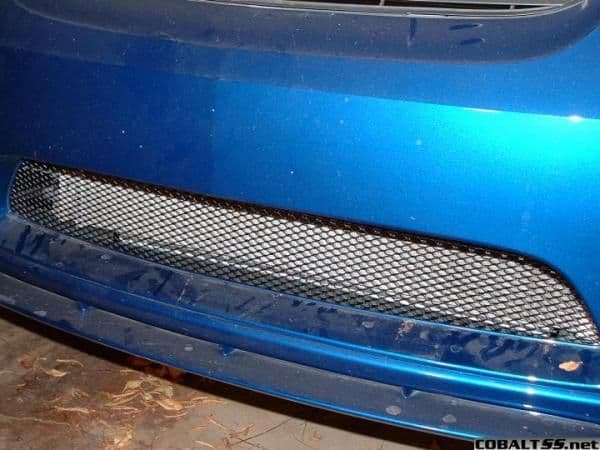
Next I sprayed mine with a black rubber sealant to prevent scratching the paint where it touched. (I know that no one will ever see the scratches, but I will know that they are there. I'm OCD ok)
Lastly place the mesh and replace the clips. Voila you have a nice looking custom mesh grill. You can paint it or leave it bare metal, to each their own. If painting I would recomend preping the mesh by cleaning it with a TSP (TriSodium Phosphate) solution and possibly applying a primer. The TSP will remove the oil that is on it from the factory and will etch the metal allowing the paint to bond better. (I worked at a hardware store for 5 yrs in the paint department, lets just say I picked up few tricks of the trade)
Materials:
Metal Lathe (aka Mesh)
TSP-TriSodium Phosphate (optional)
Spray Paint (optional)
Rubber Sealant Spray (optional)
Time & Patients ( it takes a little while and is a bit teadious)
Hope this helps others.
After reading about small critters causing upwards of $2,000 in damage by running out infront of our cars, I decided to try and prevent/reduce this expense.
As done by others, I bought a sheet of metal lathe at a building materials supply. ( Home Depot, Lowes, some Ace Hardwares, etc.) It is used for applying stucco to homes, so look in that general area. I paid about $6 for a 2.5' x 8' sheet.
I cut out a piece about 10" x 33", that leaves a little extra room for fitment. Look at the mesh and decide which way you want it to face. One way is less visible from above than the other.
I first made a bend 2" wide across the longest side. This both makes the mesh more rigid and gives you a lip to fasten it with. I used a straight edge to make the bend.
Next I took out the 6 retaining clips out and fitted the grill for the next bend.
These clips don't just pull out. They have a lock to them. Took me a while to figure that out.
Trick is to pull out the center and that unlocks the clip to be removed.
Put the mesh in place with the two larger top clips (you have to make bigger holes for them to fit throught the mesh) and mark where the mesh needs to be bent for the lower set of clips. Then using the straight edge bent it the opposite direction of the first bend.
Try fitting the mesh in place and trim where needed.
Next I sprayed mine with a black rubber sealant to prevent scratching the paint where it touched. (I know that no one will ever see the scratches, but I will know that they are there. I'm OCD ok)
Lastly place the mesh and replace the clips. Voila you have a nice looking custom mesh grill. You can paint it or leave it bare metal, to each their own. If painting I would recomend preping the mesh by cleaning it with a TSP (TriSodium Phosphate) solution and possibly applying a primer. The TSP will remove the oil that is on it from the factory and will etch the metal allowing the paint to bond better. (I worked at a hardware store for 5 yrs in the paint department, lets just say I picked up few tricks of the trade)
Materials:
Metal Lathe (aka Mesh)
TSP-TriSodium Phosphate (optional)
Spray Paint (optional)
Rubber Sealant Spray (optional)
Time & Patients ( it takes a little while and is a bit teadious)
Hope this helps others.
Last edited by TommyP; Oct 3, 2012 at 01:04 PM.

Thread Starter
Senior Member
Joined: 10-08-05
Posts: 5,295
Likes: 0
From: AZ
The mesh is aluminum I believe (non-magnetic and pretty light). If you mean the big piece of metal in the second pic, that was an aluminum straight edge I used to make the bend...well um straight. I only showed it to demo how I bent the mesh.


Senior Member
Joined: 11-15-05
Posts: 993
Likes: 0
From: Egg Harbor Township, NJ
good post. i was planning on doing the same thing...except by me we just called it chicken wire. we used it a lot at the body shop for "custom grills" for all the honda's that came in. either way though, it'll help prevent crap from hitting the condensor

 Glad to see you took the time to do it right
Senior Member
Joined: 07-17-05
Posts: 2,375
Likes: 0
From: Western Massachusetts
I think somebody should make a how to on how to wash your car cobalt supercharger 
But seriously tho. great how to. its about time somebody made one. I love the look you got w/ it .
ryan
But seriously tho. great how to. its about time somebody made one. I love the look you got w/ it .
ryan
Thread Starter
Senior Member
Joined: 10-08-05
Posts: 5,295
Likes: 0
From: AZ
Originally Posted by Cobalt30
I think somebody should make a how to on how to wash your car cobalt supercharger
I wanted to get the grill done before I left for California tomorrow morning. I could just see a jack rabbit running out in front of me on the highway and being stranded in the middle of nowhere. So it came down to being clean or being protected. Ok so it probably won't hold when I hit it at 80 mph, but it is something to make me think it's ok.
Thread Starter
Senior Member
Joined: 10-08-05
Posts: 5,295
Likes: 0
From: AZ
All right I'm back from Cali and the grill with stood 125 mph plus, and not a sign of temp change. There was a point through the windmills where the wind was against me. I was doing about 80mph at the time and wind was louder than I have ever heard in my car. When sifting from 4 to 5 it felt like I was hitting the brakes, but when I reached my destination the grill was still intact.
Also I now have a How To Wash Your Car: Drive out of town where it is raining and then come back, out running the storm.
Also I now have a How To Wash Your Car: Drive out of town where it is raining and then come back, out running the storm.

Senior Member
Joined: 02-25-06
Posts: 2,704
Likes: 0
From: New York
hey
this how to i found very helpful... cause i live in a area were theres usually deer and roadkill so i wouldnt want to hit a dead skunk or possum and rocks are around here so this helps alot and no they never do call it chicken wire. chicken wire is crap wire with big holes. this something im deffinately doing but im gonna paint it black and prolly make a custom regular front grille. thanks man for the great how to


New Member
Joined: 07-05-05
Posts: 31
Likes: 0
From: Southern Illinois
Thanks for the pics
I did this mod prior to finding this. Used all alum. hardware and on mine as well. I used 4 7inch u channel braces on mine and it looks good and has held up to high speed (no major hits from rocks or critters yet!). When I can find someone who knows how to post pictures I will show you my mod. This is great that other people are thinking along these lines (cheap custom mods that are functional and make our rides look **** hot!)


Thread Starter
Senior Member
Joined: 10-08-05
Posts: 5,295
Likes: 0
From: AZ
Originally Posted by chevytech329
I just bought the "factory" lower grill, snapped it in (20 seconds).
Thread Starter
Senior Member
Joined: 10-08-05
Posts: 5,295
Likes: 0
From: AZ
Originally Posted by SS/SCking
That looks awsome. Did the tool to take those clips out?


Member
Joined: 04-27-06
Posts: 222
Likes: 0
From: In the cornfield
Originally Posted by Cobalt_Supercharged
So far so good.
I did a rush job on the painting/rubber coating and didn't prep the mesh at all. As a result, there are a few chips.
Structurally it's holding up great.
I did a rush job on the painting/rubber coating and didn't prep the mesh at all. As a result, there are a few chips.
Structurally it's holding up great.
Thanks Cobalt_Supercharged -
Going to Lowes today to pick me up some of that mesh -
I will let you know how it turns out - I may buy the factory grille insert and modify it to allow me to put this mesh behind it, and then cut some of the cross-ties off of the insert for a custom look.
Thanks again for the great idea(s).
best regards -
mqqn

Senior Member
Joined: 02-22-05
Posts: 787
Likes: 0
From: Michigan, Clinton Twp
Originally Posted by mqqn
Thanks Cobalt_Supercharged -
Going to Lowes today to pick me up some of that mesh -
I will let you know how it turns out - I may buy the factory grille insert and modify it to allow me to put this mesh behind it, and then cut some of the cross-ties off of the insert for a custom look.
Thanks again for the great idea(s).
best regards -
mqqn
Just did mine using this how too. the thing i big!! and its only like $8!! not to bad of an install. thx to cobalt_supercharedt
P.S. some one needs to make a how to on this but the upper grill.