Appearance: How-to paint your factory 18's


How-to paint your factory 18's
So i have gotten numerous request for this particular modification. i would suggest finding an extra set of wheels, or 2 like i did to try this on because it would be terrible if the job turned out like ****, and then you dont have any nice looking wheels. mine turned out great though. all these instructions are for the TWO wheels i did. i did not have tires on the wheels when i did this, and i do not think you should have them on the wheels during this procedure.
1. go buy all the supplies-1 can primer, 1 can flat black paint (im pretty sure that glossy would work, but would *gasp* be more shiny!) 2 cans clear paint. ALL FROM NAPA AUTO PARTS! Also, you need paint stripper fromt he home depot


2. remove center cap from wheel. must remove paint from whole wheel using paint stripper, follow instructions on the stripper's bottle. may need to be applied more than once in some locations. the paint should bubble up and clump up, it is damn easy to remove. next wash and rinse the entire wheel thoroughly with dish soap, and do not touch any of the painting surfaces dry with terry cloth and make sure you dont have anything left on surface of wheel. after you have washed the wheel. 3.i did have a problem getting some black residue off some of the parts of the wheel, a fine grit sand paper or steel wool may do the trick, but i just left it. if you do sanding or anything make sure you wash the wheel again.
4. mask of the lips, and behind the spokes, where the center cap was, and where the lug nuts go so you dont spray the inner wheel black, just be sure nothing besides what you want to paint is showing.
5. this is where patience is mandatory. allow 15 minutes in between each coat of paint. 1st thin coat of primer, and then 2nd and 3rd. be sure that you are getting it evenly distributed across face of wheel, and along the edge of the spokes. watch out because it tends to go thicker on the spokes then on the center of the wheel, this is true for the primer, paint, and clear. next make sure the primer is dry before applying the 3 coats of black paint, and same for applying the 3 coats of clear. let clear dry and pull off the tape. admire the work on your new beautiful wheels.
5. for the center cap all you have to do is rinse it off, dry it with terry cloth. get masking tape that will cover the bowtie and use a razor to go around the edge if you want the gold emblem to show like i did. pull off the outer tape and follow same painting steps as for the wheels.
6. i let the wheels sit over night and then proceeded to cut out a covering made of cardboard to cover ONLY the spokes that i painted the night before. set the wheels with the backside down and lay your cover on top of the wheel to sheild the spokes. you need to spray all the aluminum parts of the wheel with 2 coats clear to sheild them from the elements, spray the rim, and i also sprayed the outer part of the wheel itself. after you have your two coats on these parts let them dry and flip the wheel over onto the spokes. be sure you have a towel or something soft down so you do not scratch your new paint. spray the remaining surfaces of the wheels with 2 coats clear, and you should be done!


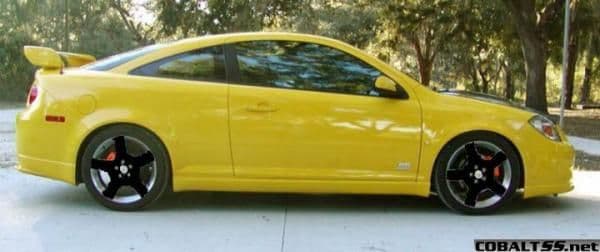
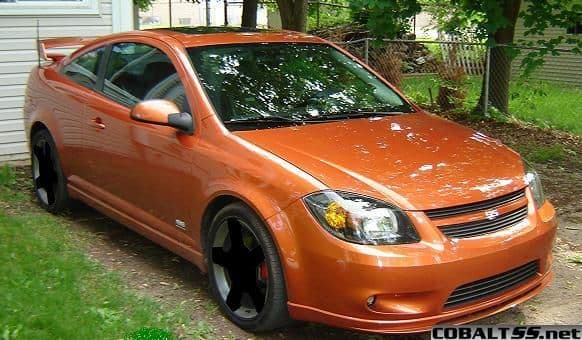
i let my wheels sit for 3 days before i mounted them and had no paint chip off when mounting. here are some pics of the finished product-


check out the full set of pics in the pictures and video section and let me know what you guys think.
1. go buy all the supplies-1 can primer, 1 can flat black paint (im pretty sure that glossy would work, but would *gasp* be more shiny!) 2 cans clear paint. ALL FROM NAPA AUTO PARTS! Also, you need paint stripper fromt he home depot
2. remove center cap from wheel. must remove paint from whole wheel using paint stripper, follow instructions on the stripper's bottle. may need to be applied more than once in some locations. the paint should bubble up and clump up, it is damn easy to remove. next wash and rinse the entire wheel thoroughly with dish soap, and do not touch any of the painting surfaces dry with terry cloth and make sure you dont have anything left on surface of wheel. after you have washed the wheel. 3.i did have a problem getting some black residue off some of the parts of the wheel, a fine grit sand paper or steel wool may do the trick, but i just left it. if you do sanding or anything make sure you wash the wheel again.
4. mask of the lips, and behind the spokes, where the center cap was, and where the lug nuts go so you dont spray the inner wheel black, just be sure nothing besides what you want to paint is showing.
5. this is where patience is mandatory. allow 15 minutes in between each coat of paint. 1st thin coat of primer, and then 2nd and 3rd. be sure that you are getting it evenly distributed across face of wheel, and along the edge of the spokes. watch out because it tends to go thicker on the spokes then on the center of the wheel, this is true for the primer, paint, and clear. next make sure the primer is dry before applying the 3 coats of black paint, and same for applying the 3 coats of clear. let clear dry and pull off the tape. admire the work on your new beautiful wheels.
5. for the center cap all you have to do is rinse it off, dry it with terry cloth. get masking tape that will cover the bowtie and use a razor to go around the edge if you want the gold emblem to show like i did. pull off the outer tape and follow same painting steps as for the wheels.
6. i let the wheels sit over night and then proceeded to cut out a covering made of cardboard to cover ONLY the spokes that i painted the night before. set the wheels with the backside down and lay your cover on top of the wheel to sheild the spokes. you need to spray all the aluminum parts of the wheel with 2 coats clear to sheild them from the elements, spray the rim, and i also sprayed the outer part of the wheel itself. after you have your two coats on these parts let them dry and flip the wheel over onto the spokes. be sure you have a towel or something soft down so you do not scratch your new paint. spray the remaining surfaces of the wheels with 2 coats clear, and you should be done!
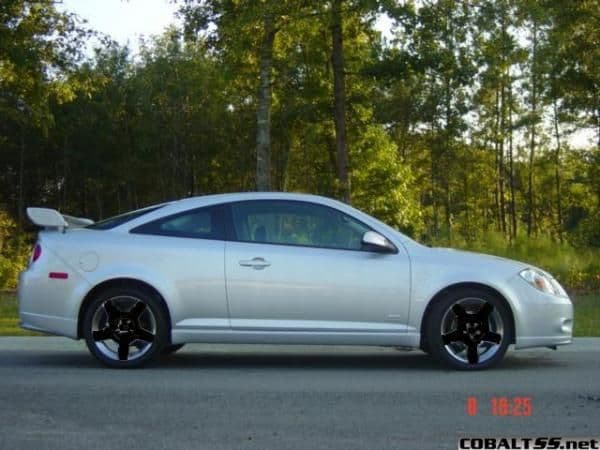
i let my wheels sit for 3 days before i mounted them and had no paint chip off when mounting. here are some pics of the finished product-
check out the full set of pics in the pictures and video section and let me know what you guys think.
Last edited by TommyP; Oct 3, 2012 at 10:19 AM.


Originally Posted by SS33
Looks awesome man. That is exactly what I've wanted to do to my rims since the day I brought her home. Are you going to do all of yours or just the front two for the track?

Senior Member
Joined: 05-21-06
Posts: 5,577
Likes: 3
From: Gainesville, FL
i like the LSD burn out. you musta lauched pretty solid to get them both to spin, i was under the impression that the LSD in the g85 would allow some slip to make it ride smooth when making tight turns
Originally Posted by joeworkstoohard
i like the LSD burn out. you musta lauched pretty solid to get them both to spin, i was under the impression that the LSD in the g85 would allow some slip to make it ride smooth when making tight turns

Senior Member
Joined: 10-08-05
Posts: 900
Likes: 0
From: Oxford,MA
looks good i like em hmm maybe ill try this on my 2.2 wheels scine they arent painted i wouldnt need to stripe them just wash them good right
btw you dot need an lsd to spin em both my 2.2 will break both loose and i dont even get that option
btw you dot need an lsd to spin em both my 2.2 will break both loose and i dont even get that option