
2.0 LSJ Engine: Install Fuel Pressure Sensor. Mechanical Only


Thread Starter
Senior Member
Joined: 09-02-09
Posts: 4,210
Likes: 2
From: Wisconsin
Install Fuel Pressure Sensor. Mechanical Only
How to install the Fuel Pressure Sensor Kit from Aeroforce.
Tools Required
1. 7/8” Open End Wrench
2. 11/16” Open End Wrench
3. 5/8” Open End Wrench
4. 9/16” Open End Wrench
5. �” Open End Wrench
6. 7/16” Open End Wrench
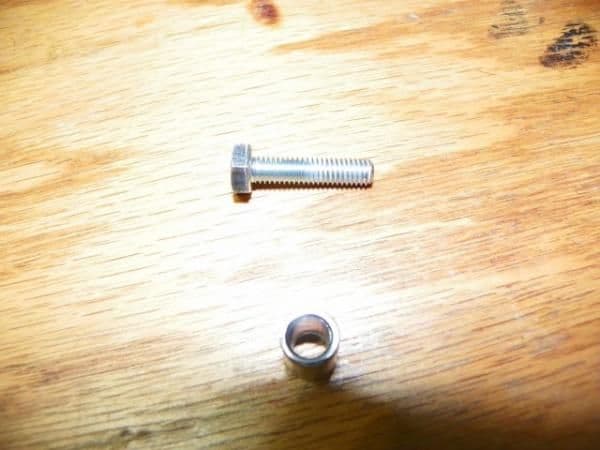
7. 10mm Socket: To Fit Head of the M6x1.0 1" Thread Bolt
8. Socket Driver
9. Yellow Handle Steel Snips: Green cuts right, Red Cuts left, Yellow Cuts Straight
10. Knife

Materials Required
1. Schrader Valve T Fitting: Casper Electronics PN 102071: Summit Racing
2. Electrical Tape: Lowes
3. Teflon Tape: Advanced Auto Parts
4. Fuel Pressure Sensor: Item # Sens021: Aeroforce
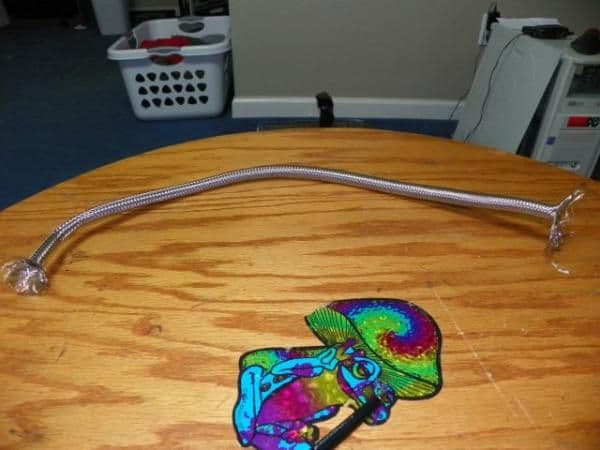
5. Steel Hose Braiding: #7490: Autozone
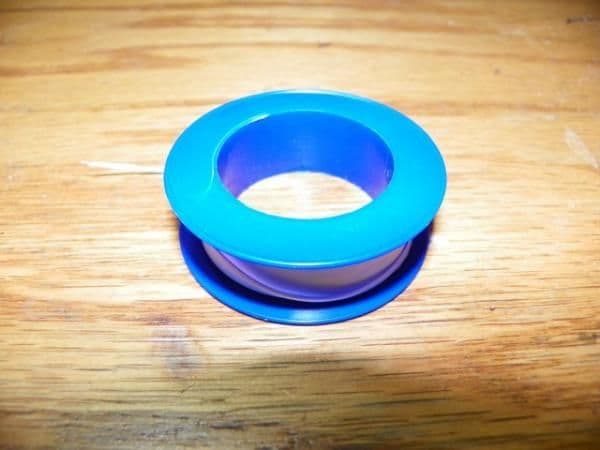
6. �” Spacer: Lowes
7. Bolt 10mm Hex Head, M6x1.0 thread 1” Long: Lowes
8. Female 1/8" NPT Coupler: Lowes
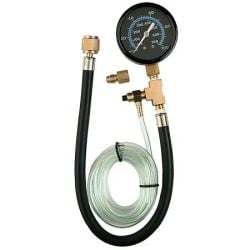
9. Fuel Pressure Tester: Actron Fuel Pressure Tester Kit # CP7818: Advanced Auto Parts


Directions:
1. Move the cap from the Schrader valve “T” fitting from the side, to the top, so that the hole without the Schrader pin is exposed and the end with the Schrader valve is covered.
2. Disassemble the Actron Fuel Pressure Tester by removing the tester’s hose from the brass block that the hose, side valve and gauge all screw into.
3. Connect the hose to the Schrader “T” fitting’s side connection.
4. Slide the Steel Braided Hose cover over the hose and hold one end while marking the length to cut so the braiding covers the entire hose.

5. Remove the steel braiding from the hose
6. Cut the Steel braiding where marked: Note Cutting In accordance with the directions supplied with the hose braided kit is not sufficient. I found that the best way to cut the steel braiding is with the metal snips.
7. Slide the now cut to size steel braiding over the hose, and tape in place with electrical tape. This also helps cover the sharp ends.
8. Carefully cover the threads on the male end of the hose with the Teflon Tape. Make SURE NOT to cover ANY of the opening
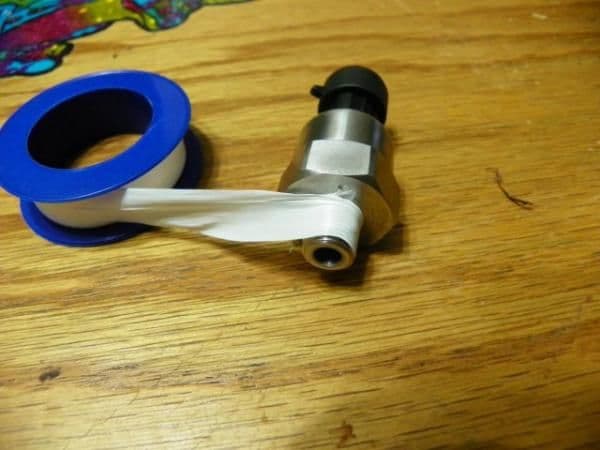
9. Do the same to the threads on the Pressure Sensor
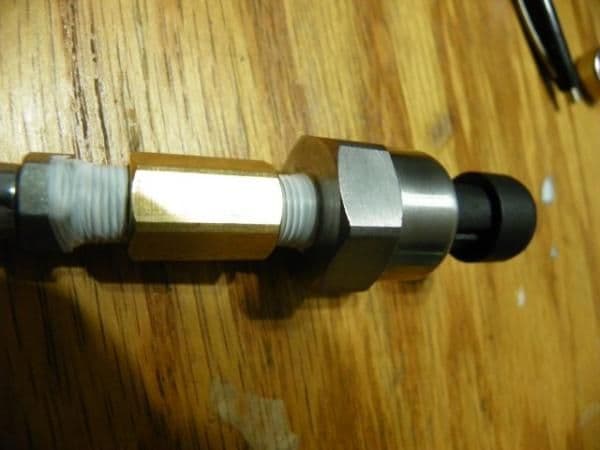
10. Thread the male end of the hose and the pressure sensor into the coupler. Make sure they are both tight, but take care not to over do it.
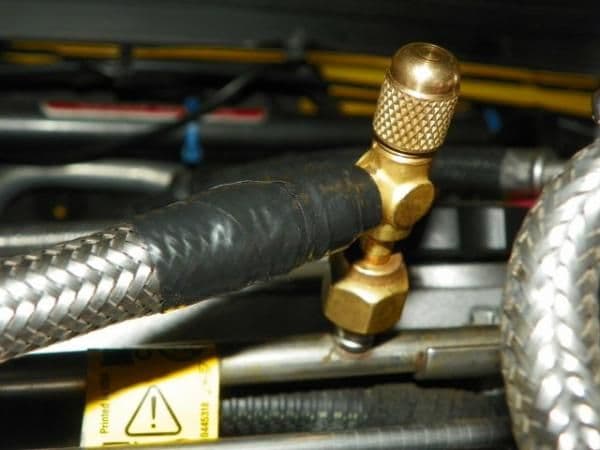
11. Remove the little plastic cap from the Schrader valve on the fuel rail
12. Connect the “T” fitting to the fuel rail: Some fuel may spray out. Use care and safety glasses if needed.
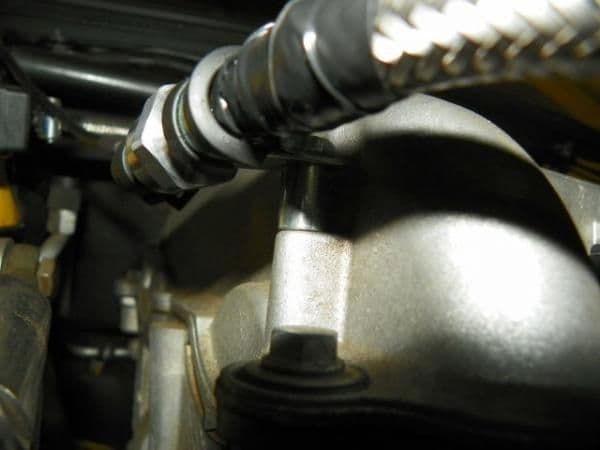
13. Place the clamp over the brass NPT coupler and secure to the valve cover with the bolt. Use the spacer under the clamp to raise it. Adjust the angle on the clamp to minimize the hose from rubbing on anything.

14. Secure and tighten all connections, using care not to over tighten anything.

15. Turn Ignition to “ON” position and listen for fuel pump to pressure the fuel system while checking for leaks, then turn off
16. Connect Sensor Electrical Plug.
Tools Required
1. 7/8” Open End Wrench
2. 11/16” Open End Wrench
3. 5/8” Open End Wrench
4. 9/16” Open End Wrench
5. �” Open End Wrench
6. 7/16” Open End Wrench
7. 10mm Socket: To Fit Head of the M6x1.0 1" Thread Bolt
8. Socket Driver
9. Yellow Handle Steel Snips: Green cuts right, Red Cuts left, Yellow Cuts Straight
10. Knife
Materials Required
1. Schrader Valve T Fitting: Casper Electronics PN 102071: Summit Racing
2. Electrical Tape: Lowes
3. Teflon Tape: Advanced Auto Parts
4. Fuel Pressure Sensor: Item # Sens021: Aeroforce
5. Steel Hose Braiding: #7490: Autozone
6. �” Spacer: Lowes
7. Bolt 10mm Hex Head, M6x1.0 thread 1” Long: Lowes
8. Female 1/8" NPT Coupler: Lowes
9. Fuel Pressure Tester: Actron Fuel Pressure Tester Kit # CP7818: Advanced Auto Parts
Directions:
1. Move the cap from the Schrader valve “T” fitting from the side, to the top, so that the hole without the Schrader pin is exposed and the end with the Schrader valve is covered.
2. Disassemble the Actron Fuel Pressure Tester by removing the tester’s hose from the brass block that the hose, side valve and gauge all screw into.
3. Connect the hose to the Schrader “T” fitting’s side connection.
4. Slide the Steel Braided Hose cover over the hose and hold one end while marking the length to cut so the braiding covers the entire hose.
5. Remove the steel braiding from the hose
6. Cut the Steel braiding where marked: Note Cutting In accordance with the directions supplied with the hose braided kit is not sufficient. I found that the best way to cut the steel braiding is with the metal snips.
7. Slide the now cut to size steel braiding over the hose, and tape in place with electrical tape. This also helps cover the sharp ends.
8. Carefully cover the threads on the male end of the hose with the Teflon Tape. Make SURE NOT to cover ANY of the opening
9. Do the same to the threads on the Pressure Sensor
10. Thread the male end of the hose and the pressure sensor into the coupler. Make sure they are both tight, but take care not to over do it.
11. Remove the little plastic cap from the Schrader valve on the fuel rail
12. Connect the “T” fitting to the fuel rail: Some fuel may spray out. Use care and safety glasses if needed.
13. Place the clamp over the brass NPT coupler and secure to the valve cover with the bolt. Use the spacer under the clamp to raise it. Adjust the angle on the clamp to minimize the hose from rubbing on anything.
14. Secure and tighten all connections, using care not to over tighten anything.
15. Turn Ignition to “ON” position and listen for fuel pump to pressure the fuel system while checking for leaks, then turn off
16. Connect Sensor Electrical Plug.
Last edited by insylem; Apr 9, 2011 at 01:47 PM. Reason: I put 1/2" bolt. Correct to 1" bolt

Also, use only the teflon tape in the yellow roll as it is the only teflon tape rated for gasoline contact.
Anyone know of a better way to get that hose or fitting rather than destroying a perfectly good pressure tester?
Anyone know of a better way to get that hose or fitting rather than destroying a perfectly good pressure tester?
Thread Starter
Senior Member
Joined: 09-02-09
Posts: 4,210
Likes: 2
From: Wisconsin
Also:
The pictures show me wraping the teflon the incorrect direction. Please wrap the corect direction. At the time I didnt know it matter, until I was watching Holmes on the HG channel talking about it and it has to do with as you tighten the threads you dont want it to unwrap the teflon tape.
Last edited by insylem; Jan 6, 2012 at 12:22 AM.

Thread Starter
Senior Member
Joined: 09-02-09
Posts: 4,210
Likes: 2
From: Wisconsin
Thread Starter
Senior Member
Joined: 09-02-09
Posts: 4,210
Likes: 2
From: Wisconsin
True, I think your always going to have an injector open. There is a pulse dampner at the end of the fuel rail. If you look though, the schrader valve isnt really on the fuel rail itself. And yes, my fuel pressure does fluxuat some due to injector pulsing.

Thread
Thread Starter
Forum
Replies
Last Post
Sl0wbaltSS
2.0L LNF Performance Tech
18
Nov 21, 2018 11:11 PM