
Detailing: Polishing 101 (How-To)

Thread Starter
Senior Member
Joined: 01-05-06
Posts: 2,509
Likes: 1
From: Ft Lauderdale
Polishing 101 (How-To)
Ok I have had Plenty of People ask how to do this, So here you go! Not all tools are needed but Highly Recomended! To get a good result You must prep it good (ie: sanding), Because when you Polish it any Blemish's will show!
Now for the Tools needed,
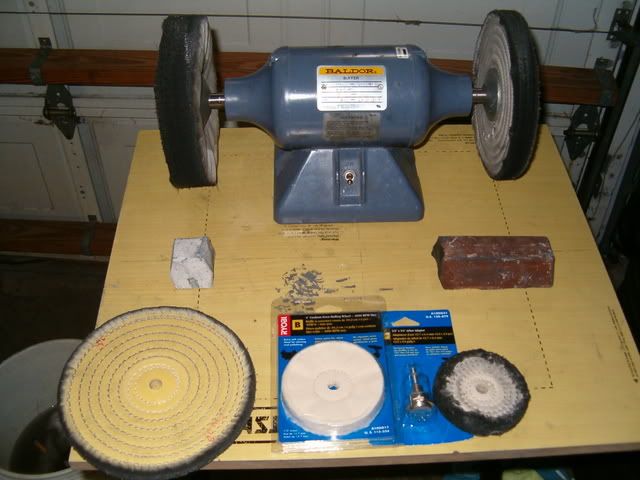
1 Baldor Buffer or compatiable 8 inch or Bigger wheels (seen in Pic #1)
1 Sewn Cloth wheel & 1 Loose Cloth wheel for either the Buffer or Drill set (seen in Pic #1)
If you dont have a Buffer then Use a Drill with 1800 rpm to 2800 rpm with 4 inch wheels (seen in Pic #1)
1lb bar of White rouqe & 1lb bar of Tipoli (seen in Pic #1)
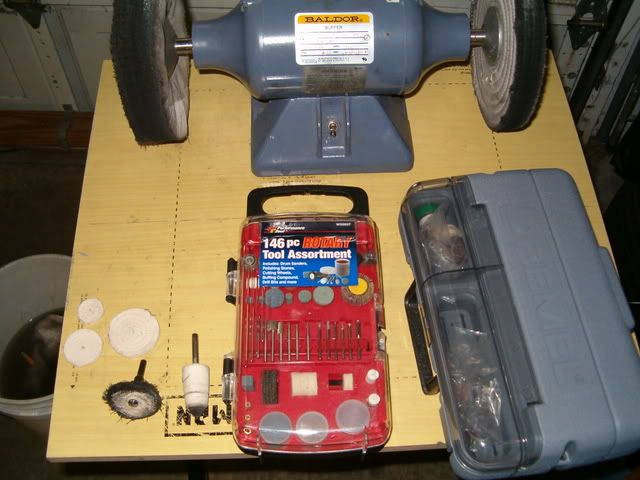
1 Dremel & attachments (seen in Pic #2)
1 set of 1 inch to 2 1/2 inch Sewn cloth wheels!(seen in Pic #2
1 Drill
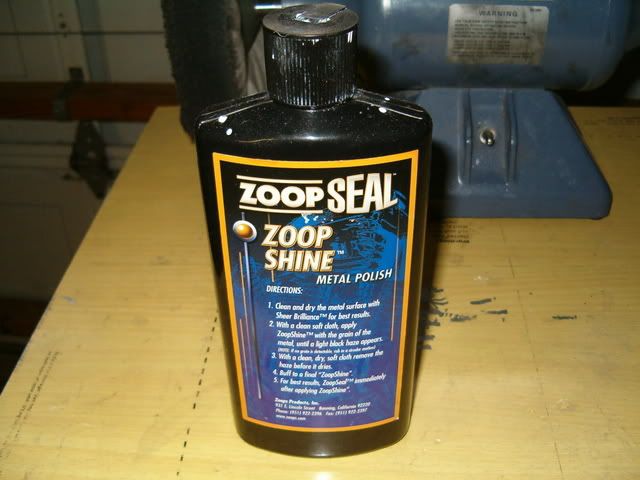
1 Bottle of Metal Polish (liquid) (seen in Pic#3) No Paste it will dull the Finish!
Wet Sand paper 220 grit thru 1500 Grit
These supplies can be had at eastwood.com, Sears & sometimes Home Depot!
Pic #1
Pic #2
Pic #3
Ok Now time to start Polishing!
1st step is the Longest, I try to use a sanding Block where ever I can, makes for a Flat Surface Start by sanding your Piece with 220 grit, Then 400, Then 600, Then 800, Then 1000, then 1500 grit! Make sure to remove the scratches from the Prior grit Before you Move up to the Next 1!
If you Dont when you polish it, They will show!
Valve covers are Soft Metal so they require Up to 1500 grit, Motor Mounts & supercharger's only have to be sanded to 1000 grit!
Before:

I sanded the ridges & The Thottle body end!

Now after sanding all the areas that you want to Smooth Its Time to Buff it up!
1st you Need your Sewn Cloth wheel & Tipoli, apply the Tipoli to the wheel & Start to Shine it up!
The tipoli will make it look blackish Mainly when Polishing the stock rough Finish, This you work in till it shines, If you have a Problem getting it all off, Wash it off with Aluminum Cleaner! Then repeat step till shine is Uniform! remember to clean your wheel wiith a Screw Driver, With drill running rub the screw driver acrossed it! This gets off the Build up on the wheel!
(Your Piece will Now have a Dull Shine) See picture Below!


Now it's Time for the Polishing,
1st Makes sure all The tipoli is remove from the surface. Now take the Loose Cloth wheel & apply the white Rouge to it, Apply to surface Till it is worked in & Repeat! Remember to never use the tipoli wheel for this step!
It should be shinny Now, The last thing I do is apply some Metal Polish to another Loose Cloth wheel & Repolish the whole thing. This gets out all the left over Compounds & leaves a Nice Luster! (See Pic below) this is also the easiest way to maintain it!

Here is The cam Cover! The front face is Stock finish Polished & the tops were sanded Like stated above!

Here is the Motor Mount Sanded!

Here it is Buffed & Polished!

Here it is Mounted!

Remember DO NOT USE Paste Polish only Liquid! (GOOD LUCK)
I do Suggest that you Practice on an old Manifold or something!
Now for the Tools needed,
1 Baldor Buffer or compatiable 8 inch or Bigger wheels (seen in Pic #1)
1 Sewn Cloth wheel & 1 Loose Cloth wheel for either the Buffer or Drill set (seen in Pic #1)
If you dont have a Buffer then Use a Drill with 1800 rpm to 2800 rpm with 4 inch wheels (seen in Pic #1)
1lb bar of White rouqe & 1lb bar of Tipoli (seen in Pic #1)
1 Dremel & attachments (seen in Pic #2)
1 set of 1 inch to 2 1/2 inch Sewn cloth wheels!(seen in Pic #2
1 Drill
1 Bottle of Metal Polish (liquid) (seen in Pic#3) No Paste it will dull the Finish!
Wet Sand paper 220 grit thru 1500 Grit
These supplies can be had at eastwood.com, Sears & sometimes Home Depot!
Pic #1
Pic #2
Pic #3
Ok Now time to start Polishing!
1st step is the Longest, I try to use a sanding Block where ever I can, makes for a Flat Surface Start by sanding your Piece with 220 grit, Then 400, Then 600, Then 800, Then 1000, then 1500 grit! Make sure to remove the scratches from the Prior grit Before you Move up to the Next 1!
If you Dont when you polish it, They will show!
Valve covers are Soft Metal so they require Up to 1500 grit, Motor Mounts & supercharger's only have to be sanded to 1000 grit!
Before:
I sanded the ridges & The Thottle body end!
Now after sanding all the areas that you want to Smooth Its Time to Buff it up!
1st you Need your Sewn Cloth wheel & Tipoli, apply the Tipoli to the wheel & Start to Shine it up!
The tipoli will make it look blackish Mainly when Polishing the stock rough Finish, This you work in till it shines, If you have a Problem getting it all off, Wash it off with Aluminum Cleaner! Then repeat step till shine is Uniform! remember to clean your wheel wiith a Screw Driver, With drill running rub the screw driver acrossed it! This gets off the Build up on the wheel!
(Your Piece will Now have a Dull Shine) See picture Below!
Now it's Time for the Polishing,
1st Makes sure all The tipoli is remove from the surface. Now take the Loose Cloth wheel & apply the white Rouge to it, Apply to surface Till it is worked in & Repeat! Remember to never use the tipoli wheel for this step!
It should be shinny Now, The last thing I do is apply some Metal Polish to another Loose Cloth wheel & Repolish the whole thing. This gets out all the left over Compounds & leaves a Nice Luster! (See Pic below) this is also the easiest way to maintain it!
Here is The cam Cover! The front face is Stock finish Polished & the tops were sanded Like stated above!
Here is the Motor Mount Sanded!
Here it is Buffed & Polished!
Here it is Mounted!
Remember DO NOT USE Paste Polish only Liquid! (GOOD LUCK)
I do Suggest that you Practice on an old Manifold or something!
Last edited by TommyP; May 17, 2012 at 08:47 PM.


Senior Member
Joined: 08-14-06
Posts: 2,760
Likes: 0
From: San Diego, CA
BlilBT, how do you take the motor mount off? do you need a jack to hold the engine up or something? Or do you just undo the nuts and its ok to take it off without worry of something dropping. forgive me if its a dumb question just don't know much about our motor mounts but would love to polish it
thanks in advance for the help
thanks in advance for the help
Thread Starter
Senior Member
Joined: 01-05-06
Posts: 2,509
Likes: 1
From: Ft Lauderdale
Thread Starter
Senior Member
Joined: 01-05-06
Posts: 2,509
Likes: 1
From: Ft Lauderdale
BlilBT, how do you take the motor mount off? do you need a jack to hold the engine up or something? Or do you just undo the nuts and its ok to take it off without worry of something dropping. forgive me if its a dumb question just don't know much about our motor mounts but would love to polish it
thanks in advance for the help
thanks in advance for the help
You have to support it with a Jack, Other wise some thing will Break!


Thread Starter
Senior Member
Joined: 01-05-06
Posts: 2,509
Likes: 1
From: Ft Lauderdale

Senior Member
Joined: 07-09-06
Posts: 7,451
Likes: 0
From: PA
Do you think it would look bad to polish the supercharger, and leave the rounded edges sanded so I could paint them black. You know the rounded edges in the middle that raise up off the super charger. For example the raised parts traveling virtecally downward, on this pic would be black.
Thread Starter
Senior Member
Joined: 01-05-06
Posts: 2,509
Likes: 1
From: Ft Lauderdale
Thread Starter
Senior Member
Joined: 01-05-06
Posts: 2,509
Likes: 1
From: Ft Lauderdale
If you look in Memebers rides I Posted all updated Shots besides the Motor mount & you can see all the caps are Billet with OEM markings! & the Rad cap is engraved with SS!
Thread Starter
Senior Member
Joined: 01-05-06
Posts: 2,509
Likes: 1
From: Ft Lauderdale
Couple threads up is a Link to a How-to for the Cam Cover!
Last edited by BlilBT; Jan 4, 2007 at 05:26 PM.
Thread Starter
Senior Member
Joined: 01-05-06
Posts: 2,509
Likes: 1
From: Ft Lauderdale

Thread Starter
Senior Member
Joined: 01-05-06
Posts: 2,509
Likes: 1
From: Ft Lauderdale

Thread Starter
Senior Member
Joined: 01-05-06
Posts: 2,509
Likes: 1
From: Ft Lauderdale