
General Suspension: Pressure Bleeding


Thread Starter
Member
Joined: 11-04-08
Posts: 241
Likes: 1
From: Castro Valley, CA
Pressure Bleeding
What Is Pressure Bleeding
Pressure bleeding a brake system is done using air pressure trapped inside a tank. Pressure bleeding is quick and easy because of the following:
What's Needed
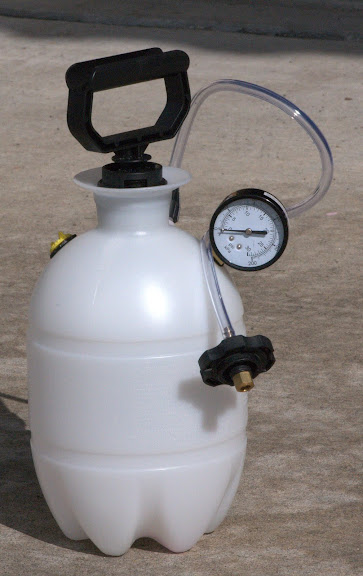
A pressure bleeder. You can either buy one or be a badass and DIY. I'm awesome, so I diy'd, here's my finished product:
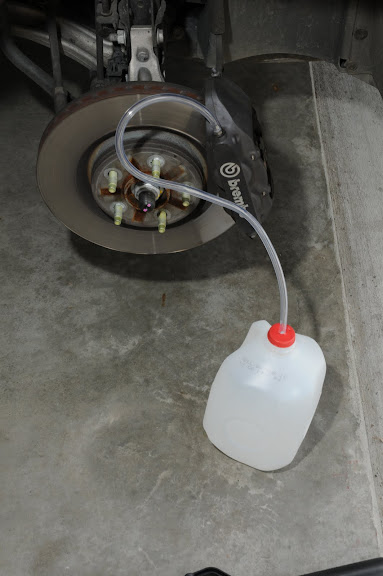
A catch can of some sort:
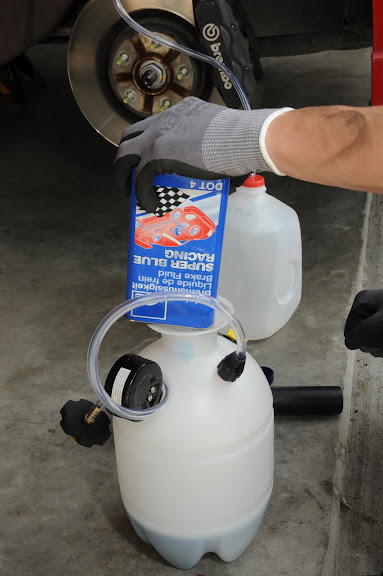
Some Fluid:

And of course anything needed to lift the car, remove the wheels, and correct wrenchs for the bleed screws. You'll also need a turkey baster with some hose.
Doing The Bleed
Get the car up in the air on jack stands, remove the wheels, and fill up your pressure bleeder with a liter of your fluid of choice. Remove the rubber gromets on your bleeder screws at each corner of the car.
Grab your turkey baster and suck out the old fluid from the resivor.
Do not connect your pressure bleeder, simply hold the line above your resivor and give the pressure bleeder a few pumps to so that you fill your resivor. Since you just sucked out the old fluid with the baster, you need to fill it back up with new fluid. Once fluid has filled to an acceptable level, connect and pressurize your master cylinder. It seems like 12-13psi was the sweet spot. Maybe somebody can chime in with the correct pressures (I'm looking at you Maven). I know some German cars require some absurd pressure. Warning: Too much pressure and you may **** **** up.

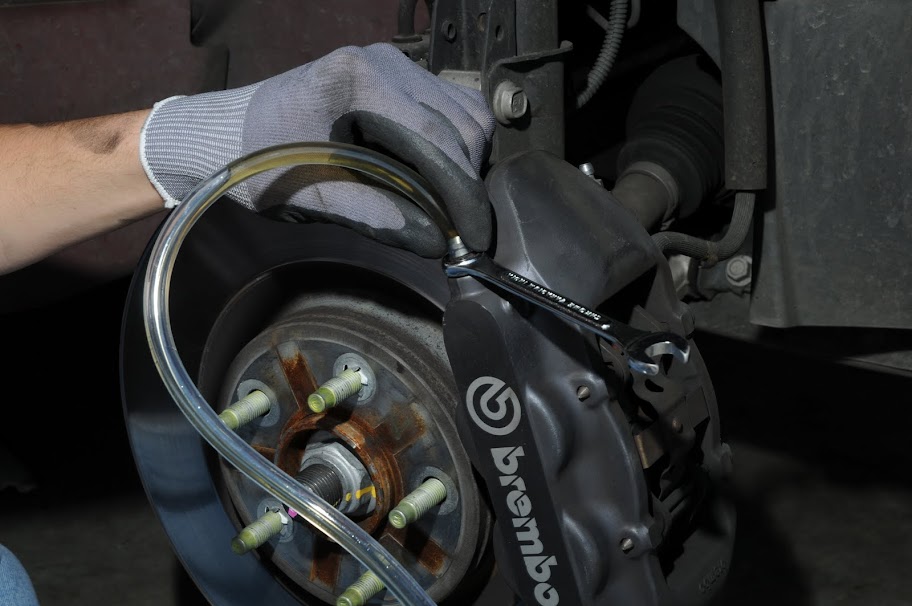
Start with the passenger side rear bleed screw, connect your catch can to the bleeder screw, and crack the screw open. Brake fluid will start to flow and will eventually come out clean, once it does, close the bleeder screw. In my case since I'm using ATE Super Blue, my fluid changes to blue. Now move on to the drivers side front and repeat these proceedures. Be sure to keep an eye on the pressure of the pressure bleeder bleeding from corner to corner. (Remember, sequence is Passenger Rear, Driver Front, Driver Rear, Passenger Front SOURCE)
Initail screw crack:
2-3 Minutes later:

Yea, my fluid was already clean looking, but a tester yeilded 3% water content.
Note for the Turbo Cobalt, there are two bleed screws on one caliper for the front Brembo's.
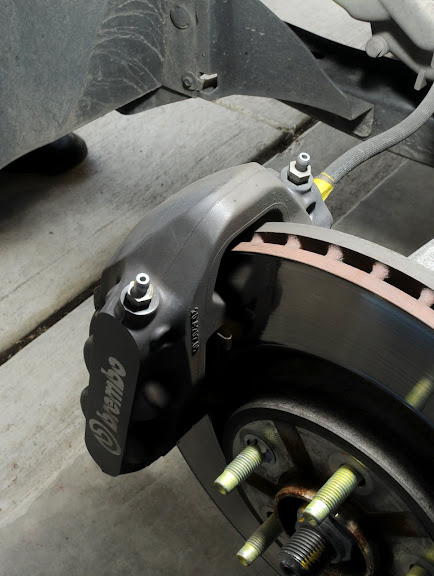
Both do need to be bleed. My best guess was outside first, then inside.
Now the hard part, the clutch bleed.
It's bleed screw is buried in here:

Zoom, enhance!
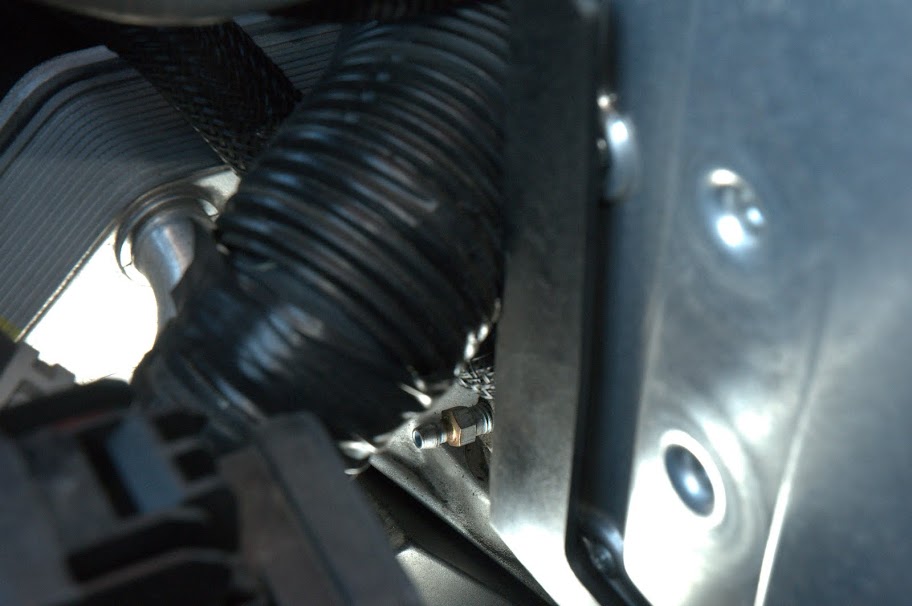
It's easier to get at the bleeder screw from the bottom of the car. Check the pressure on your pressure bleeder, run your catch can hose, and crack that screw open to bleed!
Now that you've bleed all four corners and the clutch, release the pressure on your pressure bleeder, and make sure you're within the min/max lines on the resivor. I had a little bit of new fluid left over at the end, so 1 Liter was perfect for a full system flush.
Thanks to Caddyscat/Heliscat for taking awesome photos, Google, phatnackySS, & Lubify
LINK to the full set of hi-res photos.
Pressure bleeding a brake system is done using air pressure trapped inside a tank. Pressure bleeding is quick and easy because of the following:
- It does not require an assistant.
- It maintains a constant pressure in the system.
- It keeps the master cylinder full during bleeding.
What's Needed
A pressure bleeder. You can either buy one or be a badass and DIY. I'm awesome, so I diy'd, here's my finished product:
A catch can of some sort:
Some Fluid:
And of course anything needed to lift the car, remove the wheels, and correct wrenchs for the bleed screws. You'll also need a turkey baster with some hose.
Doing The Bleed
Get the car up in the air on jack stands, remove the wheels, and fill up your pressure bleeder with a liter of your fluid of choice. Remove the rubber gromets on your bleeder screws at each corner of the car.
Grab your turkey baster and suck out the old fluid from the resivor.
Do not connect your pressure bleeder, simply hold the line above your resivor and give the pressure bleeder a few pumps to so that you fill your resivor. Since you just sucked out the old fluid with the baster, you need to fill it back up with new fluid. Once fluid has filled to an acceptable level, connect and pressurize your master cylinder. It seems like 12-13psi was the sweet spot. Maybe somebody can chime in with the correct pressures (I'm looking at you Maven). I know some German cars require some absurd pressure. Warning: Too much pressure and you may **** **** up.
Start with the passenger side rear bleed screw, connect your catch can to the bleeder screw, and crack the screw open. Brake fluid will start to flow and will eventually come out clean, once it does, close the bleeder screw. In my case since I'm using ATE Super Blue, my fluid changes to blue. Now move on to the drivers side front and repeat these proceedures. Be sure to keep an eye on the pressure of the pressure bleeder bleeding from corner to corner. (Remember, sequence is Passenger Rear, Driver Front, Driver Rear, Passenger Front SOURCE)
Initail screw crack:
2-3 Minutes later:
Yea, my fluid was already clean looking, but a tester yeilded 3% water content.
Note for the Turbo Cobalt, there are two bleed screws on one caliper for the front Brembo's.
Both do need to be bleed. My best guess was outside first, then inside.
Now the hard part, the clutch bleed.
It's bleed screw is buried in here:
Zoom, enhance!
It's easier to get at the bleeder screw from the bottom of the car. Check the pressure on your pressure bleeder, run your catch can hose, and crack that screw open to bleed!
Now that you've bleed all four corners and the clutch, release the pressure on your pressure bleeder, and make sure you're within the min/max lines on the resivor. I had a little bit of new fluid left over at the end, so 1 Liter was perfect for a full system flush.
Thanks to Caddyscat/Heliscat for taking awesome photos, Google, phatnackySS, & Lubify
LINK to the full set of hi-res photos.


OP, is that a replacement brake fluid reservir cap from the dealer or a universal type one from the auto parts store? I've been thinking of doing something similar since the motive bleeder is so damn expensive. Now I jsut need some free time to make this.

New Member
Joined: 10-19-08
Posts: 21
Likes: 0
From: Phoenix
I just made one today... I used the HELP! Universal GM Cap #42042 (be sure to fill in the groove on the cap with some RTV or it wont pressurize) and the Gasket #42072. For the bleeder screws on the LS, its a 1/4" Inner Diameter. I got that from ACE for $0.50/ft.
Last edited by TheSauce; Apr 14, 2010 at 01:42 PM.

Senior Member
Joined: 10-09-06
Posts: 1,967
Likes: 0
From: Rochester NH
I believe 1/4" ID (inner diameter) is the correct size. I used 3/8" ID and it was too big, but fit over the hex bolt part enough to make a seal. I'm still going to get 1/4" ID tubing tomorrow and do it right, and make a stab at the clutch.


Senior Member
Joined: 07-12-09
Posts: 794
Likes: 15
From: NJ
Don't mean to bring up a dead thread, but I am doing this shortly but I plan on using my air compressor set to 15psi in place of the pump/jug mechanism. Just going to fill the master cylinder reservoir and then pressurize it from the compressor. The downside to this is I have to be careful to keep the reservoir from emptying entirely. The upside is it's cheap and easy to assemble.

any one know how to bleed these like brand new. i put new ones on and i got a brake pull. thinking theres air in them still just woundering if you bleed out both sides. i did a gravity bleed on the inside bleeders and normal pump the brake bleed on the outside bleeder


Junior Member
Joined: 05-23-07
Posts: 430
Likes: 0
From: not there
So if I understand it right, there is brake fluid in the sprayer and it goes (via the tube) into the master cylinder's reservoir under pressure, right? For some reason I though it would just be air pressure in there but then I saw the picture with the fluid in the sprayer...
Is it messy when you're done bleeding and remove the cap from the master cylinder? Or does the excess fluid drain back to the sprayer?
Either way this is a project I must do!
Is it messy when you're done bleeding and remove the cap from the master cylinder? Or does the excess fluid drain back to the sprayer?
Either way this is a project I must do!

Thread
Thread Starter
Forum
Replies
Last Post
Sl0wbaltSS
2.0L LNF Performance Tech
18
Nov 21, 2018 11:11 PM