


SC silencer

Member
Joined: 02-21-06
Posts: 352
Likes: 0
From: Flora, IL
I've been doing some research and have came across of a few photos of a blower that has done this. You can see where he JB welded his wholes here. What these people did was:
~They took the rotors out
~Put gorilla tape on the rotor side of the whole (They claim Duct tape won't hold well enough)
~Held finger over the tape to insure the tape didn't fall off while filling the whole with JB weld.
~Wait over night for the JB to cure.
~Remove Tape and sand smooth the inside of the blower to insure clearence of the rotors.
~And re-assemble.


Thats what i got from numerous post and threads off of National Harley Truck Owners Club. One person claims a gain of 1/2 - 1 lb of boost gain and another said there was no gain but there was a rais in the IAT's of 10 degrees. So i think i'm going to do this starting tomarrow after i get off work and finish it up Monday while i wait on my PCM from TAG. So here is the information i gathered and take it for what it's worth as i haven't tride it for myself yet.
Dave
~They took the rotors out
~Put gorilla tape on the rotor side of the whole (They claim Duct tape won't hold well enough)
~Held finger over the tape to insure the tape didn't fall off while filling the whole with JB weld.
~Wait over night for the JB to cure.
~Remove Tape and sand smooth the inside of the blower to insure clearence of the rotors.
~And re-assemble.
Thats what i got from numerous post and threads off of National Harley Truck Owners Club. One person claims a gain of 1/2 - 1 lb of boost gain and another said there was no gain but there was a rais in the IAT's of 10 degrees. So i think i'm going to do this starting tomarrow after i get off work and finish it up Monday while i wait on my PCM from TAG. So here is the information i gathered and take it for what it's worth as i haven't tride it for myself yet.
Dave
Last edited by SStud; Mar 17, 2007 at 10:50 PM.


Member
Joined: 02-21-06
Posts: 352
Likes: 0
From: Flora, IL
Should be fixed now.
Here's a how-to that i found for this. It's not for the M62 on a cobalt, but it's the same general concept.
Also, i did read where step # 16 was not nescesary, and i wouldn't recomend it.
Tools used to do this:
1 JB WELD
1 three sided file
1 flat head screwdriver
1 rubber mallet or hammer
various sockets (8, 10, 13 mm)
? beers (optional)
Procedure:
1. Remove intake
2. Remove intake plenum and all lines(optional)
3. Remove supercharger belt with 1/2" breaker bar
3. Remove all 8 13mm bolts holding supercharger (4 of them have nuts on top as well)
4. unplug boost bypass vacuum wire
5. wiggle the supercharger off
6. spread out a towel
7. place supercharger on towel with nose of blower facing up
8. remove 3/16" allen head bolt in front to left of nose
9. drain supercharger oil into cup or alternative
10. remove 8(?) 10mm bolts from nose assembly of blower
11. remove nose assembly by banging lightly with a rubber mallet and pulling on it
12. position flat head screwdriver in crack between blower case and rotor gear box
13. pound screwdriver with medium force until the two start to separate. do this again in another spot (both preferably on bottom of blower)
14. remove rotor assembly.
15. set blower upside down on towel and clean the inside thoroughly
16. file the 4 silencer holes in an "X" pattern with the knife-edge of the file
17. cut two pieces of duct tape approximately 8 inches long and place each piece over 2 holes on each side (running long wise, one piece covering both holes on one side) and run your hand over the tape multiple times to ensure a good contact and seal
18. mix up some JB WELD, you will need quite a bit
19. scoop enough JB WELD into each hole to fill it to the brim and maybe even a little more
20. when each hole is filled, allow to site for 4-6 hours at least, if you can allow it to dry overnight
21. when it has dried you can start to re-assemble blower
22. set blower with front facing up and bottom towards you
23. place rotor assembly back into blower, it is a tight fit so be careful, you may have to spin the rotors a little while doing this (p.s., make sure that the gear with the 3 pins is on the right)
24. fill the basin back up with the oil you drained earlier, if it gets full, you can pour the rest in later through the hole
25. place the nose assembly back on and replace all 10mm bolts
26. tighten the bolts lightly all the way around and then come back around and tighten in cross-sequence until bolts are very tight (for those of you with torque wrenches, i would say about 65 ft/lbs). also you can use sealant if you want that extra protection but i didnt use it and it seems to be just fine.
27. reinstall supercharger (the back bolt on the passenger side is very hard to get in and you may have to put it through the blower hole and work it into the bolt hole at and angle to clear the firewall) and plug the boost bypass line back in
28. tighten supercharger down and reinstall intake plenum if removed making sure to reinstall all lines as well
29. reinstall intake
30. make sure all wires and hoses are hooked back up properly
31. reinstall supercharger belt and make sure it is completely on all pulleys
Here are a few vids of the truck after he was done. (Hope the links work for you guys, if not let me know and i'll try to fix them.)
http://www.reptilogic.com/HD/vid/venom2.mpg
http://www.reptilogic.com/HD/vid/venom3.mpg
http://www.reptilogic.com/HD/invisatruck.mpg
Here's a how-to that i found for this. It's not for the M62 on a cobalt, but it's the same general concept.
Also, i did read where step # 16 was not nescesary, and i wouldn't recomend it.
Tools used to do this:
1 JB WELD
1 three sided file
1 flat head screwdriver
1 rubber mallet or hammer
various sockets (8, 10, 13 mm)
? beers (optional)
Procedure:
1. Remove intake
2. Remove intake plenum and all lines(optional)
3. Remove supercharger belt with 1/2" breaker bar
3. Remove all 8 13mm bolts holding supercharger (4 of them have nuts on top as well)
4. unplug boost bypass vacuum wire
5. wiggle the supercharger off
6. spread out a towel
7. place supercharger on towel with nose of blower facing up
8. remove 3/16" allen head bolt in front to left of nose
9. drain supercharger oil into cup or alternative
10. remove 8(?) 10mm bolts from nose assembly of blower
11. remove nose assembly by banging lightly with a rubber mallet and pulling on it
12. position flat head screwdriver in crack between blower case and rotor gear box
13. pound screwdriver with medium force until the two start to separate. do this again in another spot (both preferably on bottom of blower)
14. remove rotor assembly.
15. set blower upside down on towel and clean the inside thoroughly
16. file the 4 silencer holes in an "X" pattern with the knife-edge of the file
17. cut two pieces of duct tape approximately 8 inches long and place each piece over 2 holes on each side (running long wise, one piece covering both holes on one side) and run your hand over the tape multiple times to ensure a good contact and seal
18. mix up some JB WELD, you will need quite a bit
19. scoop enough JB WELD into each hole to fill it to the brim and maybe even a little more
20. when each hole is filled, allow to site for 4-6 hours at least, if you can allow it to dry overnight
21. when it has dried you can start to re-assemble blower
22. set blower with front facing up and bottom towards you
23. place rotor assembly back into blower, it is a tight fit so be careful, you may have to spin the rotors a little while doing this (p.s., make sure that the gear with the 3 pins is on the right)
24. fill the basin back up with the oil you drained earlier, if it gets full, you can pour the rest in later through the hole
25. place the nose assembly back on and replace all 10mm bolts
26. tighten the bolts lightly all the way around and then come back around and tighten in cross-sequence until bolts are very tight (for those of you with torque wrenches, i would say about 65 ft/lbs). also you can use sealant if you want that extra protection but i didnt use it and it seems to be just fine.
27. reinstall supercharger (the back bolt on the passenger side is very hard to get in and you may have to put it through the blower hole and work it into the bolt hole at and angle to clear the firewall) and plug the boost bypass line back in
28. tighten supercharger down and reinstall intake plenum if removed making sure to reinstall all lines as well
29. reinstall intake
30. make sure all wires and hoses are hooked back up properly
31. reinstall supercharger belt and make sure it is completely on all pulleys
Here are a few vids of the truck after he was done. (Hope the links work for you guys, if not let me know and i'll try to fix them.)
http://www.reptilogic.com/HD/vid/venom2.mpg
http://www.reptilogic.com/HD/vid/venom3.mpg
http://www.reptilogic.com/HD/invisatruck.mpg
Last edited by SStud; Mar 17, 2007 at 11:16 PM. Reason: Automerged Doublepost


Thread Starter
Senior Member
Joined: 09-16-06
Posts: 1,858
Likes: 1
From: Lewisville, TX
I've been doing some research and have came across of a few photos of a blower that has done this. You can see where he JB welded his wholes here. What these people did was:
~They took the rotors out
~Put gorilla tape on the rotor side of the whole (They claim Duct tape won't hold well enough)
~Held finger over the tape to insure the tape didn't fall off while filling the whole with JB weld.
~Wait over night for the JB to cure.
~Remove Tape and sand smooth the inside of the blower to insure clearence of the rotors.
~And re-assemble.
Thats what i got from numerous post and threads off of National Harley Truck Owners Club. One person claims a gain of 1/2 - 1 lb of boost gain and another said there was no gain but there was a rais in the IAT's of 10 degrees. So i think i'm going to do this starting tomarrow after i get off work and finish it up Monday while i wait on my PCM from TAG. So here is the information i gathered and take it for what it's worth as i haven't tride it for myself yet.
Dave
~They took the rotors out
~Put gorilla tape on the rotor side of the whole (They claim Duct tape won't hold well enough)
~Held finger over the tape to insure the tape didn't fall off while filling the whole with JB weld.
~Wait over night for the JB to cure.
~Remove Tape and sand smooth the inside of the blower to insure clearence of the rotors.
~And re-assemble.
Thats what i got from numerous post and threads off of National Harley Truck Owners Club. One person claims a gain of 1/2 - 1 lb of boost gain and another said there was no gain but there was a rais in the IAT's of 10 degrees. So i think i'm going to do this starting tomarrow after i get off work and finish it up Monday while i wait on my PCM from TAG. So here is the information i gathered and take it for what it's worth as i haven't tride it for myself yet.
Dave
That is a perfect example of what I am going to do, but my plans keep getting f-d up.
Member
Joined: 02-21-06
Posts: 352
Likes: 0
From: Flora, IL
Here's another video i found of the same truck from above. I can't wait to get my PCM so i can hear how loud it's actually gonna be. I wish there was a way for me to take a sound clip for you guys.
http://www.reptilogic.com/HD/vid/venom1.mpg
http://www.reptilogic.com/HD/vid/venom1.mpg

Senior Member
Joined: 03-21-06
Posts: 7,917
Likes: 2
From: CT
Here's another video i found of the same truck from above. I can't wait to get my PCM so i can hear how loud it's actually gonna be. I wish there was a way for me to take a sound clip for you guys.
http://www.reptilogic.com/HD/vid/venom1.mpg
http://www.reptilogic.com/HD/vid/venom1.mpg


Member
Joined: 02-21-06
Posts: 352
Likes: 0
From: Flora, IL
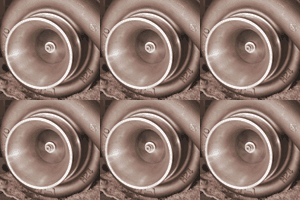
Well, i've got the blower apart and the JB weld is on now i'm just letting it set overnight to cure and hopefully i'll get my PCM tomarrow so i can see how loud this is gonna be. Here are some pics of the progress so far. I will clean it up a bunch when it hardens enough to sand the excess JB Weld off.


Last edited by SStud; Mar 18, 2007 at 04:45 PM.

Member
Joined: 02-21-06
Posts: 352
Likes: 0
From: Flora, IL
Eh, i don't have HPTuners so i wouldn't be able to adjust for the change in air flow that would result from a port job. I just noticed that i have a small verry small leak of oil somewhere off the snout. How do i go about sealing this up? Or will it seal back up when i assemble the rotors back in the casing? The amount of oil that leaked out was less then the condensation off a cold can on a summer day so should i worry about replacing some oil in there?
Last edited by SStud; Mar 18, 2007 at 07:17 PM.


Member
Joined: 02-21-06
Posts: 352
Likes: 0
From: Flora, IL
Yeah i can't get the dang thing apart to reseal it anyway so i guess i'm going to have to just hope that it takes care of it'self. I believe you're right anyway because the amount that is leaking is just such a small amount and it's been leaking for 5 1/2 hours. I emptied out the snout and it looks to me that there is almost 8 oz. of oil that came out so i'm going to just let it go. If anyone has any suggestions please chime in.

New Member
Joined: 02-17-07
Posts: 124
Likes: 0
From: In a House


 cant wait to see/hear the results from this
Junior Member
Joined: 02-06-07
Posts: 432
Likes: 0
From: Corning, NY
is no one else scared that the JB weld might crack out and be forced into your engine at high speeds? This would terrify me  I hope it works out for ya and would love to hear the s/c once it's done though...
I hope it works out for ya and would love to hear the s/c once it's done though...


Senior Member
Joined: 07-01-06
Posts: 1,626
Likes: 0
From: Raleigh NC
you bring up a good point, Here is something I want to know. If the stupid thing gets so annoying that you want to return it back to the way it was or for some unknown reason you get pulled because its a noise violation. How easy is it to get the JB weld out? can you just push it out our do you have to drill then port it out our what? This is a good question also because what if your sc is giving you a problem and you need to take it to the dealership, your going to want it to look stock so they dont say we have to void your warranty due to the jb weld on it.