
Gene's 2.2 LAP Supercharger Build


So I put my guage pillar on. I was kinda upset my Auto Meter gauge doesn't use the mounting back plate like in the 1-pod SS/SC pillar...it's a tight fit, but I can spin it. Is that how it's supposed to go in?
u need to use the black plastic thing that is held on by the 2 studs on the actual gauge, it should of came with little tightening nuts, i have yet to see a gauge w/out them, even the ebay ones use them
Ok... here's an update. Things weren't too good today. It is not good to be the test goat (2009 LAP secondary air injection (SAI) engine).
Got up yesterday morning and took off the front bumper cover. Casey's how-to on this was very good. My headlight bucket bracket was a little different, but I was easily able to figure it out. I also had to remove some pins at the top of my bumper that I didn't see mentioned in his how-to but that could be because mine is a Pontiac.


I then removed the stock air box, etc. I removed the intake manifold, TB, etc. Then I decided to stop for breakfast. Wife got up at this point, lol.

Friend came over so we got to it. Started stripping things off the engine like the coils, fuel rail, etc. Started removing all of the SAI components. Removed the SAI tubing and switching from the back. Removed the exhaust manifold and down pipe. When we got the exhaust manifold and down pipe off we got a little surprise.
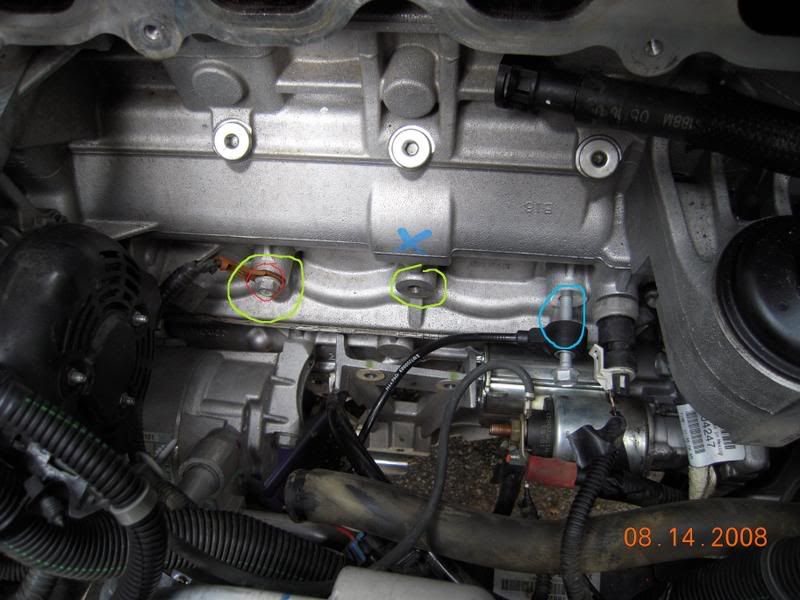
There is a tube connected to the back of my cylinder head that has open ports and the cylinder head has ports for this thing in the back!! This is not on any other year SAI vehicle except for my 2009!! Here is a picture of that tube in a diagram. I was going to take a photo but my friend put it back on before I could get to.

It looks like this when the manifold is bolted up...the holes in the gaskets show you where this tube goes on the back of the head.

I quickly realized that I may have to use the stock exhaust and leave the SAI tubing and switch in the back and wouldn't be able to use the LSJ exhaust manifold or down pipe. After sitting for a few minutes and thinking about it... I decided that I could probably modify the LSJ exhaust manifold to accept this tube.
This picture shows where those holes in the gasket to accept the tube should be on my LSJ exhaust maninfold.

So I took my red paint pen and outlined it on the LSJ exhaust manifold.

Here is the finished LSJ exhaust manifold ready to accept the SAI tube bolted to the back of the cyl head. Should have taken a different picture because it is showing black where I cut it out. It took me 1 1/2 hours of using my grinder, dremel with a diamond bit, etc, to get this to work.

The LSJ exhaust manifold and down pipe are now installed. My rear 02 sensor wouldn't come out of my pipe, so I have to buy a new one tomorrow. I also had to modify the LSJ exhaust manifold heat shield because it wouldn't fit because of that tube behind the cyl head.
I also had a couple of other issues.
I bought the LSJ eninge lift bracket so I could use the pulley boys tension relief tool. Well, when I went to install the alternator bracket to the block it wouldn't fit properly because the engine lift bracket needed to be modified to fit. So I put on my fabricator and modification hat again and I cut out the engine lift bracket so that I would be able to use that on my car with the alternator bracket.
I then decided to test fit the intake manifold. Believe it or not, this didn't go well either. After playing around with it for 30 - 40 minutes... I thought I was going to have to be a fabricator and modifier again... but it will only require slight modification.
If you look in Hunters how-to his starter has a wire with a red boot on the side of the starter. My wire and red boot is on top of the starter, thus not allowing the intake to fully sit down, so with a little bit more modification on the wire and bracket that holds the wire to the starter that will be behind me.
Here is Hunters pic of intake manifold out and starter and wire and all. The red boot and wire that is on the side of his starter is on the top on mine, thus not allowing the intake manifold to fully sit down.
After that it was over 12 hours and I had enough of the problems and the fabrication so I decided to call it a day. Today is Father's day so it isn't a good day to work on my car. I will go back at it this week. I'll see if I can get some better engine bay pics. Sorry about that.
Got up yesterday morning and took off the front bumper cover. Casey's how-to on this was very good. My headlight bucket bracket was a little different, but I was easily able to figure it out. I also had to remove some pins at the top of my bumper that I didn't see mentioned in his how-to but that could be because mine is a Pontiac.
I then removed the stock air box, etc. I removed the intake manifold, TB, etc. Then I decided to stop for breakfast. Wife got up at this point, lol.
Friend came over so we got to it. Started stripping things off the engine like the coils, fuel rail, etc. Started removing all of the SAI components. Removed the SAI tubing and switching from the back. Removed the exhaust manifold and down pipe. When we got the exhaust manifold and down pipe off we got a little surprise.
There is a tube connected to the back of my cylinder head that has open ports and the cylinder head has ports for this thing in the back!! This is not on any other year SAI vehicle except for my 2009!! Here is a picture of that tube in a diagram. I was going to take a photo but my friend put it back on before I could get to.
It looks like this when the manifold is bolted up...the holes in the gaskets show you where this tube goes on the back of the head.
I quickly realized that I may have to use the stock exhaust and leave the SAI tubing and switch in the back and wouldn't be able to use the LSJ exhaust manifold or down pipe. After sitting for a few minutes and thinking about it... I decided that I could probably modify the LSJ exhaust manifold to accept this tube.
This picture shows where those holes in the gasket to accept the tube should be on my LSJ exhaust maninfold.
So I took my red paint pen and outlined it on the LSJ exhaust manifold.
Here is the finished LSJ exhaust manifold ready to accept the SAI tube bolted to the back of the cyl head. Should have taken a different picture because it is showing black where I cut it out. It took me 1 1/2 hours of using my grinder, dremel with a diamond bit, etc, to get this to work.
The LSJ exhaust manifold and down pipe are now installed. My rear 02 sensor wouldn't come out of my pipe, so I have to buy a new one tomorrow. I also had to modify the LSJ exhaust manifold heat shield because it wouldn't fit because of that tube behind the cyl head.
I also had a couple of other issues.
I bought the LSJ eninge lift bracket so I could use the pulley boys tension relief tool. Well, when I went to install the alternator bracket to the block it wouldn't fit properly because the engine lift bracket needed to be modified to fit. So I put on my fabricator and modification hat again and I cut out the engine lift bracket so that I would be able to use that on my car with the alternator bracket.
I then decided to test fit the intake manifold. Believe it or not, this didn't go well either. After playing around with it for 30 - 40 minutes... I thought I was going to have to be a fabricator and modifier again... but it will only require slight modification.
If you look in Hunters how-to his starter has a wire with a red boot on the side of the starter. My wire and red boot is on top of the starter, thus not allowing the intake to fully sit down, so with a little bit more modification on the wire and bracket that holds the wire to the starter that will be behind me.
Here is Hunters pic of intake manifold out and starter and wire and all. The red boot and wire that is on the side of his starter is on the top on mine, thus not allowing the intake manifold to fully sit down.
After that it was over 12 hours and I had enough of the problems and the fabrication so I decided to call it a day. Today is Father's day so it isn't a good day to work on my car. I will go back at it this week. I'll see if I can get some better engine bay pics. Sorry about that.
wow why are you modding the LSJ header? you cant just delete the SAI completely? or are those ports on the actual head? good luck with everything, as a 1 man team my install took ~10hrs including lunch
That sounds about right if you're doing things right!
If I were completely 100% to remove it, I'd have to get a cylinder head! So, I'm just going to fabricate a block off plate for that tubing system.
Out of my approximate 11 hour day yesterday, 3 or more was dedicated to fabrication, lol.
Oh yeah... the bolts on my intake are way too long to use washers or anything to take up the remaining space. They are probably 10 - 15 mm too long. Have to get new intake bolts tomorrow.
Last edited by Gene Culley; Jun 21, 2009 at 08:54 PM. Reason: Automerged Doublepost

well, if it makes you feel better, my install time was 3 weeks since i didn't have any instructions or anything...lol
mostly waiting on parts to arrive, but there were at least two 14 hour days, and numerous little 2-3 hour days here and there...along with a lot of fabrication/attempted fabrication
mostly waiting on parts to arrive, but there were at least two 14 hour days, and numerous little 2-3 hour days here and there...along with a lot of fabrication/attempted fabrication

Senior Member
Joined: 07-29-05
Posts: 7,915
Likes: 0
From: AZ
There are 4 bolts on the IM aside from the 2 you're referring to that need to be replaced. The stock ones are too long so if u pick up 4 bolts the same size as stock but about 10mm shorter you should be good to go.
Also don't worry Gene, my install took about 3 days and then I spent the next 7 days troubleshooting
Also don't worry Gene, my install took about 3 days and then I spent the next 7 days troubleshooting
Last edited by IonNinja; Jun 22, 2009 at 03:32 PM.
Senior Member
Joined: 07-29-05
Posts: 7,915
Likes: 0
From: AZ
I dont remember the size off hand sorry...I'm positive all of those bolts are m6x1.0 but dont remember the length. You'll likely have to take a bolt off and take it into the store with you and get one thats slightly shorter.
well, if it makes you feel better, my install time was 3 weeks since i didn't have any instructions or anything...lol
mostly waiting on parts to arrive, but there were at least two 14 hour days, and numerous little 2-3 hour days here and there...along with a lot of fabrication/attempted fabrication
mostly waiting on parts to arrive, but there were at least two 14 hour days, and numerous little 2-3 hour days here and there...along with a lot of fabrication/attempted fabrication
There are 4 bolts on the IM aside from the 2 you're referring to that need to be replaced. The stock ones are too long so if u pick up 4 bolts the same size as stock but about 10mm shorter you should be good to go.
Also don't worry Gene, my install took about 3 days and then I spent the next 7 days troubleshooting
Also don't worry Gene, my install took about 3 days and then I spent the next 7 days troubleshooting
The GM catalog states the stock bolts are M6x1.0x38. Last night I purchased M6x1.0.25mm and all seems well.
As an update... I was working on installing the intake but decided my 6mm washers were not wide enough to cover the 8mm holes from the stock LSJ. Went to Home Depot and got new bolts and washers. Decided to work on mounting the IC pump, working on the wiring for that and I cut the bracket off my dipstick.
Going to go back at it tomorrow night as I had to mow grass tonight and do some stuff for my business tonight!
Last edited by Gene Culley; Jun 24, 2009 at 12:49 AM. Reason: Automerged Doublepost
Ok, so tonight I start to work on wiring up the IC pump... in the middle of that and had to take a 1 hour business call. Got that taken care of and finished the IC pump wiring and took care of adding the corrugated tubing around all of the wires on it.
I start working on the intake manifold. As I mentioned the other day, my washers were not wide enough in the first place. When I would go to tighten, it would try and suck up the washer in the hole.
So went to Home Depot the other day and got much wider washers. Tonight I torque all of the intake manifold bolts first round to 10 ft lbs. I go to do the second round at 18 ft lbs and something didn't feel right, so I stopped. Tried to do the next one at 13ft lbs, up from 10 and it wouldn't work.....
So now... the wider fuggin washers are apparently standard grade.. and over 10ft lbs starts to crush those bastads!
Now I have go out and find hardened washers so the darn things don't cave in. What gives??
LOL.
It is a pain in the ass.
So I did quite a bit of research this morning.
The LSJ has 8mm bolts in the intake accepting 18ft lbs.
The LAP and some of the others have 6mm bolts and only accepting 89 inch lbs (7.451 ft lbs).
So, I was near the limit of breaking the bolts. LOL.
Tonight when I go to work on it I will torque to 89 inch lbs and move on about my business.
Tonight was a good night for me... YESS finally.
The new washers were a little thicker and did not budge. Instead of the 89 inch lbs I did 10ft lbs. All seems well and the intake manifold is now bolted in its new home.
As far as wiring my intercooler... last night I put the ground wire where the alternator wire was moved to and the starter ground... all in one place.
I also mentioned yesterday we took the power wire up the starter cable and in that corrugated tubing to the fuse block. I drilled a really small hole (just enough to get 16 gauge wire in) the side of the fuse block bottom cover and ran the wire to the top of the fuse block.
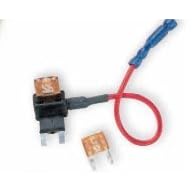
In looking at the service manual, the 15 amp fuel pump fuse below the fuel pump relay is not energized until the fuel pump relay is... so I tapped into that fuse using a "add a circuit" They have an ATM or ATC type. Our fuses are the ATM type. I inserted this into the fuel pump fuse thingy and then added 2 10 amp fuses. I tested the pump tonight and it works fine. I got this at AutoZone tonight.
My tensioner bolt, alternator bracket and idler installed flawlessly. Very fast!! My tensioner pulley does just about rub on the side of the block where the lift bracket was, so that will be grinded off on Saturday.
As far as the washer pump wiring.... there is a corrugated tube running along the top of the radiator mounting panel and it goes from side to side... which looks like my fog lamp wires and all run to. I am thinking of running my washer wiring through there now as it dumps off right into the new washer bottle location.
If not, it looks like I can just wire tie more of the corrugated tubing to the existing (side by side) and run a whole new wiring setup... so no big deal.
I will take pics... but I was working in my garage and it is dark out... and even though my garage is well lit (can lighting) the pics probably wouldn't come out well.
Can take pics of my fuse block and all.
The new washers were a little thicker and did not budge. Instead of the 89 inch lbs I did 10ft lbs. All seems well and the intake manifold is now bolted in its new home.
As far as wiring my intercooler... last night I put the ground wire where the alternator wire was moved to and the starter ground... all in one place.
I also mentioned yesterday we took the power wire up the starter cable and in that corrugated tubing to the fuse block. I drilled a really small hole (just enough to get 16 gauge wire in) the side of the fuse block bottom cover and ran the wire to the top of the fuse block.
In looking at the service manual, the 15 amp fuel pump fuse below the fuel pump relay is not energized until the fuel pump relay is... so I tapped into that fuse using a "add a circuit" They have an ATM or ATC type. Our fuses are the ATM type. I inserted this into the fuel pump fuse thingy and then added 2 10 amp fuses. I tested the pump tonight and it works fine. I got this at AutoZone tonight.
My tensioner bolt, alternator bracket and idler installed flawlessly. Very fast!! My tensioner pulley does just about rub on the side of the block where the lift bracket was, so that will be grinded off on Saturday.
As far as the washer pump wiring.... there is a corrugated tube running along the top of the radiator mounting panel and it goes from side to side... which looks like my fog lamp wires and all run to. I am thinking of running my washer wiring through there now as it dumps off right into the new washer bottle location.
If not, it looks like I can just wire tie more of the corrugated tubing to the existing (side by side) and run a whole new wiring setup... so no big deal.
I will take pics... but I was working in my garage and it is dark out... and even though my garage is well lit (can lighting) the pics probably wouldn't come out well.
Can take pics of my fuse block and all.