Making a list...


 01-02-2012, 11:41 PM
#152

No, I've heard the aftermarket ones are a mixed bag for the rear. Some love, others don't. I don't get the wallow of the hhr and find my balt has a **** ton of grip on high speed turns, my open diff is currently my limiting factor in how fast I can take on/off ramps as I loose the ability to push out of the turn before I loose 4 wheel traction. With the EP LSD, I may get sent back to the drawing board.
01-04-2012, 11:13 PM
#153
Uploaded a few more pics of the pistons, rods and my head port is getting there. Check out how beef the ZZP rod is compared to the stocker...and its 40g lighter and good for 3x the power...nuts man. Also there is a pic of the etorx showing how the bit needs to be narrow...I ground a bit off so it would get to the bolt. Should have the ex port finished tomorrow which is very extensive as I have found out. I matched the gasket too. I noticed it was actually causing a restriction at the head. Make sure you open up your gasket too. I am just going to smooth out the intake since it looks like it flows well already. Also picking up rod bearings tomorrow. Ordering some valve seals from ZZP and Tim got my clutch out so that will be here tomorrow too. The forged parts are about 100g lighter per rod/piston combo and the ring lands are about 1.7mm thicker than the stock pistons. If I get all my stuff before the weekend I might have the engine back together by Sunday.
Last edited by hhrfreek; 01-04-2012 at 11:18 PM.
01-10-2012, 12:18 AM
#154
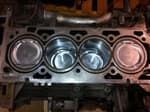
Alright! Made some progress. Got the pistons/rods installed, finished porting the head, assembled the head and tomorrow I will have the head back on the block. Pistons look frickin awesome in the block:


Few pics of the port in my gallery. I did minor porting to the intake. Just matched the valve seat up to the runner and took a little off the short radius. They are so wide open to begin with I didn't want to bother too much. The exhaust I opened up a lot. Also lapped the valves. You can see the fresh ring on the valve seat. Well worth the 45 minutes to make sure they mate up perfectly. I want to say the motor will be going in on Wednesday...but this **** just takes a long time lol.
Few pics of the port in my gallery. I did minor porting to the intake. Just matched the valve seat up to the runner and took a little off the short radius. They are so wide open to begin with I didn't want to bother too much. The exhaust I opened up a lot. Also lapped the valves. You can see the fresh ring on the valve seat. Well worth the 45 minutes to make sure they mate up perfectly. I want to say the motor will be going in on Wednesday...but this **** just takes a long time lol.
01-10-2012, 12:37 AM
#156
LOL I will likely get flamed for this, but I used my Dremel. Honestly I think it works great. This is the 3rd port I have done with it too(TB, SC, head). I picked up a few aluminum bits and a lot of sanding drums. I didn't do a fine polish on it though since the gains are in the volume.
01-10-2012, 02:13 AM
#157
Looking good 
No flame here, I have one for the very same reason. Mine is a 1.5Amp though, I've been looking at some nicer 4+ amp Makitas lately as I have the LNF head, a spare LE5 head and a spare SC and would like to port them all.
Did you use the bore brush on those cylinders? What about any sleeve measurements to check for roundness, I'm personally worried most about how hard the new rings are going to be to seal and am hoping I've got fairly round cylinders...not that I intend to really do much if they are.
Euthanasia is ready to go, I've got to pay the man out and get my ported head delivered.
01-10-2012, 08:39 AM
#158
I used the three stone hone for this. I was going to get a ball type glaze buster, but I wanted to use the 3 stone to make sure all the points in the cylinder were the same. The ball type contours any deviation and does not remove material, not that we want to, but I had a slight amount of scuffing/glazed at the very top of the bore where the pistons change directions. It took a long time to remove the glazing. The stones remove material super slow...like your spinning 400grit with light pressure. I used the stone hone until the it removed all the wear marks from the old pistons. Nothing was deep, I couldn't even feel any of the wear with my fingernail. I did not have a bore measuring gauge so I simply took my feeler gauge and put it at the skirt and checked all around the bore for clearance and I think it'll be fine. Not an accurate way to measure though. I did check end gap and filed the rings for each cylinder as well.
I found the best rpm seemed to be around 20k for all my porting work. Thats according to the Dremel dial on the tool. And I had to use a solvent like WD40 to keep the bits from clogging up with aluminum, if I kept on the solvent they never clogged. I put around 10-12 hours into the port. The intake was only about 2 hours of that since I just modded the seat area.
I found the best rpm seemed to be around 20k for all my porting work. Thats according to the Dremel dial on the tool. And I had to use a solvent like WD40 to keep the bits from clogging up with aluminum, if I kept on the solvent they never clogged. I put around 10-12 hours into the port. The intake was only about 2 hours of that since I just modded the seat area.
01-10-2012, 12:37 PM
#160
Junior Member
iTrader: (1)

Join Date: 02-09-09
Location: Canada
Posts: 401
Likes: 0
Received 0 Likes
on
0 Posts
hey guys just wondering why you did not keep LS4 tb?
and one more thing with a 2.9 pulley which injectors would work best?
right now im on 42lbs
and one more thing with a 2.9 pulley which injectors would work best?
right now im on 42lbs
Last edited by DCOBALTSS; 01-10-2012 at 12:43 PM.
01-10-2012, 02:24 PM
#161
Balancer chain is easy,orientation doesn't matter with the neutrals. With Cylinder #1and #4 at TDC and 3 marks on the timing chain, 5 o'clock on the crank, 10 o'clock on the exhaust side and 2 o'clock on the intake side, this isn't ours exactly but the pics should help: Ecotec 2.2 timing mark line-up - SaturnFans Photo Forums
Not looking forward to it myself, I haven't found a really good writ up but this one is around out there:
set the engine to TDC compression, spin the crank by using the bolt that hold the pulley on. Since the spark plugs are out you can use a long screw driver or something like it to stick in the #1 spark plug hole, DO NOT USE SOMETHING THAT CAN FIT ALL THE WAY IN THE CYLINDER!!! Now with the screwdriver in the spark plug hole slowly turn over the engine until the screw driver is at its highest point, since it’s resting on the piston top the piston will push it up. When the screw driver is at its highest point look at the marks on the cam gears.
look at the chain itself, there will be 3 colored links, from what I've heard the color is different from year to year but there are 3 colored links. You need to line up the 3 colored links with the marks on the cam gears and crank gear and since the chain is loose you can freely rotate it to the position to make the markings line up. There will be a white dot on one of the teeth on the crank, one link to that tooth, one colored link to the triangle on the exhaust cam and the 3rd colored link to the diamond on the intake cam. You will most likely have to rotate one or both of the cams slightly to get the marks to line up. Once all three colored links are lined up with the 3 timing marks bump the crank just a little bit to get all of the slack from the chain to the tensioner side of the engine. Reinstall the 10MM that holds the bottom of the tensioner chain guide then put the top tensioner bolt back in the big 1 1/4 inch one. Make sure all the marks still lined up right, the cams have a tendency to jump, it helps a ton to have an extra set of hands holding the cams in place while you mess with the chain (a big pair of vise grips will work, or a 7/8” wrench I think it was). Once the chain guides are back on and the tensioner bolt is in and tight, check again to make sure all the timing marks line up. Then spin the engine over by hand a few times to make sure nothing is hitting. When you spin the engine over the timing marks WILL NOT line up again after spinning the engine over, the number of teeth on gears and links on the chain it doesn’t line up anymore after you spin the engine, mathematically it will eventually line up again but your going to be there a LONG time spinning the engine by hand before it all lines up again. If nothing is hitting then you’re done.
01-10-2012, 03:08 PM
#162
Thanks...though I need the balance shaft info too since I am retaining them for the time being. I can't seem to find some solid info on that. I did come across what you posted and I will be following that too. Just pissed I didn't pay better attention when I took it apart to save time with this.
01-10-2012, 03:30 PM
#163
Oh ****, forgot about that holmes. Yeah the balance shafts matter if you've kept them  Alignment marks for that too, some decent pics here: How To: Ecotec Balance Shaft Delete - Performance Forum - j-body.org - the jbody organization
Alignment marks for that too, some decent pics here: How To: Ecotec Balance Shaft Delete - Performance Forum - j-body.org - the jbody organization
01-10-2012, 04:01 PM
#164
Ok thats how I set it up...Ex arrow down at colored link, In arrow up at link and then onto the crank. Lines up perfect, but I thought the shafts spun opposite of each other...this set up they are in sync meaning both weighted sides are down. This is the second separate example of this so I think it is right. Ok on to the cam timing.
01-10-2012, 10:50 PM
#165
If your 42# keep up then no need to upgrade. They are likely fine, but hard to say without seeing a scanner log.
Oh ****, forgot about that holmes. Yeah the balance shafts matter if you've kept them Alignment marks for that too, some decent pics here: How To: Ecotec Balance Shaft Delete - Performance Forum - j-body.org - the jbody organization
Also need to pick up another tensioner. Noticed its cracking:

This could be the reason though:
 01-11-2012, 02:51 PM
#167
lol, hopefully that is all the heartache you've got from all this!
The balancer shafts do spin in opposite directions, but no idea how they configure internally as most info out there is how to replace them lol.
Timing links work out ok? Was it as easy as it seems?
LS4TB is even worse with an auto, never wants to slow down while driving when it is acting up.
The balancer shafts do spin in opposite directions, but no idea how they configure internally as most info out there is how to replace them lol.
Timing links work out ok? Was it as easy as it seems?
LS4TB is even worse with an auto, never wants to slow down while driving when it is acting up.
01-11-2012, 07:31 PM
#168
Yeah timing was np...yet ha. I will know when i turn it over. Dealer gave me the tensioner for cost so it was 77 vs 127 bucks. He said he was in a good mood lol. Also ran into another issue...I didn't get pressure plate to flywheel bolts in the clutch kit. I was just going to reuse my old ones but they are m6x1.0 and the new flywheel needs m8x1.25 and the local dealer won't have them till Tuesday so i am going to try and find hardened bolts at the hardware store otherwise i am sol. Im gonna ask zzp if they were supposed to be included i am thinking yes...
01-12-2012, 01:48 AM
#169
NO...you mean ZZP forgot some bolts...???
NEVER.
Reminds me of the SC kit, 40 something instructions and they fucked up on #2. So there I was, middle of the night with bolts that didn't fit the lower intake manifold support bracket. Oh I was pissed! And thinking, if step #2 is wrong just what have I gotten myself into...
NEVER.
Reminds me of the SC kit, 40 something instructions and they fucked up on #2. So there I was, middle of the night with bolts that didn't fit the lower intake manifold support bracket. Oh I was pissed! And thinking, if step #2 is wrong just what have I gotten myself into...
01-12-2012, 09:20 AM
#170
LOL Yeah! I didn't get bolts with my kit. I scavenged through every bit of packaging and nothing. Then I called them and they sent them right away, but I ran into the same thing you did as all the bolts were not right. Tim got back to me and it sounds like I was supposed to reuse my current bolts, but the SS flywheel that the kit uses needs M8 fasteners. Some things just get over looked I guess...My question is why didn't the others that bought this clutch bring it up to them. Oh well.
Going to pick up some antifreeze. Hopefully I will get to that point today. lol
Going to pick up some antifreeze. Hopefully I will get to that point today. lol
01-13-2012, 12:12 AM
#171
Drove the car home today.
Took me about 10 hours to drop it back in and get everything buttoned up. I am thrilled right now...just too bad the day I finish is the day it finally snows. Roads are so bad I was just spinning all over so it'll be a few days before I get to cruise around. I didn't have my laptop on me so I drove it home on the current tune and it still drove like normal, but I kept the 60s. I will start tuning when I can, then throw in the 80s.
I turned it over a few times to get the oil pressure up with out the injectors connected as Tim told me. Then I connected them, fired it up and it chugged to life and purred like a lion Certainly a different exhaust note from the port/pistons. The idle sound is deeper. Both my friend and I would never have guessed 4 cylinder if it were a blind test. Happy about that. I idled it up to temp and burped out the air. The clutch really does feel awesome. I bet the pedal pressure is a 1/3 of what the Exedy was. I bet its damn close to stock. I was slamming my foot to the floor a few times then got the hang of it. Good to know I can get great holding power with stock feel. Can't tell anything of the lighter flywheel yet since the roads are slick and I don't have my winter wheels on yet. Throwing those on tomorrow. Oh also the new spring tensioner is super stiff the other one was def on its way out.
Took me about 10 hours to drop it back in and get everything buttoned up. I am thrilled right now...just too bad the day I finish is the day it finally snows. Roads are so bad I was just spinning all over so it'll be a few days before I get to cruise around. I didn't have my laptop on me so I drove it home on the current tune and it still drove like normal, but I kept the 60s. I will start tuning when I can, then throw in the 80s.
I turned it over a few times to get the oil pressure up with out the injectors connected as Tim told me. Then I connected them, fired it up and it chugged to life and purred like a lion
 01-19-2012, 02:48 AM
#173
Some info on the ATI overdriven harmonic balancer:
OEM balancer OD is 6.16"
ATI is 10% overdriven, so 6.78"
This gives a circumference of 19.35" for the OEM and 21.30" for the ATI. The question for me is much of that circumference does the belt actually touch, because that determines the additional length of belt required to run a pulley of the same size between the OEM and the ATI.
If it is 50% of the balancer that the belt actually touches, I'd need a belt 1" longer. I'm thinking I'll pick up 3 sizes, 71, 715 and 72 and should be able to run all the pulleys I've got (3.4,3.1, 2.9) with that but I wish I had better info.
It is freezing out, or I'd go and eyeball the crank to try and get a better % guesstimate.
Anyways, in other news ZZP won't install EPs clutch type LSD into their tranny. *******. Says the physics doesn't support it being able to work and while I know it isn't the highest tech it has many OEM applications and has got to be better than an open diff any day. So I've got to decide if I get both anyways and pay someone locally to install (I've got a wise old tranny guru who freelances that may be interested) or just go open diff with a built tranny. yay.
Powell never replies to my emails, a couple times now I've inquired about his Spherical CABS and Delrin Leading CABS and ZZP has pulled their control arms from the market due to a failure. I'm gonna have to call him I guess, need to stop this clunking as it is driving e nuts, whoever designed these front ends is a bitch.
01-19-2012, 08:47 AM
#174
LOL. I had to replace my CAB a few months ago. The drivers side was coming apart. Since my car is an '06 it had the bushings with the cutouts. I just picked up the solid version from the local parts store for the time being. At some point I am picking up the OTTP bushings.
Thinking back to my open diff...
Pros:
It has no noticeable operational noise
It tracks much better in the snow
Cons:
Uneven pavement or slight turning under wot throws a wheel into instant wheelspin
LSD:
Pros:
WOT turning or uneven pavement doesn't matter
Launches are quicker
Allows 1st-2nd to be way more fun
Cons:
Minor hum from the lsd
Does not track as well in the snow
The hum is minor and may just be from my OBX...wondering if a Quaife would be silent. Clutch type is probably quiet too. Also I noticed when turning in the snow while accelerating(light throttle/daily driving), the open diff spins the inside while the outside wheel maintains grip and tracks the car better. With the lsd both wheels will spin and I get bad understeer.
If you want great summer fun though you're going to be wishing you had an LSD
01-20-2012, 03:09 PM
#175
OBX eh? Chinese stuff, I hope it doesn't come unglued and gum up ur works. I'll spend some freek coin: Quaife LSD Chevrolet Cavalier Pontiac Sunfire 2002-05 - Cobalt 2005-10 2.2/2.4L Ecotec - Drivetrain - Turbo Tech Racing, LLC
 !
!
I'd be all over that ****, yeah not cheap but Quaife, mmm
<-
Powell got back, $225 and $199 plus shipping...ouch, was hoping for $350 packaged deal. ZZP has their new arms in production so it shouldn't be long and only $75 more. Tough choice.
!I'd be all over that ****, yeah not cheap but Quaife, mmm
Powell got back, $225 and $199 plus shipping...ouch, was hoping for $350 packaged deal. ZZP has their new arms in production so it shouldn't be long and only $75 more. Tough choice.