
2.0 LSJ Engine: How to install the "INGALLS Engine Damper" for your Cobalt SS/SC

Thread Starter
Senior Member
Joined: 06-30-05
Posts: 1,123
Likes: 1
From: Ottawa, Canada
How to install the "INGALLS Engine Damper" for your Cobalt SS/SC
How to install the "INGALLS Engine Damper" for your Cobalt SS/SC
By: Denny Medeiros-Cobaltss.net
You read the review now lets get right to the
install (Approx: 20-30 minutes)
Tools needed.
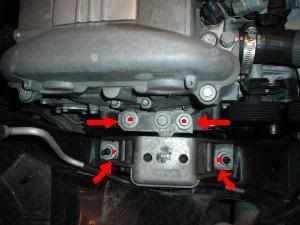
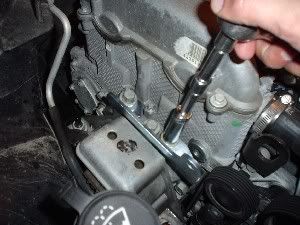
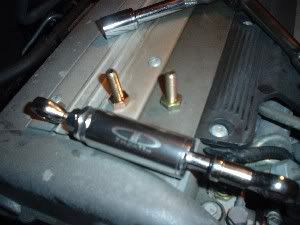
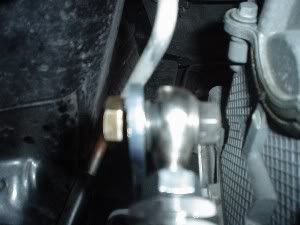
O.k in red you can see the 4 bolts that we need to
take out lets start with the 2 closest to the engine
VERY IMPORTANT Only do 1 row at a time
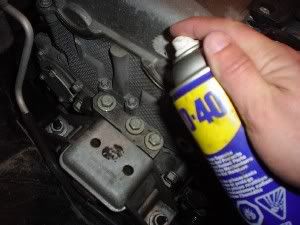
Little WD-40 on those bolt to help taking them out easier.
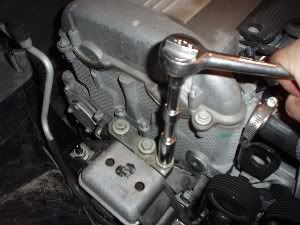
Take the First bolt out....
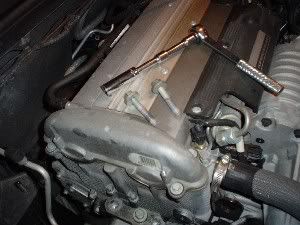
Second bolt out now their sitting on top of the engine...
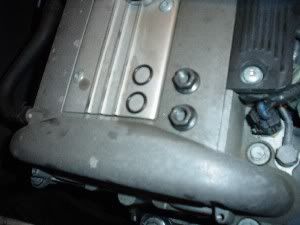
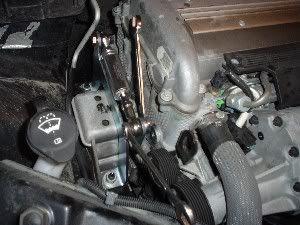
Now put the small braquet in this direction...bolt it down same way you took them out...
GM Torque specs are 37 pounds
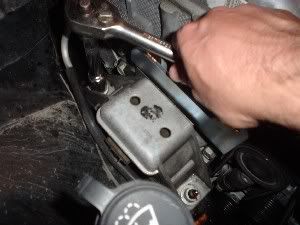
Now attack the second row..these are nuts and not bolts....
There done 2 Nuts are out and rested on the engine...
Now but in the other braquet in this direction bolt the nuts back in same spot....
GM Torque specs are 74 pounds

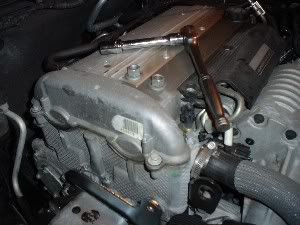
Now all bolts are torque down make sure those bolts and nuts are really tight....thats what
it should look like so far....
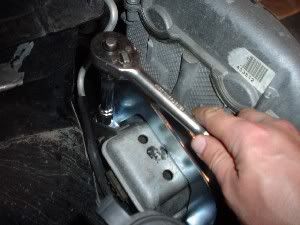
Now located the 2 bolts and brace from the kit.....
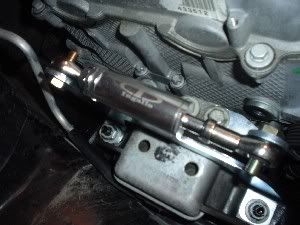
Test fit it in like this...one bolt facing one way the other facing oposite way....
o.k now locate the nuts and rubber washers.....
So now make sure the rubber washer is in between the brace and braquet like this....
Same on other side....
Now you can use 2 (open/closed ended wrenches) like I did to tighten both ends....make sure these are tight.
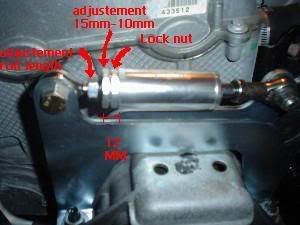
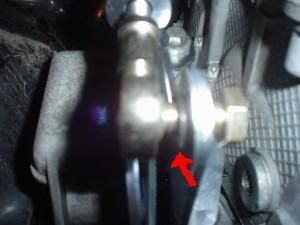
Here's a little diagram on proper adjustement
For adjustment follow this guideline
And VOILA!! Done now go test drive your car....bye bye Wheel Hop!!
Big thank you to INGALLS Engineering Company .
If you have anymore questions regarding the ( Install , product) E-mail:robs@ingallseng.com
By: Denny Medeiros-Cobaltss.net
You read the review now lets get right to the
install (Approx: 20-30 minutes)
Tools needed.
- Wrench, with long reach
- Deep socket
- 18mm Long Socket
- Socket 15mm
- 2 open/closed ended wrenches
- Some WD40 (always a good ideal)
O.k in red you can see the 4 bolts that we need to
take out lets start with the 2 closest to the engine
VERY IMPORTANT Only do 1 row at a time
Little WD-40 on those bolt to help taking them out easier.
Take the First bolt out....
Second bolt out now their sitting on top of the engine...
Now put the small braquet in this direction...bolt it down same way you took them out...
GM Torque specs are 37 pounds
Now attack the second row..these are nuts and not bolts....
There done 2 Nuts are out and rested on the engine...
Now but in the other braquet in this direction bolt the nuts back in same spot....
GM Torque specs are 74 pounds
Now all bolts are torque down make sure those bolts and nuts are really tight....thats what
it should look like so far....
Now located the 2 bolts and brace from the kit.....
Test fit it in like this...one bolt facing one way the other facing oposite way....
o.k now locate the nuts and rubber washers.....
So now make sure the rubber washer is in between the brace and braquet like this....
Same on other side....
Now you can use 2 (open/closed ended wrenches) like I did to tighten both ends....make sure these are tight.
Here's a little diagram on proper adjustement
For adjustment follow this guideline
- Counterclockwise turn the big Lock nut a few turns
- Now clockwise turn the adjustment Nut ( I think 2 full turns brings it from 14mm to 12mm) but measure to
make sure. - Now that its set clockwise turn the locking nut tight
- Because you made the damper shorter...you need to adjust the length for a perfect fit
- Counterclockwise turn the small lock nut a few turns
- Now Counterclockwise turn the arm a few turns then test fit
- If it fits good then clockwise turn the small lock nut tight
And VOILA!! Done now go test drive your car....bye bye Wheel Hop!!
Big thank you to INGALLS Engineering Company .
If you have anymore questions regarding the ( Install , product) E-mail:robs@ingallseng.com
Last edited by denny; May 12, 2006 at 05:34 PM.
Former Vendor
Joined: 02-14-06
Posts: 1,885
Likes: 0
From: Western NY
We are an Ingalls WD and have a great deal runnin on the stiffy...........
https://www.cobaltss.net/forums/dezod-motorsports-118/ingalls-super-viagra-stiffy-sale-19310/
:tup:
Hey Rob! What's up!??!?!?
https://www.cobaltss.net/forums/dezod-motorsports-118/ingalls-super-viagra-stiffy-sale-19310/
:tup:
Hey Rob! What's up!??!?!?
Great write up! We still have these for $164.99 shipped and you also get almost $6 in reward points!
If anyone has any questions please let us know
Thanks again for this great write up.
If anyone has any questions please let us know
Thanks again for this great write up.


Thread Starter
Senior Member
Joined: 06-30-05
Posts: 1,123
Likes: 1
From: Ottawa, Canada
Originally Posted by sneaky
Don't think his is a stock motor mount.
Thank you! for the all the nice feedback on my "how to"

To answer your question on my motor mount not being stock, my cobalt SS/SC is a 2005 and the motor mount is stock. It's possible the 2006 use a different motor mount. The Engine Damper fits both 2005/2006 cobalt SS/SC.

New Member
Joined: 02-22-06
Posts: 105
Likes: 0
From: Denver
Originally Posted by Xenozx
My engine mount looks different then yours. It has metal lines on it that stick up, is that normal?
Main thing is to make sure the damper is installed with both brackets as parallel as possible...
New Member
Joined: 02-22-06
Posts: 105
Likes: 0
From: Denver
Originally Posted by cmj917
What are the advantages / disadvantages to doing this rather than a stiffer engine mount (like the one from ZZP)? It seems like the net effect is essentially the same.
1. easier install than motor mounts
2. is adjustable in relation to dampening(soft for hot dates, stiff for track) maybe the other way around hehe sorry couldn't help myself..
3.Takes care of majority of engine movement from front to back on decell and acccel. I personally recommend this in conjunction with mm's cause they take up the residual engine movement from side to side...
4. eliminates wheel hop and torque steer
disadvantages
1. Resonation! The stiffer you make the engine the more you transfer vibrations weather it is mm's or stiffy damper(get dynamat extreme and put it around the strut area to decrease vibrations.) I did this on my car and it defintily helped the vibration issues and I have racing mm's..


Member
Joined: 03-10-05
Posts: 334
Likes: 0
From: Western Canada
did you mount that brace backwards??
the ingalls installation doc indicates that the adjustable end of the brace should be mounted on the chasis bracket, while the other end with the piston should mount to the engine bracket.
just wondering.....
http://www.ingallseng.com/graphics/W...0breakdown.pdf
the ingalls installation doc indicates that the adjustable end of the brace should be mounted on the chasis bracket, while the other end with the piston should mount to the engine bracket.
just wondering.....
http://www.ingallseng.com/graphics/W...0breakdown.pdf


Member
Joined: 06-02-05
Posts: 196
Likes: 0
From: Grandville, MI
Originally Posted by Rx.
Does the LSD help with the wheel hop at all?
Senior Member
Joined: 07-28-05
Posts: 2,782
Likes: 0
From: Ottawa
Denny took the time to meet up with me after work yesterday to show me the dampner. It looked really nice since it was the cleanest part under the hood lol sorry Denny... But the install looks great! Anyone know the life span of these? Im definatley ordering one now.. As soon as I get off my ass and order it that is.