
2.0 LSJ Engine: "How to" Install COMP/ZZP S1 Cams, Supertech 75# Valve Springs, & GMR Cylinder Head

Thread Starter

Joined: 12-30-07
Posts: 14,079
Likes: 197
From: NEPA
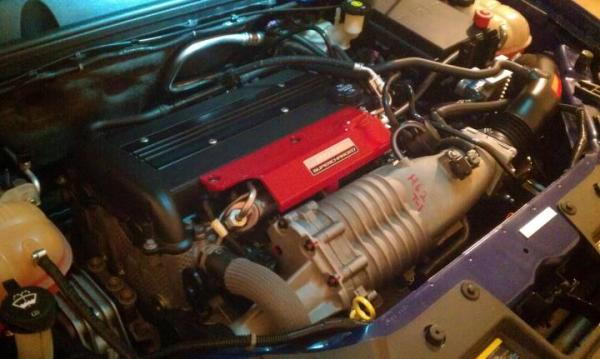
"How to" Install COMP/ZZP S1 Cams, Supertech 75# Valve Springs, & GMR Cylinder Head
Well, I just finished installing my COMP Cams/ZZP S1 Cams & Supertech 75 lb Dual Valve Springs last week (1-18-13), and decided it would be nice to make a "how to" for you guys. In this "how to", I will explain what is required to install cams & valve springs with the cylinder head installed, and what it takes to get the job done. I worked on my car over the course of 4 weeks, and had some ups & downs, but in the end, everything turned out great!!
Before you get started, there are some items you will want to make sure you have (see below):
- Ecotec 2.0L LSJ Power Book
- Haynes Repair Manual
- Kent-Moore J-43655 (cam gear bracket)
- Kent-Moore J-43649 (valve spring compressor)
- Craftsman 125 psi, 3 gallon Air Compressor (This is what I used)
- Modified 14 mm (long reach) thread, Compression Tester Fitting
- Torque Wrench
- 15/16 Open Ended Wrench
- Extendable Mirror
- Magnet
- Engine Assembly Lube
Ok, let's get started....
- Disconnect the negative terminal on the battery.
- Remove the cam cover (I'm not going into detail for this).
- Remove the spark plugs.
- Jack the car up, and remove the passenger side front wheel.
- Remove the inner splash guard.
- Place a 21 mm socket & wrench on the harmonic balancer pulley bolt.
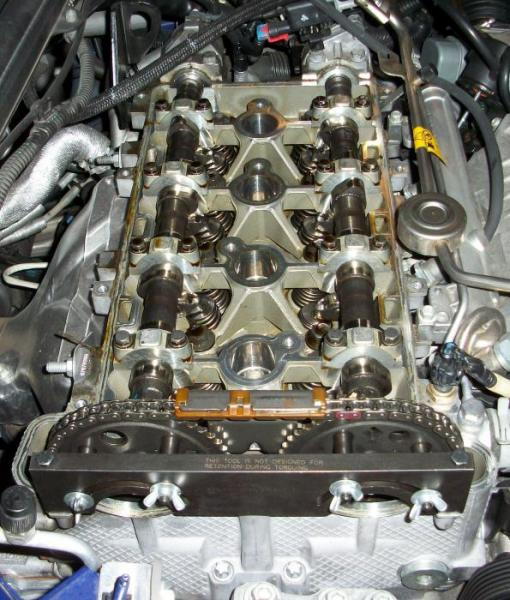
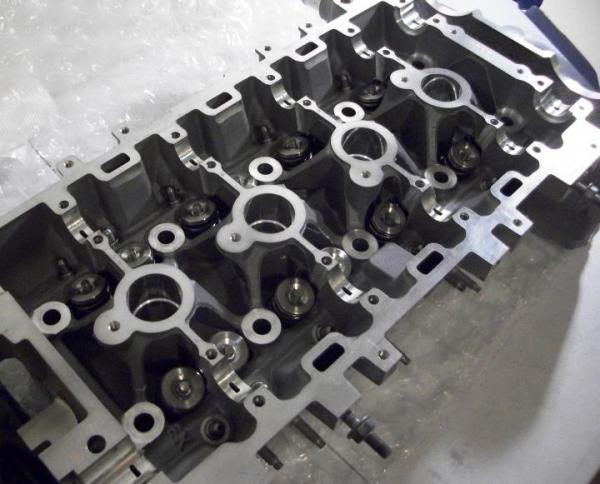
- Rotate the engine clockwise until you reach TDC for cylinder #1's compression stroke (see photo/illustration below).
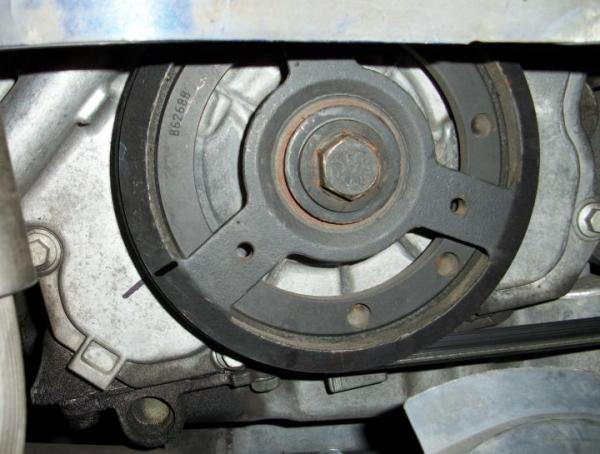
- In the photo above, notice the black mark I made. I made this mark to help me line up the timing marks on the harmonic balancer pulley & front cover quicker.
Note: You will still need to make sure the timing marks on the harmonic balancer pulley, & front cover are aligned properly (See the illustration below). This is where the extendable mirror will come in handy, because the timing mark on the harmonic balancer is on the backside of the pulley.
Tip: You are at TDC for cylinder #1's compression stroke when the exhaust cam gear triangle is pointing at 10 o'clock, and the intake cam gear diamond is pointing at 2 o'clock, & the timing marks on the harmonic balancer pulley/front cover are aligned (see photo below).
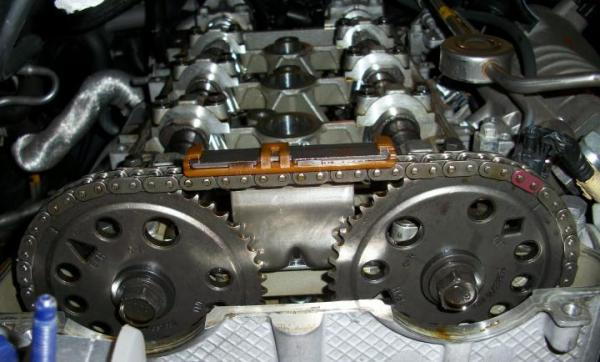
- Now rotate the the harmonic balancer pulley back counter clockwise until the intake cam gear diamond is at 12 o'clock (see photo below).
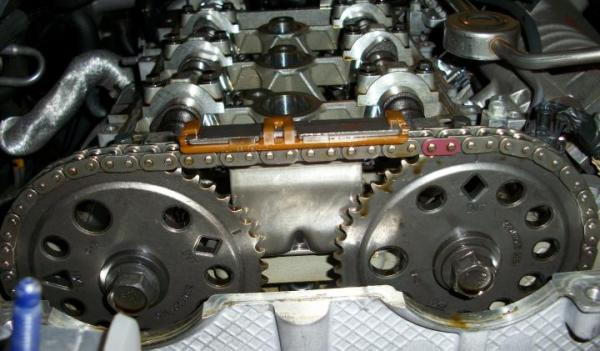
Tip: Make sure to rotate the harmonic balancer pulley counter clockwise until the intake cam gear diamond goes back past 12 o'clock slightly, and then rotate forward (clockwise) lining the intake cam gear diamond at 12 o'clock. This will assure there is no slack in the timing chain. This important tip will come into play later on (you will understand).
Note: The Haynes Repair Manual does not mention my tip on how to avoid slack in the timing chain, and should have been added to avoid what happened during my cam/valve spring install.
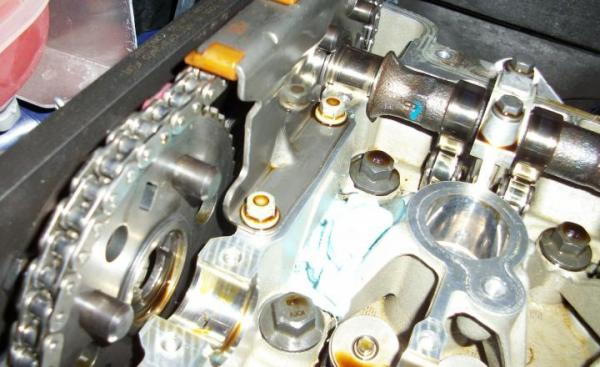
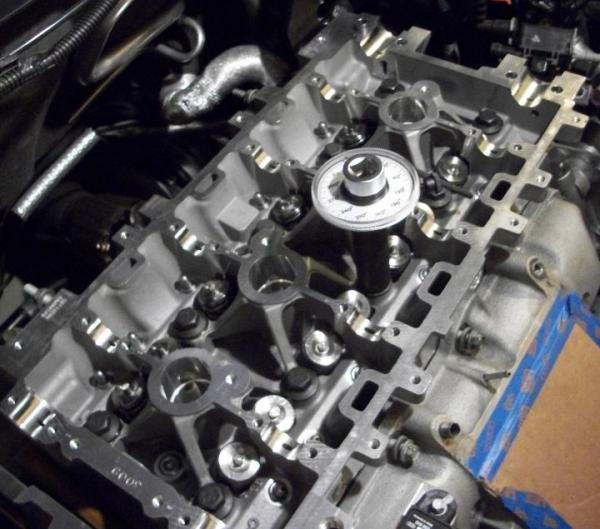
- Now install the Kent-Moore J-43655 (cam gear bracket) as seen in the photo below.
Tip: Place the four (4) studs in the holes in the cam gears first, then bolt the bracket to the cylinder head, followed by pulling the studs towards the bracket, and installing the wing nuts.
- Next remove the 18 mm cam gear bolt from both cams (place a 15/16 open ended wrench on the hex of the cam to prevent them from turning).
- Pull/slide the cam gears off of the cams back towards the Kent Moore bracket.
- Double check to make sure the wing nuts on the cam gear bracket are snug in order to hold the cam gears and timing chain assembly secure.
- Remove the cam bearing caps slowly and evenly, allowing the cams to "lift" from the cylinder head.
- Remove the cams & rocker arms.
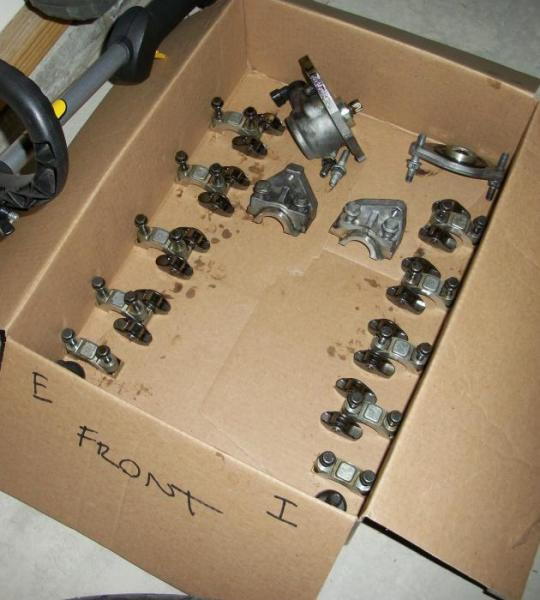
Important: Do not mix up the cam bearing caps or rocker arms. Place them in their original orientation in a marked/organized box as you remove them (see photo).
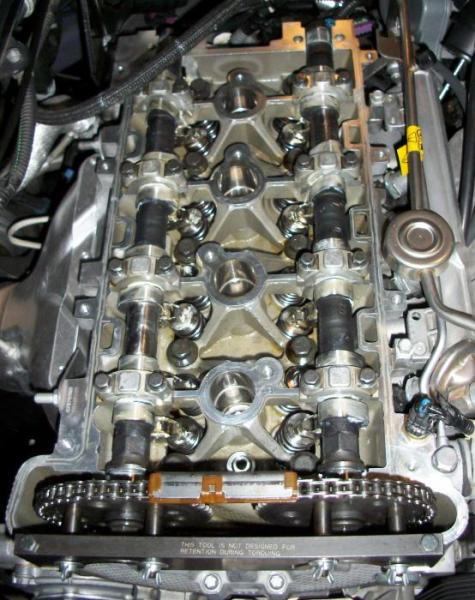
- Now it's time to install the Kent Moore J-43649 (valve spring compressor), as shown in the photo below.
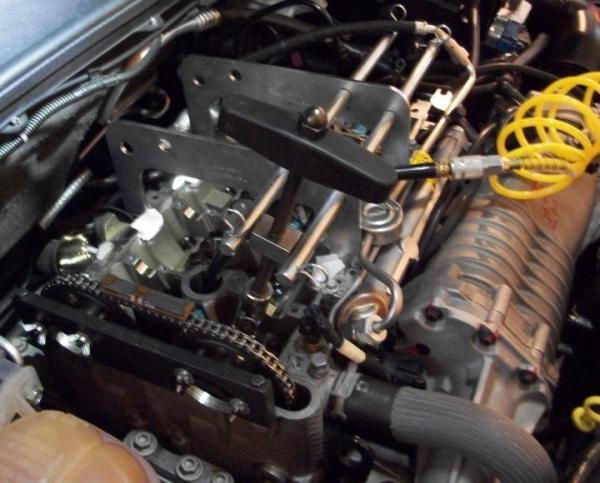
Tip: Make sure to plug oil passages, spark plug chambers, and around the cam gears with a clean rag. This will help prevent anything falling down into the crank case.
- Take your modified compression tester fitting (see photo below), and hand thread it into the spark plug chamber. I started at the front of the engine (cylinder #1), and worked my way over to the back of the engine (cylinder #4) when removing/installing my valve springs.
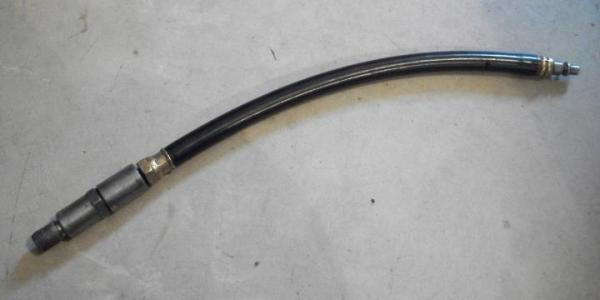
- Now connect your air compressor to the compression tester fitting (see photo below).

Tip: I set the regulator on my air compressor to around 95 psi. This allowed ample air pressure for keeping the valves up.
Valve spring removal/installation:
- Slowly turn the Kent Moore spring compressor handle clockwise until the valve spring has compressed enough to expose the keepers.
Tip: Make sure the spring compressor is centered on the valve spring retainer, & the opening on the compresser is turned to allow you to easily access the valve keepers (see photo below).

- Take your magnet, and collect the valve keepers with it (take your time).
- Slowly turn the valve spring compressor handle counter clockwise to release compression, and remove the valve spring.
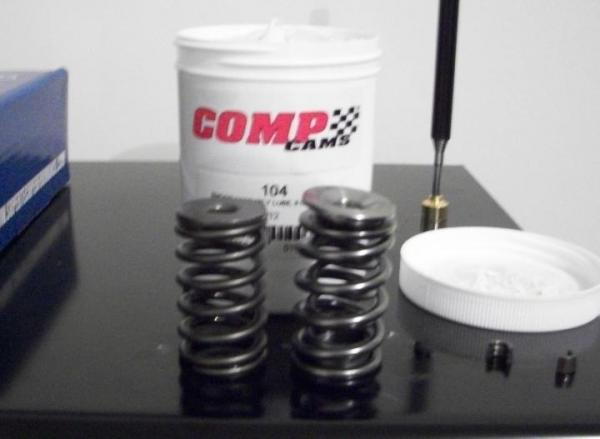
- Organize your Supertech valve spring kit, and begin assembly/installation of the new springs (see photo below).
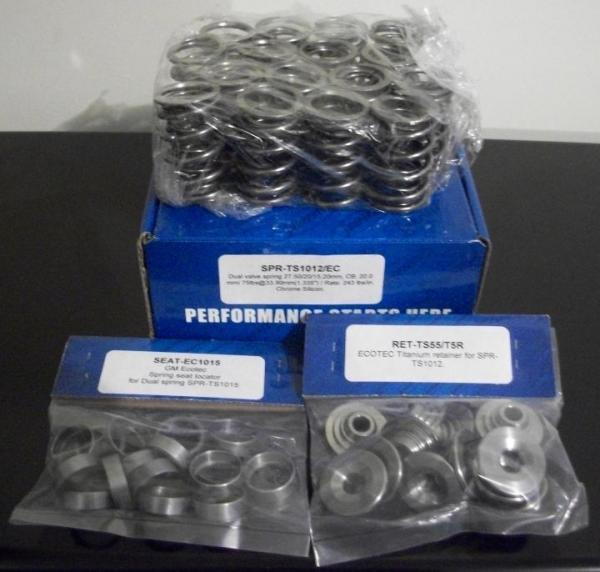
- The photo below shows the comparison between the stock valve springs (left) vs. the Supertech 75 lb dual springs (right).
- Begin installing your Supertech springs by first placing the inner spring seat locator around the valve stem, followed by the valve springs and retainer.
- Place the Kent Moore spring compressor as you did while removing the springs, and slowly compress the spring until the three (3) groves at the top of the valve stem are completely visible.
- Add a dab of greese to a small flat head screw driver, and place the keeper onto the greese at the edge of the screw driver blade (see photo below). (I stole this helpful little tip from the LSJ Build Book).
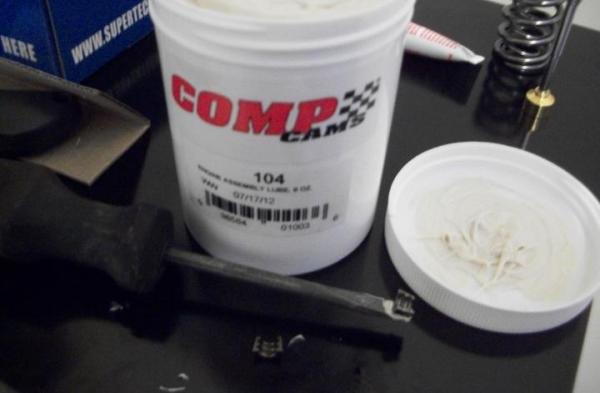
Important: The keepers are some what concave, and need to be installed correctly. The wider portion of the keeper is the top (as seen in the photo above).
- Carefully place the screw driver with the keeper up against the three (3) grooves at the top of the valve stem. The keeper will simply attach.
Important: Take your time & be very careful not to drop/loose a keeper!! They are VERY tiny!!
Tip: Push the keeper you just installed around towards the back of the valve stem. This will make installing the second keeper easier.
- Once both keepers are installed, slowly turn the spring compressor handle counter clockwise to release/lock the spring.
Tip: While you release compression on the spring, make sure both keepers are end to end, and attached correctly to the three (3) groves on the valve stem.
Note: Installing/removing the rear valve springs is a pita, due to the cowl cover and the angle of the engine. You will need to place a jack under the engine, and slowly jack the engine up/forward. This, along with lifting the cowel cover up will give you just enough clearance to get the job done (see photo below).

- Follow the steps above for the rest of the valve springs.
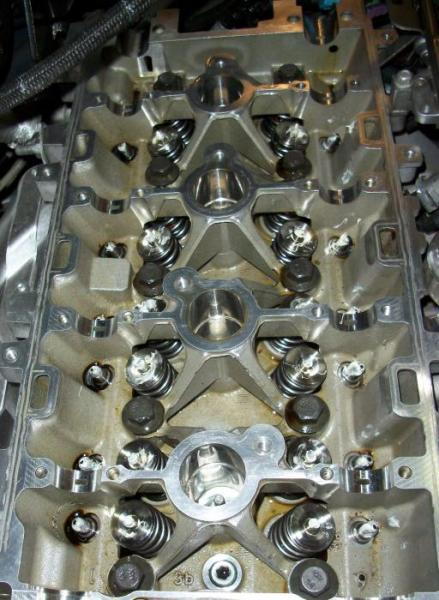
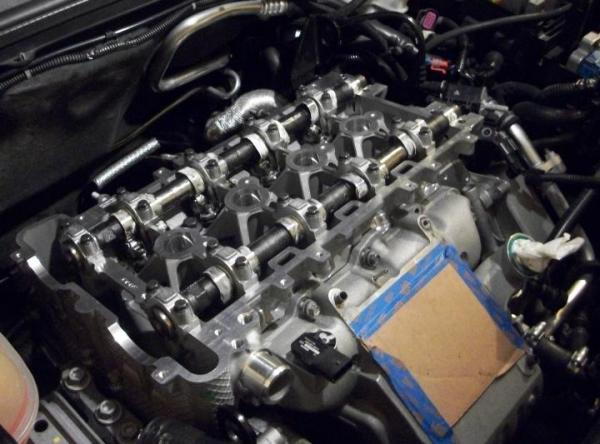
- Your cylinder head should now look like the photo below.

Installing the cams:
- Apply some engine assembly lube on top of the lifters (lash adjusters), and on top of the valve stems (see photo below).
Tip: I suggest Comp Cam's engine assembly lube.
- Lube up the rockers (make sure to place lube on all bearing points, and on the roller).
- Place rockers in the same location you removed them from.
Important: Make sure all the rockers are centered, and not tilted off to the side (see photo below).

- Get your Comp Cams ready for installation.
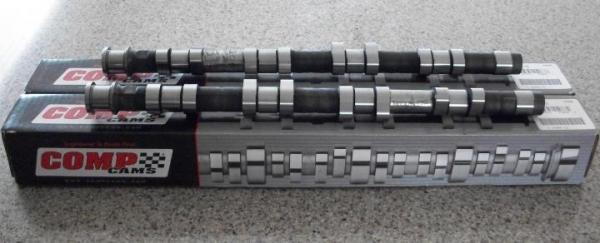
Comp Cams/ZZP S1 Cam Specs:
- 210/206 duration @ 1mm, 10.78mm/10.69mm lift, 109 LSA
Stock LSJ Cam Specs:
- 196.5/191.7 duration @ 1mm, 10.04mm/10.04mm lift, 107.5 LSA
- Apply engine assembly lube on all of the bearing areas of the cylinder head for the cams.
- Apply engine assembly lube on all of the lobes & bearing faces of the cams.
- Start by installing the intake cam first.
Tip: Follow the proceedure in the Ecotec 2.0L LSJ Power Book (p. 113) for placing the intake camshaft.
- Lube up the bearing races of the cam caps, and install the four (4) center caps.
- Hand start/tighten the cam cap bolts (working your way from the center caps out), followed by torquing the bolts to 89 in-lbs.
- Now install the exhaust cam.
Tip: Follow the proceedure in the Ecotec 2.0L LSJ Power Book (p. 114) for placing the exhaust camshaft.
- Follow the steps above for installing the exhaust camshaft, and exhaust camshaft cam caps.
Now comes a fun part....
- Loosen the wingnuts on the Kent Moore cam gear bracket, and slide the cam gears over towards the camshafts.
- Take a 15/16 open ended wrench, and place it on the hex portion of the cam.
- Slowly rotate the intake cam to line it up with the tabs (seen in photo below) on the cam gear.
- While you have the intake cam rotated/lined up, press the intake cam gear onto the cam.
- Take a new 18 mm cam gear bolt, and place a drop of red loctite on the threads.
- Hand start/tighten the bolt into the intake camshaft.
- Follow the steps above for the exhaust camshaft.
- Your cylinder head should now look like the photo below.
- Tighten the wing nuts on the Kent Moore cam gear bracket.
- Place a 15/16 open ended wrench on the hex portion of the intake cam.
- Torque the 18 mm cam gear bolt to 65 ft-lbs while holding the 15/16 open ended wrench to prevent the cam from turning.
- Proceed to the exhaust cam, and follow the steps above.
We are in the home stretch!!
- Install the rear cam caps for both the intake cam & exhaust cam.
Tip: The two (2) rear cam caps sit outside of the cam cover, and therefore should receive a light coat of Loctite flange sealant (see photo below).
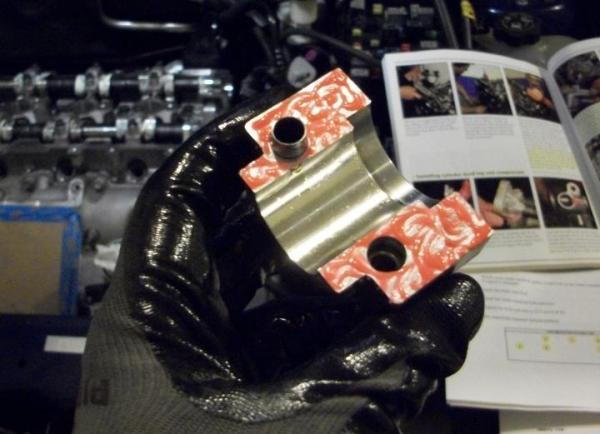
Important: Make sure to apply engine assembly lube to the bearing face of the two (2) rear cam caps (see photo above).
- Hand start/tighten the rear cam cap bolts, followed by torquing them to 15 ft-lbs.
- Wipe off any excess sealant that seeps out after tightening/torquing down the cam caps.
- Your cylinder head should now look like the photo below.

- Install the last two (2) cam caps.
- Hand start/tighten the bolts, followed by torquing them to 89 in-lbs.
- Remove the Kent Moore cam gear bracket.
Setting/installing the Camshaft Position Sensor:
- Rotate the engine to TDC cylinder #1 compression stroke (see instructions in the beginning of this thread).
- Install a new CPS sensor housing gasket (not required, but I did).
- Rotate the notch in the hex so it lines up with the tab on the CPS housing (see photo below).

Note: The instructions in the LSJ build book for aligning the CPS sensor are incorrect. The way the build book explains it makes it 180 degrees out of time. You will set a P0315 code (Crank Shaft Position Not Learned), and the engine will just crank, and crank for days w/o turning over. Trust me, I know.... it happened to me.
- Carefully insert the CPS housing into the exhaust cam (this can be a pita).
- Pull back to make sure the hex stayed in alignment.
- Place a drop of red loctite on the threads of the CPS housing bolts.
- Hand start/tighten the CPS housing bolts, followed by torquing them to 16 ft-lbs.
- Connect the CPS sensor harness to the CPS sensor.
Final installation procedures:
- Install a new intake cam rear cover plate gasket (not required, but I did).
- Place a drop of red loctite on the threads of the intake cam rear cover plate bolts.
- Hand start/tighten the bolts, followed by torquing them to 10 ft-lbs.
- Rotate the engine by hand two (2) full rotations to make sure it spins freely w/o any resistance.
- Reinstall the cam cover, spark plugs, coil packs, and all other items you removed.
- Reconnect the battery.
- Start the car.
- Check for leaks, codes, etc.
- Installation complete!!
Problems/issues during install
The only real problem I had didn't show its face until the end.... When I went to set the car to TDC for the CPS housing install, I noticed the cam gears were slightly off. Against my better judgement, I ignored it, and continued on. I figured the Kent Moore cam bracket would not allow the car to jump timing. Well, when I started it up, there was a slight ticking noise (valves hitting pistons), and I shut it off right away. I thought for sure when I removed the cam cover, I would see rockers all over the place due to bent valves. To my surprise, everything checked out ok. The cause of my timing issues was due to way back when I turned the harmonic balancer pulley counter clockwise for installation of the Kent Moore cam bracket. Turning the engine back against it's normal rotation caused slack in the timing chain, and therefore allowed the car to jump timing. At this point, I felt discouraged & defeated. After a night of thinking things over & my dad telling me to press on, I decided to learn how to time the engine, and get my car running again!! This is why I added that very important note about how to avoid slack in the timing chain.... make sure to follow it!!
After timing my engine, the only issue I had was due to the CPS being out of alignment (damn you LSJ build book). Thanks to Kenny (zrated89), I fixed the problem, and the car fired right up!!
If I had to do it again, I would prob. scratch using the Kent Moore cam gear bracket, and just time the engine after the install (timing the engine was involved, but fairly easy). The Kent Moore cam gear bracket cuts installation time in half though.
Initial thoughts/test drive
The exhaust has a nice mild lope to it now. The car idles nice & smooth (but you feel some lope through the seat) right around 850-900 rpm as per my Aeroforce Interceptor. The initial test drive was short, and I went easy on her, because I want to let the cams & springs break in a bit. I felt no noticeable loss in low end torque, and definitely felt increased power throughout the midrange & top end. The following day, I took the car out for a nice country drive, and put 40 miles on the cams & springs. The car drove like a dream, and I even zinged her to my 7,500 rpm limiter once. The top end pull is fantastic!! Eventually, when the weather breaks, I will put more miles on the cams & springs, and start logging some data.
To answer your questions before you ask.... yes, I am running these cams on the GMR S3 PCM/calibration.
Will I one day custom tune the car to maximize my gains? Possibly. My goal was to always have a mostly GMR car, and show what a great job GM Racing did with the kit. I think I'm at that point now, and couldn't be happier!!
For anyone who still might be scared to attempt this install, it really isn't bad. Just take your time!!
Special thanks goes out to:
- zrated89 (Kenny)
- mrbelvedere (John)
- More_Torque_More_HP (Bill)
- InfraRedline
- NWAE Cobalt
- Tom @ CED for getting all the parts I needed fast!
- Ryan @ ZZP
Thanks for your help guys!!
Before you get started, there are some items you will want to make sure you have (see below):
- Ecotec 2.0L LSJ Power Book
- Haynes Repair Manual
- Kent-Moore J-43655 (cam gear bracket)
- Kent-Moore J-43649 (valve spring compressor)
- Craftsman 125 psi, 3 gallon Air Compressor (This is what I used)
- Modified 14 mm (long reach) thread, Compression Tester Fitting
- Torque Wrench
- 15/16 Open Ended Wrench
- Extendable Mirror
- Magnet
- Engine Assembly Lube
Ok, let's get started....
- Disconnect the negative terminal on the battery.
- Remove the cam cover (I'm not going into detail for this).
- Remove the spark plugs.
- Jack the car up, and remove the passenger side front wheel.
- Remove the inner splash guard.
- Place a 21 mm socket & wrench on the harmonic balancer pulley bolt.
- Rotate the engine clockwise until you reach TDC for cylinder #1's compression stroke (see photo/illustration below).
- In the photo above, notice the black mark I made. I made this mark to help me line up the timing marks on the harmonic balancer pulley & front cover quicker.
Note: You will still need to make sure the timing marks on the harmonic balancer pulley, & front cover are aligned properly (See the illustration below). This is where the extendable mirror will come in handy, because the timing mark on the harmonic balancer is on the backside of the pulley.
Tip: You are at TDC for cylinder #1's compression stroke when the exhaust cam gear triangle is pointing at 10 o'clock, and the intake cam gear diamond is pointing at 2 o'clock, & the timing marks on the harmonic balancer pulley/front cover are aligned (see photo below).
- Now rotate the the harmonic balancer pulley back counter clockwise until the intake cam gear diamond is at 12 o'clock (see photo below).
Tip: Make sure to rotate the harmonic balancer pulley counter clockwise until the intake cam gear diamond goes back past 12 o'clock slightly, and then rotate forward (clockwise) lining the intake cam gear diamond at 12 o'clock. This will assure there is no slack in the timing chain. This important tip will come into play later on (you will understand).
Note: The Haynes Repair Manual does not mention my tip on how to avoid slack in the timing chain, and should have been added to avoid what happened during my cam/valve spring install.
- Now install the Kent-Moore J-43655 (cam gear bracket) as seen in the photo below.
Tip: Place the four (4) studs in the holes in the cam gears first, then bolt the bracket to the cylinder head, followed by pulling the studs towards the bracket, and installing the wing nuts.
- Next remove the 18 mm cam gear bolt from both cams (place a 15/16 open ended wrench on the hex of the cam to prevent them from turning).
- Pull/slide the cam gears off of the cams back towards the Kent Moore bracket.
- Double check to make sure the wing nuts on the cam gear bracket are snug in order to hold the cam gears and timing chain assembly secure.
- Remove the cam bearing caps slowly and evenly, allowing the cams to "lift" from the cylinder head.
- Remove the cams & rocker arms.
Important: Do not mix up the cam bearing caps or rocker arms. Place them in their original orientation in a marked/organized box as you remove them (see photo).
- Now it's time to install the Kent Moore J-43649 (valve spring compressor), as shown in the photo below.
Tip: Make sure to plug oil passages, spark plug chambers, and around the cam gears with a clean rag. This will help prevent anything falling down into the crank case.
- Take your modified compression tester fitting (see photo below), and hand thread it into the spark plug chamber. I started at the front of the engine (cylinder #1), and worked my way over to the back of the engine (cylinder #4) when removing/installing my valve springs.
- Now connect your air compressor to the compression tester fitting (see photo below).
Tip: I set the regulator on my air compressor to around 95 psi. This allowed ample air pressure for keeping the valves up.
Valve spring removal/installation:
- Slowly turn the Kent Moore spring compressor handle clockwise until the valve spring has compressed enough to expose the keepers.
Tip: Make sure the spring compressor is centered on the valve spring retainer, & the opening on the compresser is turned to allow you to easily access the valve keepers (see photo below).
- Take your magnet, and collect the valve keepers with it (take your time).
- Slowly turn the valve spring compressor handle counter clockwise to release compression, and remove the valve spring.
- Organize your Supertech valve spring kit, and begin assembly/installation of the new springs (see photo below).
- The photo below shows the comparison between the stock valve springs (left) vs. the Supertech 75 lb dual springs (right).
- Begin installing your Supertech springs by first placing the inner spring seat locator around the valve stem, followed by the valve springs and retainer.
- Place the Kent Moore spring compressor as you did while removing the springs, and slowly compress the spring until the three (3) groves at the top of the valve stem are completely visible.
- Add a dab of greese to a small flat head screw driver, and place the keeper onto the greese at the edge of the screw driver blade (see photo below). (I stole this helpful little tip from the LSJ Build Book).
Important: The keepers are some what concave, and need to be installed correctly. The wider portion of the keeper is the top (as seen in the photo above).
- Carefully place the screw driver with the keeper up against the three (3) grooves at the top of the valve stem. The keeper will simply attach.
Important: Take your time & be very careful not to drop/loose a keeper!! They are VERY tiny!!
Tip: Push the keeper you just installed around towards the back of the valve stem. This will make installing the second keeper easier.
- Once both keepers are installed, slowly turn the spring compressor handle counter clockwise to release/lock the spring.
Tip: While you release compression on the spring, make sure both keepers are end to end, and attached correctly to the three (3) groves on the valve stem.
Note: Installing/removing the rear valve springs is a pita, due to the cowl cover and the angle of the engine. You will need to place a jack under the engine, and slowly jack the engine up/forward. This, along with lifting the cowel cover up will give you just enough clearance to get the job done (see photo below).
- Follow the steps above for the rest of the valve springs.
- Your cylinder head should now look like the photo below.
Installing the cams:
- Apply some engine assembly lube on top of the lifters (lash adjusters), and on top of the valve stems (see photo below).
Tip: I suggest Comp Cam's engine assembly lube.
- Lube up the rockers (make sure to place lube on all bearing points, and on the roller).
- Place rockers in the same location you removed them from.
Important: Make sure all the rockers are centered, and not tilted off to the side (see photo below).
- Get your Comp Cams ready for installation.
Comp Cams/ZZP S1 Cam Specs:
- 210/206 duration @ 1mm, 10.78mm/10.69mm lift, 109 LSA
Stock LSJ Cam Specs:
- 196.5/191.7 duration @ 1mm, 10.04mm/10.04mm lift, 107.5 LSA
- Apply engine assembly lube on all of the bearing areas of the cylinder head for the cams.
- Apply engine assembly lube on all of the lobes & bearing faces of the cams.
- Start by installing the intake cam first.
Tip: Follow the proceedure in the Ecotec 2.0L LSJ Power Book (p. 113) for placing the intake camshaft.
- Lube up the bearing races of the cam caps, and install the four (4) center caps.
- Hand start/tighten the cam cap bolts (working your way from the center caps out), followed by torquing the bolts to 89 in-lbs.
- Now install the exhaust cam.
Tip: Follow the proceedure in the Ecotec 2.0L LSJ Power Book (p. 114) for placing the exhaust camshaft.
- Follow the steps above for installing the exhaust camshaft, and exhaust camshaft cam caps.
Now comes a fun part....
- Loosen the wingnuts on the Kent Moore cam gear bracket, and slide the cam gears over towards the camshafts.
- Take a 15/16 open ended wrench, and place it on the hex portion of the cam.
- Slowly rotate the intake cam to line it up with the tabs (seen in photo below) on the cam gear.
- While you have the intake cam rotated/lined up, press the intake cam gear onto the cam.
- Take a new 18 mm cam gear bolt, and place a drop of red loctite on the threads.
- Hand start/tighten the bolt into the intake camshaft.
- Follow the steps above for the exhaust camshaft.
- Your cylinder head should now look like the photo below.
- Tighten the wing nuts on the Kent Moore cam gear bracket.
- Place a 15/16 open ended wrench on the hex portion of the intake cam.
- Torque the 18 mm cam gear bolt to 65 ft-lbs while holding the 15/16 open ended wrench to prevent the cam from turning.
- Proceed to the exhaust cam, and follow the steps above.
We are in the home stretch!!
- Install the rear cam caps for both the intake cam & exhaust cam.
Tip: The two (2) rear cam caps sit outside of the cam cover, and therefore should receive a light coat of Loctite flange sealant (see photo below).
Important: Make sure to apply engine assembly lube to the bearing face of the two (2) rear cam caps (see photo above).
- Hand start/tighten the rear cam cap bolts, followed by torquing them to 15 ft-lbs.
- Wipe off any excess sealant that seeps out after tightening/torquing down the cam caps.
- Your cylinder head should now look like the photo below.
- Install the last two (2) cam caps.
- Hand start/tighten the bolts, followed by torquing them to 89 in-lbs.
- Remove the Kent Moore cam gear bracket.
Setting/installing the Camshaft Position Sensor:
- Rotate the engine to TDC cylinder #1 compression stroke (see instructions in the beginning of this thread).
- Install a new CPS sensor housing gasket (not required, but I did).
- Rotate the notch in the hex so it lines up with the tab on the CPS housing (see photo below).
Note: The instructions in the LSJ build book for aligning the CPS sensor are incorrect. The way the build book explains it makes it 180 degrees out of time. You will set a P0315 code (Crank Shaft Position Not Learned), and the engine will just crank, and crank for days w/o turning over. Trust me, I know.... it happened to me.
- Carefully insert the CPS housing into the exhaust cam (this can be a pita).
- Pull back to make sure the hex stayed in alignment.
- Place a drop of red loctite on the threads of the CPS housing bolts.
- Hand start/tighten the CPS housing bolts, followed by torquing them to 16 ft-lbs.
- Connect the CPS sensor harness to the CPS sensor.
Final installation procedures:
- Install a new intake cam rear cover plate gasket (not required, but I did).
- Place a drop of red loctite on the threads of the intake cam rear cover plate bolts.
- Hand start/tighten the bolts, followed by torquing them to 10 ft-lbs.
- Rotate the engine by hand two (2) full rotations to make sure it spins freely w/o any resistance.
- Reinstall the cam cover, spark plugs, coil packs, and all other items you removed.
- Reconnect the battery.
- Start the car.
- Check for leaks, codes, etc.
- Installation complete!!
Problems/issues during install
The only real problem I had didn't show its face until the end.... When I went to set the car to TDC for the CPS housing install, I noticed the cam gears were slightly off. Against my better judgement, I ignored it, and continued on. I figured the Kent Moore cam bracket would not allow the car to jump timing. Well, when I started it up, there was a slight ticking noise (valves hitting pistons), and I shut it off right away. I thought for sure when I removed the cam cover, I would see rockers all over the place due to bent valves. To my surprise, everything checked out ok. The cause of my timing issues was due to way back when I turned the harmonic balancer pulley counter clockwise for installation of the Kent Moore cam bracket. Turning the engine back against it's normal rotation caused slack in the timing chain, and therefore allowed the car to jump timing. At this point, I felt discouraged & defeated. After a night of thinking things over & my dad telling me to press on, I decided to learn how to time the engine, and get my car running again!! This is why I added that very important note about how to avoid slack in the timing chain.... make sure to follow it!!
After timing my engine, the only issue I had was due to the CPS being out of alignment (damn you LSJ build book). Thanks to Kenny (zrated89), I fixed the problem, and the car fired right up!!
If I had to do it again, I would prob. scratch using the Kent Moore cam gear bracket, and just time the engine after the install (timing the engine was involved, but fairly easy). The Kent Moore cam gear bracket cuts installation time in half though.
Initial thoughts/test drive
The exhaust has a nice mild lope to it now. The car idles nice & smooth (but you feel some lope through the seat) right around 850-900 rpm as per my Aeroforce Interceptor. The initial test drive was short, and I went easy on her, because I want to let the cams & springs break in a bit. I felt no noticeable loss in low end torque, and definitely felt increased power throughout the midrange & top end. The following day, I took the car out for a nice country drive, and put 40 miles on the cams & springs. The car drove like a dream, and I even zinged her to my 7,500 rpm limiter once. The top end pull is fantastic!! Eventually, when the weather breaks, I will put more miles on the cams & springs, and start logging some data.
To answer your questions before you ask.... yes, I am running these cams on the GMR S3 PCM/calibration.
Will I one day custom tune the car to maximize my gains? Possibly. My goal was to always have a mostly GMR car, and show what a great job GM Racing did with the kit. I think I'm at that point now, and couldn't be happier!!
For anyone who still might be scared to attempt this install, it really isn't bad. Just take your time!!
Special thanks goes out to:
- zrated89 (Kenny)
- mrbelvedere (John)
- More_Torque_More_HP (Bill)
- InfraRedline
- NWAE Cobalt
- Tom @ CED for getting all the parts I needed fast!
- Ryan @ ZZP
Thanks for your help guys!!
Last edited by Staged07SS; Aug 21, 2014 at 11:14 AM.
Thread Starter
Joined: 12-30-07
Posts: 14,079
Likes: 197
From: NEPA
"How to" Install a GM Racing Ported Cylinder Head
Wow, it's been almost a year (1-15-14) since I made my cam install "how to", and here I am, a year later, adding a new chapter to it. I thought it would be beneficial for my fellow .net members to see how to properly install a cylinder head on a Cobalt SS/SC. I'm not going to go into grave detail with this, because 99% of it can be found in the LSJ Build Book, but I will mention some tips and tricks, and let my pictures do the talking. Enjoy!
My Parts list: (may vary depending on vehicle/mileage/personal preference)
Cylinder Head Gasket 2.0 LSJ 55352039
Ecotec Head Bolt 90537691
Ecotec Head Bolt 24407225
ARP Ecotec Timing Chain Tensioner Bolt Set 11588522R
Ecotec Timing Chain Tensioner 12608580
GUIDE 13104978
GUIDE 24449448
GUIDE 12588387
Ecotec Thermostat 12622410
Fuel Injector Insulator 12571864
Ecotec LSJ Intake Gasket 12597855
Ecotec, Supercharger Mounting Bolt 11589214 13171424
Cobalt LSJ and Extruded Honed Manifold Gasket 9230949
SEAL, CM/SHF POSN SEN HSG OIL (O RING) 12600009
Ecotec LSJ 2.0 Valve Cover Gasket 90537687
Loctite 510 Flange Sealant
Loctite 277 Tread Locker
CMD #3 Extreme Pressure Lube
COMP Cams 104 Engine Assembly Lube
Req'd Tools:
Kent Moore J-43649 Valve Spring Compressor
Kent-Moore J-43655 Cam Gear Bracket
Torque Angle Dial Gauge
Torque Wrench
15/16 Open Ended Wrench
Extendable Mirror
Magnet
Literature:
- Ecotec 2.0L LSJ Power Book
- Haynes Repair Manual
Ok, let's get started....
- Remove the fuel pump fuse found in the engine bay fuse box.
- Start the car, and let it run until it stumbles/stalls. You have now just released fuel pressure from the fuel rail.
- Re-insert fuse so you don't loose it.
- Disconnect the negative terminal on the battery.
- Jack the car up, and remove the passenger side front wheel.
- Remove the inner splash guard.
- Drain the coolant via the drain plug found at the bottom of the radiator (passenger side).
- Also, remove the 13 mm plug at the bottom of the water pump for a more complete drain of the cooling system (be careful, this can get messy).
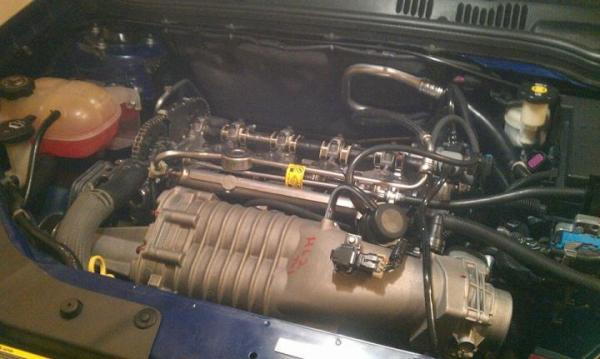
- Remove the blower, fuel rail w/ injectors, cam cover, spark plugs etc. (as seen in the build book).
- Place a 21 mm socket & wrench on the harmonic balancer pulley bolt.
- Rotate the engine clockwise until you reach TDC for cylinder #1's compression stroke, and leave it there. (See cam install "How to" above).
A photo just before I removed the cam cover & plugs, everything else for the head removal has been removed.
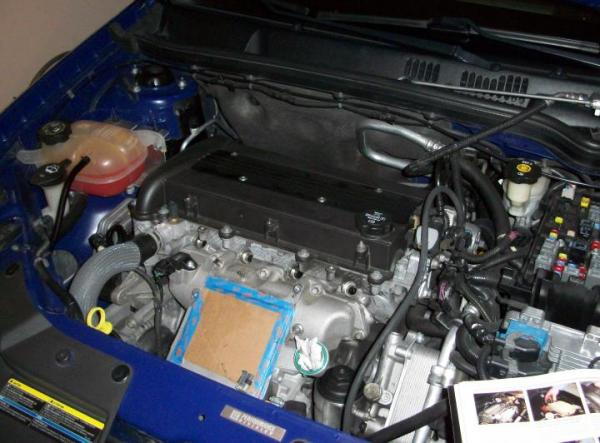
Tip: I highly recommend the use of marked zip lock bags to store and organize all the nuts and bolts. It will make reassembly much easier.
Removing the stock head bolts. Make sure to have a long breaker bar for this. I used one of my old torque wrenches.
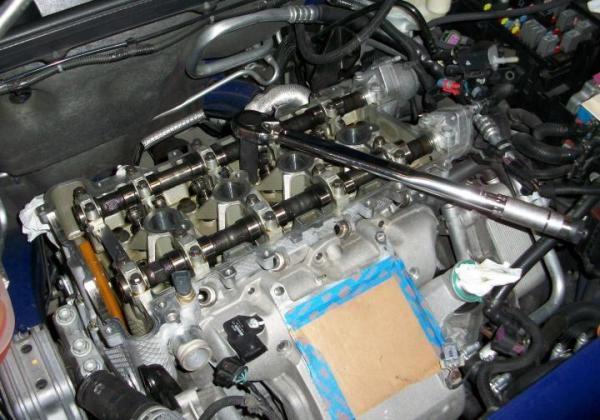
Tip: I left the intake manifold installed to help reduce removal/installation time. To do so, remove the seven (7) upper intake manifold bolts from the head. Loosen the elusive 8th bolt, but do not remove it. This will give you just enough wiggle room to tip the intake manifold forward for clearance.
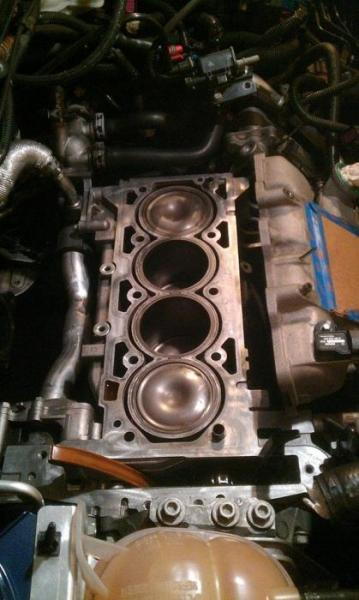
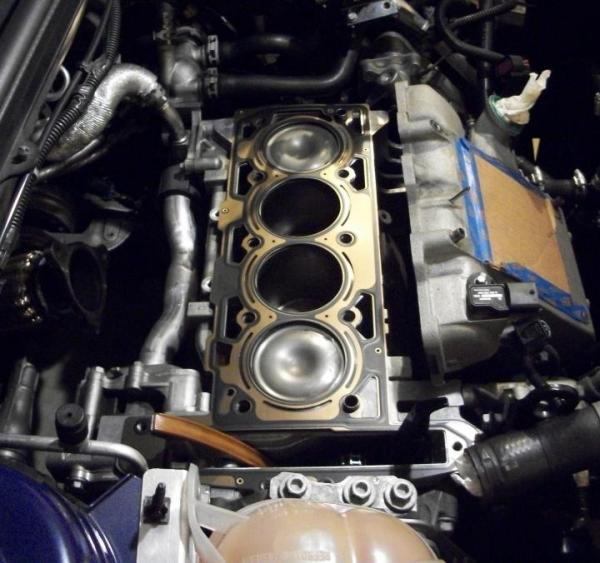
With the head removed, now is a good time to clean the tops of your pistons, and block.
I used throttle body cleaner and a microfiber cloth on the pistons, and throttle body cleaner and a scotch brite pad on the block.
Clean the block to perfection. You want a perfect sealing surface for the new head gasket.
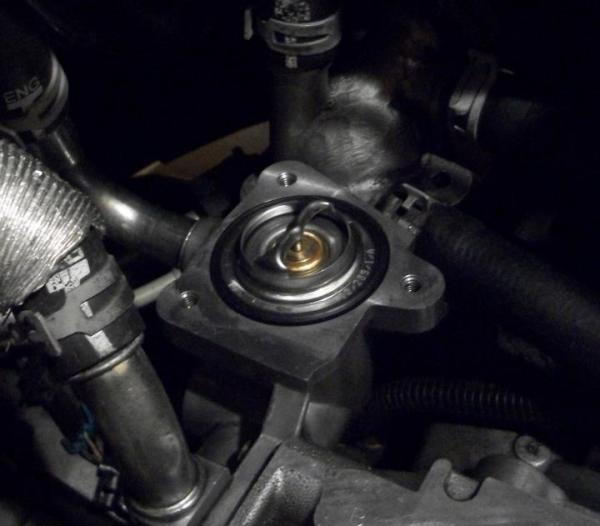
With the head removed & coolant drained, now is a perfect time to inspect/replace your thermostat.
Good thing I did, because my thermostats gasket was beginning to tear.
Old thermostat:

New thermostat:
Placing the new head gasket.... make sure it is properly placed around the dowels protruding from the top of the block.
Interesting find....
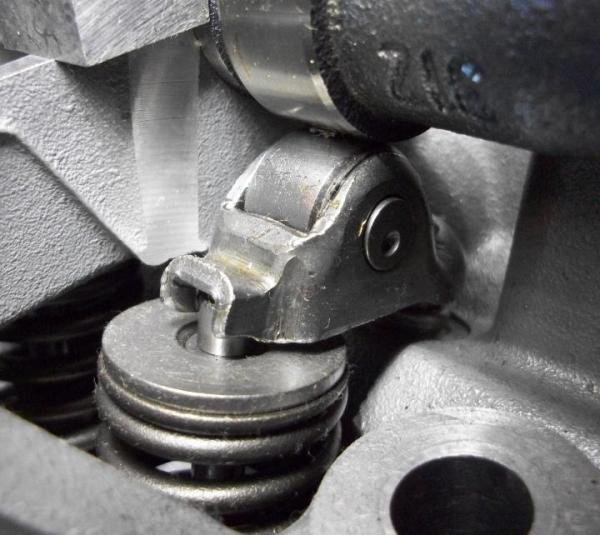
When I was removing the stock cams from the GMR head, I noticed the rockers (followers), looked different than the ones found on my 07'.
The GMR head was date coded 04', and used the older style rocker design which is known to crack in high performance setups.
If you have the rockers seen below, I highly recommend replacing them for the newer design found on my 07' (also used on the 08'-10' Cobalts)
Old style:
New style:
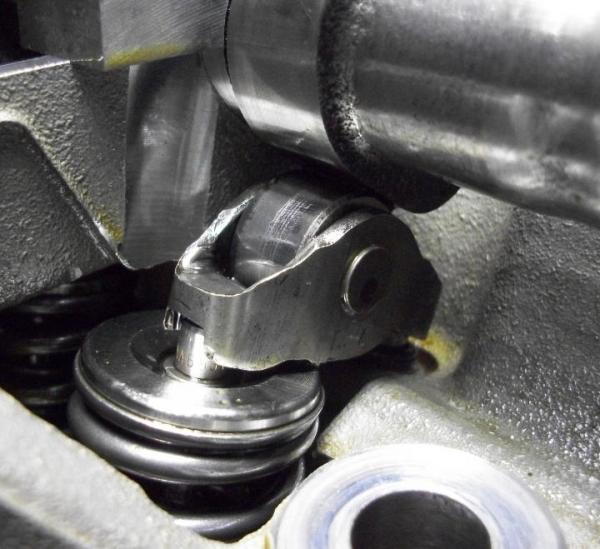
Note: I thoroughly inspected each and every rocker to insure they were mint, and being my car has rather low milegae, I reused them.
Surgery....

Supertech 75# valve springs installed in the GMR head. See my cam/valve spring "how to" above for this step.
Tip: Last year I performed this step with the head installed, and used air pressure to keep the valves up. When removing/installing valve springs on a bench, place a rag underneath the valves to keep them up.
GMR head installed. Place CMD #3 Extreme Pressure Lube on every bolt hole surround to ensure equal torque values.

Head bolts installed & torqued to spec. Now it's time to torque them to yield. Use the head bolt pattern and torque specs found in the build book for the following steps.
Note: You will need a torque angle dial gauge for this procedure.
Torqued to yield (155 degrees).

Head bolt installation complete.

Note: Many people prefer the ARP head studs, but I came across a lot of brand new factory GM head bolts for only $22 shipped ($115 + value)! I could not pass up such a great deal, and put the extra savings towards other parts I needed.
Cams installed. We should all know how to do this. Just read the "how to"
Installing the rear cam caps. Make sure to use Loctite 510 Flange Sealant, and torque the bolts to spec. See my cam install "how to" for proceedure and torque specs.
Timing complete. I didn't take any photos of this step, because I was too focused on making sure everything was timed correctly.

Note: I chose to reuse my timing chain and gears, because upoun inspection, everything checked ok. Timing chains and gears are not a failure point on our cars, it's the guides and tensioner that cause the issues. Therefore, I replaced the timing chain guides, tensioner, and installed ARP timing chain guide bolts. If my car had more miles on it, or I noticed any unusual wear, I would have replaced the whole timing set.
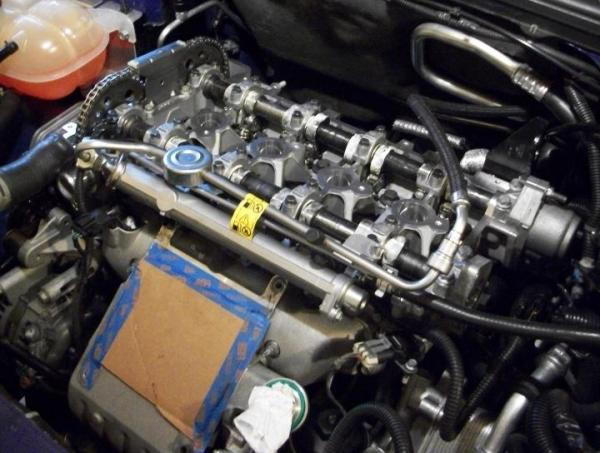
I cleaned up my fuel rail and injectors. Look at those mighty GMPP 42 lb/hr injectors!

Note: I chose to install new injector insulators. They are cheap. Why not? In fact, I replaced anything that sealed to the new head (intake mani gasket, exhaust mani gasket, etc.).
Fuel rail installed. Take your time when routing your injector harness wires, and make sure they are nice and neat.
The H62 installed. We are nearing the home stretch now.
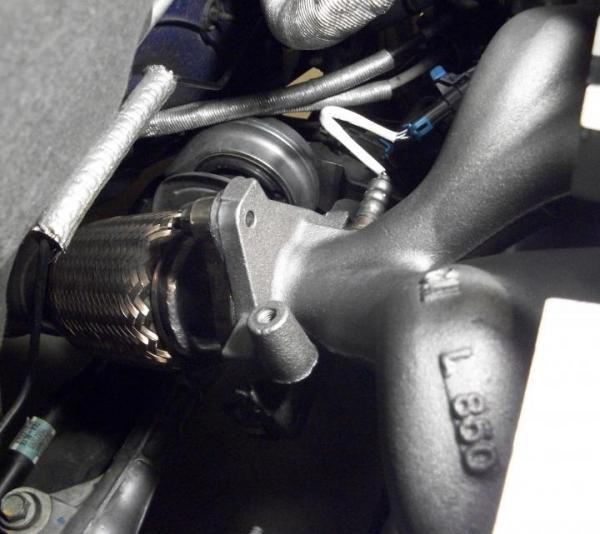
Ported GMPP Exhaust Manifold installed with a fresh coat of high temp ceramic paint.
Coolant refill time....
You need to fill the head first in order to properly add coolant to an LSJ.
Below is a shot of what I used to perform this step (3/4" heater hose and a funnel).
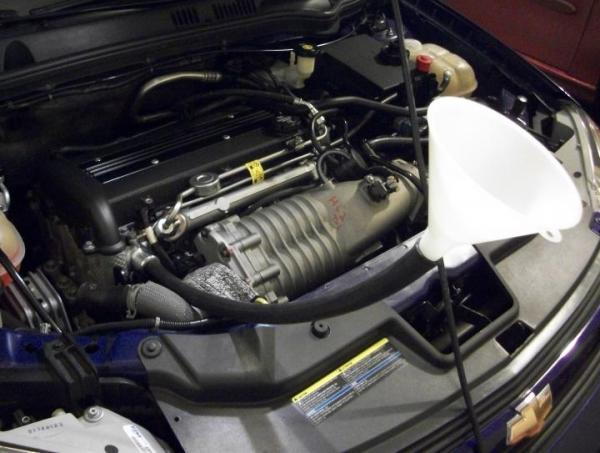
Fill with coolant until it dribbles out of the head. Make sure to have a rag placed underneath to catch the coolant that runs out.
I then filled the radiator via the upper radiator hose.
Reinstall the upper radiator hose to the head.
Fill the rest of the cooling system via the engine coolant expansion tank.
Time to start the car.... (make sure to perform an oil change before starting the car)
If the installation was performed correctly, she should fire right up. The car might be a little rough for a sec or so until pcm sorts everything out.
Turn your heat and fan control to max, and let her idle for a bit. The coolant in the expansion tank will begin to drop.
Refill until the system fully removes all the trapped air.
Installation complete!!
See my existing GM Racing Exhaust Ported Cylinder Head thread for further info and pictures:
https://www.cobaltss.net/forums/2-0l...r-head-303994/
Cam lope:
https://www.facebook.com/photo.php?v...70906223842035
My Parts list: (may vary depending on vehicle/mileage/personal preference)
Cylinder Head Gasket 2.0 LSJ 55352039
Ecotec Head Bolt 90537691
Ecotec Head Bolt 24407225
ARP Ecotec Timing Chain Tensioner Bolt Set 11588522R
Ecotec Timing Chain Tensioner 12608580
GUIDE 13104978
GUIDE 24449448
GUIDE 12588387
Ecotec Thermostat 12622410
Fuel Injector Insulator 12571864
Ecotec LSJ Intake Gasket 12597855
Ecotec, Supercharger Mounting Bolt 11589214 13171424
Cobalt LSJ and Extruded Honed Manifold Gasket 9230949
SEAL, CM/SHF POSN SEN HSG OIL (O RING) 12600009
Ecotec LSJ 2.0 Valve Cover Gasket 90537687
Loctite 510 Flange Sealant
Loctite 277 Tread Locker
CMD #3 Extreme Pressure Lube
COMP Cams 104 Engine Assembly Lube
Req'd Tools:
Kent Moore J-43649 Valve Spring Compressor
Kent-Moore J-43655 Cam Gear Bracket
Torque Angle Dial Gauge
Torque Wrench
15/16 Open Ended Wrench
Extendable Mirror
Magnet
Literature:
- Ecotec 2.0L LSJ Power Book
- Haynes Repair Manual
Ok, let's get started....
- Remove the fuel pump fuse found in the engine bay fuse box.
- Start the car, and let it run until it stumbles/stalls. You have now just released fuel pressure from the fuel rail.
- Re-insert fuse so you don't loose it.
- Disconnect the negative terminal on the battery.
- Jack the car up, and remove the passenger side front wheel.
- Remove the inner splash guard.
- Drain the coolant via the drain plug found at the bottom of the radiator (passenger side).
- Also, remove the 13 mm plug at the bottom of the water pump for a more complete drain of the cooling system (be careful, this can get messy).
- Remove the blower, fuel rail w/ injectors, cam cover, spark plugs etc. (as seen in the build book).
- Place a 21 mm socket & wrench on the harmonic balancer pulley bolt.
- Rotate the engine clockwise until you reach TDC for cylinder #1's compression stroke, and leave it there. (See cam install "How to" above).
A photo just before I removed the cam cover & plugs, everything else for the head removal has been removed.
Tip: I highly recommend the use of marked zip lock bags to store and organize all the nuts and bolts. It will make reassembly much easier.
Removing the stock head bolts. Make sure to have a long breaker bar for this. I used one of my old torque wrenches.
Tip: I left the intake manifold installed to help reduce removal/installation time. To do so, remove the seven (7) upper intake manifold bolts from the head. Loosen the elusive 8th bolt, but do not remove it. This will give you just enough wiggle room to tip the intake manifold forward for clearance.
With the head removed, now is a good time to clean the tops of your pistons, and block.
I used throttle body cleaner and a microfiber cloth on the pistons, and throttle body cleaner and a scotch brite pad on the block.
Clean the block to perfection. You want a perfect sealing surface for the new head gasket.
With the head removed & coolant drained, now is a perfect time to inspect/replace your thermostat.
Good thing I did, because my thermostats gasket was beginning to tear.
Old thermostat:
New thermostat:
Placing the new head gasket.... make sure it is properly placed around the dowels protruding from the top of the block.
Interesting find....
When I was removing the stock cams from the GMR head, I noticed the rockers (followers), looked different than the ones found on my 07'.
The GMR head was date coded 04', and used the older style rocker design which is known to crack in high performance setups.
If you have the rockers seen below, I highly recommend replacing them for the newer design found on my 07' (also used on the 08'-10' Cobalts)
Old style:
New style:
Note: I thoroughly inspected each and every rocker to insure they were mint, and being my car has rather low milegae, I reused them.
Surgery....
Supertech 75# valve springs installed in the GMR head. See my cam/valve spring "how to" above for this step.
Tip: Last year I performed this step with the head installed, and used air pressure to keep the valves up. When removing/installing valve springs on a bench, place a rag underneath the valves to keep them up.
GMR head installed. Place CMD #3 Extreme Pressure Lube on every bolt hole surround to ensure equal torque values.
Head bolts installed & torqued to spec. Now it's time to torque them to yield. Use the head bolt pattern and torque specs found in the build book for the following steps.
Note: You will need a torque angle dial gauge for this procedure.
Torqued to yield (155 degrees).
Head bolt installation complete.
Note: Many people prefer the ARP head studs, but I came across a lot of brand new factory GM head bolts for only $22 shipped ($115 + value)! I could not pass up such a great deal, and put the extra savings towards other parts I needed.
Cams installed. We should all know how to do this. Just read the "how to"
Installing the rear cam caps. Make sure to use Loctite 510 Flange Sealant, and torque the bolts to spec. See my cam install "how to" for proceedure and torque specs.
Timing complete. I didn't take any photos of this step, because I was too focused on making sure everything was timed correctly.
Note: I chose to reuse my timing chain and gears, because upoun inspection, everything checked ok. Timing chains and gears are not a failure point on our cars, it's the guides and tensioner that cause the issues. Therefore, I replaced the timing chain guides, tensioner, and installed ARP timing chain guide bolts. If my car had more miles on it, or I noticed any unusual wear, I would have replaced the whole timing set.
I cleaned up my fuel rail and injectors. Look at those mighty GMPP 42 lb/hr injectors!
Note: I chose to install new injector insulators. They are cheap. Why not? In fact, I replaced anything that sealed to the new head (intake mani gasket, exhaust mani gasket, etc.).
Fuel rail installed. Take your time when routing your injector harness wires, and make sure they are nice and neat.
The H62 installed. We are nearing the home stretch now.
Ported GMPP Exhaust Manifold installed with a fresh coat of high temp ceramic paint.
Coolant refill time....
You need to fill the head first in order to properly add coolant to an LSJ.
Below is a shot of what I used to perform this step (3/4" heater hose and a funnel).
Fill with coolant until it dribbles out of the head. Make sure to have a rag placed underneath to catch the coolant that runs out.
I then filled the radiator via the upper radiator hose.
Reinstall the upper radiator hose to the head.
Fill the rest of the cooling system via the engine coolant expansion tank.
Time to start the car.... (make sure to perform an oil change before starting the car)
If the installation was performed correctly, she should fire right up. The car might be a little rough for a sec or so until pcm sorts everything out.
Turn your heat and fan control to max, and let her idle for a bit. The coolant in the expansion tank will begin to drop.
Refill until the system fully removes all the trapped air.
Installation complete!!
See my existing GM Racing Exhaust Ported Cylinder Head thread for further info and pictures:
https://www.cobaltss.net/forums/2-0l...r-head-303994/
Cam lope:
https://www.facebook.com/photo.php?v...70906223842035
Last edited by Staged07SS; Jul 3, 2014 at 01:31 PM.


Be honest about the low end now, thats whats kept me from considering cams. I know their top end gains for the revvy LSJ would be sick but I love my low end throttle response as is
Thread Starter
Joined: 12-30-07
Posts: 14,079
Likes: 197
From: NEPA
Until you install cams, and see for yourself, I guess you will never believe me.
Look at the specs of the S1 cams. They aren't overly aggressive.
It's one thing for me to say I felt no low-end torque loss, but in actuality, I prob lost some.
But the loss, if there was any, is so small I didn't even notice.
Picking the right cams for your application is key.
Being afraid to install cams, because you think/heard you will loose mad low end is silly.
I bet people loose more low end installing huge 3" catbacks on SS/SC's then you would installing a proper set of cams.
Last edited by Staged07SS; Jan 30, 2013 at 05:32 PM.
Thread Starter
Joined: 12-30-07
Posts: 14,079
Likes: 197
From: NEPA

Thread Starter
Joined: 12-30-07
Posts: 14,079
Likes: 197
From: NEPA
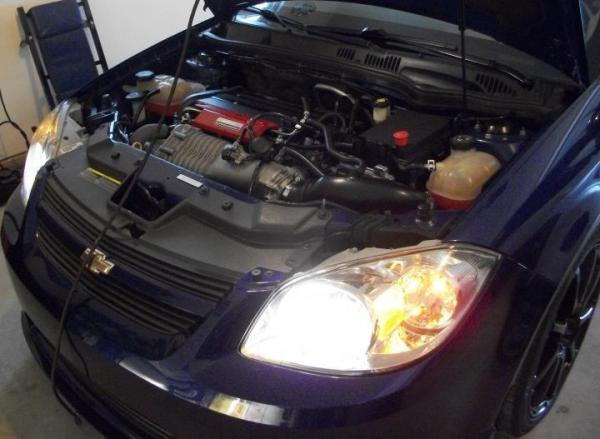
Lots of steps, but very straight forward.
I sold my black housings and went back with the stockers.
Thread Starter
Joined: 12-30-07
Posts: 14,079
Likes: 197
From: NEPA
I think I'm at the power level I always wanted to be at.
Judging by the 2nd gear pull I made during my test run, the car is making a good amount more power.
We shall see.... I need to log her and test her out, but for now she is parked until the weather gets better.
Last edited by Staged07SS; Feb 1, 2013 at 07:34 AM.
Great how to man.  looks good told ya it's not bad. Also not your fault for the Gm build book directions. Soon as you said well I read the build book I knew what your issue was. Looking forward to seeing your numbers on a almost stock blower

Thread Starter
Joined: 12-30-07
Posts: 14,079
Likes: 197
From: NEPA
I'm interested to start logging.
I will update this thread as soon as I gather data.
Thanks man!
I wanted a thread that anyone could read and say "hey I can do that install now". I researched a lot, and spoke to some good members on here through the process. So I can't take all the credit
Last edited by Staged07SS; Feb 1, 2013 at 08:54 AM.

Thread Starter
Joined: 12-30-07
Posts: 14,079
Likes: 197
From: NEPA
Yep....
I had the car out for a little this past weekend. She's running great!!
I logged zero knock, zero misfires, and fuel trims were between +1.5 & -1.5%.
More data will be collected when I get the car out for good in the spring
The neat thing about the GMR S3 calibration is GM Racing did all sorts of testing with it. Different size pulleys, cams, intercooling tests, etc.
It was refined/developed on the time attack & land speed cars, and really is a fantastic tune.
Last edited by Staged07SS; Feb 5, 2013 at 07:03 AM.

Thread Starter
Joined: 12-30-07
Posts: 14,079
Likes: 197
From: NEPA
Plus, I'm a very organized person, so it was kind of second nature for me, haha.
This.
Last edited by Staged07SS; Feb 11, 2013 at 07:47 AM.

I was thinking of possibly picking up a set of S1 cams. I am going to be getting the Supertech springs for sure though. Great write-up. Oh, I have one of those huge 3" exhausts. Lol, I am going turbo though.

Thread Starter
Joined: 12-30-07
Posts: 14,079
Likes: 197
From: NEPA
